
INSTRUCTION AND OPERATION MANUAL
For best results use only authentic Logan blades
MODEL 707
www.logangraphic.com
Logan Graphic Products, Inc.
1100 Brown Street
Wauconda, IL 60084 USA
Phone (847) 526-5515 Fax (847) 526-5155
Toll Free (800) 331-6232
Email - [email protected]
L1781 8/07
CAUTION: BLADES EXTREMELY SHARP Use Logan replacement blade kit #326.
Warranty
Logan Graphic Products, Inc. (“Logan”) warrants Groovy Mouse - Model 707, to be free from defects in parts
and workmanship for a period of one year from the date of original purchase. Logan warrants that it will either
repair or replace, at its sole discretion, any necessary replacement parts found to be defective. Should the
product need to be returned to Logan for repair or replacement parts, authorization for any return must come
from Logan in writing. Costs of returning the product to Logan, including insurances, shall be borne by the
purchaser. Logan shall not be liable for any damages or losses, incidental or consequential, direct or indirect,
arising from the use of this product. This warranty extends only to the original purchaser and is not assignable
or transferable. This warranty is in lieu of all other warranties, expressed or implied.
1
2
3
4
5
1
2
½
½
¼
¾
¼
¾
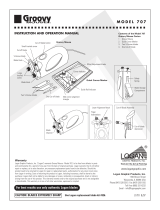
Contents of the Model 707
Groovy Mouse Carton
1 Groovy Mouse
2. Quick Corner Marker
3. Two V-Groove blades
4. One Cut-off blade
Groovy Mouse
Cut-off blade button
Two V-Groove blades One Cut-off blade
Quick Corner Marker
Small knurled screw
Cut-off blade
Cut-off blade
depression
Large
knurled
screw
V-Groove blade
Blade block
Blade block
Offset Adjustment Knobs
Corner Indicator
Guide Rail Indicator
Mat corner alignment
triangle
Safety
Spring
Blade Storage
Compartment
Cut-off Blade Assembly
Blade
Channel
Lower Alignment Notch
Finger
Indentations

Logan Graphic Products Inc., 1100 Brown Street, Wauconda, IL 60084 Toll Free 1 800 331 6232 www.logangraphic.com
MODEL 707
Installing Blades
Cut-off Blade
1. Depress the cut-off button. While continually depressing the button, remove the
small knurled screw (Figure 1).
2. Release the cut-off button and slide the button and cut-off blade assembly
upwards through the cutoff button opening. If necessary, use the screw head to
nudge the blade assembly upwards. Place a blade in the cut-off blade depression,
matching the blade angle with the diagram on the cut-off blade assembly cavity
(Figure 2) (Figure 4).
3. Slide the cut-off blade assembly down through the cut-off button opening. While
depressing the cut-offbutton, reattach the small knurled screw and tighten.
V-Groove Blades
1. Loosen two large knurled screws. Looking down at Groovy Mouse, slide the blade
into the blade channel, with the blade point to the front. Repeat for second blade
(Figure 3).
2. NOTE: Adjust blade tips so they just touch in the center (Figure 4). Squeeze the
blade blocks together to help steady the blade position and provide finer control.
Using Groovy Mouse
Note: Groovy Mouse features a safety spring located on the bottom. This prevents the
blades from gouging mat board or table surfaces when not in use. Downward pressure
on Groovy Mouse will engage the blades with the surface. Make sure that surfaces
are protected wherever Groovy Mouse is placed.
Traditional V-Groove
1. Use a pre-cut mat or cut the mat opening to the desired size.
2. Loosen the Offset Adjustment Knobs on the Quick Corner Marker and align the
indicator arrows to the desired offset dimension (distance from mat opening to
v-groove). Tighten the knobs to lock in place (Figure 5).
3. With the front of the mat facing up, place the mat alignment triangle located at
the base of the Quick Corner Marker snuggly into any corner of the mat. Make
light pencil marks at the Guide Rail Indicator and Corner Indicator identified by the
long arrowheads. Repeat for all four corners (Figures 6 & 7).
4. Align guide rail with short tick marks. Note that mat opening should slide
underneath guide rail. Groovy Mouse can be used with any suitable straight edge
or most Logan straight edges including Adapt-a-Rule, Team System plus Logan
board mounted mat cutters Compact, Intermediate+ and Simplex Plus.
5. Hook Groovy Mouse on the guide rail. Align V-Groove blades with the upper
corner indicated by pencil lines. Place index and middle finger tips into indentation
areas, remaining fingers on rubber side grips (Figure 8). Push downward towards
the front of Groovy Mouse and with steady pressure, pull the tool towards the
lower corner mark.
6. While maintaining pressure, stop when the lower alignment notch located on the
left blade channel reaches the lower corner pencil line. Lift index finger and
depress the cut-off blade button. Release the cutoff blade button and continue to
maintain even pressure while pulling Groovy Mouse slightly back to meet the cut.
The V-Groove waste should now fall away (Figure 9).
7. Rotate the mat board 90° and repeat Steps 5 & 6 for the next two sides. For the
final side, repeat Step 5 but pull Groovy Mouse into the previously cut corner. The
waste should drop away.
8. Using an artist’s eraser (kneaded, gum, etc) gently erase any pencil lines that
remain on the mat surface.
Freestyle V-Groove
Groovy Mouse can also be used to cut freestyle V-Grooves. Please note the following
for best results.
1. Lightly mark the desired design on the mat surface.
2. Practice on scrap mat board to determine best design and corner radius.
3. Keep even pressure on Groovy Mouse when blades are engaged.
4. Once complete, use an artist’s eraser to gently erase any remaining pencil lines.
Freestyle Mat Opening
Groovy Mouse can also be used to cut freestyle beveled mat openings. Please note the
following for best results.
1. Remove one V-Groove blade, and adjust the remaining blade to extend 1/8” below
Groovy Mouse blade holder.
2. Lightly mark the desired opening with a pencil.
3. Use a backing sheet underneath the mat board.
4. Once complete, use an artist’s eraser to gently erase any remaining pencil lines.
1
2
½
½
¼
¾
¼
¾
1
2
3
4
5
1
2
2
½
½
¼
¾
¼
¾
1
2
3
4
5
Fig 1 Fig 2
Fig 4
Blade Channel
Glissière de lame
Canal de la hoja
Klingenkanal
Canale lama
Fig 3
Fig 5
Fig 7
Fig 6
Fig 8
Fig 9
Trouble Shooting
V-Groove has a Rough Edge
1. The V-groove blades may be dull. Replace the blades.
2. The V-groove blades may need adjusting. Adjust the blade tips so they just meet in the
center.
V-Groove is Cutting Through the Mat
1. Check the V-groove blade depth. Excess blade depth may cut through the mat board.
Using the large knurled screws, adjust the blade tips to reduce the blade depth.
V-Groove depth is uneven
1. Maintain even pressure throughout the cut.
Finger Indentations
Lower Alignment Notch
Encoche d’alignement inférieure
Muesca de alineación inferior
Untere Ausrichtungskerbe
Tacca allineamento inferiore
Quick Corner Marker
Marqueur d’angle rapide
Marcador rápido de esquina
Eckmarkierungshilfe
Tracciatore angoli
-
 1
1
-
 2
2


Ask a question and I''ll find the answer in the document
Finding information in a document is now easier with AI
Related papers
Other documents
-
 Logan Graphic Products Mouse 707 User manual
-
MyBinding Compact Classic 32" Mat Cutter from Logan Graphics 301-1 User manual
-
-
 Logan Graphic Products 560-1 User manual
-
-
-
-
-
-

