Page is loading ...

Instruction
Manual
IMPORTANT
For your safety read
instructions carefully
before assembling or
using this product.
Save this manual for
future reference.
Wood Lathe
C1000X

Index
1 GENERAL INFORMATION
1.1 Foreword
2 MACHINE DESCRIPTION
2.1 Machine identification
2.2 Getting to know your machine
2.3 Technical specification
2.4 Recommended protective clothing
2.5 Noise emission
2.6 Prescribed use of the machine
2.7 Hazards
2.8 Additional safety instructions for table saw
3 INSTALLATION
3.1 Identification of saw unit components
3.2 Determine Lathe Location in Workshop
3.3
Stand Assembly
3.4
Bolting Lathe to Stand
3.5
Mounting Transducer box to Stand leg
4.
ADJUSTMENT
4.1 Removing Spur Center from the Headstock
4.2 Attaching Live Center on the Tailstock
4.3 Removing Live Center from the Tailstock
4.4 Tightening or Loosening Motor Belt
4.5 Tightening or Loosening Headstock
4.6 Swiveling Headstock
4.7 Adjusting the Tool Rest
4.8 Adjusting Tailstock
4.9 Changing Spindle Speeds
4.10 Variable Speed Switch
4.11 Indexing/Spindle Lock
4.12 Spur Drive Center - Headstock
4.13 Live Center - Tailstock
5 TROUBLESHOOTING
6 DIAGRAMS & COMPONENTS
2 3

1. General Information
1.1 FOREWORD
This manual must be read and understood before operating the machine. This will provde a better working knowledge of the machine,
for increased safety and to obtain the best results.
2. Machine Description
2.1
MACHINE IDENTIFICATION
There is a identification label fixed to the machine, containing the manufacturer's data, year of construction, serial number and
specifications.
2.2
GETTING TO KNOW YOUR MACHINE
A. Stand Leg
B. Stand Body
C. Lathe Bed
D. Tailstock locking lever
E. Tailstock handwheel
F. Tail stock
G. Tailstock spindle locking arm
H. Live center
I. Tool rest base
J. Tool rest
K. Tool rest seat locking lever
L. Spur center
M. Face plate
N. Spindle lock
O. Motor
P. Belt tensioning lever
Q. Headstock locking lever
R. Transducer box
S. Power cord
T. Switch
L
F
N
M
K
O
I
P
J
B
D
E
C
H
G
Q
A
R
S
T

2.3 TECHNICAL SPECIFICATION
SPECIFICATION C1000X
Swing over bed 520mm
Working distance between centers 950mm
Spindle speed electronic variable speed 50-3850rpm
Headstock&tailstock spindle MT2
Sleeve adjustment 100mm
Motor power output 1.5HP
Net weight 209KGS
2.4 RECOMMENDED PROTECTIVE CLOTHING
• Non-slip footwear is recommended.
• Do not wear loose clothing, neckties or jewellery; they can be caught in moving parts.
• Roll up long sleeves above the elbow.
• Wear protective hair covering to contain long hair.
2.5 NOISE EMISSION
The measurements of noise, in the working position and during operation, were carried out under the standard ISO 7960 annex "J":
Instantaneous acoustic pressure:
Sound power level(no load) <90dB(A)
Sound power level(load) <100dB(A)
Sound Pressure level(no load) <80dB(A)
Sound Pressure level(load) <90dB(A)
The figures quoted are emission levels and are not necessarily safe working levels. Whilst there is a correlation between the emission
and exposure levels, this cannot be used reliably to determine whether or not further precautions are required. Factors that influence
the actual level of exposure of the workforce include the characteristics of the work room and the other sources of noise etc. i.e.
the number of machines and other adjacent processes. Also the permissible exposure level can vary from country to country. This
information, however, will enable the user of the machine to make a better evaluation of the hazard and risk.
2.6 PRESCRIBED USE OF THE MACHINE
This machine has been designed to rotate heartwood both coated and not coated. Materials different from those quoted above, since
dissimilar to wood, are thus prohibited: the user is solely responsible for any damage caused by machining such materials. Always
wear protective eyewear prior to operating this machine.
It is prohibited to use the machine without having properly installed the
protections.
2.7 HAZARDS
ATTENTION Wood lathe still present risks that cannot be eliminated by the manufacturer. Therefore the user must be aware that wood
working machines are dangerous if not used with care and all safety precautions adhered to.
4 5

7
2.8 ADDITIONAL SAFETY INSTRUCTIONS FOR WOOD LATHE
SAFETY IS A COMBINATION OF OPERATOR COMMON SENSE AND ALERTNESS AT ALL TIMES WHEN THE WOOD LATHE IS
BEING USED.
WARNING: FOR YOUR OWN SAFETY, DO NOT ATTEMPT TO OPERATE YOUR WOOD LATHE UNTIL IT IS COMPLETELY
ASSEMBLED AND INSTALLED ACCORDING TO THE INSTRUCTIONS.
SAFE OPERATION
1. Do not operate this machine until you have read all of the following instructions.
2. Do not attempt to operate this machine until it is completely assembled.
3. Do not turn ON this machine if any pieces are missing.
4. If you are not familiar with the operation of the machine, obtain assistance from a qualied person.
5. It is highly recommended that this machine be rmly mounted to a at and secure work surface.
6. Always wear protective eyewear prior to operating this machine.
7. Do not operate this machine if you are under the inuence of drugs and/or alcohol.
8. Remove all jewelry prior to operating this machine.
9. Do not wear any gloves while operating this machine.
10. This machine must be properly grounded.
11. When turning between centers, make sure headstock and tailstock are snug against work piece.
12. When face plate turning, rough-cut work piece close to the nished shape before screwing to face plate.
13. Never jam tools into work piece or take too big a cut.
14. Do not operate this machine without follwing all these instructions.
15. Keep these instructions for future reference.
WARNING: Do not allow familiarity (gained from frequent use of your machine) to cause complacency. Always remember that a
careless fraction of a second is sufficient to inflict severe injury.

CAUTION
Many of the items are very heavy. We recommend that assistance is sought before trying to lift the larger components.
3.1 IDENTIFICATION OF LATHE UNIT COMPONENTS
3. Installation
A
B
C
D
E
F
G
H I
A. 1 x Lathe Bed including Transducer
B. 2 x Stand Body
C. 2 x Stand Leg
D. 2 x Wrench
E. 1 x Knockout Bar
F. 1 x 12” Tool Rest
G. 1 x 6” Tool Rest
H. 1 x Loose Parts Bag
I. 1 x Instruction Manual
6 7

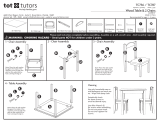
3.3 Stand Assembly
1. Remove the two stand legs from the carton and position them
approximately 54” apart (Fig.2) measureing from the outside
edges. Be sure that the shelves are facing inward and that the
double ared leg is on the left.
2.With assistance, lift stand body and carefully position the stand
legs to align the bolt holes. Secure stand to legs by using eight
M10X30 hex bolts and eight M10 at washer. (Fig.03)
Fig.02
54”
Mounting the bolts
Fig.03
Fig.04
Mounting the bolts
CAUTION
Many of the items are very heavy. We recommend that
assistance is sought before trying to lift the larger components.
Note: The machine must not be plugged in and the power switch
must be in the OFF position until assembly is complete.
3.2 Determine Lathe Location in Workshop
1. Find a location in the workshop that is level and has adequate
lighting. Make sure that there is plenty of room between the lathe
and other machines. Place the lathe in an area that will support
its weight and is close to a power source.
Leveling Feet
Fig.01
3.4 Bolting Lathe to Stand
1. Lift lathe body by the bed only, not by the head stock or tail
stock assemblies.
2. Gently place the lathe body onto the stand and secure by using
six M10X40 hex bolts, six M10 at washers, and six M10 locking
washers. (Fig.04)
3.5 Mounting Transducer box to Stand leg
Place the transducer box to left stand leg and secure by using four
Pan head screws. (Fig.05)
Fig.05
Transducer box
Mounting
screws

4.5 Tightening or Loosening Headstock
Rotate the headstock locking handle counterclockwise to loose
the headstock. (Fig.11) When nished headstock swivel adjust-
ment, rotate the locking handle clockwise to lock the headstock.
(Fig.12)
4.4 Tightening or Loosening Motor Belt
1. Turn the belt tighting handle alignning to the headstock locking
handle (Fig.09). Rotate the belt tighting handle upwards to tighten
the motor belt.
Turn the belt tighting handle aligning to the motor to lock the belt
tension. (Fig.10)
2. Turn the belt tighting handle alignning to the headstock locking
handle (Fig.09). Rotate the belt tighting handle downwards to
tighten the motor belt. Turn the belt tighting handle aligning to the
motor to lock the belt tension. (Fig.10)
4.1 Removing Spur Center from the Headstock
Insert the knockout bar into the headstock spindle from the handle
end. Tap the end of the spur center lightly until it releases from the
spindle. (Fig.06)
Fig.06
Knockout bar
Fig.07
Fig.08
4.2 Attaching Live Center on the Tailstock
Insert the live center, with a No.2 Morse Taper shank into the
tailstock spindle. (Fig.07)
4.3 Removing Live Center from the Tailstock
Insert the knockout bar into the tailstock spindle from the handle
end. Tap the end of the live center lightly until it releases from the
spindle. (Fig.08)
Fig.09
Tighten
Loosen
Belt tighting handle
Fig.11
Headstock locking handle
loosing position
Fig.10
locking position
4. Adjustment
8 9

Fig.09
Tighten
Loosen
Belt tighting handle
A
C
Fig.12
locking position
Fig.13
Position pin
4.6 Swiveling Headstock
Pull the position pin out with your right hand, at the same time
loosen the locking handle and swivel the headstock with your left
hand. Engage the position pin and then rotate the locking handle
clockwise to lock the headstock. (Fig.13)
4.7 Adjusting the Tool Rest
CAUTION
Do not adjust tool rest or tool rest base while the lathe is turned
on. Make sure lathe is turned off and that the work piece comes to
a complete stop before making adjustments.
1. The tool rest base (A-Fig.14) can be easily moved along the
lathe bed. Loosen cam lever (B-Fig.14) counterclockwise,slide
tool rest base to new position, and tighten cam lever clockwise.
2. To adjust the height of the tool rest, loosen locking arm(A-
Fig.14), raise or lower tool rest, tighten locking arm.
Fig.14
A
B
C
3. To adjust clamping action of the tool rest base, remove base
and adjust nut clockwise to tighten and counterclockwise to
loosen. (Fig.15)
Fig.15
Fig.16
A
B
C
4.8 Adjusting Tailstock
1. Loosen cam lever (A-Fig.16) to move the tailstock along the
lathe bed to desired position. Tighten lever.
2. To adjust tailstock ram in or out, loosen locking arm (B-Fig16)
and turn handwheel (C-Fig.16). When the tailstock arm is in a
desired position, tighten locking arm. (Fig.16)
3. To adjust clamping action of the tailstock, remove it from lathe
bed and adjust nut clockwise to tighten and counterclockwise to
loosen. (Fig.15)
4.9 Changing Spindle Speeds
1. The lathe features six step motor and spindle pulleys (Fig.17)
to provide six different spindle speed ranges. Open the access
covers on the headstock and stand to change spindle speeds.
(Fig.17)
Fig.17
2. With access covers open, loosen the belt tighting handle. Ro-
tate the tighting handle to release tension on the pulleys. Check
speed and belt position chart on the headstock to determine
spindle speed required. (Fig.18)

Fig.20
A
B
Fig.18
3. Move drive belt to desired pulley combination. Rotate the belt
tighting handle counterclockwise and tighten the handle. Close
access covers.
4.10 Variable Speed Switch
1. In conjuntion with the six speed pulley system, the lathe also
features a variable speed switch. To use with in a specific belt
speed range, simply turn the lathe on (A-Fig.19) and rotate the
variable speed dial (B-Fig.19) clockwise to increase the speed,
and counter clockwise to decrease the speed.
Fig.19
A
B
2. The variable speed dial will only increase speed to the highest
speed shown depending on belt position. (Fig.18)
4.11 Indexing/Spindle Lock
1. The dual purpose indexing/spindle lock (A-Fig.20) is positioned
on the front of the headstock for ease of use. The headstock in-
dexing feature has 24 equally spaced positions. The spring loaded
locking pin assembly is engaged by turning the knob a half turn
allowing it to drop into the desired position. To desengage, pull the
lock knob out and turn a half turn in either direction until the lock-
ing locating pin enters the safety catch position in the knob.
2. The 24 position indexing feature (A-Fig.21) allows accurate pat-
tern work on projects such as straight fluting, grooving, drilling, lay
out and more. This feature also allows the user to lock the spindle
for removing face plates, chucks and other accessories without
needing two tools.
Fig.21
A
4.12 Spur Drive Center - Headstock
1. The spur drive center (B-Fig.20) is used in conjunction with the
revolving center in the tailstock to support cylindrical work such as
chair and table legs, railstool handles etc.
2. When loading a project blank onto the spur drive center, do
not use a hammer or similar as damage to the headstock bear-
ings may result. The pressure obtained via the tailstock hanwheel
should be sufficient to provide adequate stability when suing
softer woods. For harder woods, shallow diagonal saw cuts in the
end section should be made plus a smalll hole in the center. The
spur center can be directly knocked into the wood by using only
a soft mallet. Never use a steel hammer as this will damage the
taper shank.
4.13 Live Center - Tailstock
1. The revolving cup center (A-Fig.22) is used for supporting spin-
dle turning projects that can not be held suitably in a chuck.
2. It can also be used as a safety device to support face plate
work for as long as possible, especially during roughing down
stage.
Fig.22
A
10 11

Fig.17
5. Troubleshooting
IIMPORTANT:
When carrying out any adjustments turn off switch and make sure electrical leads are disconnected from mains power.

6. Diagrams & Components
12 13


Key No.
Description
Lock nut M20
Washer 20
Cam spindle
Mounting plate
Set screw M5X12
Pin 5X40
Locking lever
Spindle
Adjusting cam
Pin 6X24
Position cam
Handle
Live center
Set screw
Tailstock
Locking tube
Tailstock spindle locking arm
Semicircular plate
Set screw M6X8
Tailstock spindle
Tailstock handwheel
Handle
Pin 5X40
Cam lever
Pin 5X40
Cam spindle
Pin 3X30
Cam spindle tube
Clamp disc
Lock nut M12
Tube
Cam spindle
Set screw M8X12
Tool rest 300
Tool rest 150
Cam lever
Pin 5X40
Tool rest base
Cam spindle
Clamp disc
Lock nut M12
Locking arm
Transducer
Pan head screw M6X10
Transducer box
Hex nut M5
Spring washer 5
Flat washer 5
Pan head screw M5X16
Pan head screw M5X8
Strain relief M20
Strain relief M16
Stand leg
54
55
56
57
58
59
60
61
62
63
64
65
66
67
68
69
70
71
72
73
74
75
76
77
78
79
80
81
82
83
84
85
86
87
88
89
90
91
92
93
94
95
96
97
98
99
100
101
102
103
104
105
106
Part No.
M20GB889D2Z
WSH20GB95Z
JL94010111
JL94010113
M5X12GB70D3B
PIN5X40GB879D1B
JL91020007
JL94010117
JL94010302A
PIN6x24GB879B
JL94010116
JL82050007A-001S
JL91021000
JL91020009
JL94020001
JL91020003
JL91020004
JL91020005
M6X8GB80B
JL91020002
JL91022002
JL91022001
PIN5X40GB879D1B
JL91020007
PIN5X40GB879D1B
JL91020006
PIN3X30GB879D1B
JL91023000
JL91020008
M12GB889B
JL91030005
JL91030006
M8X12GB80B
JL91030003
JL91030004
JL91020007
PIN5X40GB879D1B
JL94030001
JL91032000
JL91020008
M12GB889B
JL91031000
ATV31HU11M2A
M6X10GB818B
JL94081000
M5GB6170B
WSH5GB93B
WSH5GB97D1B
M5X16GB818B
M5X8GB818B
JL91046100
JL91046300
JL94040001A
Key No.
Description
Motor
Carriage bolt
Mounting plate
Set screw M8X30
Handwheel
Set screw M8X16
Hex nut M30
Retaining washer 30
Bearing 6006
Spacer
Set screw M8X12
Motor pulley
Poly vee belt
Spindle pulley
Headstock
Spacer
Retaining ring 62
Bearing 6007
Spindle M30X3.5
Key 8X7X40
Bearing plate
Set screw M6X12
Face plate
Spure center
Center point
Cap nut M6
Pin plate
Hex socket head screw
Pin tube
Spring
Pin
Cap nut M6
Indexing pin nut
Pin 3x30
Indexing pin body
Spring
Indexing pin
Lock nut M12
Flat washer 12
Lock nut M5
Access cover
Plastic window
Screw M4X10
Hex socket head screw
Hinge
Pan head screw M4X12
Spindle tube
Position disc
Mounting plate
Flat washer 10
Spring washer 10
Hex bolt M10X30
Lathe bed
1
2
3
4
5
6
7
8
9
10
11
12
13
14
15
16
17
18
19
20
21
22
23
24
25
26
27
28
29
30
31
32
33
34
35
36
37
38
39
40
41
42
43
44
45
46
47
48
49
50
51
52
53
Part No.
F8040504
JL94010115
JL94010301A
M8X30GB70D3Z
JL94010105A
M8X16GB79B
M30GB812Z
WSH30GB858B
BRG6006-2RSV2
JL94010108A
M8X12GB77B
JL94010201A
JL94010109
JL94010103A
JL94010101A
JL94010104A
CLP62GB893D1B
BRG6007VVCM
JL94010102A
PLN8X7X40GB1096
JL91010013A
M6X12GB70D3Z
JL91010010A
JL91011001
JL91011002
M6GB923Z
JL94010403
M5X12GB70B
JL94010402
JL94010404
1-JL94010401
M6GB923Z
JL91012004
PIN3X30GB879D1Z
JL91012002
JL91012003
JL91012001
M12GB889B
WSH12GB97D1B
M5GB889Z
JL94010008B
JL91010023
M4X10GB819
M5X25GB70Z
JL94010500
M4X12GB818B
JL94010112
JL94010003A
JL94010005A
WSH10GB97D1Z
WSH10GB93Z
M10X30GB5783Z
JL91010002A
14 15

Key No.
Description
Rear stand body
Front stand body
Hex bolt M10X25
Spring washer 10
Flat washer 10
Stand leg
Set screw M5X20
Mounting plate
Switch
Locking bar
Tool rest support
Locking shaft
Support bracket
Base casting
Square washer
Locking threaded shaft
Locking handle shaft
Cap plate
Set screw M4X10
Hex bolt M12X30
Flat washer 12
Pin 6X35
Locking arm
107
108
109
110
111
112
113
114
115
116
117
118
119
120
121
122
123
124
125
126
127
128
129
Part No.
JL94040003
JL94040004
M10X25GB5783Z
WSH10GB93Z
WSH10GB97D1Z
JL94040001
M5X20GB819Z
JL91042001
JL91042000
JL91042100
JL91100004
JL91100003
JL91100002
JL94070001
JL91100008
JL91100005
JL91100006
JL91100007
M4X10GB819Z
M12X30GB5783Z
WSH12GB97D1Z
PIN6X35GB879D2B
JL91031000
Available for optional Rear Turning Attachment
(Part No.117 through Part No.129)
/