
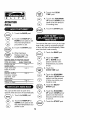
E L I T E
_M
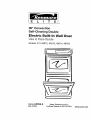
30" Convection
Self-Cleaning Double
Electric Built=In Wall Oven
Models 911.49012, 49013, 49014, 49019
l, ....
-- --- 7 T I[ IIIIII Jl I J J
IJ II , i ,
ii ii i
I II I I I IIII
I ' I I Jlll_
................. IIIql IIII itlll, i
NIII||I,IIIIII,III n Hn n
22904020P232-2
(SR-10433)
Seam, Roebuck and Co.,
Hoffman Estates, IL 60179 U.S.A.
www.sears.com

E L I T E
TABLEOFCONTENTS
SELF-CLEANING
DOUBLECONVECTION
OVEN
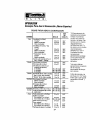
Oven Safety ....................... 3-4 -,
Features of Your Oven .......... 5
Removal of Packaging Tape ....5
Oven Control, Clock,
and Timer ............................ 6-7
Control Display ................... 8
Clock .................................. 9
Kitchen Timer ...................... 9
Tones .................................... 10
F Code ............................... 10
Oven Cooking Tips ......... 11-t3
Baking With Margarine .......... 12
Baking ................................... 14
Convection Baking Tips ........ 15
Convection Roasting Tips .....t6-17
Convection Baking and
Roasting ........................... 18
Favorite Recipe .... :........... 19-20
Multi-Stage Cooking ........ 20-21
Broiling ............................. 22-23
Setting Special Features . 24-25
Self-Cleaning Cycle ...... 26-27
Control Panel ...................... 28
Broiler Pan and Grid .............. 28
Self-Clean Oven Interior ........ 28
Oven Door Glass ................ 28
Door Vent Trim ........................ 28
Stainless Steel .............. 28
Oven Light Bulbs ................. 29
Oven Racks ............................ 29
Oven Door .............................. 30
Before Calling for
Service ............................. 31-33
Temperature Adjustment ....... 34
Warranty ................................... 35
Consumer Service
Numbers ........................... 36
For your convenience and future reference, please write down your model
and serial numbers in the space provided. They are located on the front
frame behind the oven door.
MODEL NUMBER: SERIAL NUMBER:
i,illl ,ll
2

E L i T E
IMPORTANTSAFETY
INSTRUCTIONS
SAVE THESE INSTRUCTIONS
Read all instructions before using this appliance, When using gas or
electrical appliances, basic safety precautions should be followed,
including the following:
Important: To ensure safety for yourself,
family, and home, please read your Use
and Care Guide carefully Keep it
handy for reference Pay close attention
to Safety Sections BE SURE your
appliance is installed and grounded by a
qualified technician,
• DO NOT leave children alone or
unattended near an appliance in use,
° TEACH CHILDREN not to play with
controls or any part of the appliance,
and not to sit, climb, or stand on the
door, or any other part of the appliance
° CAUTION: NEVER STORE items of
interest to children in cabinets above
the appliance Children climbing on
the appliance could be seriously
injured
° KEEP THIS book for later use
, NEVER USE your appliance for
warming or heating the room,
° NEVER TRY to repair or replace
any part of the appliance unless
instructions are given in this manual
Alt other work should be done by a
qualified technician
* ALWAYS KEEP combustible wall
coverings, curtains, dishcloths, towels,
potholders, and other linens a safe
distance from the appliance,
• NEVER HEAT ijnopened food
containers Pressure buildup can
cause the container to burst and
cause injury
3
° NEVER LEAVE containers of fat or
drippings in your oven,
• ALWAYS KEEP the oven area free
from things that will burn Food,
wooden utensils, and grease buildup
couid catch fire Plastic utensils could
melt and canned foods could explode°
Your alSpliance should never be used
as a storage area.
• ALWAYS KEEP your appliance clear
of things that will burn (gasoline and
other flammable vapors or liquids)°
o NEVER TRY to clean a hot surface.
Some cleaners produce noxious
fumes, and wet cloths or sponges
could cause steam burns
NEVER WEAR loose-fitting clothing
when using your appliance
NEVER USE a towel or other bulky
cloth as a potholder, Make sure the
pothotder is dry, Moist potholders and
wet cloths or sponges'could cause
steam burns DO NOT let potholders
touch hot surfaces
BE SURE the oven is securely
installed in a cabinet that is firmly
attached to the house structure
DO NOT touch hot heating elements,
surfaces near them, or interior oven
surfaces These may be hot enough to
cause burns even though they are dark
in color, During and after use, do not
touch or let clothing or flammable
material contact the elements or hot
surfaces until they have had time to
coo[ Other surfaces near the oven vent
openings, oven door, and window may
also be hot enough to cause burns

E L ! E
IMPORTANTSAFETY
INSTRUCTIONS
. PLACE OVEN RACKS in the
desired position while the oven is
cool. If racks must be moved while
oven is hot, do not let potholder
contact the hot oven element.
° AFTER BROILING, always take the
broiler pan and grid out of the oven
and clean them Leftover grease in
the broiler pan could catch fire the
next time you use your oven.
oALWAYS USE care when opening
the oven door. Let hot air and steam
escape before moving foods
° NEVER USE aluminum foil to line
the oven bottom+ Improper use of
foil could start a fire, or electrical
shock could result
• NEVER BLOCK the oven vent
opening.
- CLEAN ONLY the parts listed
in this manual Follow all cleaning
instructions Be sure to remove
broiler pan and grid before the self-
clean cycle
• NEVER RUB, move, clean,
or damage the door gasket on
self-cleaning ovens. It is essential
for a good seal.
• NEVER TRY to clean utensils,
cookware, removable parts, or
broiler pan and grid in the self-clean
cycle,
• DO NOT USE oven cleaners - No
commercial oven cleaner or
protective coating of any kind
should be used in or around any
part of the oven
• IF THE SELF-CLEANING mode
malfunctions, turn the oven off and
disconnect the power supply Have
it serviced by a qualified technician.
IMPORTANT
SAFETY NOTICE!
The California Safe Drinking Water
and Toxic Enforcement Act requires
the governor of California to publish
a list of substances known to the
state to cause birth defects or other
reproductive harm and requires
businesses to warn their customers
of potential exposure to such
substances. The fiberglass insulation
in a self-cleaning oven will give off
a very small amount of carbon
monoxide during the cleaning cycle.
Exposure can be minimized by
venting with an open door or window
or using a ventilation fan or hood,
IMPORTANT: The health of some
birds is extremely sensitive to
the fumes given off during the
self-cleaning cycle of any oven.
Move birds to another well-ventilated
room.
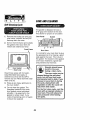
READ AND UNDERSTAND
THIS INFORMATION NOW!
Be sure everyone in your home
knows what to do in case of fire.
Never use water on a grease fire;
it will only spread the flames,
OVEN FIRE:
Do not try to move the pant
1, Close the oven door and turn
controls off,
1
if fire continues, carefully open the
door, throw baking soda on the
fire, or use a dry chemical, foam,
or halon-type extinguisher
4

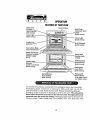
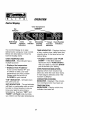
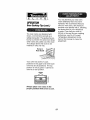
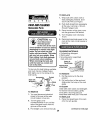
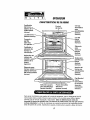
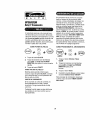
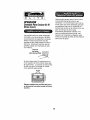
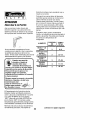
E L I T
Oven Vent
E OPERATION
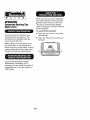
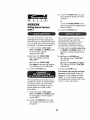
FEATURESOF YOUROVEN
Oven Control
Self-Clean
(both ovens)
Dven Light
(both ovens)
Broiler Pan
and Grid
Broil Element
(both ovens)
Convection Bake
Fan and
Model and Serial
Number Location
(behind upper
door)
Hidden Bake
Element
(under oven floor)
(both ovens)
Oven Rack
Guides (both
ovens)
Self-Cleaning
Interior
(both ovens)
Removable
Door
(both ovens)
Setf-Cldaning
Door Gasket
(both ovens)
Removable
Oven Racks
(3 in upper oven,
2 in lower oven)
To remove the adhesive residue left from packaging tape, use household
dishwashing liquid, mineral oil, or cooking oil. With a soft cloth rub into the
area and allow to soak. Rinse and dry well Repeat procedure using an
appliance polish to ensure no damage is done to the oven. This should be
done before the oven is turned on for the first time. The tape cannot be
removed once the oven has heated. Packaging tape may be found in the
following areas: Control Panel Area, Door Handle, Door Trim, and Oven Area.
5

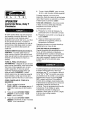
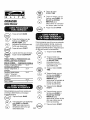
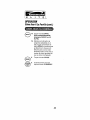
E ! T E
OPERATION
OvenControl,Clock,and Timer
I
l@@f@@ ® .-.,®®..-. ® @@
Your new touch pad oven control will allow you to set various functions with
ease Below are the different types of functions and a description of each.
BAKE - Cooks foods in the traditional
oven with a temperature range of 170°F
to 550°F.
FAVORITE RECIPE (upper oven) -
Lets you preset up to five temperature/
cooking time combinations. With this
function you can bake or convection
bake/roast any one of five of your
favorite recipes without choosing
settings each time,
MULTI-STAGE (upper oven) - Lets you
set the oven to cook your recipes that
require two temperature/time settings
BROIL - Cooks foods at 550°F HI broil
or 450 ° LO broil from the direct heat of
the upper element, Broiling should be
done with the door opened to the broil
stop position,
CLEAN -, Cleans the inside area
of the oven for you When the cycle
is finished, the oven will turn off
automatically,
NOTE: The oven door will
automatically latch and will only
unlatch once the oven has cooled
down_
Cooks food with hot air circulated
over and around foods by a
convection fan, located at the
back of the oven
CONVECTION BAKE - ideal for
baked foods cooked on multiple
shelves Good for a large quantity of
foods
CONVECTION ROAST- Good for
large tender cuts of meat, uncovered°
@
@
Set the amount of time you
want foods to cook. The
oven turns off automatically
at the end of this time.
Set the time of day you
want the oven to turn on
The oven wil! turn on
automatically at the time
you have set When DELAY
START is used with COOK
TIME, FAVORITE RECIPE,
MULTI-STAGE, or CLEAN,
the oven will also turn off
automatically, at the end of
the cooking or clean cycle,
6

E ! T E
OPERATION
OvenControl, Clock, and Timer
(cont.)
ON/OFF
The TEMP UP and DOWN
arrow pads set the oven
temperature The HOURI
MIN UP and DOWN arrow
pads set the time of day,
length of cooking time,
length of cleaning time, the
delayed start time, and the
time set on the Kitchen
Timer.
The START pad must be
touched to activate any oven
function°
The CLEARIOFF pad is
used to cancel any oven
function and the end of cycle
tone It will not cancel the
Clock or Kitchen Timer.
The KITCHEN TIMER ON/
OFF pad is used to turn the
Kitchen Timer on or off. It
will not control any other
functions
The CLOCK pad is used to
set the time of day
The OVEN LIGHT pad
turns the lights inside the
oven on or off,

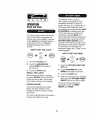
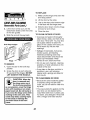
E L I T E
OPERATION
Control Display
Oven Temperature
Set Indicators
Indicator
Multi-Stage .=n On Timed Oven Function
Indicator Function Indicator Cooking Function Indicators
Indicators Indicator Indicators
The Control Display is an easy
reference for using your oven control.
Below are descriptions of how the
Control Display works
OVEN TEMPERATURE
INDICATOR - This indicator has a
multiple purpose,
• Displays the temperature
• Displays Oven Problems-
If your control flashes "F" and
a number or letter, you have
experienced an oven problem
Please read the section on
F-CODES in your manual
"ON" INDICATOR - Will light when
the oven turns on,
SET INDICATORS - The set indicator
will flash in combination with an oven
function or timed function to let you
know you need to set a time or
temperature. Example: "SET" and
"BAKE" will Flash to let you know
you need to set the bake temperature
TIME INDICATOR - Displays the time
of day, cooking time, delay start time,
cleaning time, or the time set on the
kitchen timer
• Displays reminder code "PUSH
START" - If the time indicator
flashes the word "PUSH START,"
then you need to press the START
pad to activate your setting
OVEN FUNCTION INDICATORS -
Displays which oven function has
been set, when the oven door locks,
if multi-stage is selected, and if the
function is delayed
CONVECTION COOKING
INDICATOR - Displays if the convec-
tion cooking function has been set
TIME FUNCTION
INDICATORS - Display which time
indicator has been set
8

E L I- T
OPERATION
Clock and Timer
E
The clock must be set for the correct
time of day before a delayed oven
function can work properly. The time
of day cannot be changed during a
timed oven function, but can be
changed during a bake or broil
function
HOW TO SET THE CLOCK
1. Touch the CLOCK pad.
2. Touch the HOUR/MIN UP
and/or DOWN arrow pads to
setthe time ,
3. Touch the START pad,
RECALL THE CLOCK
While using your oven for cooking,
touch the CLOCK pad if you wish to
check the time of day The current
time of day will show in the display
POWER FAILURE
If you have experienced a power
failure, the time will flash in the
display and wilt be incorrect Reset
your clock
Any oven cooking function that was in
process will need to be reset,
The Kitchen Timer is used to
time cooking processes or other
household activities. It does not
control the oven. It can be set for up
to 9 hours and 59 minutes, It wil!
count down in minutes until the LAST
60 SECONDS is reached, then the
control will beep once When the
countdown reaches ZERO, the
control will beep 3 times, followed by
one beep every 6 seconds until the
KITCHEN TIMER ON/OFF pad is
touched, The 6-second beep can be
removed for future cycles if desired.
For directions on removing this
continuous beep, see "Tones" on the
following page
HOW TO SET THE TIMER
0NIOFF (_
1. Touch the KITCHEN TIMER ON/
OFF pad.
2. Touch HOURPMIN UP and/or
DOWN arrow pads to set time.
3. Touch the START pad,
4. When the countdown has reached
zero, touch the KITCHEN TIMER
ON/OFF pad to turn off the beep,
TOcancel the timer during the
countdown, touch the TIMER
ON/OFF pad TWICE
9

E L ! T E
OPERATION
OvenControl,Clock,and Timer
Your new control has a series of
tones that will sound at different times.
These tones may sound while you set
the contro_ for an oven function, or at
the end of the oven function, tt will
also alert you that there may be a
problem with the functions, Below
are the types of tones and a brief
description of each,
TONES WHILE SETTING THE
CONTROL - When you touch a pad,
you will hear a beep, This beep will let
you know that the pad has been
activated (The arrow pads do not
beep,)
END OF TIMED CYCLE TONE - At
the end of a timed cooking function,
you will hear 3 short beeps followed
by t beep every 6 seconds, This
beep will continue to sound every 6
seconds until the CLEAR/OFF pad is
touched or you may select the special
feature to cancel this 6-second beep
from sounding at the end of future
cycles
TO CANCEL THE 6-SECOND BEEP
1. Touch and hold the BAKE and
BROIL pads, at the same time
for 3 seconds, until the display
shows "SE"
2. Touch the KITCHEN TIMER ON/
OFF pad° The display will show
"CON BEEP" (continuous beep),
3. Touch the KITCHEN TIMER ON/
OFF pad again, The display will
show "BEEP" (beep canceled).
4. Touch the START pad to cancel
the 6-second beep and leave the
special feature mode.
If you would like to return the
6-second beep, repeat steps above
until the display shows your choice
and touch the START pad.
ATTENTION TONE - This tone wilt
sound if you make an error or an
oversight is made while setting an
oven function,
Examples would be:
a. Setting a clean cycle and the oven
door is not properly closed.
b. Setting function and not pressing
the START pad
¢. Touching an additional function
pad without first setting a
temperature or time.
Any of these can be quickly identified
by watching the display
PREHEAT TONE - When you
set an oven temperature, the oven
automatically starts to heat. When the
temperature inside the oven reaches
the temperature you have set, a tone
will sound to let you know the oven is
ready for baking.
If you set an oven function and the
control beeps while the display is
flashing "F" and a number or letter
such as "F4" or "Fd," there may be a
problem with the control or oven.
Touch the CLEAR/OFF pad, If the
function code repeats, disconnect
atl power to the oven for at least 30
seconds and then reconnect the
power. Try setting the function again..
If the code repeats again, write down
the flashing code and call for service
Tell the technician what code was
flashing.
10

E ! T
OPERATION
OvenCooking Tips
It is normal to have some odor when
using your oven for the first time To
help eliminate this odor, ventilate the
room by opening a window or
using a vent hood
IMPORTANT: Never cover the oven
bottom or oven rack with aluminum
foil. Improper use can cause poor
heat flow, poor baking results, and
may damage the oven finish. To
prevent staining from spiilovers, you
may place a piece of aluminum foil or
a cookie sheet on a rack below the
food which may spil! over.
Opening the door often to check
foods will cause heat toss and poor
baking result&
Preheating is bringing the oven
temperature up to the temperature
you will be using during baking Let
the oven preheat when recipes call
for preheating.
[he low temperature zone of your
oven (between 170°F and 200°F) is
available to keep hot cooked foods
warm However, foods should not be
kept at these temperatures longer
than 2 hours..
When using your convenient Delay
Start operation, foods such as dairy
products, fish, poultry, etc, should
never sit more than 1 hour before
cooking. Room temperatures and the
heat from the oven light promote
bacterial growth
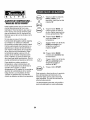
The oven vent is located just above
the door This area could become hot
during oven use It is normal for steam
to come out of the vent and/or collect
moisture underneath when the oven is
in use The vent is important for
proper air circulation Never block
this vent.
Oven Vent
___/Location )
To prolong the life of your
oven light bulbs, follow
this helpful tip: Always
turn the lights off when the oven is not
in use or during a clean cycle, If your
oven lights are left on for an extended
period of time, the oven will be warm
when the door is opened due to the
heat generated from the oven light
bulbs.
11

E L I T
OPERATION
OvenCookingTips(cont.)
if baking with more than one pan,
place the pans so each has at least
1 to 1V2"of air space around it If
baking four cake layers at the same
time, place two layers on rack 2 and
two layers on rack 4 Stagger pans on
the rack so one is not directly above
the other
Most recipes for baking have been
developed using high-fat products
such as butter or margarine (80% fat
by weight--the federal requirement
for products labeled "margarine").
You will get poor results if cakes, pies,
pastries, cookies, or candies are
made with low-fat spreads Low-fat
spreads contain less fat and more
water., The high moisture content of
these spreads affects the texture and
flavor of favorite baked recipes. The
lower the fat content of a spread
product, the more noticeable these
differences become_ To ensure best
results, use margarine, butter, or stick
spreads containing at least 70%
vegetable oil.
The bake element is under the oven
floor. Do not place food on the oven
bottom for cooking
FLAT COOKIE SHEETS, without
sides, allow air to circulate all around
the cookies for even browning.
SHINY PANS reflect heat and are
perfect for cakes and quick breads
that need a golden brown crust
GLASS, DARK NON-STICK, OR
DARKENED-BY-AGE BAKEWARE
absorbs heat and can be used for
yeast breads, pie crust, or foods
that need a brown crust. The oven
temperature, when using these pans,
should be reduced by 25°F.
The Oven Temperature Sensor at the
back of the oven continuously senses
and controls the temperature inside
the oven. To keep a constant set tem-
perature, the elements will cycle (turn
on and off during cooking).
12

E L 1 E
TM
OPERATION
OvenCookingTips(cont.)
The oven racks are designed with
stops, a convenience as well as a
safety precaution The guides have a
bump to prevent the racks from tilting
when racks are pulled out of the oven
This design allows the racks to be
inserted in only one way
Bump in J_
Rack Guide I_
Your oven has seven (7) rack
positions in the upper oven (the lower
oven has six (6) positions) The top
position is only a guide It cannot be
used as a rack position,
Guide
Always place oven racks in the
proper position while oven is cool.
You may feet that your new oven
cooks differently than the oven it
replaced, We recommend that you
use your new oven a few weeks to
become more familiar with it, following
the times given in your recipes as
a guide, If you feel your oven is
too hot or too coot for your cooking
preference, see Do-k-Yourself
Temperature Adjustment in the
back of this manual to make the
adjustment_
13

E L i T E
OPERATION
Baking
@
G
3. Touch the COOK
TIME pad.
m Touch the HOUR/MIN
UP and/or DOWN arrow
pads to set the amount
of cooking time,
(_1. Touch the BAKE pad
2,
3.
Touch the TEMP UP or
DOWN arrow pads to set
the oven temperature
you prefer to use,,
Touch the START pad,
5. Touch the START pad.
You can set the oven to turn on at a later
time of day, cook for a specific amount
of time, and turn off automatically Make
sure the clock is set correctly,,
4. When baking is
finished, touch the
CLEAR/OFF pad.
BAKING SHELF POSITION CHART
TYPE OF FOOD SHELF POSITION
Frozen pies (on 3 or 4
cookie sheet)
Angel food cake, 3 or 4
bundt or pound
cakes
Biscuits, muffins, 3 or 4
brownies, cookies,
cupcakes, layer
cakes, pies
Casseroles : , 3 or 4..........................
Turkey or Roast 1
You can set the oven to cook for a
specific time and turn off automatically,
0
G
1. Touch the BAKE pad
2. ]'ouch the TEMP UP or
DOWN arrow pads to set
the oven temperature you
prefer to use
14
1. Touch the BAKE pad.
2_
3.
4.
G
5.
6.
G
Touch the TEMP
UP or DOWN arrow
pads to set the oven
temperature you prefer
to use
Touch the
COOK TIME pad.
Touch the HOUR/IVIIN
UP and/or DOWN arrow
pads to set the amount
of time you prefer your
foods to cook,
Touch the DELAY
START pad
Touch the HOUR/MIN
UP and!or DOWN arrow
pads to set the time of
day you prefer the oven
to turn ono
Touch the START pad.

E L ! T E
OPERATION
ConvectionBakingTips
(UpperOven)
careful not to burn your hand on the
door when using a rack in the lowest
position (1).
Convection Baking uses heated air
that is circulated over and around
foods by the convection fan located
in the back of the oven When
convection baking, cooking
temperatures used in recipes
should be reduced 25°F.
_," ¢_Z'z.t ! '"!LLt,",_J.?._.f.._
NOTE: You will hear a fan while
cooking with convection. The fan will
stop when the door is opened, but the
convection heating element wilt not
turn off
Because heated air is circulated
evenly throughout the oven, foods
can be baked with excellent results
on multiple racks at the same time.
CAUTION: When you are using the
rack in the lowest position (!), you will
need to use caution when pulling the
rack out, We recommend that you pull
the rack out several inches and then,
using two potholders, pull the rack out
by holding the sides of it The rack is
low and you could be burned if you
place your hand in the middle of the
rack and pull all the way out Be very
When using 2 racks, place the two
racks in positions 2 and 4
When using 3 racks, place the racks
in positions 2, 4, and 6.
METAL OR GLASS
Any type cookware will work in
the convection oven. However,
metal pans heat faster and are
recommended Glass pans cook
more slowly.
PAPER OR PLASTIC
Heat-resistant paper and plastic that
is recommended for regular ovens
may be used in your convection oven
• For cooking foods on multiple rack
positions.
• For large quantities of cooking.
• Great for cooking biscuits, brownies,
angel food cake, and bread
15

E L i T E
OPERATION
ConvectionRoastingTips
(UpperOven)
During Convection Roasting, heat
comes from the top element, The
convection fan circulates the heat
evenly around the food
Meats cooked in a convection oven
are dark brown on the outside and
tender and juicy on the inside In most
cases cooking time will be less when
using the Convection Roast feature,
Use the recommended roasting
temperature. Preheating is not
necessary, Check foods at the end of
suggested time, You may choose to
cook longer
When you are Convection Roasting,
you should use the broiler pan and
grid that came with your new oven
The pan is used to catch grease
spills and the grid is used to prevent
grease splatters
"To use the Pan and Grid
a. Place the oven rack in the lowest
rack position
b. Place the meat on the broiler pan
and grid
16

E L 1 T E
OPERATION
ConvectionRoastingTips(UpperOven)(cont.)
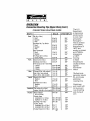
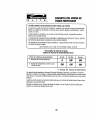
CONVECTION ROASTING GUIDE
MEATS
Beef
Pork
Ham
Lamb
.....Seafood
Poultry
MINJLB. OVEN TEMP. (°F)
35 total
40 total
45 total
18
total
total
8 to 11
7 to 10
16 to 19
17
Rib (3 to 5 lbs.)
Rare* 20 to 24
Medium 24 to28
We!l 28 to32
Boneless Rib, Top Sirloin
Rare* 20 to 24
Medium 24 to28
Well 28 to 32
Beef Tenderloin
Rare* 10 to 14
Medium 14 to I8
Pot Roast (2Y2to 3 Ibs.)
Chuck, Rump 35 to 45
Bone-in (3to 5 Ibs,) 23 to 27
Boneless (3to 5 tbs.) 23 to 27
Pork Chops (Y_to 1-inch thick)
2 chops 30 to
4 chops 35 to
6 chops 40 to
Canned (3 lbs, fully cooked) 14 to
Butt (5 lbs fully cooked) t4 to 18
Shank (5 Ibs. fully cooked) t4 to 18
Bone-in (3to 5 Ibs.)
Medium t7 to 20
Well 20 to 24
Boneless (3 to 5 Ibs..)
Medium 17 to20
Well 20 to 24
'Fish,whole"i'a"io"S'i&',i' 30'io40
Lobs!.erTails (6 to 8 oz. each) 20,,,!o,,,,25
Whole Chicken 24 to26
(2Vzto 31/2Ibs)
Cornish Hens
Unstuffed (1 to I_AIbs.) 50 to 55 total
Stuffed (1 to t½ Ibs.) 55 to 60 total
Duckling (4 to 5 lbs.) 24 to 26
Turkey, wholet
Unstuffed (10 to 16 Ibs.)
Unstuffed (18 to 24 Ibs,)
Turkey Breast (4 to 6 Ibs.)
325°
325"
325°
325°
325°
325"
325°
325"
300°
325°
3250
3250
3250
325°
325°
325°
3250
325°
325°
325°
325°
400°
350°
350°
350°
350°
3250
325°
325°
325=
*The US
Department
of Agriculture
recommends
to cook meat
and poultry
thoroughly--
meat to at least
an INTERNAL
temperature of
160°F and
poultry to at least
an INTERNAL
temperature
of 180°F.
Cooking
to these
temperatures
usually protects
against
food-borne
illness,
tStuffed birds
generally require
30-45 minutes
additional
roasting time,
Shield legs
and breast with
foil to prevent
over-browning
and drying of
skin,

E L I T E
OPERATION
ConvectionBakingand
Roasting(UpperOven)
Touch the CONVECTION
BAKE or ROAST pad
Touch the TEMP UP or
DOWN arrow pad to set the
oven temperature you
prefer to use
Touch the START pad
When baking is finished,
touch the CLEARIOFF pad
You can set theoven to cook for a specific
time and turn off automatically°
You can set the oven to turn on at a later
time of day, cook for a specific amount of
time, and turn off automatically. Make sure
the clock is set correctly.
4.
db
Touch the CONVECTION
BAKE or ROAST pad
Touch the TEMP UP or
DOWN arrow pad to set
the oven temperature you
prefer to use
Touch the COOK
TIME pad
Touch the HOUR/MIN UP
and/or DOWN arrow pads
to set the amount of time
you prefer your foods to
cook
Touch the DELAY
START pad
Touch the HOUR/MIN UP
and/or DOWN arrow pads
to set the time of day you
prefer the oven to turn on
Touch the START pad
Touch the CONVECTION
BAKE or ROAST pad
Touch the TEMP UP or
DOWN arrow pad to set the
oven temperature you prefer
to use
Touch the COOK
TIME pad.
Touch the HOUR/MIN UP
and/or DOWN arrow pads
to set the amount of cooking
time
Thisfeature will automatically convert the
temperature you set for traditional baking
to convection cooking.
1. Touch and hold the CONVECTION
BAKE pad for 4 to 5 seconds
2, Touch the TEMP UP or DOWN arrow
pad to set the temperature
3, Touch the START pad You wilt see
the converted temperature in the
display For example, if you entered
375°F, the display wilt show 350°F
This conversion will need to be set
each time you use Convection Bake
Touch the START pad
18

E L ! T E
OPERATION
Cooking TimeSavers
(UpperOven)
You can preset up to fivetemperature/
cooking time combinations with this
function You can then bake or
convection bake/roast any one of five
of your favorite recipes without choosing
settings each time,
NOTES:
, You can not use Favorite Recipe with
Broil or the Self-Cleaning cycle
• Your oven will remember Favorite
Recipe presettings even after a power
outage
• Add your estimated preheat time to
your cooking time. At the preheat
tone, put your food in the oven,
To save a favorite recipe:
1,
@ 3.
Q
Touch the FAVORITE
RECIPE pad one to five
times to find a blank space
for a recipe
Touch the BAKE,
CONVECTION BAKE,
or CONVECTION ROAST
pad
Touch the TEMP UP or
DOWN arrow pad to set the
cooking temperature (If you
do not set a temperature,
the oven will cook at the
temperature displayed on
the control ) Each time you
touch an arrow pad, the
temperature will increase/
decrease by 5°,
Touch the COOK
TIME pad
Touchthe HOUR/MIN UP
orDOWN arrow pads to
set the cook time
St
7_,
Touch the FAVORITE
RECIPE pad The display
shows "Save" Touch the
FAVORITE RECIPE pad
again and the new recipe
is saved.
Touch the START pad if
you want to start cooking
the recipe which you have
just saved
OR
Touch the CLEARIOFF
pad to clear the display
To use a favorite recipe:
Touch the FAVORITE
RECIPE pad one to five
times to find the recipe you
want to cook
2. When you have chosen the
recipe that you want to
use, touch the START pad,
NOTE: You can set Favorite Recipe to
start at a Iater time by touching the
DELAY START pad and the HOUR/MIN
UP and/or DOWN arrow pads (see "How
to Set Delayed Start Time with Timed
Bake" in the baking section) You can set
the delayed start time before or after you
choose the Favorite Recipe you want.
You can even set a delay start after you
touch the START pad
To change or replace a favorite
recipe:
1, Touch the FAVORITE
RECIPE pad one to five
times to find the recipe
that you want to change
or replace
19 continued on next page

E L 1 T E
OPERATION
CookingTimeSavers
(Upper Oven)(cont.)
To change or replace a favorite recipe
(cont.)
2.
G
4.
Touch the BAKE,
CONVECTION BAKE, or
CONVECTION ROAST
pad,
Touch the TEMP UP or
DOWN arrow pad to set
the cooking temperature,
(If you do not set a
temperature, the
oven will cook at the
temperature displayed
on the control,) Each time
you touch an arrow pad,
the temperature will
increase/decrease by 5°.
Touch the COC)K
TIME pad.
Touch the HOUR/MIN UP
or DOWN arrow pads to
set the cook time.
Touch the FAVORITE
RECIPE pad twiceto
save the changes you
have made
If you do not want to start
the recipe now, touch the
CLEAR/OFF pad once,
To delete a favorite recipe:
1. Touch theFAVORITE
RECIPE pad one tofive
times to find the recipe
that you want to delete.
2. ouch the CLEARIOFF
pad "DEL" will show in
the display
3. Touch the FAVORITE
RECIPE pad to delete
the recipe
4. Touch the CLEAR/OFF
pad to exit from the Favorite
Recipe feature.
You can set the oven tocook your
recipes that require two-stage cooking.
In other words, if your recipe calls for two
temperature settings, the control can be
programmed to automatically change
from the first temperature/time setting
to the second You wilt not have to return
to the oven to program the second
temperature and time The control does
this for you
NOTE; If there is a power outage, you
will have to reset multi-stage cooking.
To set multi (two) stage cooking:
Touch the BAKE,
CONVECTION BAKE,
or CONVECTION
ROAST pad
(_ 2.
Q
Touch the TEMP UP or
DOWN arrow pad to set
the oven temperature
you prefer to use.
Touch the COOK
TIME pad
Touch the HOUR/MIN
UP or DOWN arrow
pads to set the amount
of time you prefer your
foods to cook.
5. Touch the
MULTI-STAGE pad
2O
Page is loading ...
Page is loading ...
Page is loading ...
Page is loading ...
Page is loading ...
Page is loading ...
Page is loading ...
Page is loading ...
Page is loading ...
Page is loading ...
Page is loading ...
Page is loading ...
Page is loading ...
Page is loading ...
Page is loading ...
Page is loading ...
Page is loading ...
Page is loading ...
Page is loading ...
Page is loading ...
Page is loading ...
Page is loading ...
Page is loading ...
Page is loading ...
Page is loading ...
Page is loading ...
Page is loading ...
Page is loading ...
Page is loading ...
Page is loading ...
Page is loading ...
Page is loading ...
Page is loading ...
Page is loading ...
Page is loading ...
Page is loading ...
Page is loading ...
Page is loading ...
Page is loading ...
Page is loading ...
Page is loading ...
Page is loading ...
Page is loading ...
Page is loading ...
Page is loading ...
Page is loading ...
Page is loading ...
Page is loading ...
Page is loading ...
Page is loading ...
Page is loading ...
Page is loading ...
-
 1
1
-
 2
2
-
 3
3
-
 4
4
-
 5
5
-
 6
6
-
 7
7
-
 8
8
-
 9
9
-
 10
10
-
 11
11
-
 12
12
-
 13
13
-
 14
14
-
 15
15
-
 16
16
-
 17
17
-
 18
18
-
 19
19
-
 20
20
-
 21
21
-
 22
22
-
 23
23
-
 24
24
-
 25
25
-
 26
26
-
 27
27
-
 28
28
-
 29
29
-
 30
30
-
 31
31
-
 32
32
-
 33
33
-
 34
34
-
 35
35
-
 36
36
-
 37
37
-
 38
38
-
 39
39
-
 40
40
-
 41
41
-
 42
42
-
 43
43
-
 44
44
-
 45
45
-
 46
46
-
 47
47
-
 48
48
-
 49
49
-
 50
50
-
 51
51
-
 52
52
-
 53
53
-
 54
54
-
 55
55
-
 56
56
-
 57
57
-
 58
58
-
 59
59
-
 60
60
-
 61
61
-
 62
62
-
 63
63
-
 64
64
-
 65
65
-
 66
66
-
 67
67
-
 68
68
-
 69
69
-
 70
70
-
 71
71
-
 72
72


Ask a question and I''ll find the answer in the document
Finding information in a document is now easier with AI
in other languages
Related papers
-
Kenmore Elite 91149002993 Owner's manual
-
 Kenmore Elite 91199003991 Owner's manual
-
Kenmore Elite 79048129801 Owner's manual
-
Kenmore Elite 79047914600 User manual
-
Kenmore Elite 79048179001 Owner's manual
-
 Kenmore Elite 790.99613 User manual
-
 Kenmore Elite 7560 - Elite 40 in. Dual Fuel Range User manual
-
Kenmore Elite 79098032800 User manual
-
Kenmore Elite 79078903000 Owner's manual


Other documents
-
Kenmore 91147466791 Owner's manual
-
-
-
-
-
-
-
-
-