Page is loading ...

INSTALLATIONAND SERVICEMUST BEPERFORMEDBYA QUAUNED INSTALLER.
IMPORTANT:SAVEFORLOCALELECTRICALINSPECTOR'SUSE.
READAND SAVETHESEINSTRUCTIONSFORFUTUREREFERENCE.
FORYOUR SAFETY: Do not store or use gasoline or other flammable vapors and Hquids in the
v[dnity of this or any other appliance.
GENERAL iNFORMATION
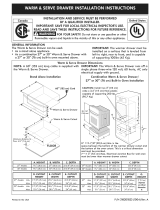
Tile Warmer Drawer carl be used:
• As a stand alone applian(e
• As a combination Warmer Drawer with a 30" (76 cm) builtqn oven mounted above
IMPORTANT: The warmer drawer must be installed on a surface leveled from left to right, rear to front and the surface
must be capable of supporting 100 pounds (45 Kg).
Warmer Drawer Dimensions
' BI C;DEPTH
i i
10"(25,4cm) 30"(76,2cm) 233/8"(59,4cm)
I I
HEIGHT WIDTH ' DEPTH
Min. 8 3/8"(21,3cm) 281/2" (72,4cm) 24"(61cm)
Max, 8 5/8"(21,9cm)* 283/4" (73cm)
IMPORTANT: The Warmer Drawer runs off a single
phase three-wire 120 volt, 60 hertz, AC only electrical
supply with ground.
Combination Warmer Drawer/
30" (76 cm) Built-in Oven installation
Caution: Two 3" (7,6 crn) wide X 3/
4" (1,9 cm) thick planks have to be
installed and they should be able to
support 200 pounds, (90,7 K,
H* =10-1/8" (25,7 cm) Min. is a @iticai
dimension and must be applied.
£ HEIGHT
10"(25,4cm) 30"(76,2cm) 233/8"(59.4cm)
Note: It is also possible to install this warmer drawer in a
height opening of 91/4"(23.5 cm). Pleaserefer to page 3
for complete instructions.
Printedin Unit_dStat_s
P/N 318201804 (O412) Rev, C
English - pages 1-4
Espafio[ - pBginas 5-8
Frangais - pages 9-12

Important Notes to the Installer
1. Read all the instructions contained in these installation
instructions before installing appliance,
2. Remove all packing material from the appliance before
connecting tile electrical supply,
3. Observe all governing (;odesarm ordinances,
4. Be sure to leavethese instructions with tile consumer.
Important Note to the Consumer
Keep these instructions for future reference.
IMPORTANT SAFETY
NS
• Be sure your appliance is installed and plugged
into a 120 Vott grounded outtet.
• This appliance must be electrically grounded in
accordance with the National Electrical Code ANSI/
NFPA No. 70--latest edition in the United States,
or CSA C22.1, Part 1 in Canada, and tocal code
requirements.
Tools You Will Need
Phillips€) Screwdriver
Pencil
Ruler or Tape Measure and Straight-edge
Hand Saw or Saber Saw
Level
Warmer Drawer Installation
Ao Standard installation (see cutout dimensions on
page 1).
AntPtip Bracket
I
I
\ I
\
I
. (64.3 cm)
/
Figure 1
1. Locate the 2 antPtip brackets supplied as shown on
figure 1. Fix them using 2 of the 4 black head
screws (!0-16 X lY4") supplied.
2. Slide the drawer into tile cutout opening until the
front frame of tile drawer is flush against the
cabinet. Be careful not to pinch the electrical cord.
3. Remove the drawer as instructed in the Use & Care
Guide and secure the drawer housing to the cabinet
using the 2 black head screws (10-16 X 3A") supplied
(see Figure 2). Do not overtighten screws.
4. Tile 60" (152 cm) appliance power cord can now be
connected into the 120 Volt outlet.
5. Proceed with mounting tile builtqn oven above tile
drawer (if applicable). Follow the installation
instructions provided with the builtqn oven. Make
sure to use the antPtip brackets supplied with the
builtqn oven.
....--
m
Use tile black head screws
supplied to attach tile drawer
to tile front of the cabinet.
Figure 2

B.[nstaHationforacoutoutheightof 91/4(23.5cm)
1. Locate tile 2 anti-tip brackets and the 2 front
supports supplied as shown on figure 3. Fix them
using the 4 black head screws (10-16 X lY4")
supplied
2. Install the 4 spacers (Figure 4) supplied under drawer
as shown in figure 5 using the 4 screws (I0-24 X %").
Install two spacers on each side of drawer.
3. Slide tile drawer into the cutout opening until the
front frame of the drawer is flush against the
cabinet. Be careful not to pinch the electrical (ord.
4. Remove the drawer as instructed in the Use & Care
Guide and secure the drawer housing to the cabinet
using the 2 black head screws (8-18 X Y2") supplied
(see Figure 2). Do not overtighten screws.
5. The 60" (152 cm) appliance power cord can now be
connected into the 120 Volt outlet.
6. Proceed with mounting the built-in oven above the
drawer (if applicable). Follow the installation
instructions provided with the built-in oven. Make
sure to use the anti-tip brackets supplied with the
built-in oven.
Anti-tip Bracket
Front Su
Figure 3
S SPACER
Figure 4
Use the screws supplied to fix
the drawer support
Figure 5
/