Page is loading ...

Front Cover

MAK GRILLS
OWNER'S MANUAL
PELLET BBQ SMOKER-GRILL
MODEL EP-429-2G
NOTICE!
PLEASE READ THIS ENTIRE MANUAL BEFORE ASSEMBLING OR USING
THIS PELLET FUEL-BURNING APPLIANCE. FAILURE TO FOLLOW THESE
INSTRUCTIONS COULD RESULT IN PROPERTY DAMAGE, BODILY
INJURY OR EVEN DEATH! CONTACT YOUR LOCAL BUILDING OR FIRE
OFFICIALS ABOUT RESTRICTIONS AND INSTALLATION INSPECTION
REQUIREMENTS IN YOUR AREA. WHEN GRILL IS NOT IN USE, UNPLUG
CORD FROM OUTLET.
SAVE THESE INSTRUCTIONS AND KEEP AVAILABLE FOR REFERENCE.
This MAK GRILL was designed for RESIDENTIAL OUTDOOR USE ONLY!
Any other use may cause serious injury and will void any and all warranties. Do
not operate this grill in the vicinity of any liquid combustibles such as gasoline
or use any such items inside the unit. Maintain a clearance of at least (24)
twenty-four inches around this grill at all times. Only touch handles with the
understanding that the unit will be HOT during operation. In case of fire or other
emergency, unplug the unit from the power source. Before removing the
fan/access panel or the Pellet Boss® for servicing or any other reason,
disconnect unit from power source. WHEN GRILL IS NOT IN USE, UNPLUG
FROM POWER SOURCE.
BEWARE OF CARBON MONOXIDE POISONING!
Follow these guidelines to prevent this colorless, odorless gas from poisoning
you, your family or others.
a) Know the symptoms of carbon monoxide poisoning: headache,
dizziness, weakness, nausea, vomiting, sleepiness, and confusion.
Carbon monoxide poisoning reduces the blood's ability to carry
oxygen. Low blood oxygen levels can result in loss of consciousness
and death!
b) See a doctor if you or others develop cold or flu-like symptoms while
cooking or in the vicinity of this appliance. Carbon monoxide poisoning
can easily be mistaken for a cold or flu, is often detected too late.
c) Alcohol consumption or drug use will increase the effects of carbon
monoxide poisoning.
Carbon Monoxide Poisoning is especially toxic to mother and
child during pregnancy, infants, the elderly, smokers and people
with blood or circulatory system problems, such as anemia or
heart disease.

Welcome to the MAK GRILLS family! We appreciate your purchase of
our quality, American-made products, proudly built in Dallas, Oregon.
MAK GRILLS is proud to be an American company that makes every
effort to purchase products locally.
If you have any questions concerning the assembly or operation of your
MAK GRILL, please call us at (503) 623-1234. You may also reach us via
email, [email protected]. Additional useful information and help can
be found on our website, www.makgrills.com
To find your Pellet Boss firmware version, turn the grill on. Push and hold
the UP button Note: the lock icon will display within (10) ten seconds.
Keep pressing the UP button until the words MAK GRILL VER____
appear. The version number is on that screen. To return back to normal
screen, press the UP button until SETPONT SMOKE appears on the
Pellet Boss display screen.
Please record the following information here for future reference:
Grill Serial number (back left side of the pellet hopper) _______________
Pellet Boss Firmware Version #_________________________________
Inspected by:_____________________________ Date: _____________
Date Purchased:__________ Purchased From: ____________________
Please keep your sales receipt in a safe place for reference if needed.
When not in use, unplug grill power cordALWAYS
from the electical outlet.
PO BOX 817
960 SE Monmouth Cutoff
Dallas, OR 97338
(503) 623 - 1234
Proud to be American Made
Superior Wood Pellet BBQ Smoker-Grills

TABLE OF CONTENTS
Additional Warnings and Precautions Page 2
BBQ Parts List Page 3
BBQ Diagram Page 6
MAK Glossary Page 7
Assembly Instructions Page 9
FLAMEZONE™ Direct Grilling System Set-Up Page 14
Start Up and Seasoning Grill Page 16
Pellet Boss® Explanation & Operation Page 18
Pellet Boss® Rear View Page 28
Cleaning Your MAK Grill Page 29
Trouble Shooting and Repair Page 34
Manual Lighting Instructions Page 35
Two Star Accessories Page 39
Grill Warranty Page 40
Basic MAK Recipes Page 41
Copyright 2018 MAK Grills LLC
1

ADDITIONAL WARNINGS AND PRECAUTIONS
4 Always use this product outside, in a well ventilated area. NEVER use
indoors or an enclosed area without proper ventilation.
4 If this unit is not properly installed or assembled, a fire may result. To reduce
the risk of fire, follow the assembly instructions and clearance requirements.
4 A MAJOR CAUSE OF FIRES IS THE FAILURE TO MAINTAIN REQUIRED
CLEARANCES (AIR SPACES) TO COMBUSTABLE MATERIALS. IT IS
OF THE UTMOST IMPORTANCE THAT THIS PRODUCT BE INSTALLED
ONLY IN ACCORDANCE WITH THESE INSTRUCTIONS.
4 MINIMUM AIR SPACE IS (24) TWENTY-FOUR INCHES AROUND THE
ENTIRE UNIT.
4 NEVER use gasoline, gasoline-type lantern fuel, kerosene or charcoal lighter
fluid or similar liquids to start or “freshen up” a fire in this appliance. Keep all
such liquids well away from the appliance when it is in use. Keep all
combustible liquids at least (2) two feet distant from this appliance when it is
use, this also includes ALL MOTORZIED VEHICLES.
4 NEVER place or store flammable materials or materials that could melt
under the grill while it is operating.
4 Keep all exhaust vents unobstructed. Clean them on a regular basis to
ensure proper airflow in the grill.
4 To prevent grease fires, clean your grill on a regular basis. This includes the
grease tray and FlameZone™ pan.
4 Contact local building or fire officials about restrictions and installation
inspection requirements for your area.
4 Never move or transport a hot or operating grill.
4 Should a grease fire occur, turn the grill completely off. Carefully remove all
food and leave the grill lid closed until the fire is out.
4 When the grill is operating, assume that ALL SURFACES, except
handles are HOT.
4 When not using the grill, unplug from the power source.
4 Save these instructions.
2

PACKAGE CONTENTS
There will some assembly required with your grill. All necessary parts,
hardware and tools needed for proper assembly are included with your
grill. Make sure that you have each of the items listed before you attempt
assembly of this grill. Refer to the BBQ PARTS LIST to help you identify
the individual components of your grill.
NOTE: The approximate assembly time for this grill is between 60-90
minutes.
9
Grill Lid Handle Grip (1)
BBQ P LARTS IST
DESCRIPTION / QUANTITY
ITEM
Main body of pellet grill (1)
Left leg panel with locking casters (1)
Right leg panel with locking casters (1)
1
2
3
4
5
6
7
8
Bottom Shelf (1)
Warmer/Smoker Box (1)
Back splash (1)
Side cover handles (3)
Grill lid handle (1)
3

DESCRIPTION / QUANTITY
ITEM
2 Qt. Grease drawer (1)
Heat diffuser (1)
Ash Cleanout Cover (1)
Grease shield (1)
Grease tray frame (1)
FlameZone™ covers (2)
FlameZone™ pan (1)
Split cooking grates (2)
Warmer/Smoker box grate (1)
Warmer/Smoker box grease tray (1)
Tool hanger (1)
Hex Wrench Set (1)
Meat probe (1)
Spare fuse (1)
(stapled to the back of this manual)
12
10
11
18
19
20
21
22
17
23
13
14
15
16
4

NOTE: Accessories not manufactured by MAK GRILLS, or
made for MAK GRILLS, may cause damage to your grill.
When purchasing an accessory, make sure that it does not
interfere or restrict the airflow within the grill. If you have any
questions, please contact us at (503) 623-1234.
DESCRIPTION / QUANTITY
ITEM
Hardware:
1/4” - 20 x 1/2” long screw (35)
Use 9/64 hex wrench to install
1/4” lock washer (32)
1/4” x 5/8” flat washer (4)
#6 x 3/8” long screw (7)
Use 5/64 hex wrench to install
#6 lock washer (7)
24
25
26
27
28
1/4” - 20 flat nut (21)
29
5
Two Star General Specifications:
Grill Dimensions: 49”H x 60” W x 25” D
Cooking Surface: 429 sq. inches/858 sq. inches (19.5”x22”x14”)
Grill Weight: 200 lbs.
Construction: 16 & 14 gauge 304 Stainless Steel and aluminized steel
Finish: High temperature powder coat
Hopper Capacity: 20 lbs.
Grease Collection: 2 qt. grease drawer
Smoking temperature range: 170-190F
Cooking temperature range: 200F-500F

6
BBQ DIAGRAM

Ash Clean Out
The ash clean out is located to the right of the
firepot in the bottom of the grill body. It has a square
stainless steel cover. Pellet ash can be swept from
the chamber into the grease drawer below the grill
for easy disposal.
Auger
The auger is the long steel corkscrew that moves
the pellets from the pellet hopper to the firepot. It is
located below the pellet hopper and inside the
auger tube.
Auger Motor
The electric motor that attaches to the auger and is
used to rotate the auger. The auger motor plugs
into the WHITE receptacle on the back of the Pellet
Boss controller.
Auger Stop Switch
This is a safety switch which stops the auger from
turning any time the pellet hopper lid is opened. The
switch is attached to the left wall of the pellet
hopper. The switch wire connects to the back of the
Pellet Boss controller.
Casters
Wheels that are attached to the grill legs. When
unlocked, the casters swivel to make moving your
grill easier. When the casters are locked the grill
becomes immovable.
Cooking Grate(s)
MAK cooking grates are made of 1/4 inch stainless
steel rod. They sit above the FlameZone or drip pan
and provide the cooking surface inside the grill.
Exhaust Louvers
The louvers allow heat and smoke to exit the
cooking chamber. You will find the exhaust
louvers along the back wall of the barbecue body.
On the 2 Star there is also a set of exhaust lovers on
the left and right sides of the Warmer/Smoker box.
Fan Access Panel
On the 1 & 2 Star models the panel is located on the
left end of the barbecue. On the 3 Star there are 2
fan/access panels on the front of the grill body. The
panel protects the internal operating components
of the grills. It is removable in order to access the
fan, auger and control board.
7
Firepot
This is where the pellets burn to create the heat and
smoke to cook your food. Every MAK firepot is
removable to allow for easy disposal of
accumulated pellet ash.
Firepot Pin
Is used to secure the firepot. The pin is attached to
a split ring and inserts on the left side of the firepot.
FlameZone Covers™
Two stainless steel plates fit over the top of the
FlameZone ports. They help to redirect heat and
smoke around the food on the cooking grates,
rather than allow it to flow directly under the food.
FlameZone Pan™
This pan sits on the grease tray inside the grill. It is
perforated with 88 ports, which allows heat to come
up directly under the food on the cooking grates,
allowing for hot and fast grilling.
FlashFire Igniter™
This component starts the fire in your grill. It
automatically starts when you first turn the grill on.
The igniter sits behind the firepot. The intense heat
it generates is blown via a funnel into the firepot.
The igniter plugs into the RED receptacle on the
back of the Pellet Boss controller.
Grease Drawer
The grease drawer collects grease and food
drippings, helping to prevent flare-ups and grease
fires. It slides in below the grill on the right hand side
of the barbecue body under the warmer/smoker
box. Pellet ash can also be swept into the drawer
using the ash-clean out opening in the bottom of the
barbecue body.
Grease Pan
This angled pan is used to direct grease and food
drippings out of the cooking chamber and into the
grease drawer. The right edge of the grease pan
runs over the top and behind the the grease shield.
Grease Shield
The stainless steel triangular shield fits inside the
"V" shaped flange on the right side of the barbecue
body. It is used to direct drippings into the 2 Qt.
grease drawer below the barbecue.
MGAK LOSSARY
These definitions will help you become familiar with the various components
and features of your MAK Grill.

8
Grill Body
Is the main cooking chamber and lid. The pellet
hopper, auger tube, Warmer/Smoker box (2 Star
only) and leg panels attach to the grill body.
Grill Leg Panels
The left and right leg panels attach to the grill body.
Each leg panel has locking casters on the front and
rear ends of the panel.
Grill Lid
Allows access to the cooking chamber on the
barbecue body. The lid rolls over the top of the grill
hood to expose the cooking area in the grill.
Igniter Clip
Holds the igniter in proper position. The clip is
located behind the firepot.
Meat Probe
The probe inserts into the food being cooked to
monitor its internal temperature. The meat probe
plugs into one of the three inputs on the front of the
Pellet Boss controller.
Pellet Boss®
Our digital controller which operates the fan, auger
and igniter, as well as controls cooking
temperatures in the grill. The Pellet Boss is the
brains of the outfit.
Pellet Hopper
Holds the fuel used to smoke and cook food in your
grill. The pellet hopper is located on the left-hand
side of the grill on 1 & 2 Star models. On the 3 Star
the pellet hopper is on the front of the grill.
Pellet Hopper Dump Door
On the 2 Star the door is on the front right side of the
pellet hopper.
Thermocouple
Is located in the back left-hand corner of the
cooking chamber. This is a temperature
measurement device that senses the ambient air
temperature inside the grill. It averages the cooking
chamber temperature on a minute by minute basis.
Tube Axial Fan
Located under the pellet hopper, inside the
component area of the grill. The fan provides
positive airflow to keep the pellets in the firepot
burning and helps to circulate heat and smoke
inside the cooking chamber. The fan plugs into the
BLUE receptacle on the back of the Pellet Boss
board.
Upper Grate Slides
Are located on the left and right side of the grill
hood.
Warmer/Smoker Box
Attaches to the right side of the 2 Star grill body.
This feature is only available on the 2 Star General
model.
Warmer/Smoker Box Drip Pan
A stainless steel tray that sits inside the
Warmer/Smoker box under the grate.
Warmer/Smoker Box Grate
The stainless steel grate that sits inside the
Warmer/Smoker box. Can also be used as
additional cooking surface inside the barbecue
body.

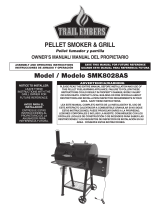
STEP 1: INSTALLING THE LEFT & RIGHT LEG PANELS
1-1 Unbox both the left and right leg panels---indicated by the “L” and “R”
on the side of the boxes.
1-2 Unbox the backsplash and base tray. Set the backsplash (the thin flat
rectangle) aside for later installation.
1-3 Lay the base tray on an even surface.
1-4 Set the left end of the bottom shelf on its end so that the shelf is in a
vertical position. Place the right leg panel onto the right end of the bottom
shelf as shown in illustration Step 1-4.
Note: The corner cut outs on the bottom shelf will line-up with the
rear caster supports.
1-5 With the bottom shelf in place, use (4)
four 1/4” x 1/2” screws and lock washers
placed on the screw before installation.
Start with the farthest left screw hole on
the outside of the leg panel.
1-6 Secure the leg panel to the bottom
shelf by attaching a 1/2” x 20 lock nut to
the screw on the inside of the leg panel.
Finger tighten each of the screws.
1-7 Repeat steps 1-5 & 6 with the other screw holes on the leg panel.
Once the screws and nuts are attached, tighten firmly using the 5/32 hex
wrench.
ASSEMBLY INSTRUCTIONS
NOTE: The assembly of your MAK 2 Star Grill requires (2) two people.
Before starting the assembly process, remove the outer cardboard sleeve
surrounding the grill. Flatten the sleeve and use it to place the grill body
on during leg panel assembly. Be sure to remove ALL parts and
components from the grill and pallet before starting the assembly
process. Place the components in an area that allows you to get to them,
but does not interfere with assembling the grill.
NOTE: Lock washers should always be placed on the screws before
installing.
9
Step 1-4
10
1-8 When you are finished attaching the right leg panel to the bottom
shelf, lay the right leg panel down on top of the cardboard surround and
attach the left leg panel by repeating steps 1-4 through 1-6. You have
now completed assembling the grill cart.
1-9 After attaching the leg panels to the bottom shelf, use one other
person to help you set the grill cart upright. Before continuing, LOCK ALL
FOUR CASTERS to prevent the cart assembly from moving when
attaching the grill body to the cart.
STEP 2: ATTACHING THE BACKSPLASH
2-1 Note: There are three screw holes and five larger holes for the leg
panel rivets. Please refer to illustration Step 2-1.
2-1 The backsplash can be attached to the grill leg panels only one way
allowing for the rivets to be seen. You may need to flip or rotate the panel
in order to correctly align the screw and
rivet holes for correct installation.
2-2 Take six 1/4”-20 x 1/2” screws and
place a 1/4” lock washer on each screw.
The nuts for the backsplash are welded to
the inside of the leg panels.
2-3 Thread each screw into the hole and
finger tighten.
NOTE: At this step the backsplash
should be loose on the grill cart. This is necessary to allow some
flexing when placing the grill body onto the cart assembly. You will
fully tighten the screws a little later on in the assembly process.
Step 2 - 1

11
STEP 3: ATTACHING THE GRILL BODY TO THE GRILL CART
NOTE: MAKE SURE THAT ALL (4) FOUR CASTERS ARE LOCKED
BEFORE STARTING THIS PART OF THE ASSEMBLY PROCESS.
3-1 Using one other person, lift the pellet hopper and grill body assembly
on to the cart and gently set it down on the leg panels on each side of the
cart.
3-2 Align each of the leg screw holes with the barbecue body.
3-3 Using eight 1/4” x 1/2” screws, (There are four per side) place a lock
washer on each screw.
3-4 Insert the screws and washers into the (2) two holes on the exterior of
the leg panels.
3-5 Inside the grill insert and finger tighten the other (2) two screws and
lock washers (illustration 3-6). Do this for all (4) four corners of the
barbecue body.
NOTE: You may need to shift the grill body or cart slightly to align
the screw holes.
3-6 From the inside of the grill, insert and finger tighten the other 2
screws/lock washers (illustration 3-6) Do this for all 4 corners of the
barbecue body.
NOTE: You may need to shift the grill body or leg base slightly to
allow all of the holes to line up with the leg panel holes.
3-7 Once ALL screws and nuts have been installed in the leg panels,
backsplash and grill body, complete attaching the barbecue body by fully
tightening all of the screws using the 9/64” hex wrench.
Step 3 - 6Step 3 - 4
12
Step 4-1 Step 4-2
STEP 4: INSTALL WARMER/SMOKER BOX
Step 4-1 With the assistance of one other person, tilt the Warmer/Smoker
box into position by resting the lip at the left side of the box over the
bracket on the barbecue body as shown in Step 4-1.
Step 4-2 Attach the Warmer/Smoker box to the barbecue body using five
1/4”-20 x 1/2” screws, ¼” lock washers and nuts. Feed the screws and
washers from the left inside of the Warmer/Smoker box into the barbecue
body. From the inside of the barbecue body, attach a 1/4” nut to each
screw. Use the 9/64”
hex wrench to fully
tighten the nuts and
screws to complete
this step.
STEP 5: INSTALLING
PELLET HOPPER,
WARMER/SMOKER
BOX AND GREASE DRAWER HANDLES
For each handle, you will need to use two #6 x 3/8” screws and #6x 3/8”
lock washers as shown in Step 5.
STEP 6: INSTALLING THE GRILL LID HANDLE
GRIP
To help slide the grip onto the handle soak it in hot,
soapy water for (30) thirty seconds. Use only a
couple of drops of dish soap in the half cup of water.
WARNING! This product contains a chemical
known to the state of California to cause cancer.
STEP 7: INSTALLING THE GRILL LID HANDLE
Attach this handle to the grill lid using two 1/4”- 20x
1/2” screws, 1/4” lock washers and 1/4”x 5/8” flat
washers. Make sure that both washers are on the
inside of the lid as shown in Step 7.
STEP 8: INSTALLING THE TOOL HOOK
Using three 1/4” - 20 x ½” screws, 1/4” x 5/8” flat
washers, and 1/4” x 20 lock nuts install the tool hook
on to the Warmer/Smoker box as shown in Step 8.
Step 5
Step 7
Step 8

STEP 9: INSTALLING WARMER/SMOKER
BOX COMPONENTS
Open the Warmer/Smoker box lid. Place the
Warmer/Smoker box grease tray inside the box
first. Next, add the Warmer/Smoker box grate so
that it fits inside the grease tray. Refer to
illustration Step 9 reference.
STEP 10: INSTALLING THE TRIANGULAR
GREASE SHIELD
Place the Triangular Grease Shield into place as
shown in illustration Step 10. Make sure that the
clip on the front of the grease shield is facing
towards the firepot, and that the clip overlaps the
grease shield flange. The top overlap lip also
needs to be over the top edges of the “V” shaped
flange. Refer to illustration in Step 10 for
reference.
STEP 11: INSTALLING THE ASH CLEAN OUT
COVER
Place the square ash clean out cover over the
square hole between the firepot and triangular
grease shield. Refer to illustration Step 11 for
reference.
STEP 12: INSTALLING THE 2 QUART
GREASE DRAWER
The (2) two quart grease drawer slides into the
slots under the Warmer/Smoker box on the right
hand side of the grill.
Step 10
Step 9
Step 11
13
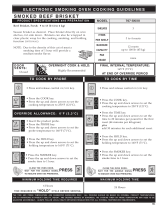
FLAMEZONE™ DIRECT GRILLING SYSTEM SET-UP
There are (5) five main components to the FlameZone™ direct grilling
system:
1)The Grease Tray (outer frame) sits inside the barbecue body on the lip
which runs around the entire perimeter of the cooking chamber. It
channels grease and dripping from the cooking chamber into the (2) two
quart grease drawer.
2) Heat Diffuser Lid fits
over the two Grease
Tray handles. It helps
to deflect the heat from
the firepot evenly
across the cooking
surface of the grill.
3) FlameZone™ Pan
sits on the raised lip of
the center of the
Grease Tray. When the
covers are removed it
channels intense,
searing heat under
what is placed on the
(2) two cooking grates.
4) The (2) two FlameZone™ covers fit horizontally over the ports on the
FlameZone™ pan. Leave them on when cooking indirectly (low 'n slow).
Remove for direct (hot 'n fast) cooking.
INSTALLING THE FLAMEZONE™ DIRECT GRILLING SYSTEM:
The Grease Tray sits on the lip which runs around the inside perimeter of
the cooking chamber. There is a slot on the right-hand side of the tray.
The lip below the slot fits over the top of the Triangular Grease Shield.
When properly installed, the Grease Tray will slope downwards to the
right side of the barbecue body so that grease and drippings run out of
the grill and into the two quart grease drawer located below the barbecue
body.
14
4
3
2
1

STEP 9: INSTALLING WARMER/SMOKER
BOX COMPONENTS
Open the Warmer/Smoker box lid. Place the
Warmer/Smoker box grease tray inside the box
first. Next, add the Warmer/Smoker box grate so
that it fits inside the grease tray. Refer to
illustration Step 9 reference.
STEP 10: INSTALLING THE TRIANGULAR
GREASE SHIELD
Place the Triangular Grease Shield into place as
shown in illustration Step 10. Make sure that the
clip on the front of the grease shield is facing
towards the firepot, and that the clip overlaps the
grease shield flange. The top overlap lip also
needs to be over the top edges of the “V” shaped
flange. Refer to illustration in Step 10 for
reference.
STEP 11: INSTALLING THE ASH CLEAN OUT
COVER
Place the square ash clean out cover over the
square hole between the firepot and triangular
grease shield. Refer to illustration Step 11 for
reference.
STEP 12: INSTALLING THE 2 QUART
GREASE DRAWER
The (2) two quart grease drawer slides into the
slots under the Warmer/Smoker box on the right
hand side of the grill.
Step 10
Step 9
Step 11
13
FLAMEZONE™ DIRECT GRILLING SYSTEM SET-UP
There are (5) five main components to the FlameZone™ direct grilling
system:
1)The Grease Tray (outer frame) sits inside the barbecue body on the lip
which runs around the entire perimeter of the cooking chamber. It
channels grease and dripping from the cooking chamber into the (2) two
quart grease drawer.
2) Heat Diffuser Lid fits
over the two Grease
Tray handles. It helps
to deflect the heat from
the firepot evenly
across the cooking
surface of the grill.
3) FlameZone™ Pan
sits on the raised lip of
the center of the
Grease Tray. When the
covers are removed it
channels intense,
searing heat under
what is placed on the
(2) two cooking grates.
4) The (2) two FlameZone™ covers fit horizontally over the ports on the
FlameZone™ pan. Leave them on when cooking indirectly (low 'n slow).
Remove for direct (hot 'n fast) cooking.
INSTALLING THE FLAMEZONE™ DIRECT GRILLING SYSTEM:
The Grease Tray sits on the lip which runs around the inside perimeter of
the cooking chamber. There is a slot on the right-hand side of the tray.
The lip below the slot fits over the top of the Triangular Grease Shield.
When properly installed, the Grease Tray will slope downwards to the
right side of the barbecue body so that grease and drippings run out of
the grill and into the two quart grease drawer located below the barbecue
body.
14
4
3
2
1

Once the Grease Tray is properly installed, you will want to put the
square Heat Diffuser in place by slipping it over the handles in the center
of the Grease Tray. Make sure that you are able to see the embossed
word TOP on the top of the Heat Diffuser.
Place the FlameZone™ pan over the raised lip in the center of the
Grease Tray. There is an “F” stamped on the front side of the
FlameZone® pan. Make sure that it is facing the front of the grill.
The FlameZone™ covers are placed horizontally over the front and back
ports of the FlameZone™ pan. There will be a blank peaked space
between the front and rear FlameZone™ pan covers.
When you want to cook hot 'n fast, remove one or both of the covers so
that intense, searing heat is channeled under what you are cooking. For
all other forms of cooking, (barbecuing, smoking, roasting, baking, etc.)
leave the covers in place.
15
START UP AND SEASONING PROCEDURES
Make sure each of the interior grill components (firepot, triangular grease
shield, ash clean out cover, FlameZone™ pan system and cooking grates)
are installed correctly and in proper position before proceeding!
Start Up Procedure:
1) Fill hopper with hardwood barbecue pellets. NEVER use fuel pellets.
2) Plug grill power cord into a grounded 110 electrical outlet or power
source.
3) Press the ON/OFF button once. The Pellet Boss® display will light up
and the fan will begin operating.
4) Press the STAR button in the center of the arrow buttons once. The
word SMOKE will begin to flash. Use the Up or Down button to adjust
the grill temperature to 450F.
5) Press the STAR button again to accept the grill temperature. Allow the
grill to run for (30) thirty minutes at 450F with all of the internal grill parts
inside the grill.
6) Once seasoned, you may adjust the SETPOINT temperature to any
desired temperature you want and begin cooking on your MAK Grill.
The first time you start your grill, it may take (10-20) ten to twenty minutes
before the pellets travel from the pellet hopper into the firepot. The grill may
begin to beep and display “Flame Out” on the Pellet Boss®. If this happens,
restart the seasoning process by first turning the grill off completely by
pressing the On/Off button. Then, press the On/Off button again to resume
the ignition sequence. You will also need to reset the grill temperature by
following steps (4 and 5) four and five listed above.
Shut Down Procedure:
Press and hold the ON/OFF button until the words COOL DOWN appear.
The Pellet Boss® will automatically go into cool-down mode and may run for
up to (20) twenty minutes before the grill completely shuts off.
NOTE: Always wait at least (20) twenty minutes after the grill has
completely shut down before placing a cover on the grill. Never place a
cover on a hot grill!
READ THIS BEFORE USING YOUR GRILL!
Warning: This unit will get extremely hot!
Only touch handles while operating this grill.
16

Changing Pellets:
To change the variety of pellets you are using, place a container under the
pellet hopper dump door.
1) Change pellets before starting the grill.
2) Turn the bezel on the pellet hopper dump door counter-clockwise until
you can pull the dump door open. Allow the pellets to flow into the
container below the pellet hopper dump. You may need to use your
hands to help push some of the pellets in the hopper through the door.
3) Once the hopper is empty, close the dump door and turn the bezel
clock-wise to secure it.
4) Fill the hopper with a new variety of pellets. Always be sure to use
fresh and dry barbecue pellets.
Cleaning Out Your Firepot:
For optimum performance, we strongly recommend emptying the firepot
after every 3-5 uses, or more often if you perform long-term “low 'n slow”
cooking sessions.
NOTE: Before emptying your firepot, make sure the grill is completely
cold.
To empty the firepot, remove the cooking grates, FlameZone™ pan and
heat diffuser. You should be able to look into the firepot. Reach down and
insert your finger into the split ring attached to the firepot securing pin. (The
pin is located on the left-hand side of the firepot.)
Pull the pin straight up and then slide the firepot to the right until it is free of
the auger and igniter tubes. Lift out of the grill.
Dump the pellet ash into a non-combustible container, then slide the firepot
back into place. Once the firepot is correctly positioned, re-secure it with the
firepot pin.
Cleaning The Grease Drawer:
The two quart grease drawer should be checked on a regular basis so that it
do es no t o ve rf lo w wit h g re as e or dri pp in gs or pellet a sh .
To empty: gently pull the drawer out from below the Warmer/Smoker box,
making sure you do not spill the contents.
We recommend inserting a disposable foil loaf pan inside the drawer. You
will need to bend the lip of the pan up and then push it into the drawer,
configuring it to the interior of the drawer. When the foil pan gets full, gently
remove it from the drawer and place it in an empty pellet bag. Secure the bag
with a twist-tie and dispose of it. Replace the old foil pan with a new one.
17 18
ON/OFF BUTTON
This button is on the left-hand
side of the Pellet Boss® control
faceplate. To turn the grill on or
off, press the button once.
STAR BUTTON
The STAR button is used to
activate different functions and
screens. It acts in the same
manner as the ENTER key on a
computer keyboard. Pressing the
STAR button selects or sets a
particular function or temperature.
Press the STAR button to
activate, change, or accept
changes made to any Pellet
Boss® function.
Example: To change the grill
SETPOINT temperature, press
the STAR button. (The
temperature on the display screen
will flash). Use the UP or DOWN
buttons to select your desired
cooking temperature. When the
temperature you want is
displayed, push the STAR button
once to lock in that temperature. The temperature will stop flashing.
ARROW BUTTONS
There are four arrow buttons: LEFT, RIGHT, UP and DOWN. Use the
LEFT or RIGHT buttons to scroll through screens. The UP and DOWN
buttons adjust settings up or down.
Example: You want to set a PROBE alarm for 150F. Press the RIGHT
button to advance the screen to PROBE 1. Now press the STAR button.
Under the word ALARM, the word OFF will flash. Press the UP button
until you reach 150F. Now press the STAR button to accept that meat
probe alarm temperature setting.
®
PELLET BOSS
OPERATING INSTRUCTIONS
/