Page is loading ...

Drinking Water Systems
R
everse
O
smosis
Installation
Manual

Reverse Osmosis Package Content
4-Stage Reverse Osmosis Assembly
Reverse Osmosis Membrane
Feed Water
Saddle Valve
Drain Saddle Valve
Faucet Package
Filter Housing Wrench
Drinking Water Storage Tank
Storage Tank
Shut-Off Ball Valve

SECTION I. INTRODUCTION
Congratulations, you have just purchased one of
the finest Reverse Os mo sis Drinking Water
Appliances avail able.
Like any other fine product, this ap pli ance requires
periodic maintenance in accordance with the sched-
ule outlined below.
Recommended Filter Change Schedule*
1 - Pre-filter, 10", 5 Micron 6 Months
2 - Granulated Activated Carbon 6 Months
Post-filter
3 - Reverse Osmosis Membrane 24 - 36 Months
4 - Pre-Carbon Filter For Chlorine 6 Months
Removal
5 - Inline Carbon Adsorbtion Filter 6 Months
*Based on standard conditions.
Your new Reverse Osmosis (R.O.) Drinking Wa ter
sys tem uses a combination of filtration tech nol o gies
to reduce unwanted contaminants in a water sup ply.
The following steps combine to give you the best in
clear sparkling drinking water:
MECHANICAL FILTRATION - The sediment pre-fil-
ter will remove the larger particles such as silt, rust
and scale. Its 5 micron (equal to 0.0002 inch) nomi-
nal rating helps to give maximum life to the R.O.
Mem brane and carbon filter.
ACTIVATED CARBON PRE FILTER(S) - The activat-
ed carbon in a pre-filter will remove any chlorine
that may be present in the feed water.
This pre-
treatment is also necessary for membrane pro tec -
tion in chlorinated water.
REVERSE OSMOSIS MEMBRANE - The R.O. Mem -
brane is the heart of the filtration system. It is
designed to reduce the dissolved mineral content of the
water. Minerals picked up in the environment by the
water are measured as Total Dissolved Solids (T.D.S.).
In the Reverse Osmosis process, dissolved min er als
are sep a rat ed from the incoming water (Feed Wa ter) to
pro duce the product water (the Permeate). The excess
minerals are rinsed to drain (the Reject Water). The
spiral wound construction of the R.O. Membrane
pro vides max i mum surface area for water
production and is less sus cep ti ble to fouling by par -
tic u late matter, turbidity and col loi dal materials.
ACTIVATED CARBON POST FILTER - The Ac ti vat ed
Carbon Post Filter cartridge contains carbon parti-
cles with a vast network of pores. The tre men dous
surface area of these pores (typically 800-1200
square meters per gram of carbon) gives the carbon
very good ad sorp tive sites for chlorine as well as
other substances that contribute to tastes and
odors. The product water from the membrane as
well as the holding tank passes through the
Activated Carbon Post filter on the way to the
Dispensing Faucet. The Activated Carbon Post
Filter reduces tastes and odors that may pass
through the system. It adds a final “polish” to the
water.
INLINE CARBON ADSORPTION FIL TER - This slow
flow carbon filter is designed to reduce certain
organic compounds and chloramines.
AUTOMATIC SHUT-OFF VALVE - The A.S.O.
Valve sens es when the product water tank is full
and clos es the feed water supply to prevent excess
reject water from going to drain when the unit is not
pro duc ing water.
SECTION II: PREPARATION
A. Major System Components
The following components comprise the R.O. Drink -
ing Water System
1. A Reverse Osmosis assembly consisting of the
white alu mi num bracket, filter hous ings,
automatic shut-off, mem brane module and an
in-line carbon filter.
2. A drinking water holding tank.
3. A faucet kit.
4. A plastic tubing kit with self-piercing saddle
valve and drain clamp.
5. Other items necessary for installation may
include wood screws or ma chine screws for
mounting the R.O. assembly, or concrete an -
chors for hang ing on base ment wall,
additional tubing or tube con nec tors, plastic
wire ties for or ga niz ing tubing.
Note:
For systems equipped with Quick Connect fit-
tings, see last page.

B. Tools Recommended for In stal la tion
The following tools will cover most of the in stal la -
tion sites encountered:
• 3/8" variable speed electric drill.
• Extension work light with outlet.
• Safety Glasses.
• 1-1/4" porcelain hole cutter kit.
• 1-1/4" Greenlee hole punch and 1/8" and 1/2"
metal drill bits for pilot hole.
• Center punch and hammer.
• 1-1/4" wood bit.
• Assorted wood and metal drill bits including
7/32" metal drill bit.
• Phillips head and flat blade screwdrivers.
• 1/2", 9/16" and 5/8" open end wrench.
• 10" Crescent wrench with jaws taped to hold
faucet.
• Teflon tape.
• Wide masking tape or duct tape.
• Plastic tubing cutter.
• Extra plastic tubing.
• Low range air pressure gauge.
• Bicycle hand air pump.
• Small bottle of liquid chlorine bleach.
C. Determine System Location
The R.O. system can be located under a sink or in a
basement depending on space availability and the
cus tom er’s preference. If a basement installation is
se lect ed, additional tubing, hardware and fittings
may be needed and a hole will have to be made from
in side the cabinet, through the floor, to the basement.
Nev er install in an area of the home where tem per a -
ture is freezing as damage to the system will result.
Considerations for an ice maker or other remote
hook up should be determined, including rout ing and
any ad di tion al tools, fittings, and tub ing that may
be re quired.
1. Faucet - The faucet should be placed near the
sink where drinking water is normally
obtained. Con ve nience of use (filling of water
pitchers and glass es), and an open area
beneath the faucet under the sink for attaching
product tubing are considerations.
A 2" di am e ter flat surface is re quired above
and be low the mounting site. The thick ness of
the mount ing surface should not exceed 1-1/4".
Watch for strengthening web bing on the un der -
side of cast iron sinks.
2. Drinking Water Holding Tank - The hold ing
tank may be placed where it is convenient
within 10 feet of the faucet, under the sink or
in an adjacent cabinet are best choic es. If a
longer run of tubing is required, the tubing
should be the 1/2" di am e ter O.D. size to pre -
vent a high pres sure drop. Re mem ber, these
tanks can weigh up to 30 pounds when full of
water , a firm, level area is required.
3. R.O Assembly - The R.O. Assembly may be
mount ed on either the right or left side of the
under-sink area or a cabinet. Mounting in the
basement is also an option, one possible loca-
tion is near the laundry /utility sink where cold
potable water and drain access is handy. The
mounting location should allow adequate clear -
ance and ac ces si bil i ty for car tridge changes.
4. Feed Water Connection - The self-pierc ing feed
water shut off valve should be located as close
to the R.O. as sem bly as possible. USE A
POTABLE COLD WA TER SUPPLY ONLY.
Softened water is pre ferred as it will ex tend
the life of the R.O. Mem brane.
5. Drain Connection - The drain saddle assembly
is designed to fit around a standard 1-1/2" OD
drain pipe. The drain saddle should always be
installed above (before) the trap and on the
vertical or hor i zon tal tail piece. Never install
the drain saddle close to the outlet of a garbage
disposal or plug ging of the RO drain line may
occur. If discharging into an util i ty sink or
standpipe, an air gap of greater than 1" above
the flood rim must be pro vid ed. Do NOT con-
nect the system drain line to the dishwasher
drain or near the garbage disposal.
D. Prepare The Area For Installation
To save time it is often advised to call the customer
and request they clear under the sink prior to
arrival. Oth er wise, remove supplies from under the
sink and stack them neatly away from the work ing
area. Ar range a light for the work area, if necessary.
If a basement installation is called for, de ter mine
where components will be located and how they will
be mounted. Special mounting brack ets and
hardware may be nec es sary to secure the system to
a wall or ceiling joists.
Inspect cold water supply line and drain to de ter -
mine if any special fittings, in addition to what is
included in the kit, are required.

E. Prepare The Appliance For
Installation
Open shipping carton and remove com po nents.
Check that all installation parts are present which
includes the purification assembly, storage tank,
fau cet, installation hard ware and tubing.
Check that the air supply in the empty tank is ap -
prox i mate ly 7 psi. Adjust if necessary.
SECTION III: INSTALLATION STEPS
All plumbing should be done in accordance with
state and local plumbing codes.
NOTE: Some codes may require installation by a
licensed plumber; check with the local plumbing
au thor i ty prior to installation.
In restricted under-sink areas, it may be easier to
install the faucet first. Allow adequate tubing
lengths for any final component position.
A. Install The Faucet
See Figure 1 for Faucet Installation Diagram
The customer should be consulted before de ter min -
ing faucet location. The faucet should be po si tioned
so that it empties into the sink and the spout
swivels freely for con ve nience.
If the sink already has a hole provided that can ac -
com mo date the RO faucet, then no drilling is re -
quired and you can proceed to the section on mount-
ing the faucet.
1. Make The Faucet Mounting Hole
IMPORTANT: It is mandatory that safety glass es
be worn during sink hole drilling operations to pre -
vent eye injury.
Before starting the hole making operation, always
check below the sink so that nothing interferes with
mount ing the faucet such as reinforcing ribs,
support brack ets or cabinet construction.
STAINLESS STEEL SINK:
Recommended tools:
• Center punch
• Variable speed drill and high speed drill bits.
• Greenlee chassis punch 7/8" hole size (alternate
9/16" size may be used for non air gap faucet)
• Protective gloves
Procedure:
a) Center punch a small indent at the desired
faucet lo ca tion.
b) Slowly drill the required pilot hole for the
chassis punch.
c) Set up the chassis punch per in struc tions and
tighten nut to cut the desired hole size.
d) Clean up sharp edges with a file if necessary.
PORCELAIN/ENAMEL/CERAMIC ON SHEET
MET AL OR CAST IRON BASE:
Recommended tools:
• Variable speed drill
• Relton porcelain cutter tool set 7/8" size (al ter -
nate 9/16: size may be used for air gap or non
air gap faucet)
• Plumber’s putty
It is important to understand what is in volved in
this procedure. First, the glassy layer of porcelain
must be penetrated through to the base metal.
Second, a center disc of porcelain must be re moved
while pro tect ing the sur round ing porcelain against
chip ping or fracturing. Third, the base metal must
be drilled through to com plete the hole.
Procedure:
a) Mark the center for the 7/8" hole
b) Form shallow putty dam around hole area
and fill with enough water to lubricate carbide
drill bit.
c) Carefully drill pilot hole through por ce -
lain/enam el and base metal using carbide type
pilot drill.
Faucet
Rubber washer
Chrome base plate
Rubber washer
Sink/countertop
Plastic washer
Star washer
Hex nut
Compression nut
Plastic ferrule
Plastic tubing insert
1/4" white tubing
FIGURE 1

IMPORTANT: Always operate drill with light
pres sure at slow speed (300-400 rpm).
d) Insert pilot tip of spring-loaded por ce lain
cutter into pilot hole.
e) Drill porcelain/enamel using spring-load ed
por ce lain cutter, making certain a com plete
ring has been cut through the por ce -
lain/enamel to the metal base.
f) Change to the metal cutter. With slow speed
and light pressure, cut away the inner por ce -
lain/enam el disc down to base metal. Make
certain that the cutter does not touch out er
rim of the cut porcelain/enamel. Con tin ue with
this bit to cut through metal until sink has
been completely pen e trat ed.
IMPORTANT: When using a porcelain cutter it
is critical to take precautions that it is always in
a sharp ened condition. Dull cutters are known to
chip sinks.
2. Mount The Faucet:
a) Familiarize yourself with all com po nents
shown in the faucet diagram.
b) Disassemble hardware from the threaded
nipple, except for chrome base plate and rub-
ber washer.
NOTE: Rubber washer may be replaced withbead
of plumber’s putty for neater ap pear ance.
c) Connect length of standard 1/4" tub ing to
faucet. Push on firmly until it seats.
d) Feed the threaded nip ple through sink/counter
mounting hole and orient the faucet as dis-
cussed with the customer.
e) From below sink/counter assemble the black
plastic washer, star washer and hex nut on
threaded nip ple and tighten by hand.
f) After rechecking faucet orientation, tighten hex
nut (9/16" wrench or deep socket) until faucet
feels secure.
g) From above the sink make any minor ori en ta -
tion cor rec tions by turning the faucet with a
padded adjustable wrench.
Note: Flats on chrome faucet may be used for
tight en ing with an adjustable wrench. Use care
not to mar chrome finish.
B. Install the Feed Water Valve and
Tub ing
The saddle tapping valve supplied is de signed for
use with 3/8" to 1/2" OD soft copper supply tubing
(plain or chromed), rigid metal pipe, or CPVC plas-
tic pipe. Do not use with flexible ribbed supply tub-
ing which has too thin a wall thickness and requires
special hard ware.
Saddle Valve Installation
SOFT COPPER TUBING INSTALLATIONS:
1) Turn off cold water valve under the sink, or
main valve for the house.
2) Before installing saddle tapping valve, make
sure pierc ing lance does not protrude be yond
rubber gasket.
3) Assemble saddle tapping valve on copper tub-
ing. Tighten clamp.
4) To pierce soft copper tube, turn handle clock -
wise until it is firmly seated. The valve is
closed in this position.
5) Turn on main supply valve to pressurize cold
water line. Check for leaks. With a wrench
snug nut/seal around valve stem.
NOTE: For basement installations the existing
feed water tubing may have to be longer to reach
feed valve.
6) Connect one end of the tubing to the feed
water valve using brass compression nut and
plas tic sleeve.
RIGID METAL PIPE AND CPVC PLASTIC
PIPE INSTALLATIONS:
1) Turn off cold water supply valve and drain the
line to prevent spillage.
2) Drill 3/16" hole at the desired location. To pre-
vent shock hazard, use a battery op er at ed
drill.
PHOTO 1

3) Before installing saddle tapping valve, make
sure pierc ing lance does not protrude be yond
rubber gasket.
4) Assemble saddle tapping valve on copper tubing.
5) Turn saddle valve handle clockwise to close
valve. With a wrench tighten nut/seal around
valve stem.
6) When you wish to open valve and supply
cold water to the unit, turn valve handle
coun ter clock wise.
7) Connect one end of the tubing to the feed
water valve using brass compression nut
and plas tic sleeve.
NOTE: For basement installations the existing
feed water tubing may have to be longer to reach
feed valve.
C. Prefill and Sanitize the Storage Tank
Prefilling the tank is always rec om mend ed so there
is pressure to check for leaks and several gallons of
water to flush carbon post filter. Tanks are fur -
nished with a special disinfectant and only re quire
filling with water for 15 min utes to be com plete ly
sanitized. It is im por tant to use a sanitizer when
prefilling tank so the solution can sanitize the
tubing, fit tings, and faucet at the time of installa-
tion and startup.
1) Insert free end of feed water tubing into the
fitting on the stor age tank.
2) Open feed water valve and tank valve and
allow tank to fill (about 3 minutes).
3) Turn off feed water valve, tank valve,
remove tank from tubing and set tank aside
(15 minutes minimum).
D. Install the Drain Connection
IMPORTANT: Before starting this pro ce dure, in -
spect the condition of the drain piping, especially
in older homes where the traps and tailpieces can
be deceptively thin and frail. If in poor condition,
it is wise to inform the customer that the condi-
tion should be remedied.
The drain saddle assembly is de signed to fit
around a standard 1-1/2" OD drain pipe.
The drain saddle should always be installed above
(before) the trap and on the vertical or horizontal
tailpiece. Never in stall the drain saddle close to the
outlet of a gar bage disposal or plugging of the RO
drain line may occur.
1) Peel adhesive covering from the back of foam
square gasket and line up with the hole in the
saddle drain and apply. This gasket provides a
leak proof seal on the drain stand pipe.
2) Position both halves of drain saddle at desired
lo ca tion on drain pipe.
3) Use bolts and nuts to clamp drain saddle onto
drain pipe. Do not over tight en and make sure
there is equal space between saddle halves on
each side.
4) Carefully drill hole through threaded fitting
of drain sadlle (as shown in Photo 2) being
careful not to drill through opposite side of
drain pipe.
5) Wrap teflon tape on thread of fitting, insert
drain tubing into compression nut and tighten
onto drain sad dle.
PHOTO 2
PHOTO 3

D. Install the R.O. Membrane
The RO Membrane has been shipped to you in a spe-
cial preservative. Unscrew the tubing from the end-
cap of the membrane housing. Then unscrew the
end cap from the membrane housing on the appli-
ance, insert the membrane as illustrated below. The
O-rings on the product water tube of the membrane
MUST FULLY SEAT in the membrane housing for
proper operation. Also make sure that the Brine
Seal on the membrane seals with no gaps or wrin-
kles inside the membrane housing. Once the mem-
brane is installed, replace the end cap and reconnect
the tubing.
To insure that all the special preservative is flushed
from the system before use, DO NOT use the first
two tankfuls of water produced by the system.
F. Make Initial Tubing Connections
It is advantageous to make some of the tubing con nec -
tions at this time, since the undersink work area is not
so cramped and access to the com po nents is easier.
G. Install the Purification Assembly and
Storage Assembly
The purification assembly is usually mounted to the
right or left sink cabinet sidewall, taking into con -
sid er ation the space available and the tank lo ca tion.
Generally, the tank is placed in the rear of the
cabinet while the pu ri fi ca tion assembly is posi-
tioned toward the front for cartridge ac ces si bil i ty.
To mount the purification assembly elevate at least
2" off the cabinet floor and, while keeping level,
mark the lo ca tion of the mounting holes on cabinet
sidewall. Make small pilot holes with an awl or drill
and screw in the two mounting screws, leaving just
enough pro trud ing to allow bracket mounting slots
to slide over them.
NOTE: If the cabinet sidewalls are not of solid
con struc tion, the purification assembly can be set
on the cabinet floor and held against the sidewall
with the mounting screws.
The tank may be oriented either vertically or hor i -
zon tal ly. It is generally placed to the rear of the cab-
inet but can be set in the front center (between the
sink basins) for ease of access if space permits.
H. Make Final Tubing Con nec tions
With all of the components in place, the final tubing
connections can be made. When routing tubing
between components, several guidelines should be
ob served.
• Tubing runs should generally follow the con-
tour of the cabinets rather than interfere with
the cab i net storage area.
• Strive for neatness and an orderly tubing “flow”
using fasteners (e.g. insulated staples) to secure
the tubing. Cut tubing to the desired length.
• Arrange the tubing so there are no sharp bends
and leave some “play” in the tubing for ease of
ser vic ing.
• Try to keep the tubing from the purification as -
sem bly to the tank and faucet as short as prac -
ti cal for good flow.
I. Install Ice Maker Hookup (optional)
Note: Check with refridgerator manufacturer for
compatibility with your refridgerator model.
The RO drinking water appliance can be con nect ed
to any standard refrigerator ice maker or ice
maker/water dispenser. It should never be
connected to a com mer cial type bar ice maker.
Hooking up an ice maker involves connecting a tee
with shut off valve into the faucet tubing and rout-
ing tubing over to the refrigerator.
Do not
hook-up
to existing copper tubing.
Before turning off the existing tap water sup ply to a
refrigerator ice maker, always shut off the ice maker
first (usually by lifting the lever arm above the bin
to the up per most position). The ice maker should
only be turned on again after the RO system has
been drained several times and the tank has a full
supply of water.
NOTE: Before any service is performed on the RO
system, always turn off ice maker valve and the ice
maker unit. Only turn on when system is operat-
ing and tank is full.
J. Start Up the System
1) Double check that all connections are secure.
2) Turn on feed water valve and check for leaks.
If any leaks are noted, turn off valve and
correct before pro ceed ing.
3) Turn on storage tank valve and open faucet
until a steady stream of water flows. Close
faucet, wait at least 5 minutes and carefully
check for leaks. Cor rect as nec es sary.

K. Flush System of Preservative and
Check Operation.
1) Lift faucet handle and allow tank to drain
com plete ly of sanitizing solution. Do Not Use
This Water. When tank is empty, the faucet
will steadi ly drip. This is the rate water is
processed by the RO system.
2) With faucet handle in “up” position, measure the
rate of the steady drip from spout. Use a grad u -
at ed cylinder (in milliliters) and watch with a
second hand to calculate approximate
production in gallons per day (mil li li ters per
minute X 0.38 = gpd). Proceed to check reject
flow rate by dis con nect ing tubing at drain con -
nec tion and measure as per above. The ratio
should be a minimum of 2.5 (reject) to 1 (prod-
uct).
3) Close faucet and re-inspect system for leaks.
In struct customer to wait at least 4 hours and
drain tank again. The water should be
discarded as it may contain some pre ser va -
tive/dis in fec tant solution.
4) System should be ready to use as soon as the
tank refills. If any objectionable taste is
noticed after second tank draining, instruct
customer to wait and drain tank the following
day. Only at this time should an ice maker be
turned on if one is con nect ed to the system.
SECTION IV: OPERATION & MAINTENANCE
A. Normal Operation
1. It is normal for the Total Dissolved Solids
(T.D.S.) of the water to be higher than normal
during the first 5 gallons of operation, this is
due to the sanitizing solution and the new Post
Filter. After this water is rinsed to drain, the
removal rate should stabilize at a value
greater than 75%. Water pressure affects the
production rate and quality.
2. R.O. systems produce drinking water at rel a -
tive ly slow rates, it can take up to 8 hours or
more to fill the holding tank. Normal opera-
tion is to let the Holding Tank fill with water
and then draw water as is needed. When the
pressure in the Holding Tank falls to a given
pressure( as the water is being used) the
Automatic Shut Off Valve (A.S.O. Valve) will
start wa ter production and the system will
refill the Holding Tank. When the Holding
Tank is full and no water is being used, the
A.S.O. Valve will automatically shut off the
feed water to con serve water.
The more water that is used (up to the capacity of
the system) the better the R.O. system will function.
Utilize other uses for the water, such as flowers,
pets and rinsing glassware.
After periods of non-use, such as a week’s va ca tion,
it is better to empty the holding tank and allow the
system to produce fresh water for use. If the system
is not used for 3-4 weeks or longer, it is a good idea
to re sanitize the system and to change the
Activated Car bon and Sed i ment Filters.
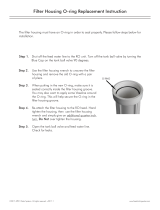
B. Changing Filters
NOTE: THIS R.O. SYSTEM CONTAINS
FILTERS WHICH MUST BE REPLACED
AT REGULAR IN TER VALS TO MAIN TAIN
PROPER PERFORMANCE. USE ONLY
FAC TO RY AP PROVED FILTERS
.
Please see Page 1 for the recommended in ter val for
changing the filters. Local conditions may dictate
more frequent changes.
Use a drip pan to catch any water that may spill
when the Filter Housing are removed.
1) Close the Saddle Tapping Valve by turning
fully clock wise and open the Dispensing
Faucet by lifting the handle. Allow the
Holding Tank to empty.
2) Loosen and remove the appropriate Filter
Hous ing. Discard the cartridge(s).
3) Wash the inside of the Housing(s) using a mild
de ter gent and a soft cloth. Do not use abra-
sive cleaners or pads. Thoroughly rinse all
soap from the housing before reassembly.
4) To sanitize the system and replace the filter
cartridge(s):
NOTE: The system should be sanitized before
installing the Ac ti vat ed Carbon Post Filter
Cartridge.
a) Use a good quality unscented 5-1/4% liquid
bleach such as Clorox.
b) Add one cap full of bleach (this is 2 tsp. or 10
ml) to the Sediment Filter Housing. Install
the Sed i ment Prefilter only. Check the
Housing O-ring for proper position in its
groove, replace Sediment Filter Housing on
R.O. assembly.
c) If your R.O. system has a Pre Carbon Filter
Hous ing, add one cap full of bleach. Care ful ly
fill the housing with tap water and temporarily
install the housing, without the Activated
Carbon Pre Filter.

d) Add one cap full of bleach to the Activated
Carbon Post Filter Housing. Carefully fill the
housing with tap water and temporarily install
the hous ing, without the Ac ti vat ed Carbon
Post Filter.
e) The Dispensing Faucet should be open, slowly
open the Saddle Tapping Valve on the Feed
Water Line.
f) As soon as water begins to drip out of the Dis -
pens ing Faucet, close the Faucet.
g) Let the system stand for 15 minutes.
h) At the end of 15 minutes, in the following
order, close the Saddle Tapping Valve, close
the Hold ing Tank Valve and open the
Dispensing Faucet to release the pressure.
i) Remove the Post Carbon Filter Housing and
emp ty (Repeat procedure if your system has a
Pre Carbon Filter Housing). Remove any
wrapping/pack ag ing from carbon cartridge (s)
and install in hous ings. Check the O-ring to
insure that it is po si tioned properly in its
groove and replace Housing(s) on R.O. unit.
j) Disconnect the yellow product water tubing
that runs from the Holding Tank. Put 50 drops
of bleach (this is 1/2 tsp. or 3 ml) into the tub-
ing and reconnect it.
k) Slowly open the Saddle Tapping Valve. When
water begins dripping out of the Dispensing
Fau cet, in the following order, close the Faucet
and then open the Holding Tank Valve.
l) Do not open the Faucet for at least 8 hours.
m) Discard the first two full tanks of water pro-
duced, they will contain chlorine.
n) When the Faucet is first opened, expect air
and carbon fines (very fine black powder),
from the new carbon filter (s) to be rinsed out.
This is normal for the first tank of water.
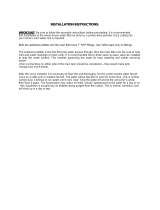
RESIDENTIAL REVERSE OSMOSIS SYSTEM DIAGRAM

Push tubing straight in as far
as it will go.
Collet
Tubing
1
Your new Reverse Osmosis Drinking Wa ter
Appliance may be outfitted with the new gen er a tion
of user-friend ly quick connect push-in fit tings. Prop -
er use of the fit tings is shown in the di a grams.
It is important that the tub ing se lect ed for use
with these con nec tors be of high qual i ty, exact size
and roundness, and with no surface nicks or
scratches. If it is necessary to cut the tubing, use a
plastic tubing cutter or sharp razor knife. Make a
clean, square cut.
An optional blue locking clip is installed in cer-
tain fittings to provide extra security. Remove this
clip first before trying to remove tubing by sliding
away from fitting.
Should a leak occur at a fitting, the cause is usually
defective tubing.
To fix: • Relieve pressure
• Release tubing
• Cut off at least 1/4" from end
• Reattach tubing
• Confirm connection is leak free
To Attach Tubing...For System Equipped with
Quick Connect Fittings...
Push in collet to release tubing.
To Release Tubing...
Push in collet to release tubing.
Optional Locking Clip...
Tubing is secured in position.
2

/