Page is loading ...

PLEASE READ AND SAVE THIS USE AND CARE BOOK.
POR FAVOR LEA ESTE INSTRUCTIVO ANTES DE USAR EL PRODUCTO.
VEUILLEZ LIRE ET CONSERVER CE GUIDE D’ENTRETIEN ET D’UTILISATION.
Digital 9-fin oil-filled
heater
Calentador de aceite
con 9 aletas y digital
Radiateur à l’huile,
à 9 ailettes et à
affichage numérique
Models/Modelos/Modèles
BDOH200 , BDOH200C
?
USA/Canada 1-800-231-9786
Mexico 01-800-714-2503
www.blackanddecker.com
Accessories/Parts
(USA/Canada) 1-800-738-0245
Accesorios/Partes
(EE.UU/Canadá)
Accessoires/Pièces (É.-U./Canada)
BDOH200.Pub179200RV2 5/18/05 9:11 AM Page 1

2
1
WARNING: To reduce the risk of fire:
❑
Keep combustible materials, such as furniture, pillows, bedding, papers,
clothes and curtains at least 3 feet (0.9m) from the front, sides and rear
of heater when the heater is plugged in.
❑
Do not place heater near a bed, because objects such as pillows or
blankets can fall off the bed and be ignited by heater.
❑
Always unplug from electrical outlet whenever heater is not in use.
❑
Avoid the use of an extension cord because it may overheat and cause a
risk of fire. However, if an extension cord must be used, it shall be of a
minimum size of 14 AWG and rated not less than 1875 watts.
CAUTION: Risk of fire - Do not operate without casters attached.
When using any electrical appliance, basic precautions should always be
followed to reduce the risk of fire, electrical shock, and injury to persons
including the following:
❑
Read all instructions before using heater.
❑
Heater is hot when in use. To avoid burns, do not let bare skin touch
hot surface. Unplug and let heater cool down for at least ten (10)
minutes before moving it. Use handles provided.
❑
Extreme caution is necessary when any heater is used by or near
children or invalids, and whenever heater is left operating and
unattended.
❑
Do not operate any heater with a damaged cord or plug or after it
malfunctions or is dropped or damaged in any manner. Return heater
to the nearest authorized service facility for examination, repair, or
electrical or mechanical adjustment. Or call appropriate toll-free
number listed on the cover of this manual.
❑
Do not use outdoors.
❑
Heater is not intended for use in wet or moist locations such as
bathrooms, laundry areas or similar indoor locations. Never locate
heater where it may fall into a bathtub or other water container.
❑
Do not run cord under carpeting. Do not cover cord with throw rugs,
runners, or similar coverings. Arrange cord away from traffic areas, and
where it will not be tripped over.
❑
To disconnect heater, press OFF button, then remove plug from outlet
by pulling the plug, not the cord.
❑
Do not insert or allow foreign objects to enter any ventilation or exhaust
opening, as this may cause an electric shock or fire, or damage the
heater.
IMPORTANT SAFETY
INSTRUCTIONS
SAVE THESE INSTRUCTIONS.
❑
A heater has hot and arcing or sparking parts inside. Do not use it in
areas where gasoline, paint or flammable liquids are used or stored.
❑
Use heater only as described in this manual. Any other use not
recommended by the manufacturer may cause fire, electric shock or
injury to persons.
❑
Avoid using heater when sleeping.
❑
To prevent a possible fire, do not block air intakes or exhaust in any
manner. Do not use on soft surface, like bed, where openings may
become blocked.
POLARIZED PLUG
This appliance has a polarized plug (one blade is wider than the other). To reduce the
risk of electric shock, this plug will fit into a polarized outlet only one way. If the plug
does not fit fully in the outlet, reverse the plug. If it still does not fit, contact a
qualified electrician. Do not attempt to modify the plug in any way.
TAMPER-RESISTANT SCREW
This unit is equipped with tamper-resistant screws. To reduce the risk of shock, do not
attempt to remove the front or back housing. There are no user serviceable parts
inside. Repair should be done only by authorized service personnel.
SPECIAL ATTENTION:
The use of an extension cord is not recommended. However, if it is absolutely
necessary, be sure that the cord is (1) No. 14 AWG minimum size and rated no
less than 1875 watts; (2) UL Listed; (3) as short as possible (long cords can
overheat, as well as trip circuit breakers); (4) not used for operating more than one
appliance at a time.
Note: If the power supply cord is damaged, it must be replaced by the
manufacturer or its service agent or a similarly qualified person in order to
avoid a hazard.
BDOH200.Pub179200RV2 5/18/05 9:11 AM Page 2

How to Use
This appliance is intended for household use only.
Important: For warranty verification, please do not remove line cord sticker.
Note: This heater is packed with two caster assemblies that must be installed between the
radiator fins at each end of base pipe to make unit portable and operable. Do not use
heater in any other orientation other than upright as shown in this manual.
To assemble:
1. Be sure heater is unplugged and off.
2. Keep cord out of way by winding it around cord wrap.
3. Turn heater upside down and place the two metal U-shaped screws over base pipe,
between the radiator fins on either end of heater, so the screw threads extend beyond
the pipe.
4. Position assembly bracket so the two slots on the bracket line up with the two screws
on end of heater.
5. Set each assembly bracket over threaded end of each U-shaped screw and fasten them
securely in place with wing nuts (A).
6. Set heater right side up.
The Advanced Safety Technology™ (AST) system features unique technology built into your
heater that offers protection detailed in the "Special Features" section.
Important: Portable electric heaters are designed for space heating or as a supplementary
heat source. They are not intended to be a main source of heat. Do not use heater as an
integral part of any life support or equipment protection system, where a functional failure
or misapplication of heater could jeopardize the people or things being protected. Do not
touch or attempt to move heater when it is plugged in.
Always unplug and allow heater to cool before handling. Never pull unit by cord — use
handle. During the first few minutes of initial use, you may notice a slight odor. This is
normal and will quickly disappear.
Use heater only on floor. It radiates heat in all directions. Always leave ample space
around it so it’s not too close to a wall.
1. You don't have to set the clock before using heater. Plug heater into a standard AC
outlet.
Caution: Be sure that no other appliances are plugged into same circuit with heater as a
circuit overload could occur.
2. Press ON/OFF button to activate heater. The red lights by POWER and TEMP SETTING
buttons will turn on (B).
3. Press POWER button to select appropriate setting: LO for a small (approx. 10’x10’/3m
x 3m), MED for a medium (approx. 12’x12’/3.8m x 3.8m), or HI for a large room
(approx. 12’x 16’/3.8m x 5m).
4. Press TEMP SETTING button to MAX. Once desired room temperature is achieved,
lower temperature setting. Leave temperature control at this position since heater will
automatically cycle on and off to maintain your chosen room temperature.
5. This heater will continue to operate as long as one of the 3 red lights next to POWER
button is illuminated. Be sure to press ON/OFF button to turn heater off when finished.
Note: Oil in unit is permanently sealed. You do not need to refill it.
To set clock for current time of day:
1. Plug heater in. The digital clock will flash 12:00 AM until correct time is set.
2. Press FUNCTION button until clock light and hour LED start flashing.
3. Set hour by pressing down ( ) or up ( ) arrow buttons. (If setting for PM time, make
sure PM light is on.) Press FUNCTION button again to set. The minute LED will start
flashing.
4
3
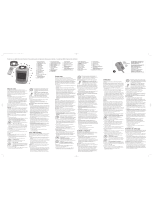
Product may vary slightly from what is illustrated.
1. Fins
†2. Casters (Part #178451-00)
†3. Assembly Bracket (Part #178453-00)
4. Cord Wrap
5. Vents
6. Handle
7. Digital control panel
†8.Wing Nuts (Part #178452-00)
†9. U-Shaped Screw (Part #178454-00)
10. Base Pipe
† Consumer replaceable
A
Digital Display
Function button
Temperature button
On/Off button
Power button
Timer I
Clock
Timer II
B
BDOH200.Pub179200RV2 5/18/05 9:11 AM Page 4

4. Set minutes by pressing the down ( ) or up ( ) arrow buttons. Press FUNCTION
button again to set.
Note: If heater is unplugged at any time, clock must be reset.
To set timer:
This heater has two automatic timers that enable it to turn on and off automatically during
two time periods within 24 hours. You may set one or both timers depending on your
preference. Once set, heater will operate only at the times chosen.
To set TIMER I/ TIMER II:
1. Press ON/OFF button to turn heater on. The red lights by the POWER and TEMP
SETTING buttons will turn on.
2. Press FUNCTION button (several times if needed) until both TIMER I or Timer II (if
desired) and ON TIME lights start flashing.
3. Set hour and minutes by pressing down ( ) or up ( ) arrow buttons. Then press
FUNCTION button again to set.
4. Press FUNCTION button until both TIMER I or Timer II (if desired) and OFF TIME lights
start flashing.
5. Set hour by pressing the down ( ) or up ( ) arrow buttons until the hour is
displayed. Then press FUNCTION button again. The minute LED will start flashing. Set
minutes by pressing the down ( ) or up ( ) arrow buttons until minutes are
displayed. Press FUNCTION button again to set.
Once one or both timers are set, heater will cycle on and off continuously at the times you
set until the timers are turned off, or power is turned off. When a timer is set, the green
timer light will remain on. Then, as heater turns on during the set ON TIME chosen, the
green light will turn red, indicating heater is on. The light will revert back to green when
heater turns off after it reaches the set OFF TIME.
To turn off the timers:
You can turn off either or both timers.
To turn off Timer I, set ON TIME and OFF TIME to 00:00.
To turn off Timer II, set ON TIME and OFF TIME to 00:00.
Special features and the (AST) Advanced Safety Technology™ system
1. This unit has a safety thermostat. If unit experiences excessive heat, thermostat will shut
off unit. If this happens turn power off immediately. Be sure that the fins are not blocked
and nothing is restricting heater. Let it cool down, and wait 10 minutes before plugging
it back in to operate. If unit fails to operate after 10 minutes, it may mean that heater
has internal damage and will need service or replacement.
2. A built-in tip-over switch will cut power if unit is accidentally knocked over with fins
down in either direction. To reset, stand heater upright and wait a few seconds for
it to begin operating again.
Care and Cleaning
This product contains no user serviceable parts. Refer service to qualified service
personnel.
1. Be sure heat control is in OFF position before unplugging. Always unplug heater and
allow it to cool thoroughly before attempting to clean.
2. Remove accumulated dust from heater surfaces with a soft cloth. You may use a cloth or
sponge moistened with a mild detergent and water. Dry heater casing thoroughly with a
soft, dry cloth before operating again. Do not immerse heater in water.
3. Coil the cord around the cord wrap at side of unit and store heater in a dry area.
6
5
INSTRUCCIONES IMPORTANTES
DE SEGURIDAD
ADVERTENCIA: Para reducir el riesgo de incendio:
❑
A fin de reducir el riesgo de incendio, cuando el calentador se
encuentre enchufado, mantenga todo material combustible incluyendo
los muebles, las almohadas, la ropa de cama, ropa, cortinas y papeles
por lo menos a 0,9 m (3 pies) de distancia del frente, de los costados
y de la parte trasera del calentador.
❑
No coloque el calentador cerca de las camas; las almohadas o las
cobijas podrían caerse de la cama e incendiarse al entrar en contacto
con el calentador.
❑
Siempre desconecte el calentador de la toma de corriente cuando éste
no se encuentre en funcionamiento.
❑
Evite el uso de un cable de extensión porque éste se puede
sobrecalentar y ocasionar el riesgo de un incendio. Si no tiene otra
alternativa, utilice un cable de extensión con capacidad mínima de
14 AWG y de calificación no menor de 1875 watts.
PRECAUCIÓN: Riesgo de incendio - No utilice este aparato sin antes
haber instalado los rodillos.
A fin de reducir el riesgo de un incendio, choque eléctrico o lesiones a las
personas, cuando se utilizan aparatos eléctricos, siempre se debe respetar
ciertas medidas de seguridad incluyendo las siguientes:
❑
Por favor lea todas las instrucciones antes de utilizar este calentador.
❑
El calentador permanece caliente mientras está en funcionamiento. A fin
de evitar quemaduras, no permita que la piel entre en contacto con las
superficies calientes. Desconecte y espere que el calentador se enfríe
por lo menos diez (10) minutos antes de transportarlo de un lugar a
otro. Utilice los mangos provistos.
❑
Se debe de tener mucho cuidado cuando un calentador se utiliza por
o en la presencia de los menores de edad o de las personas
minusválidas. No desatienda el aparato mientras éste se encuentre en
funcionamiento.
❑
No utilice ningún calentador si el cable o el enchufe presentan
cualquier desperfecto, si el aparato no funciona bien, si lo ha dejado
caer o dañado. Devuelva el calentador a un centro de servicio
autorizado para que lo examinen, reparen o arreglen. También puede
llamar gratis al número apropiado que aparece en la cubierta de este
manual.
❑
No utilice este aparato a la intemperie.
❑
Este calentador no ha sido diseñado para uso en los baños, en los
cuartos de lavandería ni en las áreas interiores semejantes. Jamás
coloque el calentador donde pueda caer adentro de una bañera u otro
recipiente con agua.
BDOH200.Pub179200RV2 5/18/05 9:11 AM Page 6

18
17
2. Un interrupteur en cas de renversement intégré coupe le courant lorsque l’appareil
bascule par inadvertance avec les ailettes vers le bas. Pour le remettre en marche, il
suffit de remettre le radiateur en place et d’attendre quelques secondes.
Entretien et nettoyage
L’utilisateur ne peut entretenir aucune composante du produit. En confier l’entretien à du
personnel qualifié.
1. S’assurer que le réglage est à la position hors tension (OFF) avant de débrancher
l’appareil. Toujours débrancher l’appareil et le laisser complètement refroidir avant de le
nettoyer.
2. Utiliser un chiffon doux pour elever la poussière accumulée sur le radiateur. On peut
utiliser un chiffon ou une éponge humide avec un détergent doux et de l’eau. Assécher
complètement le boîtier du radiateur avec un chiffon doux et sec avant d’utiliser
l’appareil. Ne pas immerger l’appareil.
3. Se servir de l'enrouleur sur le côté de l’appareil pour fixer le cordon puis ranger le
radiateur dans un endroit sec.
NEED HELP?
For service, repair or any questions regarding your appliance, call the appropriate
"800" number on the cover of this book. Do not return the product to the place of
purchase. Do not mail the product back to the manufacturer nor bring it to a
service center. You may also want to consult the website listed on the cover of this
manual.
One-Year Limited Warranty
(Applies only in the United States and Canada)
What does it cover?
• Any defect in material or workmanship; provided; however, Applica’s liability will
not exceed the purchase price of the product.
For how long?
• One year after the date of original purchase.
What will we do to help you?
• Provide you with a reasonably similar replacement product that is either new or
factory refurbished.
How do you get service?
• Save your receipt as proof of the date of sale.
• Check our on-line service site at www.prodprotect.com/applica, or call our toll-
free number, 1-800-231-9786, for general warranty service.
• If you need parts or accessories, please call 1-800-738-0245.
What does your warranty not cover?
• Damage from commercial use
• Damage from misuse, abuse or neglect
• Products that have been modified in any way
• Products used or serviced outside the country of purchase
• Glass parts and other accessory items that are packed with the unit
• Shipping and handling costs associated with the replacement of the unit
• Consequential or incidental damages (Please note, however, that some states do
not allow the exclusion or limitation of consequential or incidental damages, so
this limitation may not apply to you.)
How does state law relate to this warranty?
• This warranty gives you specific legal rights, and you may also have other rights
that vary from state to state or province to province.
BDOH200.Pub179200RV2 5/18/05 9:11 AM Page 18

Copyright © 2002-2005 Applica Consumer Products, Inc.
Pub. No. 179200-00-RV02
Made in People’s Republic of China
Printed in People’s Republic of China
Importado por:
Applica de México S. de R.L. de C.V.
Blvd. Manuel Avila Camacho 2900 Int. 902
Los Pirules, Tlalnepantla,
Edo. Mex.
C.P. 54040
México
Teléfono: (55) 1106-1400
Del interior marque sin costo
01 (800) 714-2499
Fabricado en la República Popular de China
Impreso en la República Popular de China
Fabriqué en République populaire de Chine
Imprimé en République populaire de Chine
is a trademark of The Black & Decker Corporation,
Towson, Maryland, USA
Marca registrada de The Black & Decker Corporation, Towson, Maryland, E.U.
Marque de commerce déposée de la société The Black & Decker Corporation, Towson, Maryland, É.-U.
R22003/2-17-60E/S/F
1500 W 120 V 60Hz
BDOH200.Pub179200RV2 5/18/05 9:11 AM Page 24
/