HQ Power VDP250SC8M2 Datasheet
- Category
- Stroboscopes & disco lights
- Type
- Datasheet
Page is loading ...

08.01.201
1. In
t
To all r
e
Import
a
If in do
u
Thank y
o
service.
I
VDP250
S
2. Sa
f
• Dama
g
the d
e
• A qual
• Do no
t
the d
e
• This d
e
qualifi
e
• Conne
conta
c
• Make
s
manu
a
• Do no
t
neces
s
• Disco
n
plug o
• Clean
• If ext
e
power
• Make
s
includ
i
• Never
• There
norm
a
• Do no
t
• Note t
• Keep
t
0
t
roduction
e
sidents of th
e
a
nt environme
This symbol
o
could harm t
h
waste; it sho
u
returned to y
rules.
u
bt, contact y
o
o
u for choosing
H
I
f the device wa
s
S
C8M2 should
c
f
ety Instru
c
Risk of
e
electros
h
Indoor
Keep th
e
liquids.
Do not t
o
Unplug
t
g
e caused by di
e
aler will not ac
c
ified technician
t
switch the de
v
e
vice against da
e
vice falls unde
e
d person carr
y
ct the device t
o
c
t with other ca
b
s
ure that the a
v
a
l.
t
crimp the po
w
s
ary.
n
nect the devic
e
nly.
a dusty power
c
e
nsion cords ar
e
cord apply to
e
s
ure no liquid o
i
ng the power c
o
leave a power
e
may be some
s
a
l and any smo
k
t
look directly a
hat damage ca
u
t
he device awa
y
e
European Un
ntal informati
o
n the device o
r
h
e environment
u
ld be taken to
our distributor
o
o
ur local wast
e
H
QPower™! Ple
a
s
damaged in tr
a
c
ontain: 1 x 8-c
c
tions
e
lectroshock
d
h
ocks.
use only.
e
control unit a
n
o
uch the devic
e
t
he mains lead
b
sregard of cert
a
c
ept responsibil
i
should install
a
v
ice on immedi
a
mage by leavin
g
r protection cla
s
y
out the electri
c
o
the mains onl
y
b
les.
v
ailable voltage
w
er cord and pr
o
e
from the main
c
ord with a dry
e
used make su
r
e
xtension cords
.
r any object ca
n
o
rd. Failure to
d
e
d device unatt
e
s
moke or a part
i
k
e or smell will
g
t the light sour
c
u
sed by user m
o
y
from children
a
VDP250
S
2
USER M
A
ion
on about this
r
the package i
n
. Do not dispos
e
a specialized c
o
o
r to a local re
c
e
disposal au
t
a
se read the ma
a
nsit, don't inst
a
hannel scanner
,
d
uring install
a
n
d monitor awa
y
e
during operati
o
b
efore opening
t
a
in guidelines i
n
i
ty for any ens
u
a
nd service this
a
tely after it ha
s
g
it switched of
f
s
s I. It is there
f
c
connection.
y
when installat
i
does not exce
e
o
tect it against
d
s to clean it or
w
cloth.
r
e the core dia
m
.
n
enter the hou
s
d
o so may lead
e
nded.
i
cular smell wh
e
g
radually disap
p
c
e as sensitive
p
o
difications to t
a
nd unauthoriz
e
S
C8M2
A
NUAL
product
n
dicates that di
s
e
of the unit (o
r
o
mpany for rec
y
c
ycling service.
R
t
horities.
nual thoroughly
a
ll or use it and
,
1x IEC-approv
e
a
tion: touching
y
from rain, mo
o
n as the housi
n
t
he housing.
n
this manual is
u
ing defects or
p
device.
s
been exposed
f
until it has re
a
f
ore essential t
h
i
on is complete
.
e
d the voltage s
t
d
amage. Have
a
w
hen it is not i
n
m
eter is sufficie
n
s
ing or come in
to malfunction,
e
n the device is
p
ear.
p
eople may go
i
he device is no
t
e
d users.
s
posal of the de
r
batteries) as
u
y
cling.
T
his dev
i
R
espect the loc
a
before bringing
contact your de
e
d power cord a
live wires can
c
isture, splashin
n
g heats up.
not covered b
y
p
roblems.
to changes in t
a
ched room te
m
h
at the device b
.
Never let the
p
t
ated in the sp
e
a
n authorised d
e
n
use. Handle t
h
n
t. All warnings
contact with t
h
short-circuits
o
activated for t
h
i
nto epileptic s
e
t
covered by th
e
Re
v
©Vellem
a
vice after its lif
e
u
nsorted munici
i
ce should be
a
l environment
a
this device int
o
aler. The
nd this manual.
c
ause life-threa
t
g and dripping
y
the warranty
a
emperature. Pr
o
m
perature.
e earthed. Hav
e
p
ower cord co
m
e
cifications of t
h
e
aler replace it
h
e power cord
b
concerning th
e
h
e electric circui
o
r electroshock
s
h
e first time. T
h
e
izure if they do
e
warranty.
v
. 04
a
n nv
e
cycle
pal
a
l
o
t
ening
a
nd
o
tect
e
a
m
e in
h
is
if
b
y the
e
t,
s
.
h
is is
.

VDP250SC8M2 Rev. 04
08.01.2010 ©Velleman nv
3
3. General Guidelines
Refer to the Velleman
®
Service and Quality Warranty on the last pages of this manual.
• This device is designed for professional use on stage, in discos, theatres, etc. The VDP250SC8M2
should only be used indoors and connected to an alternating current of max. 230 VAC~50 Hz.
• Lighting effects are not designed for permanent operation: regular operation breaks will prolong their
lives.
• Do not shake the device. Avoid brute force when installing or operating the device.
• Select a location where the device is protected against extreme heat (see “Technical
Specifications”), dust and moisture. Respect a minimum distance of 0.5 m between the device’s light
output and any illuminated surface.
• Never operate the device where splashing or dripping water, rain, moisture or fog may harm the device.
Install the device 0.5m away from a smoke machine output nozzle.
• Do not operate the device during thunderstorms.
• Ensure sufficient ventilation by leaving 0.5 m of free space between the device and any other object.
• Use an appropriate safety cable to fix the device (e.g. VDLSC7 or VDLSC8).
• Familiarise yourself with the functions of the device before actually using it. Do not allow operation by
unqualified people. Any damage that may occur will most probably be due to unprofessional use of the
device.
• Use the original packaging if the device is to be transported.
• All modifications of the device are forbidden for safety reasons. Never remove the barcode.
• Only use the device for its intended purpose. All other uses may lead to short circuits, burns,
electroshocks, crash, etc. Using the device in an unauthorised way will void the warranty.
• The installation has to be approved by an expert before the device is taken into service.
4. Features
• 7 different dichroic colours filters + white
• rainbow effect with adjustable speed in both directions
• gobo wheel with 7 rotating gobos + open
• strobe effect with adjustable speed via shutter
• motorised focus
• 3-facet prism with adjustable speed rotating in both directions
• DMX-controlled, stand-alone or master/slave
• sound control via built-in microphone
• control panel with LCD and encoder
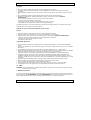
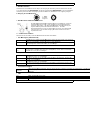
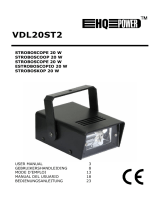
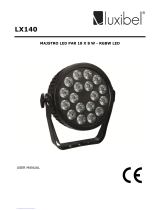
5. Overview
1. ventilation slots
2. fixation screw
3. mounting bracket
4. lens
5. mirror
6. housing
7. housing screw
8. DMX output
9. DMX input
10. power cord connection / fuse holder
11. LCD
12. control LEDs
13. encoder

VDP250SC8M2 Rev. 04
08.01.2010 ©Velleman nv
4
6. Installation
a) Lamps
• Only fit or replace a lamp when the device is unplugged from the mains.
• Let a lamp cool down before replacing it as the temperature of a lamp can reach 600°C during
operation.
• When handling a halogen lamp, do not touch it with your bare hands. Use a cloth to insert or remove
it.
• Do not install lamps with a higher wattage than what this device was designed for.
• Replace any deformed or damaged lamp with a lamp of the same type (see “Technical
Specifications”):
1. Unscrew the 4 housing screws at the rear. Remove the housing.
2. Unscrew the knurled screws of the lamp.
3. Gently remove the old lamp from its holder and insert a new one.
4. Retighten the knurled screws, replace the housing and tighten.
Remember the lamp is not a hot-restrike type. Please wait for approximately 10 minutes after having
switched off the device before turning it back on.
Remark: Do not use the device when the cover is open.
b) Fuse
• Only fit or replace a fuse when the device is unplugged from the mains.
• If the lamp burns out, chances are you will need to replace the fuse as well.
• Replace a blown fuse with a fuse of the same type and rating (see “Technical Specifications”):
1. Remove the fuse holder at the rear using an appropriate screwdriver.
2. Remove the old fuse and install a new one.
3. Replace the fuse holder.
c) Mounting the Device
• Have the device installed by a qualified person, respecting EN 60598-2-17 and all other applicable
norms.
• The carrying construction must be able to support 10 times the weight of the device for 1 hour without
deforming.
• The installation must always be secured with a secondary attachment e.g. a safety cable.
• Never stand directly below the device when it is being mounted, removed or serviced. Have a qualified
technician check the device once a year and once before you bring it into service.
• Install the device in a location with few passers-by that is inaccessible to unauthorised persons.
• Overhead mounting requires extensive experience: calculating workload limits, determining the
installation material to be used… Have the material and the device itself checked regularly. Do not
attempt to install the device yourself if you lack these qualifications as improper installation may result
in injuries.
• Adjust the desired inclination angle via the mounting bracket and tighten the bracket screws.
• Make sure there is no flammable material within a 0.5m radius of the device.
• Have a qualified electrician carry out the electric connection.
• Connect the device to the mains with the power plug. Do not connect it to a dimming pack.
• The installation has to be approved by an expert before the device is taken into service.
7. Use
REMARK: This device features an internal safety switch. This device will not switch on when the lamp is
missing, defect or too hot.
a. DMX512 Connection
Connect an XLR cable to the female 3-pin XLR output of your controller and the other side to the male 3-
pin XLR input of the VDP250SC8M2. Multiple VDP250SC8M2s can be linked through serial linking. The
linking cable should be a two-core screened cable with XLR input and output connectors.

08.01.201
b. Occu
p
c. DMX
5
d. Contr
o
Switch t
h
• No D
M
Sound
Auto
• DMX
a
Addr
001
• Pan/
t
Reverse
t
Reverse
t
Reverse
Reverse
• Chas
e
Chase
Speed00
• Contr
o
Red
Yellow
Green
0
p
ation of the
X
5
12 Chain wit
h
o
l Panel and
L
h
e device on an
d
M
X signal (2 r
u
Soun
d
enco
d
Auto
m
enco
d
a
ddress
To set
increa
to con
t
ilt reverse
t
ilt
Y
Reve
r
confi
r
t
ilt N
Nor
m
confi
r
pan
Y
Reve
r
to co
n
pan N
Nor
m
confi
r
e
speed
1
T
o
a
n
o
l LEDs
P
o
D
M
D
M
X
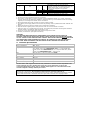
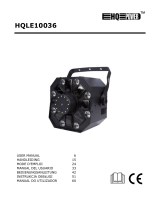
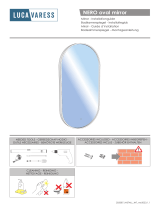
LR Connectio
n
h
Termination
A DMX term
i
to run a lon
g
The termina
t
noise. The
D
between pin
last device i
n
Please see il
L
CD Menu
d
off by connec
t
u
nning modes
d
-controlled mo
d
er and turn it i
n
m
atic program
m
d
er and turn it i
n
the DMX addr
e
se the value or
firm.
r
se tilt. Press t
h
r
m.
m
al tilt. Press th
e
r
m.
r
se pan. Press
t
n
firm.
m
al pan. Press t
h
r
m.
o
set the chase
s
n
ti-clockwise di
r
o
wer ON
M
X out (sound/
a
M
X in
VDP250
S
5
n
1. gro
u
2. sig
n
3. sign
a
i
nator is recom
m
g
distance or is
t
or prevents co
r
D
MX terminator
s 2 and 3, whic
n
the chain.
lustration.
t
ing it with the
)
de. To select th
n
an anti-clock
w
m
ode. To select
n
an anti-clock
w
e
ss, press the e
n
in an anti-cloc
k
h
e encoder and
e
encoder and t
t
he encoder an
d
h
e encoder and
s
peed, press th
r
ection to decre
a
a
uto mode)
S
C8M2
u
nd
n
al -
a
l +
m
ended for ins
t
in an electricall
y
r
ruption of the
d
is simply an XL
h is then plugg
e
mains using th
e
is function, dis
c
w
ise direction.
P
this function, d
w
ise direction.
P
n
coder and tur
n
k
wise direction
t
turn it in an an
t
urn it in a cloc
k
d
turn it in an a
n
turn it in a cloc
e encoder and
t
a
se the value (
s
t
allations where
y
noisy environ
d
igital control s
R plug with a 1
2
e
d into the XLR
e
power plug.
c
onnect the DM
X
P
ress again to c
o
isconnect the
D
P
ress again to c
o
n
it in a clockwi
s
t
o decrease the
t
i-clockwise dir
e
k
wise direction.
n
ti-clockwise di
r
kwise direction
.
t
urn it in a cloc
k
s
lower). Press a
Re
v
©Vellem
a
the DMX cable
ment (e.g. disc
o
i
gnal by electri
c
2
0Ω resistor
output socket
o
X
signal, press
t
o
nfirm.
D
MX signal, pre
s
o
nfirm.
s
e direction to
value. Press a
g
e
ction. Press ag
Press again to
r
ection. Press a
g
.
Press again to
k
wise direction
t
gain to confirm
v
. 04
a
n nv
has
o
s).
c
al
o
f the
t
he
s
s the
g
ain
ain to
g
ain
t
o increase the
.
value (faster)
o
o
r in an

VDP250SC8M2 Rev. 04
08.01.2010 ©Velleman nv
6
e. Stand-Alone Mode
In stand-alone mode, your VDP250SC8M2 can be used without controller. The scanner is equipped with
a built-in microphone which allows a sound-controlled operation. Select the “Master mode” to use this
function.
f. Master/Slave Mode
This operation mode allows all slave devices to operate synchronously with the master device. Connect
the DMX out of one device to the DMX in of the next using a cable with XLR jacks. Set the master device
to “No DMX sound” or “No DMX auto”. Set the address of all slave devices to 1.
g. DMX Mode
All DMX-controlled devices need a digital start address so that the correct device responds to the signals.
This start address is the channel number from which the device starts to “listen” to the DMX controller.
Enter the correct number and read it from the display located on the base of the VDP250SC8M2.
You can use the same starting address for a whole group of devices or enter an individual one for every
device. When all devices have the same address, all the VDP250SC8M2s will “listen” to the control
signal on one particular channel. In other words: changing the settings of one channel will affect all
devices simultaneously. If you set different addresses, each device will “listen” to a separate channel
number. Changing the settings of one channel will only affect the device in question.
In the case of the 8-channel VDP250SC8M2, you will have to set the start address of the first
VDP250SC8M2 to 1, the second VDP250SC8M2 to 9 (1 + 8), the third to 17 (9 + 8) and so on.
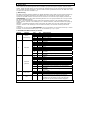
h. Detailed DMX Values per Channel
Channel Function From To Description
1 Shutter, strobe
0 128 Gradual dimmer adjustment from 0 to 100%
129 133 No function (shutter open)
134 243 Random strobe effect with decreasing speed
244 249 Shutter closed
250 255 Shutter open
2 Colour wheel
0 15 White
16 31 Magenta
32 47 Yellow
45 63 Orange
64 79 Green
80 95 Red
96 111 Blue
112 127 Violet
128 191 Forwards rainbow effect with increasing speed
192 255 Backwards rainbow effect with increasing speed
3
Rotating gobo
wheel
0 15 Open
16 31 Gobo 1
32 47 Gobo 2
48 63 Gobo 3
64 9 Gobo 4
80 95 Gobo 5
96 111 Gobo 6
112 127 Gobo 7
128 191 Forwards gobo change with increasing speed
192 255 Backwards gobo change with increasing speed
4 Gobo rotation
0 15 No rotation
16 135 Forwards gobo rotation with increasing speed
136 255 Backwards gobo rotation with increasing speed
5 Pan - -
Push slider in order to move the mirror
horizontally. Gradual mirror adjustment from
one of slider to the other (0-255, 128-center).
Mirror can be stopped at any position.

VDP250SC8M2 Rev. 04
08.01.2010 ©Velleman nv
7
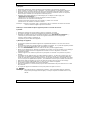
6 Tilt - -
Push slider in order to move the mirror
vertically. Gradual mirror adjustment from one
of slider to the other (0-255, 128-center).
Mirror can be stopped at any position.
7 Prism rotation
0 63 No function
64 159 Forwards rotation with increasing speed
160 255 Backwards rotation with increasing speed
8 Focus 0 255 Continuous adjustment for near to fa
r
8. Maintenance
1. All screws should be tightened and free of corrosion.
2. The housing, visible parts, mounting supports and the installation location (e.g. ceiling, suspension,
trussing) should not be deformed, modified or tampered with e.g. do not drill extra holes in mounting
supports, do not change the location of the connections.
3. Moving mechanic parts must not show any signs of wear and tear.
4. The electric power supply cables must not show any damage. Have a qualified technician maintain the
device.
5. Disconnect the device from the mains prior to maintenance activities.
6. Wipe the device regularly with a moist, lint-free cloth. Do not use alcohol or solvents.
7. Clean the mirror on a weekly basis; the interior, the cooling fans, the filters and the gobos should be
cleaned monthly. Lubricate the gobo wheel twice a year.
8. There are no user-serviceable parts apart from the lamp and the fuse.
9. Contact your dealer for spare parts if necessary.
WARNING
THIS FIXTURE NEEDS PERIODICAL MAINTENANCE. DUST INSIDE THE UNIT MUST BE
REMOVED. VENTILATION HOLES MUST BE KEPT CLEAN. REPLACE THE LAMP BEFORE
ITS END
OF LIFE. CONSULT LAMP MANUFACTURER. INSPECT ABOVE POINTS BEFORE EACH OPERATION.
NOT RESPECTING THESE WARNINGS MAY RESULT IN OVERHEAT OR FIRE AND WARRANTY
WILL VOID. READ THE MANUAL FOR ADDITIONAL SAFETY INFORMATION BEFORE USE.
9. Technical Specifications
power supply max. 230 VAC~50 Hz
power consumption max. 350 W
lamp 1 x Philips MSD 250 W, 6700K (order code LAMP250MSD), 1 x Philips MSD
250, 8500K (order code LAMP250MSD/2PH), 1 x Xenpow MSD 250,
8000K (order code LAMP250MSD/2) or 1 x Sylvania MSD 250, 8500K
(order code LAMP250MSD/2SYL) – lamp not incl.
fuse 5 A, 250 VAC (5 x 20 mm) (order code FF5N)
dimensions 535 x 295 x 180 mm
total weight 13.95 kg
max. humidity 50% RH
operation temperature -5°C ~ +45°C
max. ambient temperature 45°C
Use this device with original accessories only. Velleman nv cannot be held responsible in the
event of damage or injury resulted from (incorrect) use of this device. For more info
concerning this product, please visit our website www.hqpower.eu. The information in this
manual is subject to change without prior notice.
© COPYRIGHT NOTICE
This manual is copyrighted. The copyright to this manual is owned by Velleman nv.
All worldwide rights reserved. No part of this manual may be copied, reproduced, translated or reduced
to any electronic medium or otherwise without the prior written consent of the copyright holder.
Page is loading ...
Page is loading ...
Page is loading ...
Page is loading ...
Page is loading ...
Page is loading ...
Page is loading ...
Page is loading ...
Page is loading ...
Page is loading ...
Page is loading ...
Page is loading ...
Page is loading ...
Page is loading ...
Page is loading ...
Page is loading ...
Page is loading ...
Page is loading ...
Page is loading ...
Page is loading ...
Page is loading ...
Page is loading ...
Page is loading ...
Page is loading ...

Velleman® Service and Quality Warranty
Velleman® has over 35 years of experience in the electronics world
and distributes its products in more than 85 countries.
All our products fulfil strict quality requirements and legal
stipulations in the EU. In order to ensure the quality, our products
regularly go through an extra quality check, both by an internal
quality department and by specialized external organisations. If, all
precautionary measures notwithstanding, problems should occur,
please make appeal to our warranty (see guarantee conditions).
General Warranty Conditions Concerning Consumer Products
(for EU):
• All consumer products are subject to a 24-month warranty on
production flaws and defective material as from the original date of
purchase.
• Velleman® can decide to replace an article with an equivalent
article, or to refund the retail value totally or partially when the
complaint is valid and a free repair or replacement of the article is
impossible, or if the expenses are out of proportion.
You will be delivered a replacing article or a refund at the value of
100% of the purchase price in case of a flaw occurred in the first
year after the date of purchase and delivery, or a replacing article at
50% of the purchase price or a refund at the value of 50% of the
retail value in case of a flaw occurred in the second year after the
date of purchase and delivery.
• Not covered by warranty:
- all direct or indirect damage caused after delivery to the article
(e.g. by oxidation, shocks, falls, dust, dirt, humidity...), and by the
article, as well as its contents (e.g. data loss), compensation for loss
of profits;
- frequently replaced consumable goods, parts or accessories such as
batteries, lamps, rubber parts, drive belts... (unlimited list);
- flaws resulting from fire, water damage, lightning, accident, natural
disaster, etc. …;
- flaws caused deliberately, negligently or resulting from improper
handling, negligent maintenance, abusive use or use contrary to the
manufacturer’s instructions;
- damage caused by a commercial, professional or collective use of
the article (the warranty validity will be reduced to six (6) months
when the article is used professionally);
- damage resulting from an inappropriate packing and shipping of
the article;
- all damage caused by modification, repair or alteration performed
by a third party without written permission by Velleman®.
• Articles to be repaired must be delivered to your Velleman®
dealer, solidly packed (preferably in the original packaging), and be
completed with the original receipt of purchase and a clear flaw
description.
• Hint: In order to save on cost and time, please reread the manual
and check if the flaw is caused by obvious causes prior to presenting
the article for repair. Note that returning a non-defective article can
also involve handling costs.
• Repairs occurring after warranty expiration are subject to shipping
costs.
• The above conditions are without prejudice to all commercial
warranties.
The above enumeration is subject to modification according
to the article (see article’s manual).
Velleman® service- en kwaliteitsgarantie
Velleman® heeft ruim 35 jaar ervaring in de elektronicawereld en
verdeelt in meer dan 85 landen.
Al onze producten beantwoorden aan strikte kwaliteitseisen en aan
de wettelijke bepalingen geldig in de EU. Om de kwaliteit te
waarborgen,
ondergaan onze producten op regelmatige tijdstippen een extra
kwaliteitscontrole, zowel door onze eigen kwaliteitsafdeling als door
externe gespecialiseerde organisaties. Mocht er ondanks deze
voorzorgen toch een probleem optreden, dan kunt u steeds een
beroep doen op onze waarborg (zie waarborgvoorwaarden).
Algemene waarborgvoorwaarden consumentengoederen
(voor Europese Unie):
• Op alle consumentengoederen geldt een garantieperiode van 24
maanden op productie- en materiaalfouten en dit vanaf de
oorspronkelijke aankoopdatum.
• Indien de klacht gegrond is en een gratis reparatie of vervanging
van een artikel onmogelijk is of indien de kosten hiervoor buiten
verhouding zijn, kan Velleman® beslissen het desbetreffende artikel
te vervangen door een gelijkwaardig artikel of de aankoopsom van
het artikel gedeeltelijk of volledig terug te betalen. In dat geval krijgt
u een vervangend product of terugbetaling ter waarde van 100% van
de aankoopsom bij ontdekking van een gebrek tot één jaar na
aankoop en levering, of een vervangend product tegen 50% van de
kostprijs of terugbetaling van 50 % bij ontdekking na één jaar tot 2
jaar.
• Valt niet onder waarborg:
- alle rechtstreekse of onrechtstreekse schade na de levering
veroorzaakt aan het toestel (bv. door oxidatie, schokken, val, stof,
vuil, vocht...), en door het toestel, alsook zijn inhoud (bv. verlies van
data), vergoeding voor eventuele winstderving.
- verbruiksgoederen, onderdelen of hulpstukken die regelmatig
dienen te worden vervangen, zoals bv. batterijen, lampen, rubberen
onderdelen, aandrijfriemen... (onbeperkte lijst).
- defecten ten gevolge van brand, waterschade, bliksem, ongevallen,
natuurrampen, enz.
- defecten veroorzaakt door opzet, nalatigheid of door een
onoordeelkundige behandeling, slecht onderhoud of abnormaal
gebruik of gebruik van het toestel strijdig met de voorschriften van
de fabrikant.
- schade ten gevolge van een commercieel, professioneel of collectief
gebruik van het apparaat (bij professioneel gebruik wordt de
garantieperiode herleid tot 6 maand).
- schade veroorzaakt door onvoldoende bescherming bij transport
van het apparaat.
- alle schade door wijzigingen, reparaties of modificaties uitgevoerd
door derden zonder toestemming van Velleman®.
• Toestellen dienen ter reparatie aangeboden te worden bij uw
Velleman®-verdeler. Het toestel dient vergezeld te zijn van het
oorspronkelijke aankoopbewijs. Zorg voor een degelijke verpakking
(bij voorkeur de originele verpakking) en voeg een duidelijke
foutomschrijving bij.
• Tip: alvorens het toestel voor reparatie aan te bieden, kijk nog
eens na of er geen voor de hand liggende reden is waarom het
toestel niet naar behoren werkt (zie handleiding). Op deze wijze kunt
u kosten en tijd besparen. Denk eraan dat er ook voor niet-defecte
toestellen een kost voor controle aangerekend kan worden.
• Bij reparaties buiten de waarborgperiode zullen transportkosten
aangerekend worden.
• Elke commerciële garantie laat deze rechten onverminderd.
Bovenstaande opsomming kan eventueel aangepast worden
naargelang de aard van het product (zie handleiding van het
betreffende product).
Garantie de service et de qualité Velleman®
Velleman® jouit d’une expérience de plus de 35 ans dans le monde
de l’électronique avec une distribution dans plus de 85 pays.
Tous nos produits répondent à des exigences de qualité rigoureuses
et à des dispositions légales en vigueur dans l’UE. Afin de garantir la
qualité, nous soumettons régulièrement nos produits à des contrôles
de qualité supplémentaires, tant par notre propre service qualité que
par un service qualité externe. Dans le cas improbable d’un défaut
malgré toutes les précautions, il est possible d’invoquer notre
garantie (voir les conditions de garantie).
Conditions générales concernant la garantie sur les produits
grand public (pour l’UE) :
• tout produit grand public est garanti 24 mois contre tout vice de
production ou de matériaux à dater du jour d’acquisition effective ;
• si la plainte est justifiée et que la réparation ou le remplacement
d’un article est jugé impossible, ou lorsque les coûts s’avèrent
disproportionnés, Velleman® s’autorise à remplacer ledit article par
un article équivalent ou à rembourser la totalité ou une partie du prix
d’achat. Le cas échéant, il vous sera consenti un article de
remplacement ou le remboursement complet du prix d’achat lors
d’un défaut dans un délai de 1 an après l’achat et la livraison, ou un
article de remplacement moyennant 50% du prix d’achat ou le
remboursement de 50% du prix d’achat lors d’un défaut après 1 à 2
ans.
• sont par conséquent exclus :
- tout dommage direct ou indirect survenu à l’article après livraison
(p.ex. dommage lié à l’oxydation, choc, chute, poussière, sable,
impureté…) et provoqué par l’appareil, ainsi que son contenu (p.ex.
perte de données) et une indemnisation éventuelle pour perte de
revenus ;
- tout bien de consommation ou accessoire, ou pièce qui nécessite un
remplacement régulier comme p.ex. piles, ampoules, pièces en
caoutchouc, courroies… (liste illimitée) ;
- tout dommage qui résulte d’un incendie, de la foudre, d’un
accident, d’une catastrophe naturelle, etc. ;
- out dommage provoqué par une négligence, volontaire ou non, une
utilisation ou un entretien incorrects, ou une utilisation de l’appareil
contraire aux prescriptions du fabricant ;
- tout dommage à cause d’une utilisation commerciale,
professionnelle ou collective de l’appareil (la période de garantie sera
réduite à 6 mois lors d’une utilisation professionnelle) ;
Page is loading ...
-
 1
1
-
 2
2
-
 3
3
-
 4
4
-
 5
5
-
 6
6
-
 7
7
-
 8
8
-
 9
9
-
 10
10
-
 11
11
-
 12
12
-
 13
13
-
 14
14
-
 15
15
-
 16
16
-
 17
17
-
 18
18
-
 19
19
-
 20
20
-
 21
21
-
 22
22
-
 23
23
-
 24
24
-
 25
25
-
 26
26
-
 27
27
-
 28
28
-
 29
29
-
 30
30
-
 31
31
-
 32
32
-
 33
33


HQ Power VDP250SC8M2 Datasheet
- Category
- Stroboscopes & disco lights
- Type
- Datasheet
Ask a question and I''ll find the answer in the document
Finding information in a document is now easier with AI
in other languages
- français: HQ Power VDP250SC8M2 Fiche technique
- español: HQ Power VDP250SC8M2 Ficha de datos
- Deutsch: HQ Power VDP250SC8M2 Datenblatt
- Nederlands: HQ Power VDP250SC8M2 Data papier
Related papers
-
 HQ Power VDP250MGD2 User manual
-
HQ Power VDL20UV User manual
-
 HQ Power VDPL2201MHW10 User manual
-
HQ Power Ellison Specification
-
 HQ Power VDL20ST2 User manual
-
 HQ Power HQLE10036 User manual
-
HQ Power VDLL300CB User manual
-
 HQ Power VDL100MLDN User manual
-
 HQ Power AERON 575 I User manual
-
 HQ Power VDP250MHS16 User manual


Other documents
-
Velleman HQ POWER VDP250ML User manual
-
 Luxibel LX114 User manual
-
 Luxibel LXLP10106 User manual
-
 Luxibel LX140 User manual
-
HQ-Power HQLP10014 User manual
-
Velleman VDL4DL Datasheet
-
Velleman PS2 2403 User manual
-
 Luca Varess 202087 Installation guide
-
 Balmani 64973 Installation guide
-
 Luca Varess 202006 Installation guide


