König HA-INDUC-11N Owner's manual
- Category
- Hobs
- Type
- Owner's manual
This manual is also suitable for

HA-INDUC-
11N/12N/21N
MANUAL (p. 2)
ANLEITUNG (S. 7)
MODE D’EMPLOI (p. 12)
GEBRUIKSAANWIJZING (p. 17)
MANUALE (p. 22)
MANUAL DE USO (p. 27)
MANUAL (p. 32)
HASZNÁLATI ÚTMUTATÓ (o. 37)
KÄYTTÖOHJE (s. 42)
BRUKSANVISNING (s. 47)
NÁVOD K POUŽITÍ (s. 52)
MANUAL DE UTILIZARE (p. 57)
ΕΓΧΕΙΡΙΔΙΟ XPHΣHΣ (σελ. 62)
BRUGERVEJLEDNING (s. 67)
VEILEDNING (s. 72)
ИНСТРУКЦИЯ (77 стр.)
KILAVUZ (s. 82)
KASUTUSJUHEND (lk. 87)
NÁVOD (s. 92)
ROKASGRĀMATA (lpp. 97)
NAUDOJIMO VADOVAS (102 p.)
PRIRUČNIK (str. 107)
РЪКОВОДСТВО (p. 112)
INSTRUKCJA OBSŁUGI (str. 117)
PRIROČNIK (str. 122)
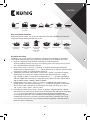
Induction Cooker

2
ENGLISH
Important!
Please read the following instructions carefully before using the induction cooker.
1) Do not plug the power cable in with wet hands.
2) Do not plug into a socket where other appliances are already plugged in.
3) Do not use if the plug cord is damaged or the power plug does not t the socket safely.
4) Do not modify the parts or repair the cooker by yourself.
5) Do not use the cooker near ames or in wet places.
6) Do not use where children can easily touch the cooker and do not allow children to use it
by themselves.
7) Do not place the cooker on an unstable surface.
8) Do not move the cooker when there are pots and pans on it.
9) Do not heat or overheat an empty pan.
10) Do not place metallic objects such as knives, forks, spoons, lids, cans and aluminium foil
on the top plate.
11) Use the cooker with sucient space around it. Keep the front, right and left sides of the
cooker clear.
12) Do not use the cooker on carpets, tablecloths (vinyl) or any other low-heat resistant
items.
13) Do not place a sheet of paper between a pan and the cooker. The paper is a source of
ignition.
14) If the surface is cracked, do not use the cooker.
15) Do not block the air intake or exhaust vent.
16) Do not touch the top plate immediately after removing a pot or pan, as the top plate will
still be very hot.
17) Do not place the cooker close to objects which are aected by magnets, such as radios,
televisions, automatic-banking cards and cassette tapes.
18) The power cord must be replaced by qualied technicians.
How to clean
1) Disconnect the induction cooker and wait until it has cooled down completely. Clean
after use.
2) If the pots/pans are used without being cleaned, discoloration or burn stains may result.
3) Do not use benzene, thinner, scrubbing brushes or polishing powder to clean the
induction cooker.
4) Wipe clean using detergent and a damp cloth.
5) Use a vacuum cleaner to remove dirt from the air intake and exhaust vent.
6) Never pour water over the cooker (if water gets inside the cooker it will cause
malfunction).
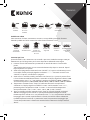
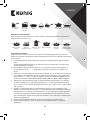
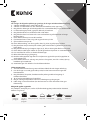
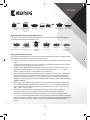
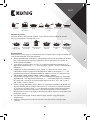
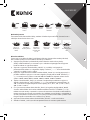
Suitable pans
Steel, cast iron, enamelled iron, stainless steel, at-bottom pans/pots with diameter between
12 and 26cm.

3
ENGLISH
Enamelled
iron pot
Iron or
enamelled
iron pot
Cast-iron
pan
Iron pot Deep-fry pan Stainless
steel pot
Iron plate
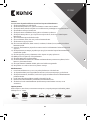
Unsuitable pans
Heat-resistant glass, ceramic containers, copper, aluminium pans/pots. Round-bottom pans/
pots measuring less than 12cm.
Rounded base
Pot
Aluminium/
Copper pot
Base measuring
less than 12cm
Pans with stand Ceramic pot Heat-resistant
glass pot
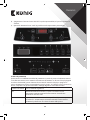
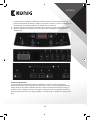
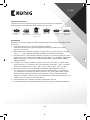
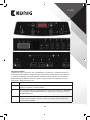
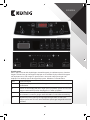
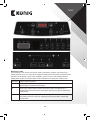
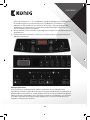
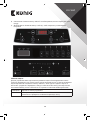
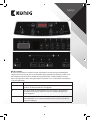
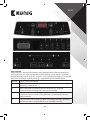
Operating Instructions
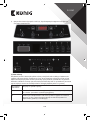
This cooker has 6 or 7buttons and a press control. See pictures below to determine which
diagram is suitable for your device. Operate as following:
1) Plug in the power cable and put a cooking utensil on the centre of the top plate.
All light indicators will be illuminated and you will hear a beep after 1second. After the
beep the device will be in the o mode.
2) ON/OFF: Press the “ON/OFF” (1) button, the induction cooker will go to standby mode
and the digital display will show “--------”. Touch the “ON/OFF” button again, and the
induction cooker will shut down.
3) Power: In standby mode, press the “Power” (2) button. The cooker will be ready for use.
The power indicator light will glow and the digital display will show 1600. You can press
the “+”, “-” button to adjust the working power from 300W to 2000W. There are 8 power
levels; 300W, 600W, 900W, 1200W, 1400W, 1600W, 1800W, and 2000W.
4) Temp: Press the “Temp” (3) button, the corresponding indicator light will glow and the
digital display will show “150”. By pressing the “+” “-” button, adjust the temperature
from 60°C to 240°C. The plate has 8 corresponding temperature levels; 60°C, 90°C,
120°C, 150°C, 180°C, 200°C, 220°C and 240°C.
5) Time: in working mode, press the “Timer” (4) button. The digital display will show “00:30”
and ash for 5seconds. During this period you can set the time. You can set the minutes
from 31-59minutes by pressing the “+/^” (5) button. The time set will ash for 5seconds
and then start working according to the time set. You can set the hours from 0 to 2hours
by pressing the button the time you set will ash 5seconds, then it will work according to
the time. The total time is “02:59”.
6) Turn o: Press “ON/OFF” in any mode and the cooker will stop heating.
7) Optional: Press the “Lock” (6) button to protect preinstalled settings from being changed.

4
ENGLISH
Protection system
This unit has 10 dierent protection modes. When the induction cooker shows a malfunction,
it will stop working and an alarm will sound. The digital display shows the fault code. Pressing
the ON/OFF button will clear the display and will turn o the cooker. Wait for 1 minute and
turn the cooker on again. If the display shows an error again, there is something wrong with
the cooker. The error details are listed below.
Showing Cause and handle method
EO The circuit has a malfunction. The cooker shows “EO” and automatically stops
working. Check and replace the motherboard.
E1 The pan is not suitable or there is not a pan on the plate. The cooker shows
“E1” and automatically stops working. Replace with a suitable pan in the
centre of the plate.
E2 IGBT (Insulated Gate Bipolar Transistor) overheats. The cooker will stop heating
after the buzzer has “beeped” 5times. Wait for the IGBT to cool before using.

5
ENGLISH
Showing Cause and handle method
E3 Voltage surge protection. When the input voltage is over 275V, the cooker will
stop working and show “E3”. It will work again when the voltage returns to the
145-275V range.
E4 Low voltage protection. When the input voltage has already dropped below
145V, the unit will stop working and show “E4”.
It will work again when the voltage returns to the 145-275V range.
E5 The sensor of the top plate was open or has short circuited.
The unit will stop working and show “E5”. Check all inner parts and replace if
necessary.
E6 The sensor of the IGBT was open or has short circuited. The cooker will stop
working and show “E6”. Check all inner parts and replace if necessary.
E7 The top plate has overheated and the cooker has stopped working. Allow to
cool.
Specications
HA-INDUC11N:
Power rate: 2000W
Voltage: 230V AC~50Hz
HA-INDUC12N:
Power rate: 2000W
Voltage: 230V AC~50Hz
HA-INDUC21N:
Power rate: 2 x 1700W
Voltage: 230V AC~50Hz

6
ENGLISH
CAUTION
RISK OF ELECTRIC SHOCK
DO NOT OPEN
Safety precautions:
To reduce risk of electric shock, this product should ONLY be opened by an authorized
technician when service is required.
Disconnect the product from mains and other equipment if a problem should occur.
Do not expose the product to water or moisture.
Maintenance:
Clean only with a dry cloth.
Do not use cleaning solvents or abrasives.
Warranty:
No guarantee or liability can be accepted for any changes and modications of the product or damage caused due to incorrect use
of this product.
General:
Designs and specications are subject to change without notice.
All logos brands and product names are trademarks or registered trademarks of their respective holders and are hereby recognized
as such.
Keep this manual and packaging for future reference.
Attention:
This product is marked with this symbol. It means that used electrical and electronic products should not be mixed with
general household waste. There is a separate collections system for these products.
This product has been manufactured and supplied in compliance with all relevant regulations and directives, valid for all member
states of the European Union. It also complies to all applicable specications and regulations in the country of sales.
Formal documentation is available upon request. This includes, but is not limited to: Declaration of Conformity (and product
identity), Material Safety Data Sheet, product test report.
Please contact our customer service desk for support:
via website: http://www.nedis.com/en-us/contact/contact-form.htm
via e-mail: [email protected]
via telephone: +31 (0)73-5993965 (during oce hours)
NEDIS B.V., De Tweeling 28, 5215 MC ’s-Hertogenbosch, THE NETHERLANDS
Page is loading ...
Page is loading ...
Page is loading ...
Page is loading ...
Page is loading ...
Page is loading ...
Page is loading ...
Page is loading ...
Page is loading ...
Page is loading ...
Page is loading ...
Page is loading ...
Page is loading ...
Page is loading ...
Page is loading ...
Page is loading ...
Page is loading ...
Page is loading ...
Page is loading ...
Page is loading ...
Page is loading ...
Page is loading ...
Page is loading ...
Page is loading ...
Page is loading ...
Page is loading ...
Page is loading ...
Page is loading ...
Page is loading ...
Page is loading ...
Page is loading ...
Page is loading ...
Page is loading ...
Page is loading ...
Page is loading ...
Page is loading ...
Page is loading ...
Page is loading ...
Page is loading ...
Page is loading ...
Page is loading ...
Page is loading ...
Page is loading ...
Page is loading ...
Page is loading ...
Page is loading ...
Page is loading ...
Page is loading ...
Page is loading ...
Page is loading ...
Page is loading ...
Page is loading ...
Page is loading ...
Page is loading ...
Page is loading ...
Page is loading ...
Page is loading ...
Page is loading ...
Page is loading ...
Page is loading ...
Page is loading ...
Page is loading ...
Page is loading ...
Page is loading ...
Page is loading ...
Page is loading ...
Page is loading ...
Page is loading ...
Page is loading ...
Page is loading ...
Page is loading ...
Page is loading ...
Page is loading ...
Page is loading ...
Page is loading ...
Page is loading ...
Page is loading ...
Page is loading ...
Page is loading ...
Page is loading ...
Page is loading ...
Page is loading ...
Page is loading ...
Page is loading ...
Page is loading ...
Page is loading ...
Page is loading ...
Page is loading ...
Page is loading ...
Page is loading ...
Page is loading ...
Page is loading ...
Page is loading ...
Page is loading ...
Page is loading ...
Page is loading ...
Page is loading ...
Page is loading ...
Page is loading ...
Page is loading ...
Page is loading ...
Page is loading ...
Page is loading ...
Page is loading ...
Page is loading ...
Page is loading ...
Page is loading ...
Page is loading ...
Page is loading ...
Page is loading ...
Page is loading ...
Page is loading ...
Page is loading ...
Page is loading ...
Page is loading ...
Page is loading ...
Page is loading ...
Page is loading ...
Page is loading ...
Page is loading ...
-
 1
1
-
 2
2
-
 3
3
-
 4
4
-
 5
5
-
 6
6
-
 7
7
-
 8
8
-
 9
9
-
 10
10
-
 11
11
-
 12
12
-
 13
13
-
 14
14
-
 15
15
-
 16
16
-
 17
17
-
 18
18
-
 19
19
-
 20
20
-
 21
21
-
 22
22
-
 23
23
-
 24
24
-
 25
25
-
 26
26
-
 27
27
-
 28
28
-
 29
29
-
 30
30
-
 31
31
-
 32
32
-
 33
33
-
 34
34
-
 35
35
-
 36
36
-
 37
37
-
 38
38
-
 39
39
-
 40
40
-
 41
41
-
 42
42
-
 43
43
-
 44
44
-
 45
45
-
 46
46
-
 47
47
-
 48
48
-
 49
49
-
 50
50
-
 51
51
-
 52
52
-
 53
53
-
 54
54
-
 55
55
-
 56
56
-
 57
57
-
 58
58
-
 59
59
-
 60
60
-
 61
61
-
 62
62
-
 63
63
-
 64
64
-
 65
65
-
 66
66
-
 67
67
-
 68
68
-
 69
69
-
 70
70
-
 71
71
-
 72
72
-
 73
73
-
 74
74
-
 75
75
-
 76
76
-
 77
77
-
 78
78
-
 79
79
-
 80
80
-
 81
81
-
 82
82
-
 83
83
-
 84
84
-
 85
85
-
 86
86
-
 87
87
-
 88
88
-
 89
89
-
 90
90
-
 91
91
-
 92
92
-
 93
93
-
 94
94
-
 95
95
-
 96
96
-
 97
97
-
 98
98
-
 99
99
-
 100
100
-
 101
101
-
 102
102
-
 103
103
-
 104
104
-
 105
105
-
 106
106
-
 107
107
-
 108
108
-
 109
109
-
 110
110
-
 111
111
-
 112
112
-
 113
113
-
 114
114
-
 115
115
-
 116
116
-
 117
117
-
 118
118
-
 119
119
-
 120
120
-
 121
121
-
 122
122
-
 123
123
-
 124
124
-
 125
125
-
 126
126


König HA-INDUC-11N Owner's manual
- Category
- Hobs
- Type
- Owner's manual
- This manual is also suitable for
Ask a question and I''ll find the answer in the document
Finding information in a document is now easier with AI
in other languages
- italiano: König HA-INDUC-11N Manuale del proprietario
- français: König HA-INDUC-11N Le manuel du propriétaire
- español: König HA-INDUC-11N El manual del propietario
- Deutsch: König HA-INDUC-11N Bedienungsanleitung
- русский: König HA-INDUC-11N Инструкция по применению
- Nederlands: König HA-INDUC-11N de handleiding
- português: König HA-INDUC-11N Manual do proprietário
- slovenčina: König HA-INDUC-11N Návod na obsluhu
- dansk: König HA-INDUC-11N Brugervejledning
- polski: König HA-INDUC-11N Instrukcja obsługi
- čeština: König HA-INDUC-11N Návod k obsluze
- Türkçe: König HA-INDUC-11N El kitabı
- eesti: König HA-INDUC-11N Omaniku manuaal
- svenska: König HA-INDUC-11N Bruksanvisning
- suomi: König HA-INDUC-11N Omistajan opas
- română: König HA-INDUC-11N Manualul proprietarului
Related papers
Other documents
-
Alecto TRM-663W User manual
-
Caso MASTER P3 Datasheet
-
-
-
Caso D21 Operating instructions
-
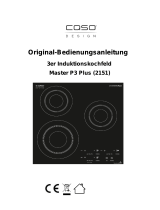 Caso Design CASO Master Hl P3 Plus Operating instructions
-
-
-
-
ROSIERES RFI 802 Kochfeld User manual
