Page is loading ...

GB2
Contents Page
Safety Precautions GB3
Important Information GB9
Electrical Requirement (For UK market only) GB10
Parts Names and Handling Instructions GB11
Display GB13
Flavour setting GB15
Before Use GB16
Espresso/Coffee GB19
Cappuccino/Latte Macchiato/Hot milk GB21
Powder coffee preparation GB24
Hot water GB26
Turn off the power GB27
Changing the setting GB29
Memory setting GB33
How to Clean GB35
Troubleshooting GB44
Error display GB46
Replacement parts GB47
Specifications GB47
Thank you for purchasing the Panasonic product.
• This product is intended for household use only.
• Please read these instructions carefully to use the product correctly and safely.
• Before using this product please give your special attention to “Safety Precautions” (Page GB3–GB8).
• Please keep this Operating Instructions for future use.
GB3
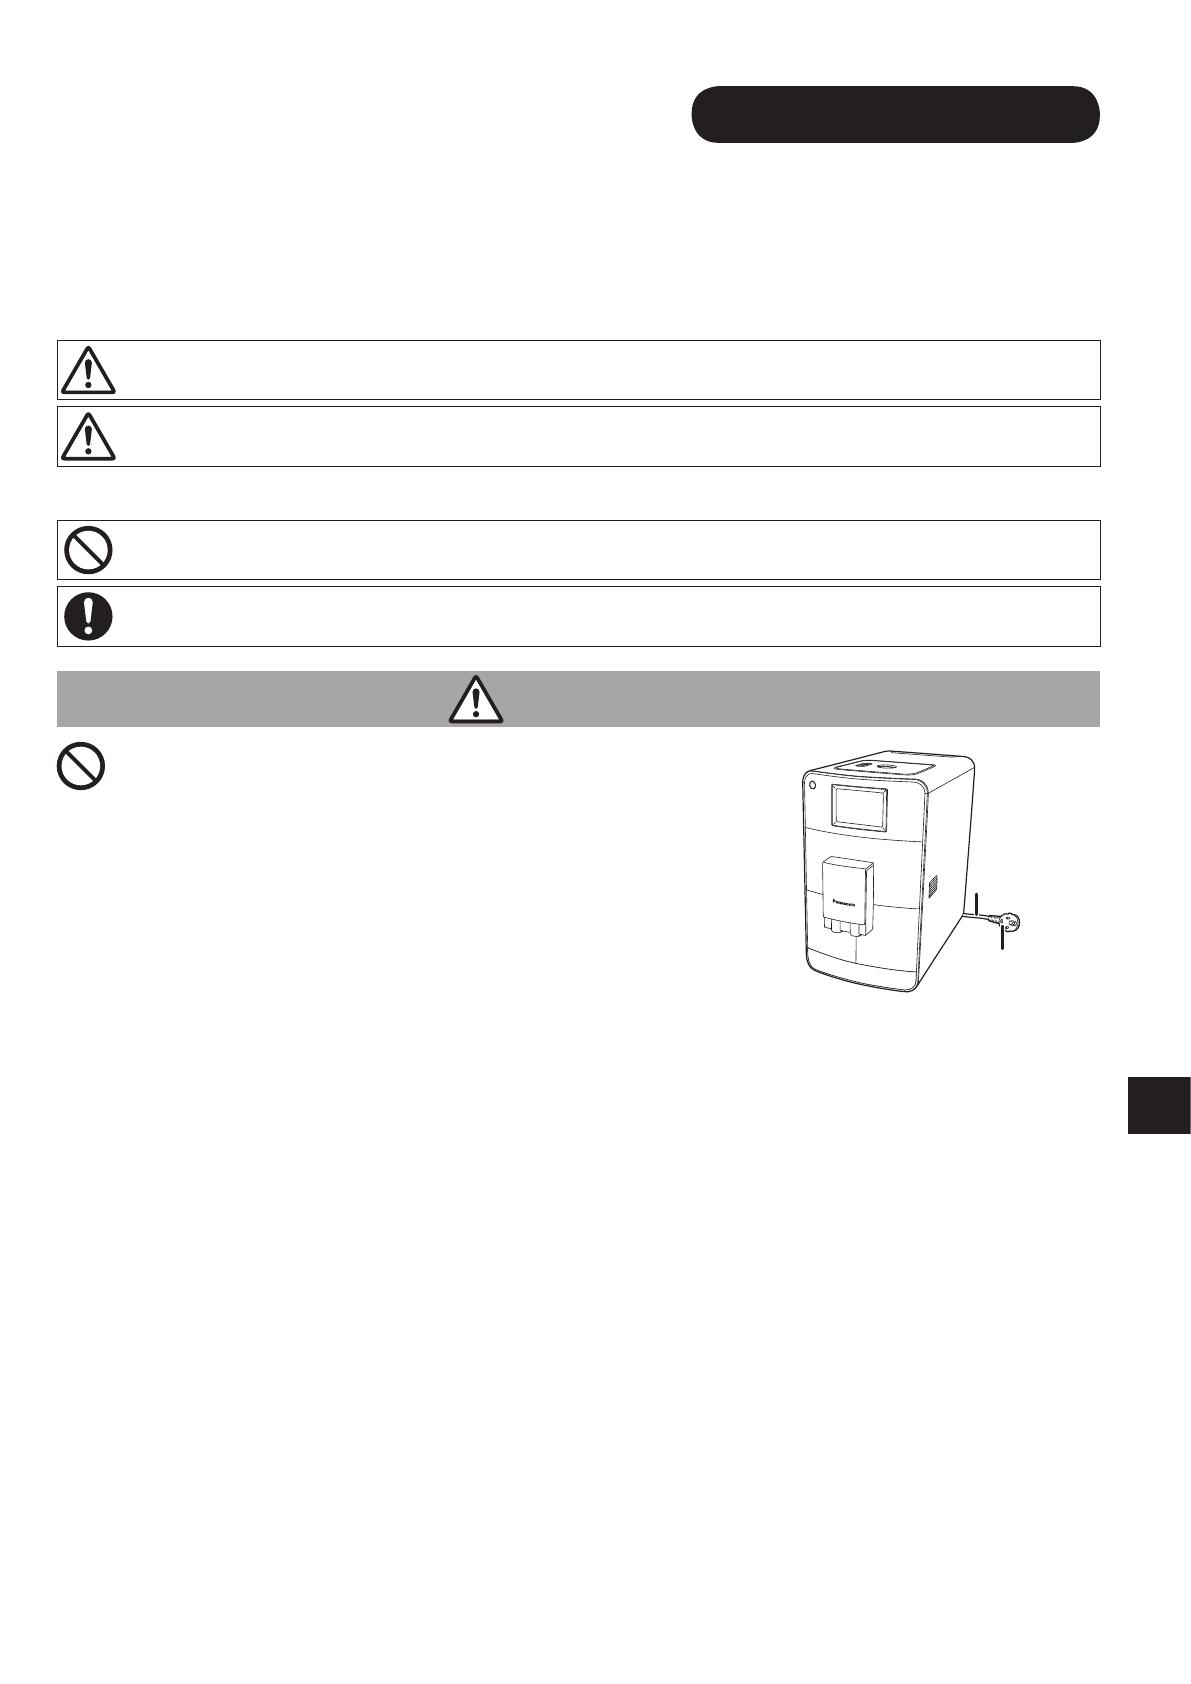
Safety Precautions
Please make sure to follow these
instructions.
In order to prevent accidents or injuries to the user, other people, and
damage to property, please follow the instructions below.
Q The following charts indicate the degree of damage caused by
wrong operation.
WARNING:
Indicates serious injury or death.
CAUTION:
Indicates risk of injury or property damage.
Q The symbols are classified and explained as follows.
This symbol indicates prohibition.
This symbol indicates requirement that must be followed.
WARNING
O
Mains lead
Mains plug
Do not damage the mains lead or mains
plug.
Following actions are strictly prohibited.
Modifying, touching on or placing near
heating elements, bending, twisting, pulling,
pulled over sharp edges, putting heavy
objects on top, bundling the mains lead and
carrying the appliance by the mains lead.
(It may cause electric shock, or fire due to short circuit.)
ODo not use the appliance if the mains lead or mains plug is
damaged or the mains plug is loosely connected to the
household mains socket.
(It may cause electric shock, or fire due to short circuit.)
« If the supply cord is damaged, it must be replaced by the
manufacturer, its service agent or similarly qualified persons in
order to avoid a hazard.
ODo not plug or unplug the mains plug with wet hands.
(It may cause electric shock.)
• Always ensure that hands are dry before handling the mains plug
or switching on the appliance.

GB4
WARNING
OMake sure the voltage indicated on the label of the appliance
is the same as your local supply.
(It may cause electric shock or fire.)
Also avoid plugging other devices into the same household mains
socket to prevent electrical over heating. However, if you are
connecting a number of mains plugs, make sure the total wattage
does not exceed the rated wattage of the household mains socket.
The use of extension cords is not recommended.
OInsert the mains plug firmly.
(
Otherwise it may cause electric shock and fire due to heat that
may be generated around the mains plug.
• Place the appliance where the mains plug can be easily pulled
out.
OClean the mains plug regularly.
(
Dust and moisture build-up on the mains plug may cause
insufficient insulation, which may cause a fire.
« Unplug the mains plug, and wipe with a dry cloth.
OKeep the mains lead out of reach of children. Do not let the
mains lead hang over the edge of the table or worktop.
(It may cause burns, injury or electric shock.)
ODo not immerse the appliance in water or splash it with water.
(It may cause electric shock, or fire due to short circuit.)
ODo not disassemble, repair or modify this appliance.
(It may cause fire, electric shock or injury.)
« Consult the place of purchase or a Panasonic service centre.
ODo not touch or get your face close to places where steam is
coming out.
(It may cause burns or injury.)
• Especially keep the appliance out of reach of infants and children.
)
)
Safety Precautions
Please make sure to follow these
instructions.

GB5
WARNING
OThis appliance can be used by children aged from 8 years and
above if they have been given supervision or instruction
concerning use of the appliance in a safe way and if they
understand the hazards involved. Cleaning and user
maintenance shall not be made by children unless they are
older than 8 and supervised. Keep the appliance and its cord
out of reach of children aged less than 8 years.
(It may cause burns, injury or electric shock.)
OAlways keep the children away from the appliance and
cleaning agent.
(It may cause burns or injury.)
• Children do not realise dangers that are likely to occur because of
improper use of appliances.
ODiscontinue using the appliance immediately and unplug in
the unlikely event that this appliance stops working properly.
(It may cause smoking, fire, electric shock or burns.)
e.g. for abnormal operation or break down
• The mains plug and the mains lead become abnormally hot.
• The mains lead is damaged or the appliance power fails.
• The main body is deformed, has visible damage or is abnormally
hot.
• Water is leaking from the inside of main body.
• There is another abnormality or failure.
« Unplug the appliance immediately and consult the place of
purchase or a Panasonic service centre for inspection or repair.
ODo not allow infants and children to play with packaging
material.
(It may cause suffocation.)
ODo not open the water tank, dispenser or tray while the coffee
is brewing.
(It may cause burns.)

GB6
CAUTION
ODo not use the appliance for any purpose other than those
described in these instructions.
(It may cause burns or injury.)
• Panasonic will not accept any liability if the appliance is subject to
improper use, or failure to comply with these instructions.
ODo not insert any object in the gaps.
(It may cause electric shock.)
• Especially metal objects such as pins or wires.
ODo not touch the hot surface such as coffee spouts while
appliance is in use or immediately after use.
(It may cause burns.)
• Never touch the appliance with wet hands.
ODo not use the appliance on following places.
• On uneven surfaces, on carpet, non-water-resistant surface or
table cloths etc.
(It may cause fire or injury.)
• Places where it may be splashed with water or near a heat
source.
(It may cause electric shock or electrical leakage.)
• Near any open water such as bathtubs, sinks, or other containers.
(It may cause electric shock or electrical leakage.)
• Near a wall or furniture.
(It may cause discolouration or deformation.)
• Places that could be damaged even by moderate heat.
(It may cause discolouration or deformation.)
• Places where it is not strong enough to hold the appliance.
(It may cause damage or injury.)
• In enclosed spaces such as a built-in cupboard.
(It may cause discolouration or deformation.)
Safety Precautions
Please make sure to follow these
instructions.
GB7
CAUTION
ODo not remove the cup or pot while brewing.
(It may cause burns.)
ODo not move the appliance by holding dispenser or drip tray.
(It may cause injury.)
ODo not reach into the grinding unit.
(It may cause injury.)
ODo not hold the espresso machine with the mains lead.
(It may cause fire or electric shock.)
OMake sure to hold the mains plug when unplugging the mains
plug. Never pull on the mains lead.
(Otherwise it may cause electric shock, or fire due to short circuit.)
OAlways ensure the appliance is switched off and unplug the
mains plug when the appliance is not in use, before moving
and before cleaning (except cleaning function).
(
Otherwise it may cause electric shock, or fire due to electric
leakage.
OPlace the appliance (including the drip tray and Latte
Macchiato plate) on a firm, dry, clean flat heatproof worktop.
(Otherwise it may cause burns or injury.)
OBeware not to be tripped over or get caught in the mains lead
while in use.
(Otherwise it may cause burns or injury.)
ODo not touch, block or cover the steam vent holes during use.
(It may cause discolouration.)
• Especially pay attention when supervising children.
)

GB8
CAUTION
OUnplug and allow the appliance to cool down fully before
cleaning and storing away.
(It may cause burns.)
OMake sure to clean the appliance after every use.
(
Otherwise it may cause burns due to overflow by clogging the
filter holder.
OAvoid getting contact with the skin or eyes while handling
cleaning agent.
(It may cause injury.)
« In case of contact with skin or eyes, rinse immediately with
plenty of water and consult a doctor.
OIf the cleaning agent comes into contact with sensitive
surfaces, clean up any splashes immediately.
(It may cause discolouration damage.)
)
Safety Precautions
Please make sure to follow these
instructions.

GB9
Important Information
• Do not fill the water tank with milk (including soy and rice milk), mineral
water, sparkling water or hot water etc. Only use tap water.
(It may cause a malfunction.)
• Do not use the appliance outdoors.
• Do not place coffee powder in the powder coffee shaft when the
appliance is not turned on.
• Adjust the grinding level only while coffee beans are ground. (P. GB12)
• Do not fill the coffee bean container with freeze-dry, candied or
caramelised or oily coffee beans or water.
• Do not use any attachment and cleaning agent other than those
provided or recommended by the manufacturer. (P. GB47)
• If leaving the appliance unattended for long time, turn the power off.
• Place the temperature could drop below freezing point.
(It may cause a malfunction.)

GB10
Electrical Requirement (For UK market only)
FOR YOUR SAFETY PLEASE READ THE FOLLOWING TEXT
CAREFULLY.
This appliance is supplied with a moulded three pin mains plug for your
safety and convenience. A 13-amp fuse is fitted in this plug.
Should the fuse need to be replaced please ensure that the replacement
fuse has a rating of 13-amp and that it is approved by ASTA or BSI to
BS1362.
Check for the ASTA mark or the BSI mark on the body of the fuse.
If the plug contains a removable fuse cover, you must ensure that it is
refitted when the fuse is replaced.
If you lose the fuse cover, the plug must not be used until a replacement
cover is obtained.
A replacement fuse cover can be purchased from your local Panasonic
Dealer.
If the fitted moulded plug is unsuitable for the socket outlet in your home,
then the fuse should be removed and the plug cut off and disposed of
safely. There is a danger of severe electrical shock if the cut off plug is
inserted into any 13-amp socket.
How to replace the fuse
The location of the fuse differs according
to the type of AC mains plug (figures A
and B). Confirm the AC mains plug fitted
and follow the instructions below.
Illustrations may differ from actual AC
mains plug.
Open the fuse cover with a screwdriver
and replace the fuse and close or attach
the fuse cover.
Figure A Figure B
Fuse cover

GB11
Filter cartridge
It may only be used together with the
BRITA INTENZA water filter cartridge;
cartridge is not supplied by default.
Cartridges are available from your local
BRITA customer service: www.brita.net
(Availability varies by country.)
Parts Names and Handling
Instructions
Q Wash the all detachable parts before using the appliance for the first time or when you have not used it for a while. (P. GB35)
For parts names inside the door, refer to “How to Clean” on pages GB36–GB38.
Coffee bean container (P. GB12)
Quick reference (Inserted)
Power button
Display (P. GB13, GB14)
Steam vent
Dispenser
Door
Mains lead
Spout
Mains plug
* The shape of plug may
be different from
illustration.
Waste container
Water tank (P. GB12)
Sold separately
Drip tray
Stainless steel
plate
Place the stainless steel plate (rounded
edge is facing up) on the drip tray.
Push them into the espresso machine until
they snap into place.
Open the drip tray by pressing it.
Latte Macchiato plate
• Close the drip tray by pressing it
and place the Latte Macchiato
plate until it snaps into place.
Measuring spoon
(
with cleaning brush
and setting function
Adapter
(for filter cartridge)
Test strip
(
for determining the
water hardness
Bean container
extension (P. GB12)
Cleaning tablets
Descaling agent
Milk hose
Milk system cleaner
Quick reference
)
)
Accessories
GB12
Parts Names and Handling
Instructions
(Continued)
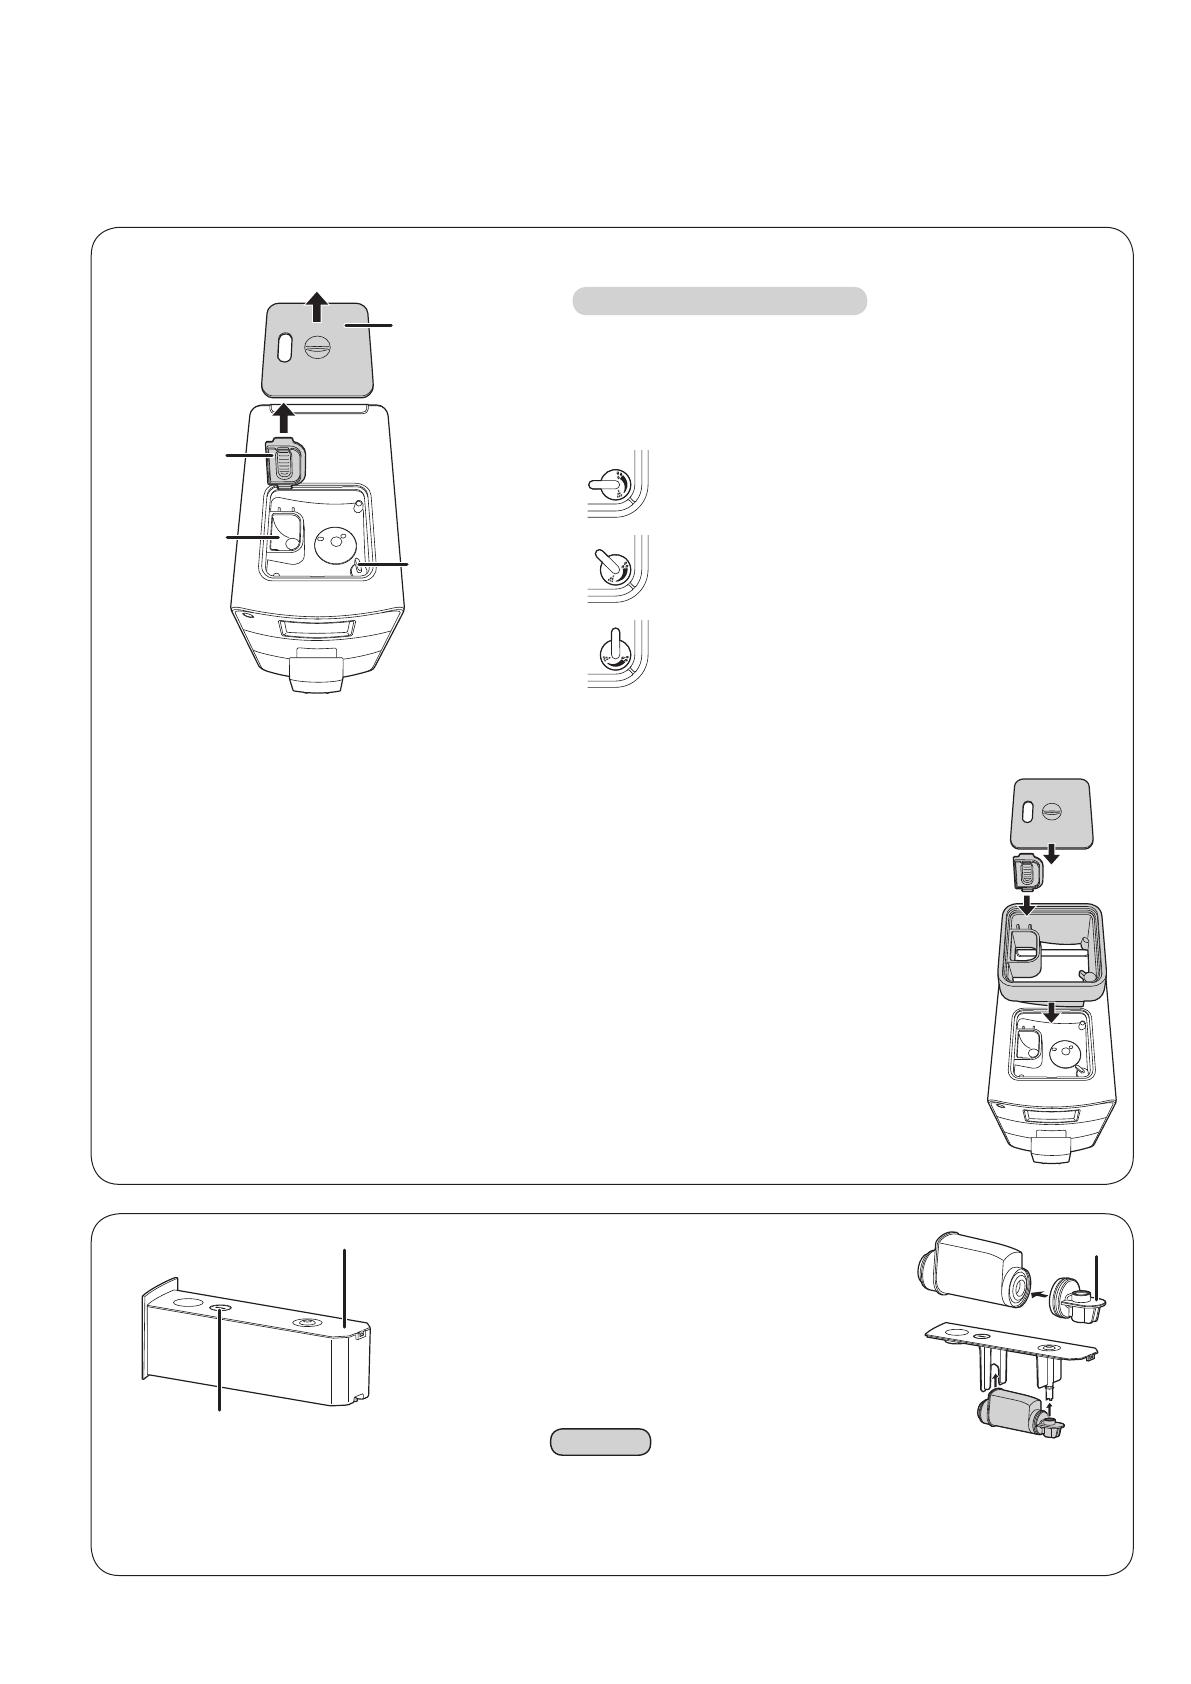
Coffee bean container
Powder coffee
shaft
Grinding setting
lever
Coffee bean
container lid
Powder coffee
shaft lid
Setting the grinding fineness
Turn the grinding setting lever to the desired level of fineness.
Only set the grinding fineness when the grinder is running.
During grinding, do not touch coffee beans or put fingers into
the grinder. Close the coffee bean container lid after adjusting
the lever.
Fine ground for “Intensive taste”.
Use this setting for light roasted coffee beans.
Medium ground for “normal taste”.
Use this setting for medium roasted coffee
beans.
Coarse ground for “mild taste”.
Use this setting for dark roasted coffee beans.
• Taste does not meet at your desire right away.
Wait for a few times brewing to get desire taste.
To attach the bean container extension
O If you desire to increase the capacity of the standard coffee bean container from 125 g to 250 g, proceed
as follows.
1
Remove the coffee bean container lid from its holder.
2
Remove the powder coffee shaft lid by opening it to an upright position and pulling it out of its
holder.
3
Put the bean container extension onto the coffee bean container.
Make sure that the grinding setting levers are at the same position each other.
4
Attach the powder coffee shaft lid and close the coffee bean container lid.
Water tank
Helps to keep in mind changing time of the filter
cartridge.
IN: Time the filter cartridge was attached.
OUT: Time to change the filter cartridge.
1
Attach the adapter to the filter
cartridge.
2
Insert the filter cartridge with the
adapter into the guides as the
illustration.
* sold separately
Note
• The cartridge must be from BRITA INTENZA.
Similar INTENZA from different manufacture will not fit to this
espresso machine.
Filter time control
Water tank lid Filter cartridge*
Adapter
Lift up the lid to
open.

GB13
Display
Menu display
Operation icon
Main menu
Espresso (P. GB19)
Coffee (P. GB19)
Cappuccino* (P. GB21)
Latte Macchiato* (P. GB21)
Hot milk/foam* (P. GB21)
Hot water (P. GB26)
Powder coffee preparation (P. GB24)
Memory menu (P. GB33)
• If no action for 1 minute, display turns dark.
*Milk menu
User menu
Coffee temperature (P. GB29)
Heating mode (P. GB29)
Auto off timer (P. GB30)
Cup illumination (P. GB30)
ml / oz selection (P. GB31)
Water hardness level (P. GB31)
Milk system cleaning programme (P. GB41)
Cleaning programme (P. GB39)
Descaling programme (P. GB42)
Setting Return Start
OK Reset (P. GB32) Stop
Save Delete
Information
(P. GB32)

GB14
Display (Continued)
Information display
Following displays appear during operations.
Refill with water
After the water tank is replaced, it takes approx. 5 seconds to detect it.
To ensure there is sufficient water for one dispensing, this display shows even when there may be water
remaining in the water tank.
Empty the waste container
Only empty it when the espresso machine is turned on.
Otherwise, it shows again next time power is turned on.
Open the drip tray Simple rinsing (P. GB23)
Refill with coffee beans Rinsing cycle
Attach the waste container
Cleaning the milk system
Close the door
Heating up
Restart brewing
Cleaning programme
In process
It shows after the brewing and rinsing
etc.
Descaling programme
Stop the process
GB15
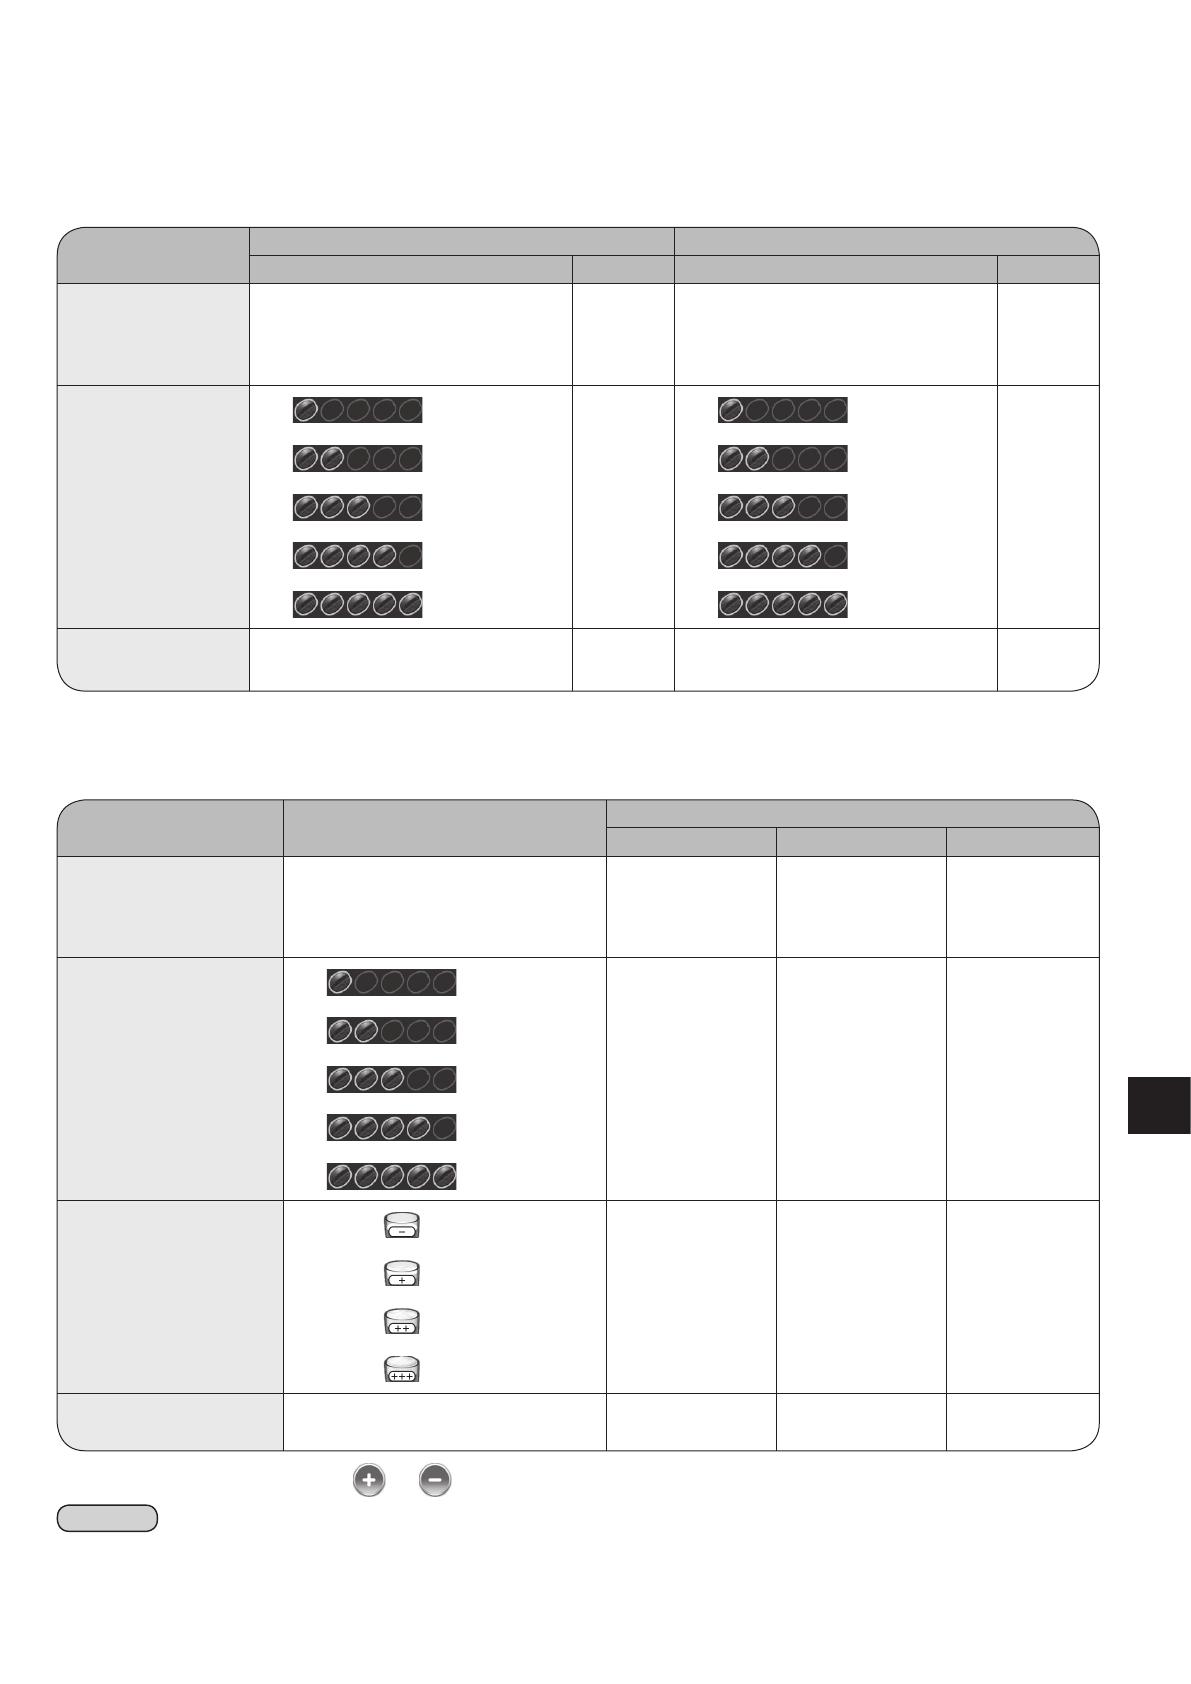
Flavour setting
Espresso/Coffee
Espresso Coffee
Setting range Default Setting range Default
Coffee amount
< mL>
20–100 mL (change by 5 mL)
< oz>
0.7–3.5 oz (change by 0.1 or 0.2 oz)
35 mL
1.2 oz
< mL>
60–300 mL (change by 10 mL)
< oz>
2.1–10.6 oz (change by 0.3 or 0.4 oz)
120 mL
4.2 oz
Bean level
extra light
normal
extra light
normal
light light
normal normal
strong strong
extra strong extra strong
Number of cups for
a pot
— —
3–6 cups
each: 120 mL/4.2 oz
3 cups
Milk menu
• Select your flavour by pressing the or icon repeatedly.
Note
• First time of use or change the type of coffee beans, taste does not meet at your desire right away.
Wait for a few times brewing to get desire taste.
Setting range
Default
Cappuccino Latte Macchiato Hot milk
Coffee amount
< mL>
60–300 mL (change by 10 mL)
< oz>
2.1–10.6 oz (change by 0.3 or 0.4 oz)
120 mL
4.2 oz
180 mL
6.3 oz
120 mL
4.2 oz
Bean level
extra light
normal normal —
light
normal
strong
extra strong
Milk foam
no foam
extra rich extra rich extra rich
normal
rich
extra rich
Milk and coffee ratio
Milk : Coffee
80 : 20–20 : 80
Milk : Coffee
60 : 40
Milk : Coffee
80 : 20
—
GB16
Before Use
<Preparations>
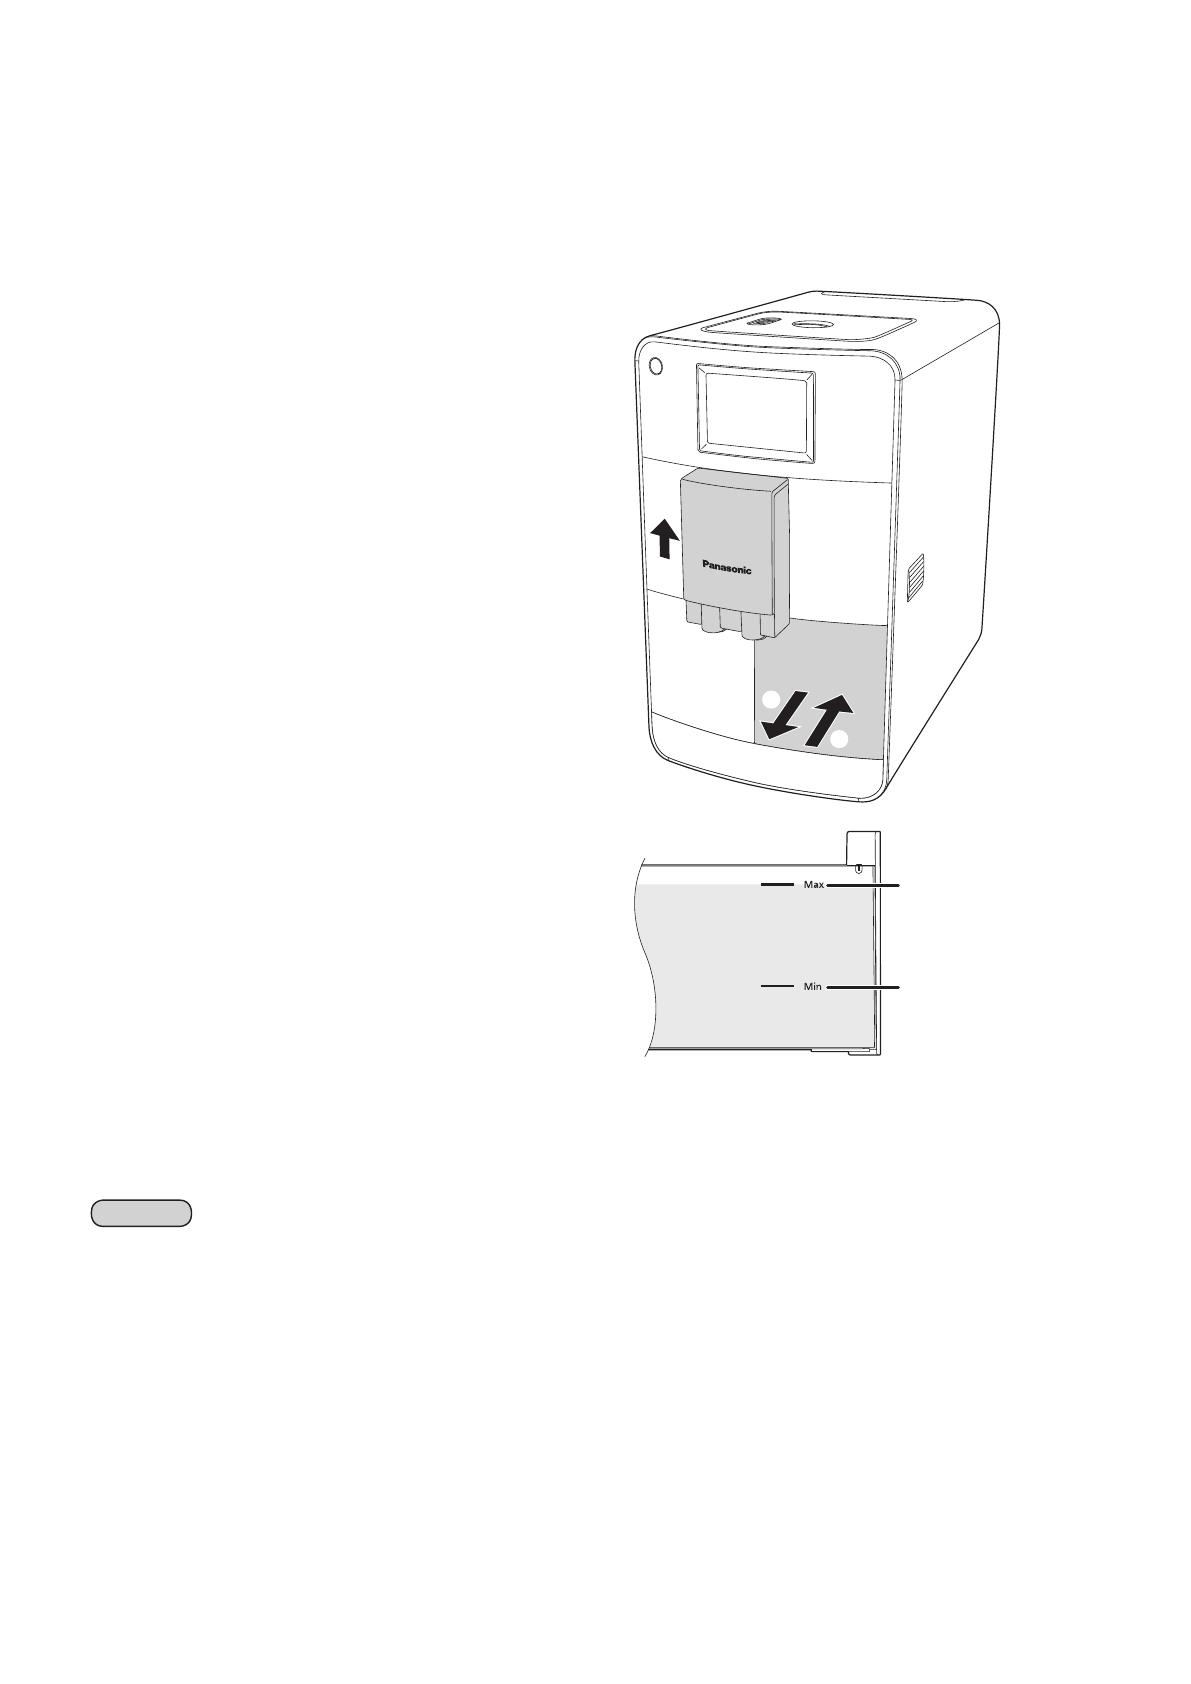
1
Fill the water tank with fresh cold water.
1
Push the dispenser up into the upper position.
2
Push the water tank and pull it out.
3
Fill the water tank with tap water up to “Max”
(maximum) line.
Dry off the out side of water tank.
“Max” (maximum) line
“Min” (minimum) line
4
Replace the water tank.
Push it until it snaps in.
Note
• Do not fill the water tank with milk (including soy and rice milk), mineral water, sparkling water or hot water etc. Only use tap
water.
• When filling the water tank with water, hold the bottom of the water tank with both hands.
GB17
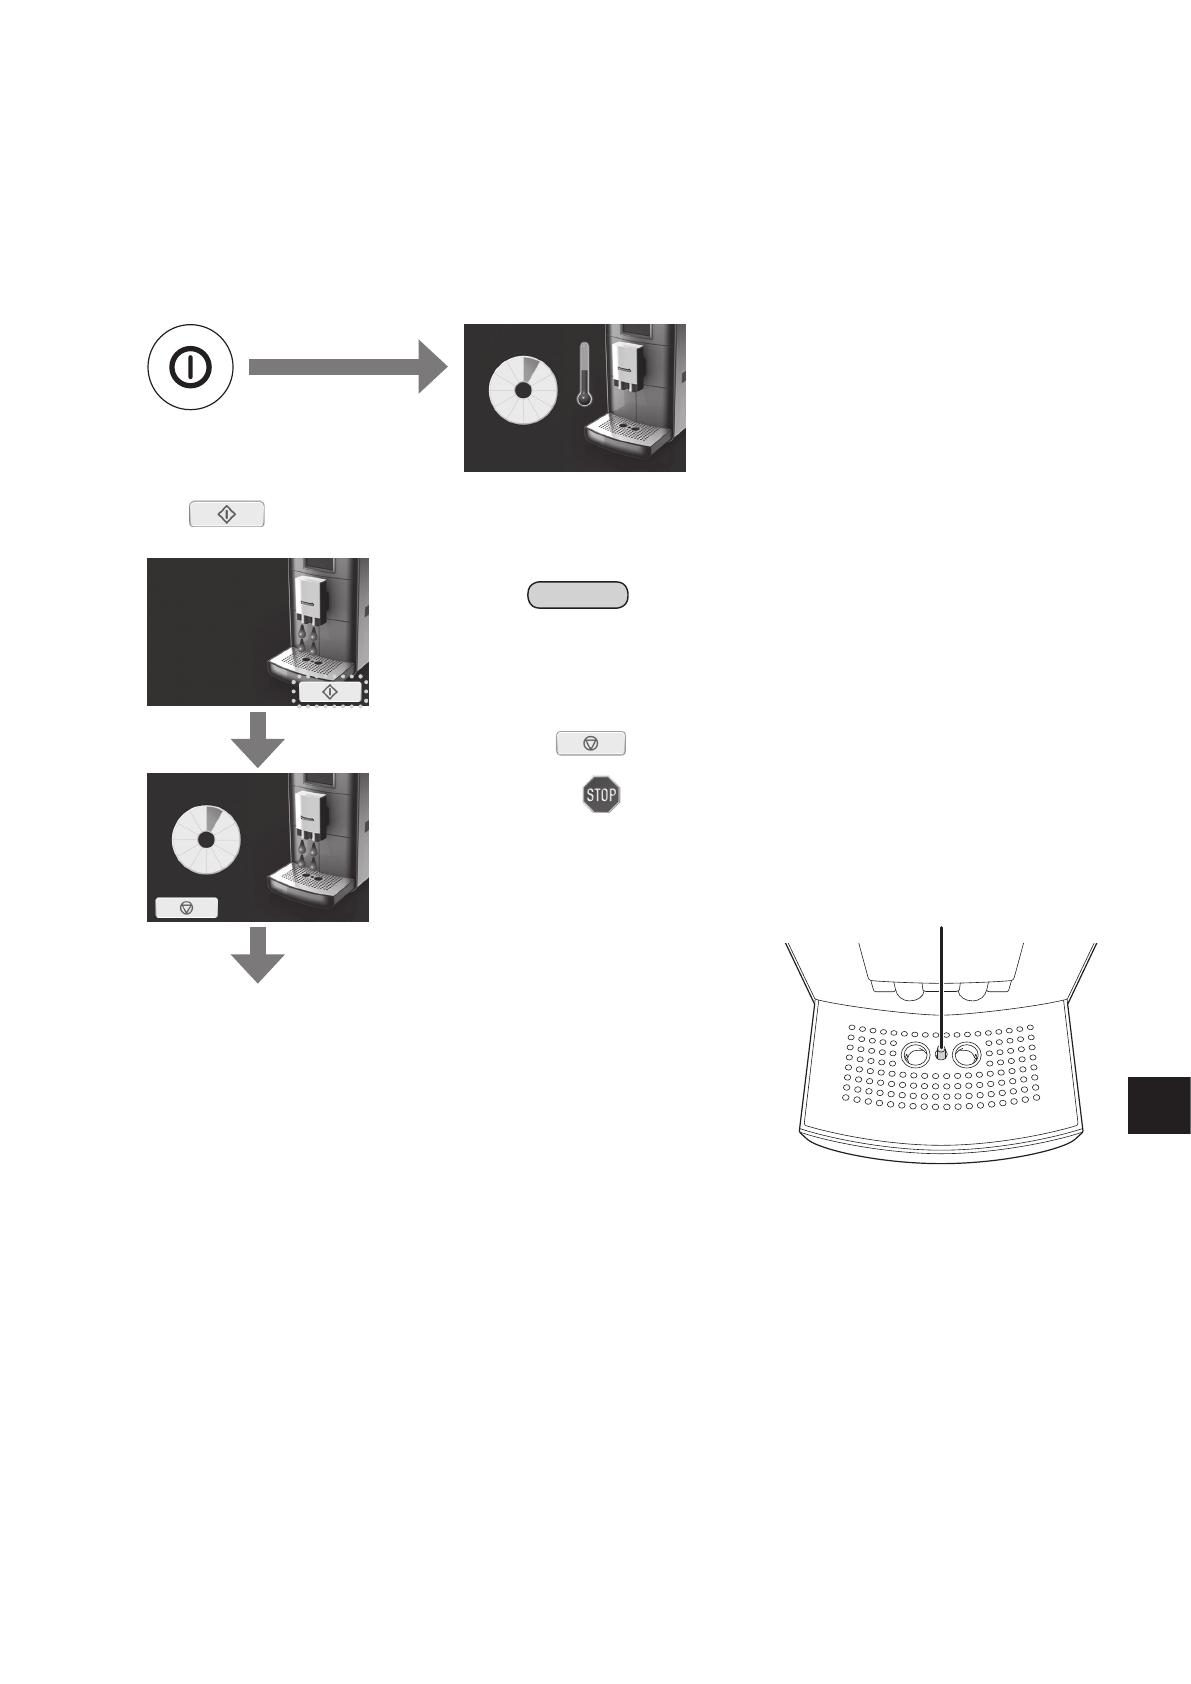
2
Turn the power on.
1
Plug in and press the power button.
• Make sure the waste container, water tank, drip tray and stainless steel plate are fitted.
• Open the drip tray by pressing it. (Attention for drip tray display will show for 3 seconds after the espresso machine is
heated up.)
Heats up the machine
automatically.
2
Press to start rinsing.
• Make sure the drip tray is opened. Otherwise hot water will dispense onto the countertop.
When rinsing is complete (dispense hot
water 4 times), the display will return to
the main menu. Wait until the display
shows the main menu.
Note
• When starting up for the first time or when the water tank was
completely emptied, water suction may take a little longer dispensing
hot water for rinsing cycle.
• A small amount of water can get into the waste container during each
rinsing cycle. This is system-related and not a fault.
• If
is pressed during the rinsing cycle, it immediately stops
the process.
After
flashes, the display will return to the previous display.
• When dispensing hot water into the drip tray during rinsing cycle, you
may place the container under the dispenser.
• During the rinsing, water is to collect in the drip tray.
When water is full in the drip tray, the red float will be float up.
Float

GB18
<Setting water hardness>
Before using the espresso machine for the first time, it should be set to the appropriate water hardness for your area.
1
Determine the water hardness.
1
Dip the test strip into cold water for 1 second and shake off the excess water.
2
Read the water hardness from the pink-coloured areas on test strip after approximately 1 minute.
Water hardness level
1
soft
2
medium-hard
3
hard
4
very hard
Water hardness mol/m
3
German hardness
French hardness
up to 1.24
up to 7°
up to 12.6°
up to 2.5
up to 14°
up to 25.2°
up to 3.7
up to 21°
up to 37.8°
over 3.7
over 21°
over 38°
Test strip
2
Press .
3
Select “water hardness level”.
Note
• If the no action for 30 seconds or is pressed, the display will
return to the main menu.
4
Select level and press to save the setting.
(e.g. for very hard)
Soft
The selected setting will light up
in blue.
Very hard
Note
• If the no action for 30 seconds, the display will return to the
main menu without saving the settings.
• If
is pressed, the display will return to the previous
display without saving the setting.
Before Use (Continued)

GB19
Espresso/Coffee
1
Fill the coffee bean container with whole coffee beans and close the lid.
Then place a cup(s) or pot under the spout.
• When preparing drink for a pot, use the Latte Macchiato plate. (Height between the dispenser and Latte Macchiato plate:
approx. 14 cm)
• Make sure the door is closed firmly.
Note
• In order to reduce heat and splashing, adjust the dispenser height to
suit your cup size by moving it up and down.
If the dispenser is difficult to move, clean it. (P. GB36)
• When preparing 2 cups of drink, place the
cups under the spout side by side.
• Preheat a cup(s) or pot by pouring hot water or use the hot water
menu (P. GB26) to have hot and tasty coffee.
After preheating a cup(s) or pot, throw the hot water away.
2
Select “Espresso” or “Coffee” on the main menu.
Espresso
Coffee
3
Select the number of cups or pot and adjust the taste to your desire.
• The selected cup will light up in blue.
• Press
The selected cup will light up in blue.
or
The selected cup will light up in blue.
repeatedly to adjust quantity for coffee and coffee beans. (P. GB15)
• If adjustment is unnecessary, move on to step 4.
(
e.g.: When 1 cup is selected
on espresso menu
(
e.g.: When 2 cups are
selected on coffee menu
(
e.g.: When pot is selected
on coffee menu
(Not available for espresso)
Note
• If is pressed, the display will return to the previous display.
• Fill the water tank with water up to “Max” (maximum) line when preparing 6 cups of drink for a pot.
• If you wish to memorise your settings, see P. GB33.
) ) )

GB20
4
Press to start brewing.
(e.g.: When 1 cup is selected on coffee menu)
Time bar is increasing
according to process.
When the brewing is complete,
the display will return to the main
menu. Wait until the display
shows the main menu before
removing the cup(s) or pot.
Note
• If is pressed during the brewing process, it immediately
stops the process.
After
flashes, the display will return to the main menu.
• If
is pressed, the display will return to the previous display.
• If the temperature of the water is not sufficient to
brew coffee, the heating up process will be used
prior to the brewing process.
Q To turn off the power after use « P. GB27
Espresso/Coffee (Continued)
If following display shows;
refill with beans. refill with water.
empty the waste
container.
GB21
Cappuccino/Latte Macchiato/Hot
milk
Preparations:
(P. GB16)
1
Fill the water tank with water.
2
Operate rinsing cycle.
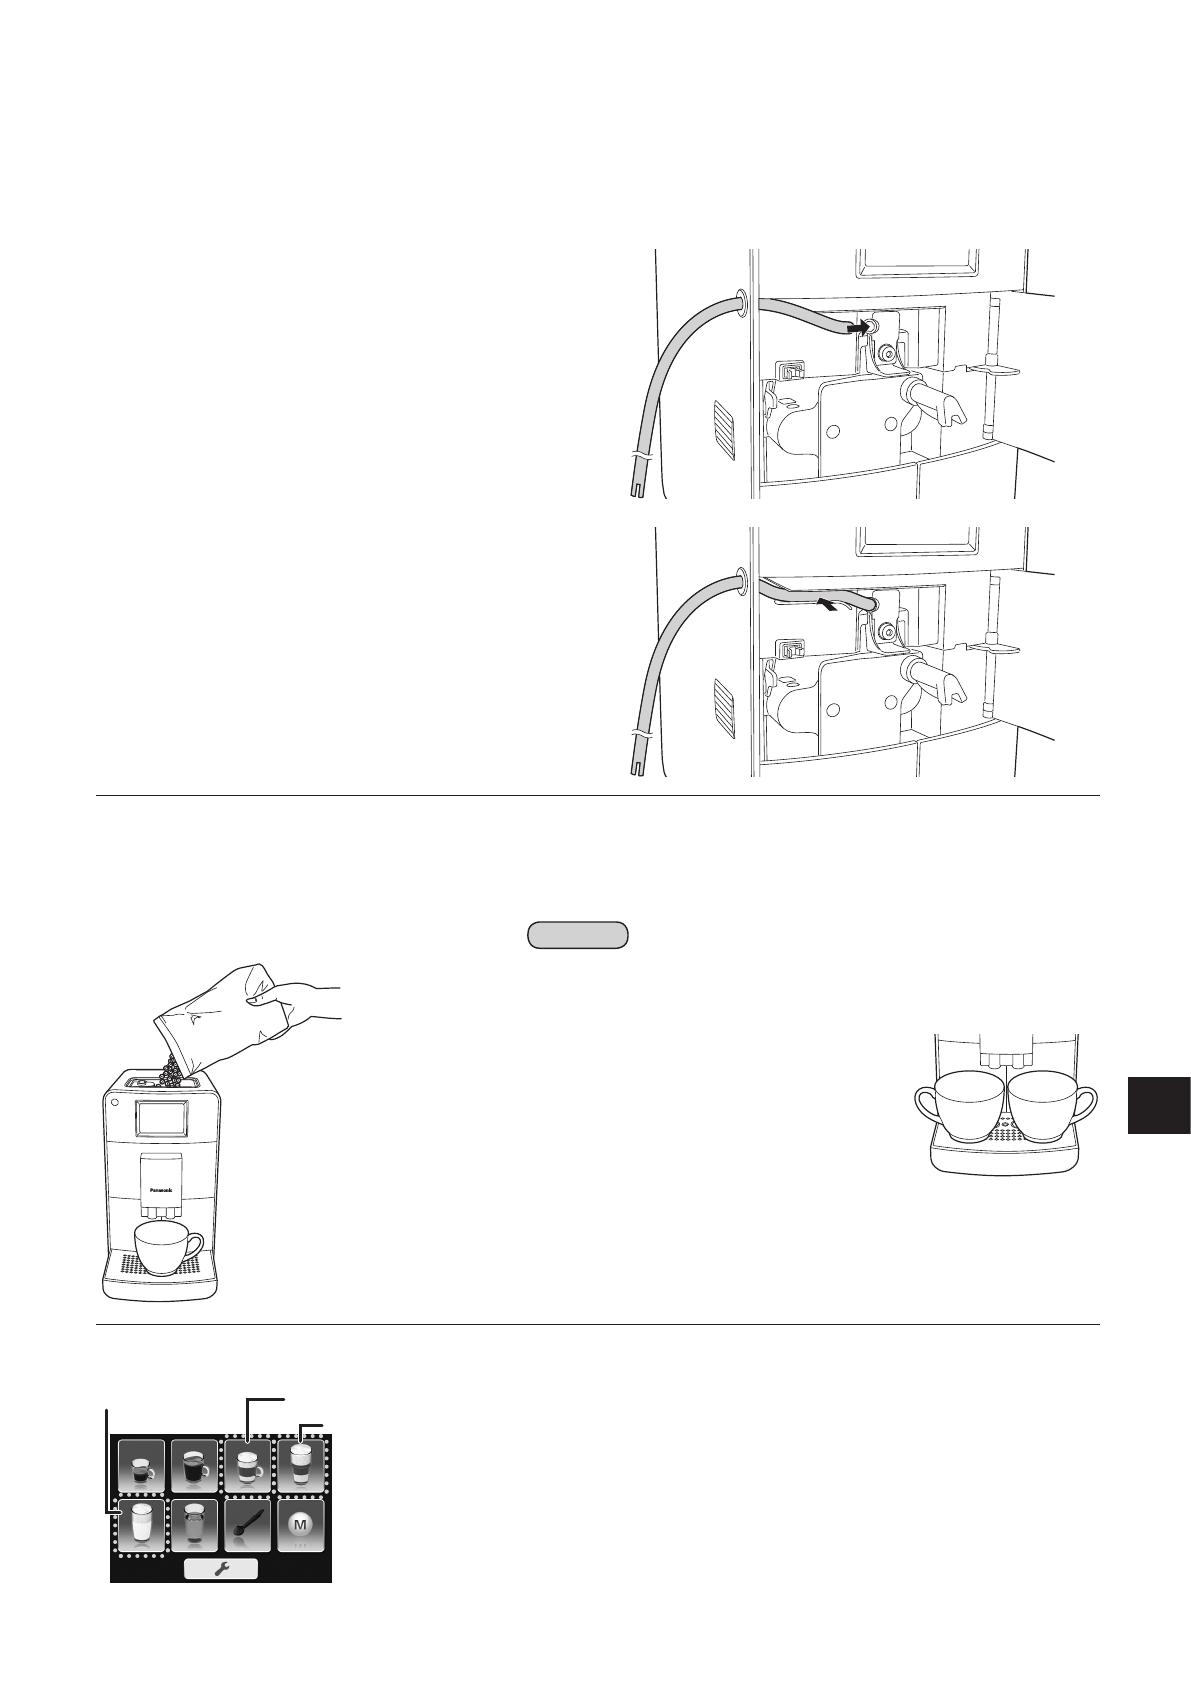
1
Attach the milk hose.
1
Insert the straight cut end of the milk hose through
the side opening of the espresso machine.
2
Insert the end of the milk hose into the opening on
the side of the milk foamer until it stops.
3
Press the milk hose into the guide, then close the
door.
4
Insert the milk hose into the milk package.
Do not use soy or rice milk otherwise it may
influence the milk foam quality.
2
Fill the coffee bean container with whole coffee beans (except hot milk
preparation). Then place a cup(s) under the spout.
• When using a tall cup, use the Latte Macchiato
plate instead of the drip tray.
• Preparing hot milk, move on to step 3.
Note
• In order to reduce heat and splashing, adjust the dispenser height to
suit your cup size by moving it up and down.
If the dispenser is difficult to move, clean it. (P. GB36)
• When preparing 2 cups of drink, place the
cups under the spout side by side.
• Preheat a cup(s) or pot by pouring hot water or use the hot water
menu (P. GB26) to have hot and tasty coffee.
After preheating a cup(s) or pot, throw the hot water away.
• Result of the Latte Macchiato may vary by the shape of glass.
3
Select “Cappuccino”, “Latte Macchiato” or “Hot milk” on the main menu.
Cappuccino
Latte Macchiato
Hot milk
/