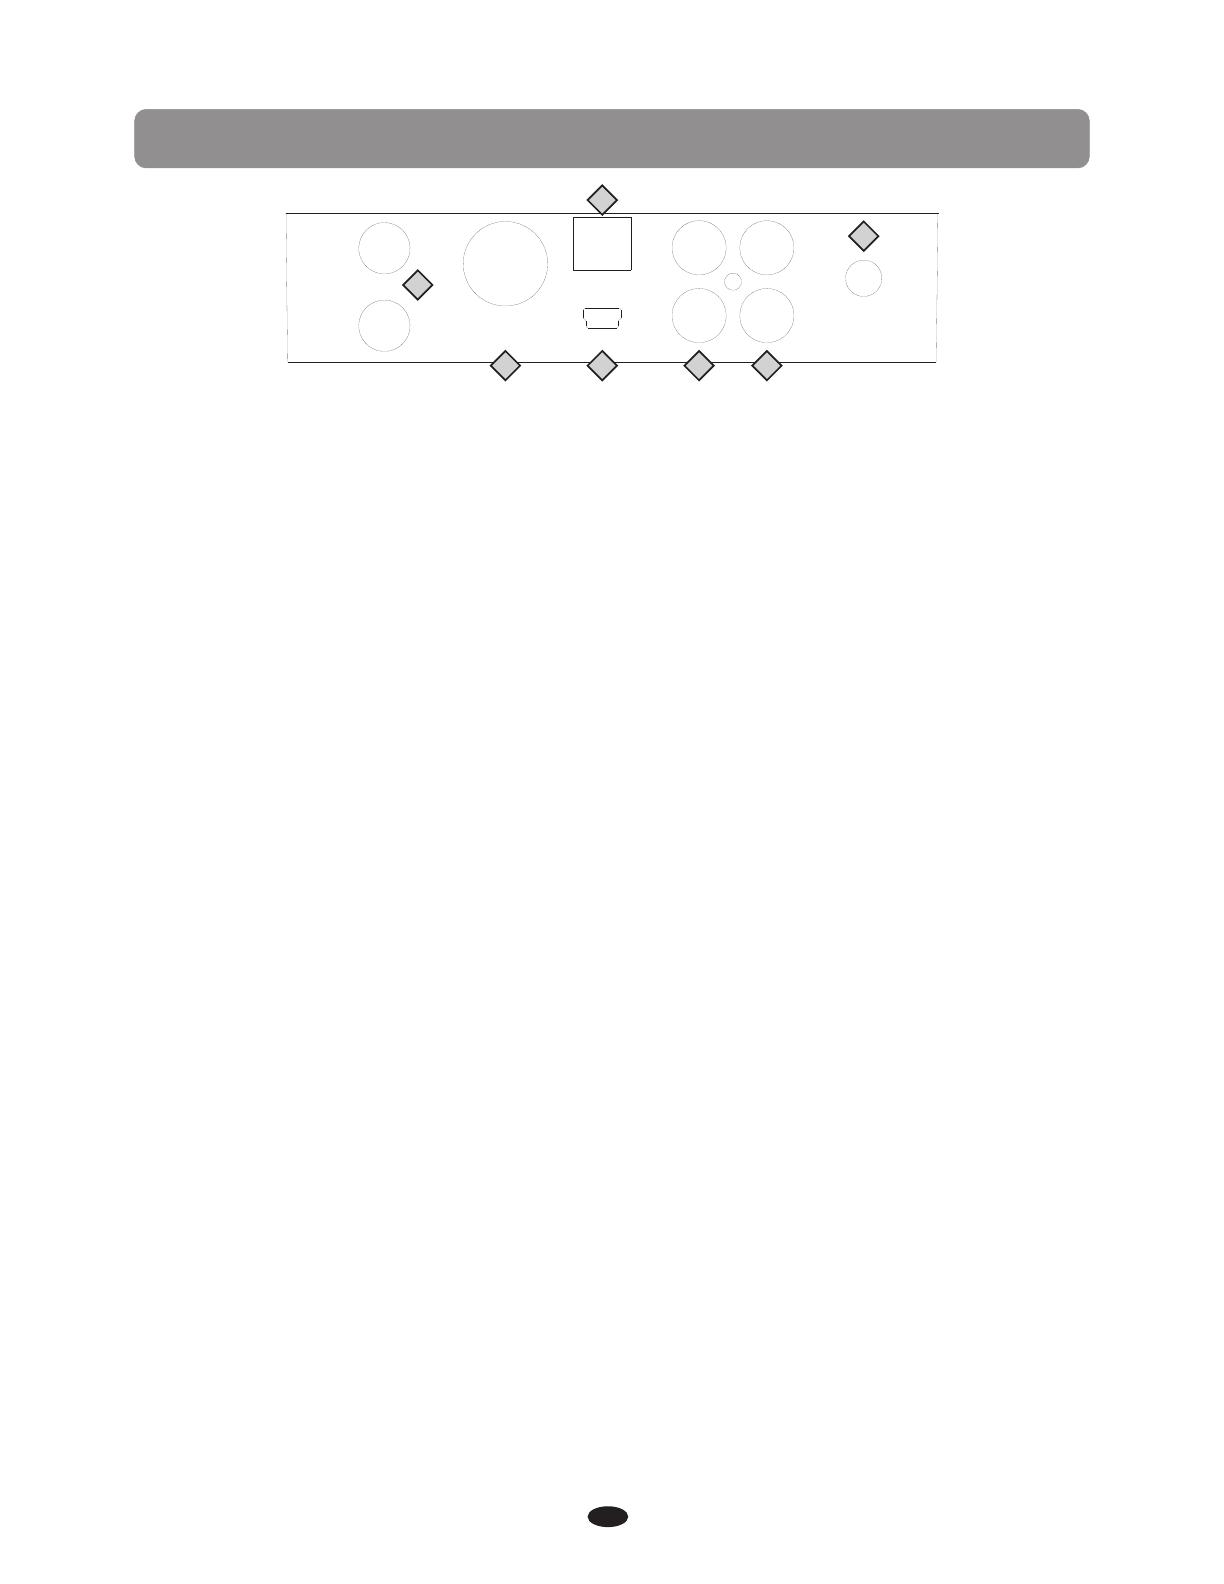
Artesia AG-50 Owner's manual

Category
Digital pianos
Type
Owner's manual

This manual is also suitable for

1
Contents
TAKING CARE OF YOUR DIGITAL PIANO
SERVICE AND MODIFICATION
HANDLING AND TRANSPORT
CLEANING
LOCATION
POWER
PANEL CONTROLS
CONNECTOR PANEL
BOTTOM OF PIANO
DEMO
PLAY DEMO SONGS
CHOOSE A DEMO SONG
PLAY ALONG DEMO SONGS
KEYBOARD VOICES
VOICE SELECT
ADJUSTING THE KEYBOARD VOICE VOLUME
LAYER VOICE
SPLIT VOICE
REVERB/CHORUS
DUET
EQUALIZER
RHYTHM
RHYTHM STYLE SELECT
USING THE RHYTHM STYLE
ADJUSTING THE TEMPO
SPLIT POINT FOR AUTO ACCOMPANIMENT
ADJUSTING THE CHORD
ADJUSTING THE AUTO ACCOMPANIMENT VOLUME
AUTO ACCOMPANIMENT
SINGLE MODE
FINGERED MODE
USING THE AUTO ACCOMPANIMENT
.....................................
4
4
4
4
4
5
6
12
13
14
14
14
14
15
15
16
17
18
19
20
20
22
22
23
24
25
25
25
26
26
26
27
................................................
...................................................
.................................................................................
.....................................................................................
........................................................................
......................................................................
.............................................................................................
...................................................................
..........................................................
..................................................
......................................................................
..........................................................................
........................
...........................................................................
.............................................................................
....................................................................
.........................................................................................
...............................................................................
........................................................................................
...........................................................
.....................................................
..........................................................
...........................
.........................................................
...............................................................
..........................................................................
.....................................................................
......................................
.............
......................................................................
.................................................................................
Contents
2
METRONOME
FUNCTION
ADJUSTING THE KEYBOARD VOICE VOLUME
TRANSPOSE
MASTER TUNE
TOUCH CURE
MAIN OCTAVE
SPLIT OCTAVE
DUAL OCTAVE
SPLIT POINT
CHORD POINT
CHORD TYPE
MAIN/SPLIT/DUAL PAN
REVERB TYPE
REVERB LEVEL
CHORUS TYPE
CHORUS LEVEL
USB MIDI IN
MIDI OUT
LOCAL
USB PLAY MODE
USB PLAY SPEED
AUTO RECORD TRACK
USB MUTE TRACK
BLUETOOTH
AUTO CLOSE TIME
FACTORY RESET
REGISTRATION MEMORY
SAVE REGISTRATION
RECALL REGISTRATION
STYLE HOLD
........................................................................................
29
30
30
31
31
31
31
31
32
32
32
32
32
33
33
33
34
35
35
35
36
36
36
36
37
37
37
38
38
38
39
............................
.................................................................................
..............................................................................
...............................................................................
..............................................................................
................................................................................
..............................................................................
................................................................................
...............................................................
................................................................................
.............................................................................
............................................................................
............................................................................
.................................................................................
...........................................................................................
..........................................................................
..........................................................................
................................................................
........................................................................
.................................................................................
......................................................................
................................................................
.................................................................
............................................................
...............................................................................
..........................................................................
.............................................................................
..............................................................................
......................................................................................
................................................................................
Contents
3
RECORD
LOCAL RECORDING
PLAY BACK
DELECTING TRACKS
USB RECORDING
PLAY BACK
DELECTING TRACKS
PLAY ALONG SONGS
SELECT AND LISTEN TO A SONG
PRACTICING THE RIGHT HAND MELODY OF THE SONG
PRACTICING THE LEFT HAND MELODY OF THE SONG
PRACTICING BOTH HANDS OF THE SONG
USB
INSERT THE USB
REMOVE THE USB
PLAY
BLUETOOTH
BT-1 ARTESIA BLUETOOTH CONNECTION
BLUETOOTH CONNECTION
MIDI
MIDI CONNECTION
MIDI OUT
LOCAL ON/OFF
MIDI IMPLEMENTATION CHART
AUTO BASS CHORD FINGERING GUIDE
VOICE LIST
STYLE LIST
TROUBLESHOOTING
SPECIFICATIONS
............................................................................................
40
40
41
41
42
42
43
44
44
45
45
46
47
47
47
47
48
48
48
50
50
50
50
51
52
53
54
55
56
......................................................................
..................................................................................
....................................................................
........................................................................
...................................................................................
................................................
...........
.................................
...................................................................
........................................................................
......................................................................
........................................................................
..............................................................................................
.......................................................................................
................................
.......................................................
....................................................................
....................................................................................
...........................................................................
................................................
........................................
...................................................................................
...................................................................................
.......................................................................
.......................................................................
............................................................................................
....................................................................................................
...........
4
TAKING CARE OF YOUR DIGITAL PIANO
SERVICE AND MODIFICATION
This digital piano will supply you with years of musical enjoyment if you follow the simple rules
listed below.
Do not attempt to open the piano or make any change in the circuits or parts of the unit. This
product should be serviced by qualified service personnel when;
·The power supply cord or the plug has been damaged,
·Liquid has been spattered into the unit or it has been exposed to rain,
·The instrument does not appear to operate normally or exhibits a marked change in
performance,
·The instrument has been dropped or the cabinet has damaged.
HANDLING AND TRANSPORT
·Never apply excessive force th the controls, connectors or other parts of the instrument.
·Always unplug cables by gripping the plug firmly, not by pulling on the cable.
·Disconnect all cables before moving the instrument.
·Physical shocks caused by dropping, bumping, or placing heavy objects on the instrument
can result in scratches and/or more serious damage.
·Avoid placing vinyl objects on top of the instrument, vinyl can stick to and discolor the surface.
CLEANING
·Clean the cabinet and panel with a soft, nonabrasive, dry cloth. A wax based polish may be
used on the cabinet. Do not use paint thinner or chemical based polishes.
·To maintain the luster of the keys and buttons wipe with a clean, slightly damp cloth, and
then polish with a soft dry cloth.
LOCATION
·Direct sunlight (near a window)
·High temperatures (near a heat source, outside, or near a window)
·Excessive humidity
·Excessive dust
·Strong vibration
·Leave enough space around the piano for it to be properly ventilated.
·This instrument contains digital circuitry and may cause interference if placed too close to
radio or television receivers. If interference occurs, move the instrument further away from
the affected equipment.
5
POWER
·Turn the power switch off when the instrument is not in use.
·To avoid damage, turn the power switches of all related devices off prior to connection or
disconnection of MIDI cables.
·Turn the power off if the main cable is damaged or the instrument is spattered with liquid.
·Do not switch the unit on and off in quick succession, this places an undue load on the
electronic components.
·Unplug the AC power cord during an electrical storm.
·Avoid plugging the AC power cord into the same outlet as appliances with high power
consumption, such as electric heaters or refrigerators.
·Carefully check the amplifier volume control before starting to play. Excessive volume can
cause permanent hearing loss.
PANEL CONTROLS
The elegant control panel is divided into several distinct sections. The following is a
brief description of all the features located on the control panel.
1.POWER / STANDBY:
The power switch is located to the left of the keys. Press the button to turn the power
on and off. The LCD screen, and the indicator lights for the start up settings, will light
up when the power is turned on.
This piano is equipped with an automatic power off feature, the piano will shut off
automatically after a set time of inactivity. The default time setting is off,the Auto
Power Off Time can be changed in the Function menu.
Please see the Function section of this manual for more information.
Please note, when you turn the power off, do not turn it back on immediately. Wait at
least five seconds to turn the power back on so that the electronic circuits can properly
reset.
POWER/
STANDBY
DEMO
2.VOLUME:
1 Use this button to adjust the overall master volume of the keyboard to your desired
level. Turn to the right to increase the volume and turn to the left to decrease the volume.
Please note, at higher volumes there may be audio "clipping" or distortion depending on
the frequencies being played. Please reduce the volume if this occurs.
Please also note, the keyboard and accompaniment volumes can adjusted independently
from each other by using the KB.VOL and ACCOMP buttons.
3.BASS:
With the bass tone knob you can adjust the sound of your piano to the room or
according to your preferences. As a starting point, set both controls to their neutral
12 o'clock position. If you want more bass sound turn the bass control to the right and
if you want less bass sound turn it to the left.
4.TREBLE:
With the treble tone knob you can adjust the sound of your piano to the room or to your
taste. As a starting point, set both controls to their neutral 12 o'clock position. If you
prefer a brighter sound turn the treble control to the right, if you prefer a more
"rounded" tone turn the treble control to the left.
5.DEMO:
Press the DEMO button, the indicator turns on and the first of the ten different
demonstration songs will play.
Please see the Demo section of this manual for more information.
1
2
3 4
5
6
/ /
PANEL CONTROLS
6.ACCOMP :
Press the TEMPO buttons to select the , the current tempo value will
appear on the display.
tempo value
7.KB.VOL :
8.TRANS :
9.TEMPO :
The metronome is a convenient feature for practice, and can also provide a solid
rhythmic guide when recording. The METRONOME button toggles the metronome
feature on and off. Press the metronome button to hear the tempo & beat.
Use the MTTRO button and the +/YES and the -/NO buttons to select the beat of
your choice;1/4, 2/4, 3/4, 4/4, 5/4, 6/4, 3/8, 6/8,7/8,9/8 or12/8.
10.METRO:
/
/
/
/
/
Press the ACCOMP buttons to adjust the volume of rhythm style and the auto
accompaniment only, the keyboard instrument voice will not be affected.
/
6
7 8
9
10
ACCOMP KB.VOL TRANS TEMPO ME TRO
LAYER
REVER B/
CHORUS
FUNCTION
SYNCHRO STAR T/STOP INTRO/EN DING FILLIN1 FILLIN2
VARIATION
ACCOMP
SPLIT
DUET
EQ
7
Press the KB.VOL buttons to adjust the main volume, you can also adjust the
split/ layer/ learn and USB song volume.
Please see the ADJUSTING THE KEYBOARD VOICE VOLUME.
/
Press the TRANS buttons to adjust the transpose.
Please see the function section of the manual for more information.
/
PANEL CONTROLS
11.SYNCHRO:
Synchronized Start sets the auto accompaniment into standby mode.
The rhythm style will start as soon as you play on the left hand side of the keyboard.
With auto accompaniment engaged the rhythm style will start as soon as you play on
the left hand side of the keyboard and the auto accompaniment will start with the first
recognized chord played, depending on which fingering mode is selected.
Pressing the SYNC START button again will stop the auto accompaniment and put the
keyboard back on standby mode.
12.START/STOP:
The START/STOP button immediately starts or stops the selected rhythm style.
The auto accompaniment will start with the first recognized chord played depending on
the fingering mode selected.
13.INTRO/ENDING:
Each of the 100 rhythm styles can be started or finished with a detailed introduction
and/or ending pattern.
When INTRO/ENDING is engaged, an introduction of rhythm pattern will sound followed
by the main pattern. When a rhythm or accompaniment pattern is already playing, the
accompaniment will be professionally completed with an ending pattern from the next
measure by pressing the INTRO/ENDING button.
14.FILL IN 1:
The fill-in feature provides the accompaniment with a short rhythm pattern of one or
two measures for each style.
Press the FILL IN1 button at any time while the accompaniment is playing to add a fill.
If you holddown the FILL IN1 button, the fill pattern will repeat until the button is
released, and then the mainpattern will resume from the beginning of the next measure.
The FILL buttons can also be usedto start a rhythm style.
15.FILL IN 2 VARIATION:
The 100 rhythm styles and their corresponding auto accompaniments all include a
variation of that style and accompaniment that can be heard simply by engaging the
FILL IN 2 VARIATION button. Press the FILL IN 2 VARIATION button and the fill variation
will play followed by the variation of the selected rhythm style. The FILL buttons can also
be used to start a rhythm style.
Press the FILL IN 1 button again to disengage the variation and return to the main
pattern after the fill.
16.ACCOMP:
ACCOMP KB.VOL TRANS TEMPO ME TRO
LAYER
REVER B/
CHORUS
FUNCTION
SYNCHRO STAR T/STOP INTRO/EN DING FILLIN1 FILLIN2
VARIATION
ACCOMP
SPLIT
DUET
EQ
11
12
13
14
15
16
8
Press this button to close or open the chord.
PANEL CONTROLS
17.LAYER:
Pressing the LAYER button will put the keyboard in the layer or dual mode. Layer refers
to an additional voice that is tone mixed with the main selected keyboard voice. The
assigned layer voice will be heard with the original voice when the keys are played.
Please see the Keyboard Voices section of this manual for more information.
18.REVERB/CHORUS:
19.FUNCTION:
20.SPLIT:
21.DUET:
22.EQ:
With the split feature engaged the keyboard operates in the split or lower mode.
In the split mode the keyboard is divided into two sections. In the right hand section
the main or layered voice will sound, and in the left hand section a different voice can
be assigned to sound when the keys are played.
Please see the Keyboard Voices section for more information.
Wth the duet feature engaged the keyboard is divided into two sections, left A1-C3 and
right C#3-C7 that have the exact same notes. The two sections will share the same
voice and volume. This is a great feature for teaching or when two people want the play
the pianosimultaneously.
Please see the Keyboard Voices section for more information.
Please note, engaging the DUET feature will disable the Layer, the Split and the Auto
Accompaniment modes.
The FUNCTION button is used to access the function menu. The function menu can be
used to adjust or change the values of a number of settings.
Please see the Function section of this manual for more information.
ACCOMP KB.VOL TRANS TEMPO ME TRO
LAYER
REVER B/
CHORUS
FUNCTION
SYNCHRO STAR T/STOP INTRO/EN DING FILLIN1 FILLIN2
VARIATION
ACCOMP
SPLIT
DUET
EQ
17
18
19
20
21 22
Press REVERB/CHORUS enter the effect setting, than press buttons to select a Sub
interface, use the +YES/-NO to change the value.
Please see the Function section of this manual for more information.
9
Press this button enter the equalizer interface.
Please see the Equalizer section for more information.
PANEL CONTROLS
23.+YES/-NO:
Use the +/YES or-/NO buttons to access different options of selected features and functions.
Use the buttons to selected features and functions.
Use the OK button to confirm a selection of a feature button and to
confirm selections within the function menu.
+YES
-NO
R&B SWING BALLAD POP LATI N ST YLE
GOSPEL
M1
WORLD
M2
DANCE
M3
TRADITION AL
M4
BOSA NOVA
ST YLE HOLD
STO RE/BANK
REGIST RATION
GRAND PIAN O
BASS
E. PIANO VIBES ORGAN N. GUITAR VOICE
STRINGS CHOIR BRASS EF FECT
23
24 25
26
27
24.
25.QUICK SELECT VOICE/STYLE:
There are 10 instrument voices that can be selected quickly by pressing one of the quick
select voice/style buttons, The voice name is printed above the select button and the
style name is printed under the select button.
Press the select button, the indicator will light and the selected voice or style name and
its number will be shown on the display.
26.VIOCE/STYLE:
Press VOICE/STYLE button to switch between voice and style, the light not bright is said
to choose the voice, the light bright is said to choose the style.
There is a complete list of all 137 voices and 100 styles listed in the back of the manual.
27.STORE/BANK REGISTRATION:
Press STORE/BANK REGISTRATION button enter registration memory interface.
Please see the Registration memory section for more information.
10
Note:this is the OK button
USB TO DEVICE
TRACK 1 TRACK 2
DELETE
MULTI
RECORD SELECTION
LEFT RIGHT
SONG
RECORD
MEMORY
PLAY/STOP
TRACK
PANEL CONTROLS
28
29
30
31
32
33
28.RECORD:
The RECORD button is used to engage the recording mode to record your playing. This unit
is able to record one song internally, with a 2-melody track sequencer. All note events
will be recorded exactly as they are performed. This recorded information will not be
lost when the power is turned off and can be saved to a USB drive.
Please see the Record section of this manual for more information
29.MEMORY:
The MEMORY button is used to access and engaged USB flash drive.
Please see the USB section of this manual for more information.
30.PLAY/STOP:
Press the PLAY/STOP button to hear your selected recorded tracks when in the Record
mode, the Play Along Songs when in the Play Along Songs Music Teacher mode and the
recorded USB data when the MEMORY button is engaged and a USB drive with MIDI files
is connected. Press the PLAY/STOP button again to stop any playback.
31.TRACK:
When recording to USB use this TRACK button to select recording tracks.
Please see the Record and USB section of this manual for more information
32.TRACK 1/SONG LEFT, TRACK 2/SONG RIGHT:
When in the melody recording mode these indicators will be lit when the corresponding
tracks are selected. Use the TRACK button(s) to choose which track(s) to record in or
to playback.
Please see the Record section of this manual for more information These buttons are
also used in conjunction with the play along songs music teacher. When the SONG LEFT
and SONG RIGHT buttons are pressed simultaneously the Play Along Song music teacher
mode will be engaged or disengaged. This feature can be used as an aid to learn the 55
songs built into the piano. These songs are split into left hand accompaniment and right
hand melody portions. The SONG LEFT and SONG RIGHT buttons are used to choose
which portion(s) of the song to play.
Please see the Play Along Song section of this manual for more information.
Please note, indiscriminate pressing of the RECORD SELECTION and the
SONG/TRACK buttons can overload the piano and cause the circuits to jam. In the
event of that occurrence you may need to turn the piano off to reset the circuits.
33.USB TO DEVICE:
On the far right side of the piano is the USB TO DEVICE port. When you insert your USB
flash drive into this USB terminal you can record your performances and save your
registrations to the USB drive, or play MIDI songs from a USB.
11
CONNECTOR PANEL
Headphones
MIDI
Out
1
2
USB
to Host
Aux In
Line Out
Input
Level
Bluetooth
1
2
3
4 5 6
7
12
1 HEADPHONES 1 & 2: You can play in total silence, without disturbing others in the room,
by plugging a set of headphones into one of the appropriate sockets. When headphones1 are
plugged into either of these jacks the internal speaker system is turned off.
Please note, using headphones at high volume levels may cause permanent hearing
damage.
2 MIDI OUT: This piano contains a MIDI output port that transmits MIDI data to another
MIDI device allowing communication with other products equipped with MIDI interfaces.
Connect the piano's MIDI Out to another device's MIDI In to transmit MIDI data to that
device. Please see the MIDI section of this manual for further details.
3 USB TO HOST: USB is a digital audio interface. The USB connector allows you to connect
the piano directly to your computer’s USB port by USB cable. This allows you transfer MIDI
information over USB to a computer. This piano is USB Class Compliant, therefore there is
no need to install a driver. Just plug it in and the OS will do the rest. The piano will work with
all standard MIDI based computer software.
♫Please note, for recording and listening to MIDI files use the USB TO DEVICE dock
located on the right side of the control panel.
♪Please also note, do not turn on the piano with the USB cable connected to the computer to
avoid having to restart your computer. It can be connected without driver installation under
the Windows XP, Windows 7 and MAC OSX environment. The piano will be recognized as USB
audio device to receive and transmit MIDI messages.
4 BLUETOOTH: Plug the tiny Bluetooth receiver unit into the allotted slot on the connector
panel to stream audio from any Bluetooth device.
Turn the Bluetooth capability on and off in the Function menu.
Please see the Bluetooth section of this manual for more information.
5 AUX IN: These stereo RCA audio input jacks will amplify the supplied signal through the
internal sound delivery system. They can be used to hook up items such as CD players, MP3
player or Cassette player. The audio output from the other sound system can be mixed with
the sound of the piano, this function is convenient for playing along to a favorite song.
6 LINE OUT: These stereo RCA line audio output jacks supplies the piano’s output signal
to externalamplification, such as home stereo, PA system or keyboard amplifier or to send
to a mixing console or tape recorder. The piano's internal sound system will remain on unless
headphones are plugged into either headphone jack.
7 INPUT LEVEL: Use this control knob adjusts the Aux In signal level for the piano. Turn the
knob clockwise to increase the level and counterclockwise to decrease the level.
BOTTOM OF PIANO
1.SOFT PEDAL:
This piano is complete with three function pedals.
When the left soft pedal is engaged the piano volume is reduced and the timbre slightly
altered on the notes that are played.
2.SOSTENUTO PEDAL:
When the center pedal is engaged, the keys that are pressed and already sounding will
continue to sustain and the notes will decay gradually after they are released. Keys that
are played after the pedal has been pressed are not affected.
3.SUSTAIN PEDAL:
Like the damper pedal on an acoustic piano the the right sustain, or damper, pedal will
sustain the sound of the piano voice after releasing the piano keys while engaged. The
length of sustain time is determined by the amount of pressure used to depress the pedal.
13
1 2 3
AC 110/220V~50/60Hz
CAUTION
PEDAL
AC 110V
AC 220V
Connection for the AC power(Fige.1)
You can switch between AC110V and AC220V(Fige.2).
AC 110/220V~50/60Hz
CAUTION
PEDAL
AC 110V
AC 220V
Fige.1
Fige.2
PEDAL
AC110V/220V
DEMO
PLAY DEMO SONGS
This piano has ten different demonstration or demo songs that are designed to
showcase the different sampled voices that are available.
1.Press the DEMO button, the indicator light will blink and the first demo song will
play. The demo song and number will appear on the display and will change as the
subsequent songs play. This piano has ten demo songs that will all play in sequence.
2.Press the DEMO button again to stop the demonstration.
CHOOSE A DEMO SONG
1.Press the DEMO button.
2.Use the buttons to change songs while
the demo is playing.
3.Press the DEMO button again to stop the
demonstration.
PLAY ALONG SONGS DEMO
1.Press the LEFT and RIGHT SONG buttons simultaneously to enter the music teacher
feature. The PLAY/STOP and DEMO button indicator lights will flash and the display
will show the first play along song.
2.Use the buttons to change songs (before or while the demo is playing).
3.Press the DEMO button to start the song.
4.Press the DEMO button again to stop the demonstration, and press the LEFT and
RIGHT SONG buttons simultaneously again to exit the play along song music teacher
mode.
Please see the Play Along Song section of the manual for more information.
DEMO
There are 55 songs for the Play Along Song music teacher feature that can also be
played back for demonstration.
TRACK 1 TRACK 2
LEFT RIGHT
SONG
14
KEYBOARD VOICES
VOICE SELECT
This piano offers 137 GM (General MIDI) authentic acoustic instrument voices offering
unmatched realism with digital effects to further enhance the sound.
Please see the complete list of all 137 voices in the Voice List at the back of this manual.
Please note, the keyboard and accompaniment volumes can adjusted independently
from each other and the master volume by using the KB.VOL and/or ACCOMP buttons .
1.If needed press the VOICE/STYLE button to select voice.(The indicator will be unlit
when VOICE is selected)
2.Press the voice select button that corresponds to the desired voice. The voice name
and its number will show on the display and the newly selected voice is available for
playing.
There are ten voices that can be selected quickly by pressing one of the voice select
buttons: GRAND PIANO/ E.PIANO/ VIBES/ ORGAN/ N.GUITAR/ BASS/ STRINGS/ CHOIR
/ BRASS/ EFFECT. The voice name is printed above the select button.
QUICK SELECT VOICE BUTTONS
R&B SWING BALLAD POP LATIN ST YLE
GOSPEL
M1
WORLD
M2
DANCE
M3
TRADITIONAL
M4
BOSA NOVA
ST YLE HOLD
STORE/BANK
REGISTRATION
GRAND PIANO
BASS
E. PIANO VIBES ORGAN N. GUITAR VOICE
STRINGS CHOIR BRASS EFFECT
1.Press the VOICE/STYLE button to select voice.(The indicator will be unlit when VOICE
is selected)
2.Press the OK button.
3.Use the buttons to select a voice group(Fig.1), press OK button again.
4.Use the buttons to select the voice(Fig.2), press OK button to enter.
The newly selected voice name and number will be on the screen and that voice is
selected for playing on the keyboard.
Please refer to the Voice List at the back of the manual for a list of all available voices.
SELECTING ONE OF THE 137 VOICES
Fig.1 Fig.2
15
+YES
-NO
3.You can also use the +/YES,-/NO buttons to select voice.
KEYBOARD VOICES
ADJUSTING THE KEYBOARD VOICE VOLUME
There are tow ways to adjust the keyboard voice volume.
First method
1.Select the VOLUME module on the main interface(Fig.1), press OK button to enter.
2.Use the buttons to select main volume / split volume/ layer volume/
learn volume/ USB song volume. Than use +YES/-NO buttons or KB.VOL buttons
to adjust the volume(Fig.2).
3.Use the buttons to select the EXIT and press OK button to return to the
main interface.
Second method
1.Press the KB.VOL buttons to enter the VOLUME MIXER interface.
2.Use the buttons to select main volume / split volume/ layer volume/
learn volume/ USB song volume. Than use +YES/-NO buttons or KB.VOL buttons
to adjust the volume.
3.Use the buttons to select the EXIT and press OK button to return to the
main interface.
/
/
/
Fig.1 Fig.2
16
KEYBOARD VOICES
1.Press the LAYER button, the currently assigned layer voice will show on the display,
and the indicator will light up signaling that the layer feature is engaged(Fig.1).
2.Use the +/YES, -/NO buttons to select the desired layer voice.
3.Use the buttons to select the EXIT and press OK button to return to the
main interface.
4.Press the LATER button to turn the layer feature off, the indicator will go out.
If the LAYER button indicator is lit, the layer feature is engaged.
Please also note, engaging the DUET feature will disable the Layer and Split modes.
LAYER
LAYER VOICE
Layer or dual refers to an additional voice that is tone mixed with the selected
keyboard voice. The assigned layer voice will be heard with the original voice when the
layer feature is engaged. If you need to adjust ratio of the layered to main voice
volume, adjust the main voice volume using the KB. VOL button, this will not affect the
layer voice.
17
  • Page 1 1
  • Page 2 2
  • Page 3 3
  • Page 4 4
  • Page 5 5
  • Page 6 6
  • Page 7 7
  • Page 8 8
  • Page 9 9
  • Page 10 10
  • Page 11 11
  • Page 12 12
  • Page 13 13
  • Page 14 14
  • Page 15 15
  • Page 16 16
  • Page 17 17
  • Page 18 18
  • Page 19 19
  • Page 20 20
  • Page 21 21
  • Page 22 22
  • Page 23 23
  • Page 24 24
  • Page 25 25
  • Page 26 26
  • Page 27 27
  • Page 28 28
  • Page 29 29
  • Page 30 30
  • Page 31 31
  • Page 32 32
  • Page 33 33
  • Page 34 34
  • Page 35 35
  • Page 36 36
  • Page 37 37
  • Page 38 38
  • Page 39 39
  • Page 40 40
  • Page 41 41
  • Page 42 42
  • Page 43 43
  • Page 44 44
  • Page 45 45
  • Page 46 46
  • Page 47 47
  • Page 48 48
  • Page 49 49
  • Page 50 50
  • Page 51 51
  • Page 52 52
  • Page 53 53
  • Page 54 54
  • Page 55 55
  • Page 56 56
  • Page 57 57
  • Page 58 58
  • Page 59 59
  • Page 60 60
  • Page 61 61

Artesia AG-50 Owner's manual

Category
Digital pianos
Type
Owner's manual
This manual is also suitable for

Ask a question and I''ll find the answer in the document

Finding information in a document is now easier with AI