3
This product satisfies CE regulations when
shielded cables and connectors are used
to connect the unit to other equipment.
To prevent electromagnetic interference
with electric appliances, such as radios
and televisions, use shielded cables and
connectors for connections.
IMPORTANT NOTE
The mains lead on this equipment is supplied
with a moulded plug incorporating a fuse. The
value of the fuse is indicated on the pin face
of the plug.
If it requires replacing, a fuse approved to
BS1362 of the same rating must be used.
Never use the plug with the fuse cover
omitted if the cover is detachable. If a
replacement fuse cover is required, it must be
of the same colour as the pin face of the plug.
Replacement covers are available from your
dealer.
If the fitted plug is not suitable for the power
points in your house or the cable is not long
enough to reach a power point, you should
obtain a suitable safety approved extension
lead or consult your dealer for assistance.
However, if there is no alternative to cutting
off the plug, remove the fuse and then safely
dispose of the plug. Do not connect the plug
to a mains jack, as there is a risk of shock
hazard from the bared flexible cord.
To disconnect the apparatus from the mains,
the plug must be pulled out from the mains
socket, therefore the mains plug shall be
readily operable.
The product unit accompanying this user
manual is licensed under certain intellectual
property rights of certain third parties.
Precautions
Important Safety Instructions
Read these operating instructions carefully
before using the unit. Follow all the safety
instructions listed below.
Keep these operating instructions handy for
future reference.
1. Read these instructions.
2. Keep these instructions.
3. Heed all warnings.
4. Follow all instructions.
5. Do not use this apparatus near water.
6. Clean only with a dry cloth.
7. Do not block any ventilation openings.
Install in accordance with the
manufacturer’s instructions.
8. Do not install near any heat sources such
as radiators, heat registers, stoves, or
other apparatus (including AV receivers)
that produce heat.
9. Do not defeat the safety purpose of
the polarized or grounding-type plug.
A polarized plug has two blades with
one wider than the other. A grounding
type plug has two blades and a third
grounding prong. The wide blade or
the third prong are provided for your
safety. If the provided plug does not fit
into your outlet, consult an electrician for
replacement of the obsolete outlet.
10. Protect the power cord from being
walked on or pinched particularly at
plugs, convenience receptacles, and the
point where they exit from the apparatus.
11. Only use attachments/accessories
specified by the manufacturer.
12. Use only with the
cart, stand, tripod,
bracket, or table
specified by the
manufacturer,
or sold with the
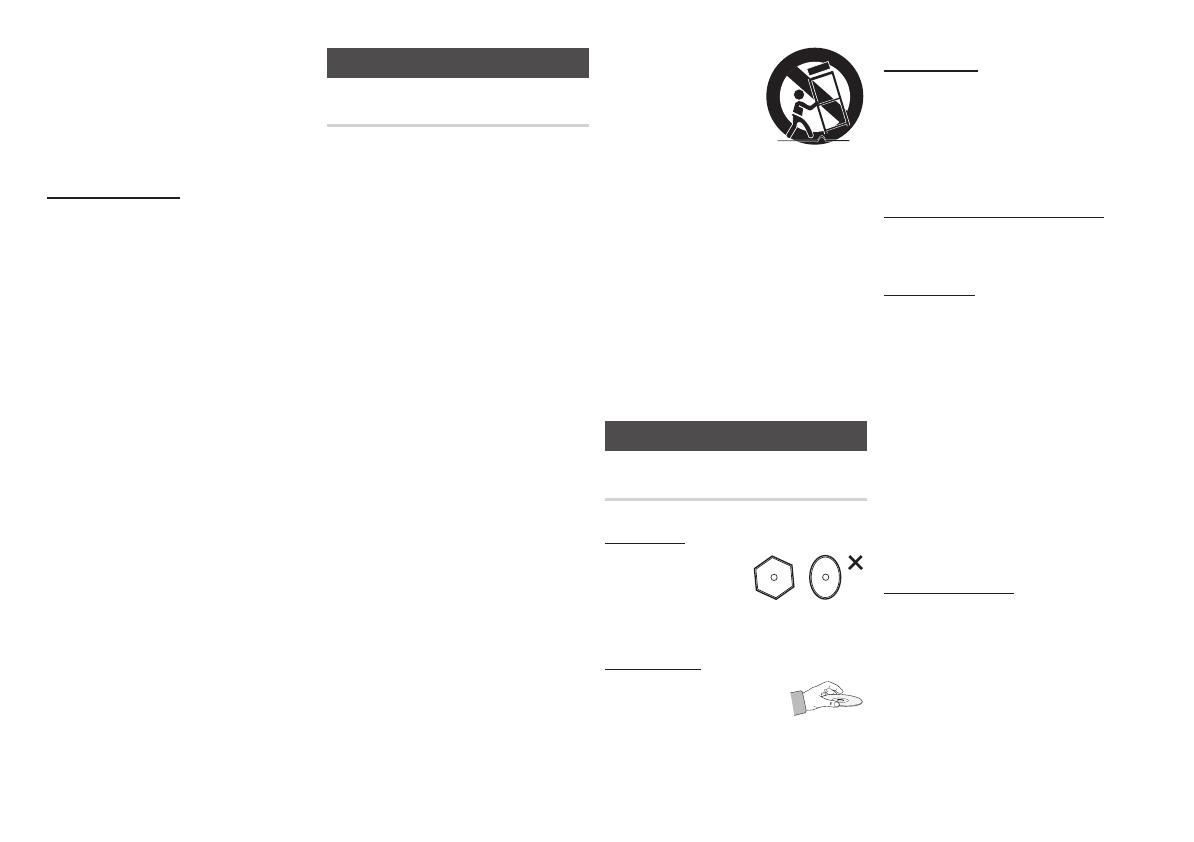
apparatus. When a
cart is used, use caution when moving
the cart/apparatus combination to avoid
injury from tip-over.
13. Unplug this apparatus during lightning
storms or when unused for long periods
of time.
14. Refer all servicing to qualified service
personnel. Servicing is required when
the apparatus has been damaged in any
way, such as when power-supply cord or
plug is damaged, liquid has been spilled
or objects have fallen into the apparatus,
the apparatus has been exposed to rain
or moisture, does not operate normally,
or has been dropped.
Disc Storage & Management
Disc Handling
Disc Shape
• Use discs with
regular shapes. If you
use an irregular disc
(a disc with a special
shape), you can damage the player.
Holding discs
• Avoid touching the surface
of a disc where data has
been recorded.
Blu-ray Discs
• Do not leave a Blu-ray Disc in the player for
long periods of time. Remove the Blu-ray
Disc from the player and store it in its case.
• Be careful not to scratch or leave
fingerprints on the surface of the Blu-ray
Disc.
DVD-VIDEO, Audio CD (CD-DA)
• Wipe off dirt or contamination on the disc
with a soft cloth.
Disc Storage
Be careful not to damage the disc because
the data on these discs is highly vulnerable to
the environment.
• Do not keep under direct sunlight.
• Keep in a cool ventilated area.
• Store vertically.
• Keep in a clean, protective jacket.
• If you move your player suddenly from a
cold place to a warm place, condensation
may occur on the operating parts and lens
and cause abnormal disc playback. If this
occurs, unplug the player, wait for two
hours, and then connect the plug to the
power outlet. Then, insert the disc, and try
to play back again.
Handling Cautions
• Do not write on the printed side with a ball-
point pen or pencil.
• Do not use record cleaning sprays or
antistatic sprays to clean discs. Also,
do not use volatile chemicals, such as
benzene or thinner.
• Do not apply labels or stickers to discs.
(Do not use discs fixed with exposed tape
adhesive or leftover peeled-off stickers.)
• Do not use scratch-proof protectors or covers.
02231Q-BD-ES5000-EN-ENG.indd 3 2012-04-13 오후 4:10:20


