Avent ECOUTE-BEBE SDC620 User manual

Category
Babyphones
Type
User manual

This manual is also suitable for

8 Neck strap 25
9 Cleaning and maintenance 26
10 Storage 26
11 Ordering accessories 26
12 Guarantee and support 26
13 Frequently asked questions 27
1 Introduction
Congratulations on your purchase and welcome
to Philips AVENT! To fully benet from the
support that Philips AVENT offers, register your
product at www.philips.com/welcome.
Philips AVENT is dedicated to producing
caring, reliable products that give parents the
reassurance they need. This Philips AVENT baby
monitor provides round-the-clock support
by ensuring you can always hear your baby
clearly without any distracting noise. The DECT
technology guarantees zero interference and a
crystal clear sound between the baby unit and the
parent unit.
The temperature sensor enables you to monitor
the temperature in your baby’s room, and offers
you personalised settings to help keep your baby’s
room comfortable.
This baby monitor has a baby unit with a
projector and a parent unit with a special soothing
screen that allows you control the soothing
options (nightlight, lullabies and projector) on the
baby unit from a distance.
Table of contents
1 Introduction 3
2 Overview 4
3 Preparing for use 4
3.1 Baby unit 4
3.2 Parent unit 6
4 Using the baby monitor 7
4.1 Positioning the baby monitor 7
4.2 Linking parent unit and baby unit 7
5 Functions and feedback on the
baby unit 9
5.1 Nightlight 9
5.2 Lullaby function 9
5.3 Projector 10
5.4 Paging the parent unit 10
5.5 Battery status light 11
6 Functions and feedback on the
parent unit 11
6.1 Soothing menu 11
6.2 Volume 14
6.3 Talk function 15
6.4 Night dim mode 15
6.5 Baby unit battery low alert 16
6.6 Battery status indications 16
6.7 Signal strength indicator 18
6.8 Reset 18
7 Menu of the parent unit 18
7.1 Navigating the menu 18
7.2 Sensitivity 19
7.3 Eco Max mode 20
7.4 Feed timer 21
7.5 Temperature 22
7.6 Humidity 23
7.7 Cry alert 24
7.8 Clock 24
7.9 Language 24
7.10 Key lock 25
ENGLISH
3
4
III Baby unit
1 Projector
2 Nightlight
3 FIND button
4 Microphone
5 Projector on/off button
6 Next lullaby button
7 Lullaby play/stop button
8 Volume - button
9 Power-on light
10 On/off button
11 Battery status light
12 Nightlight on/off button
13 Volume + button
14 Humidity sensor
15 Temperature sensor
16 Loudspeaker
17 Socket for audio appliance
18 Socket for small plug of adapter
19 Compartment for non-rechargeable
batteries
20 Lid of compartment for non-rechargeable
batteries
21 Small plug of adapter
22 Adapter
23 Auxiliary cable
3 Preparing for use
IMPORTANT: Read the safety instructions
carefully before you use the baby monitor
and keep them for future reference.
3.1 Baby unit
Use the baby unit from the mains. To guarantee
automatic power backup in case of mains failure,
we advise you to insert non-rechargeable batteries.
2 Overview
I Display
1 Signal strength indicator
2 Eco Max indicator
3 Night dim mode symbol
4 Cry alert indicator
5 Mute symbol
6 Battery status indicator
7 Humidity alert symbol
8 Navigation arrow
9 Temperature symbol
10 Message eld
11 Microphone sensitivity indicator
12 Nightlight symbol
13 Lullaby symbol
14 Projector symbol
15 Timer or timer repeat symbol
II Parent unit
1 On/off button
2 TALK button
3 Night dim button
4 - button to scroll backwards
5 Microphone
6 ’link’ light
7 Display
8 Sound level lights
9 MENU button
10 + button to scroll forwards
11 Battery status light
12 OK button
13 Soothing button
14 Handgrip/attachment hole for neck strap
15 Compartment for rechargeable batteries
16 Lid of compartment for rechargeable
batteries
17 Connection points for charging
18 Rechargeable batteries
19 Neck strap
20 Socket for small plug of adapter
21 Charger
22 Small plug of adapter
23 Adapter
5
2 Insert four non-rechargeable batteries.
D
Note:
Make sure the + and - poles point in the right
direction.
3 To reattach the lid, rst insert the lugs into the
openings in the rim of the compartment for
non-rechargeable batteries.
4 Then push down the lid until the lock closes
with a click.
3.1.1 Mains operation
1 Put the adapter in a wall socket and insert the
small appliance plug into the baby unit.
3.1.2 Placing the non-rechargeable batteries
In case of mains failure the baby unit can run on
four 1.5V R6 AA alkaline batteries (not included).
Do not use rechargeable batteries. The baby
unit does not have a charging function and
rechargeable batteries discharge slowly when they
are not in use.
B
Warning:
Unplug the baby unit and make sure your hands
and the unit are dry when you insert non-
rechargeable batteries.
D
Note:
We advise you to use the baby unit on mains
power, as the baby unit has a limited operating
time when you use it on non-rechargeable alkaline
batteries. The operating time on non-rechargeable
batteries is 24 hours.
1 Push the lock to release the lid of the
compartment for non-rechargeable batteries
and remove the lid.
ENGLISH
6
3.2.2 Charging the parent unit
Charge the parent unit before you use it for the
rst time or when the parent unit indicates that
the batteries are low.
Important: You have to charge the parent
unit for the full 10 hours to have a cordless
operating time of 18 hours.
1 Insert the small appliance plug of the adapter
in the socket on the back of the charger. Put
the adapter in a wall socket.
2 Put the parent unit in the charger.
The display goes on and the battery status
indications show that the parent unit is
charging. For battery status indications,
see ‘Battery charge indications’ in chapter
‘Functions and feedback on the parent unit’.
3 Leave the parent unit in the plugged-in
charger until the rechargeable batteries
are fully charged.
D
Note:
When you start using the baby monitor, it takes
four charge and discharge cycles before the
rechargeable batteries reach their full capacity.
3.2 Parent unit
The parent unit runs on two rechargeable
batteries that are supplied with the baby monitor.
3.2.1 Inserting the rechargeable batteries
1 Slide the lid of the compartment for the
rechargeable batteries off the parent unit.
2 Insert the rechargeable batteries.
D
Note:
Make sure the + and - poles of the batteries
point in the right direction.
3 Slide the lid of the compartment for the
rechargeable batteries back onto the parent
unit. Push the lid home until it locks into place
with a click.
7
4.2 Linking parent unit and
baby unit
1 Press and hold the on/off button 3 on the
baby unit for 2 seconds.
The nightlight, the battery status light and
the power-on light go on briey.
2 Press and hold the on/off button 3 on the
parent unit for 2 seconds.
The display goes on and briey displays all
indicators and symbols. Then the indicators
and symbols fade out and the battery status
indicator appears.
4 Using the baby
monitor
4.1 Positioning the baby
monitor
B Warning:
Keep the baby unit out of the reach of the baby.
Never place the baby unit inside the baby’s bed
or playpen.
1 Because the cord of the baby unit presents a
potential strangulation hazard, make sure that
the baby unit and its cord are at least
1 metre/3.5 feet away from your baby.
2 To prevent a high-pitched sound from one
or both units, make sure the parent unit is at
least 1 metre/3.5 feet away from the baby
unit.
ENGLISH
8
What to do if no link is established
The parent unit may be out of range
of the baby unit. Place the parent unit
closer to the baby unit, but not closer
than 1 metre/3.5 feet.
The baby unit or the parent unit may
lose connection because it is too
close to another DECT appliance
(e.g. a cordless phone). Switch off this
DECT appliance or place the unit
further away from this appliance.
The baby unit may be switched off.
Switch on the baby unit.
4.2.1 Operating range
In both standard operating mode with Smart
Eco and in Eco Max mode, the operating
range is 330 metres/1000 feet outdoors and
up to 50 metres/150 feet indoors.
The operating range of the baby monitor
varies depending on the surroundings and
factors that cause interference. Wet and moist
materials cause so much interference that
the range loss is up to 100%. For interference
from dry materials, see table below
D Note:
When you switch on the parent unit for
the rst time or after a reset, you have to
select your preferred display language (see
‘Language’ in chapter ‘Menu of the parent
unit’).
The ‘link’ light on the parent unit starts
ashing red and the message ‘I AM
LINKING’ appears on the display.
When the parent unit and baby unit are
linked, the ‘link’ light turns solid green. The
signal strength indicator and the message
‘LINKED’ appear on the display.
If no connection is established within
10 seconds, the message ‘NOT LINKED’ on
the display alternates with ‘I AM LINKING’.
If still no connection is established after
30 seconds, the parent unit starts to beep
and only the message ‘NOT LINKED’ is shown.
9
5.2 Lullaby function
1 Press the lullaby play/stop button K on the
baby unit to play the last selected lullaby.
The selected lullaby repeats for the set time.
If no lullaby was selected before, lullaby 1
is played.
2 Press the next lullaby button to select
another lullaby from the list.
If no lullaby is playing, the last selected
lullaby starts playing when you press the
next lullaby button
.
When you press the next lullaby button
while a lullaby is playing, the next
lullaby starts playing.
3 To adjust the sound level of the lullaby, press
the volume + or the volume – button on the
baby unit.
Dry materials Material
thickness
Loss of
range
Wood, plaster, cardboard,
glass (without metal,
wires or lead)
< 30cm
(12in)
0-10%
Brick, plywood < 30cm
(12in)
5-35%
Reinforced concrete < 30cm
(12in)
30-100%
Metal grilles or bars < 1cm
(0.4in)
90-100%
Metal or aluminium
sheets
< 1cm
(0.4in)
100%
5 Functions and
feedback on the
baby unit
5.1 Nightlight
The nightlight produces a soft glow that comforts
your baby.
1 Press the nightlight on/off button on the baby
unit to switch on the nightlight.
Q appears on the display of the parent unit.
2 Press the nightlight on/off button again to
switch off the nightlight.
The nightlight dims gradually before it goes
out completely.
Q disappears from the display of the parent
unit.
ENGLISH
10
There are six different patterns and
each pattern is projected for 10 seconds.
When all six patterns have been shown,
the projector starts with pattern 1 again.
The patterns are repeated for the set time
(see ‘Projector’ in chapter ‘Functions and
feedback on the parent unit’).
2 To switch off the projector before the set
time has elapsed, press the projector on/off
button again.
The pattern projected fades out and the
projector switches off.
The projector symbol disappears from the
display.
5.4 Paging the parent unit
If you have lost the parent unit, you can use the
FIND button on the baby unit to locate the
parent unit.
D
Note:
The paging function only works when the parent
unit is switched on.
1 Press the FIND button on the baby unit.
D Note:
You can only set the loudspeaker volume on the
baby unit when a lullaby is playing. If you have
set the volume for the lullaby higher on the baby
unit, the sound will also be louder when you use
the talk function on the parent unit.
4 To stop lullaby playing before the set time has
elapsed, press the lullaby play/stop button K
on the baby unit.
5.3 Projector
You can soothe your baby with coloured light
patterns projected on the ceiling by switching on
the projector.
1 Press the projector on/off button to switch
on the projector.
The projector symbol appears on the display
of the parent unit.
The rst pattern from the projector fades in
to full intensity in 2 seconds. It is projected
for 8 seconds and then fades out for 2
seconds while the next pattern fades in.
11
Replace the batteries when they run low.
If the batteries run out of power while the
baby unit is running on battery power, the
baby unit switches off and the parent unit
loses connection with the baby unit.
D
Note:
We advise you to use the baby unit on mains
power, as the baby unit has a limited operating
time when you use it on non-rechargeable alkaline
batteries. The operating time on non-rechargeable
batteries is 24 hours.
6 Functions and
feedback on the
parent unit
6.1 Soothing menu
The parent unit has a separate soothing menu
for all soothing features: nightlight, lullaby and
projector. To open this menu, press the soothing
button. This menu allows you to operate the
nightlight, the lullabies and the projector on the
baby unit remotely.
1 To open the soothing menu, press the
soothing button.
The message ‘PAGING’ appears on the
display of the parent unit and the parent
unit produces a paging alert tone.
2 To stop the paging alert tone, press the FIND
button on the baby unit again or press any
button on the parent unit.
D
Note:
The paging alert tone stops automatically after
2 minutes.
5.5 Battery status light
1 The battery status light is solid green when
the baby unit runs on battery power and the
batteries contain enough energy.
2 The battery status light ashes red quickly
when the batteries run low while the baby
unit is running on battery power.
ENGLISH
12
If a feature is on, there is a tick above the
feature symbol.
If a feature is off, there is a cross above the
feature symbol.
4 To open the menu with options for the
feature, move the arrow over the options
menu eld and press OK.
5 Use the - and + buttons to navigate through
the list of options and press OK to select an
option.
6 To leave the soothing menu, press the
soothing button.
6.1.1 Nightlight
This soothing feature allows you to switch the
nightlight on or off and to set the nightlight timer.
1 To select the nightlight feature, use the + and
- buttons to move the arrow to above the
nightlight symbol and press OK to switch the
nightlight on or off.
2 To open the menu with nightlight options,
point the arrow at the options menu eld and
press OK to conrm.
The soothing menu screen appears. This
screen shows three features on the baby
unit: nightlight, lullaby and projector. For each
feature there are two segments: the on/off
selection eld and the options menu eld.
D
Note:
If you do not press any button within
7 seconds, the soothing menu closes and
the display returns to normal.
2 Use the + and - buttons to point the arrow
to a soothing feature.
3 To switch on a soothing feature when it is off
or to switch it off when it is on, press OK.
13
2 To open the menu with lullaby options, point
the arrow at the options menu eld and press
OK to conrm.
3 In the menu, you can choose a number of
options:
Select a lullaby from the list of pre-stored
lullabies. The most recently played lullaby
is preselected. If no selection was made
before, lullaby 1 is preselected.
You can also select ‘Play all’ to play all pre-
stored lullabies.
Select ‘Aux’ and select a track if you want
to play music from an external audio
player. To play music from an external
audio player, you have to connect this
player to the socket for audio appliances
on the back of the baby unit (Aux-in)
with the auxiliary cable supplied. You have
to adjust the volume on the audio player,
as the volume + and - buttons on the
baby unit do not work for external audio
appliances.
Press OK to conrm your selection.
4 You can set the lullaby timer for 5 to
20 minutes or you can choose to play
lullabies continuously. Press OK to conrm
the timer setting.
3 You can set the nightlight timer for 5 to
20 minutes or you can switch the nightlight
on continuously. Press OK to conrm.
If you switched on the nightlight, the
nightlight symbol is visible on the parent unit
display when you press the soothing button
to leave the soothing screen.
If you set the nightlight timer, the nightlight
switches off automatically and the nightlight
symbol disappears from the parent unit
display after the time set.
If you switch on the nightlight continuously,
you can switch off the nightlight in the
soothing screen of the parent unit or by
pressing the nightlight button on the
baby unit.
6.1.2 Lullaby
This soothing feature allows you to select the
lullaby playing options and set the lullaby timer.
1 To select the lullaby feature, use the + and
- buttons to move the arrow to above the
lullaby symbol and press OK to play or stop
playing lullabies.
ENGLISH
14
3 You can set the projector timer for 5 to
20 minutes or you can switch the projector
on continuously. Press OK to conrm.
If you switched on the projector, the
projector symbol is visible on the parent unit
display when you leave the soothing screen
by pressing the soothing button.
If you set the projector timer, the projector
switches off automatically and the projector
symbol disappears from the parent unit
display after the time set.
If you switch on the projector continuously, you
have to switch off the projector in the soothing
screen. This makes the projector symbol
disappear from the parent unit display.
6.2 Volume
The volume can be set if the menu is not active.
There are seven volume levels and a ‘volume off
setting.
6.2.1 Setting the volume level
1 Press the + button or the - button once.
The current volume level appears on the
display.
2 Press the + button to increase the volume or
press the - button to decrease the volume.
The parent unit beeps at every volume step
At maximum volume, the parent unit gives
two beeps.
If you selected lullaby playing, the lullaby
symbol is visible on the parent unit display
when you press the soothing button to leave
the soothing screen. The lullaby played is
shown on the second line of the message
eld for 2 seconds.
If you set the lullaby timer, the lullaby
function switches off and the lullaby symbol
disappears from the parent unit display
after the time set.
If you choose to play lullabies continuously,
switch off lullaby playing in the soothing
screen or by pressing the lullaby play/stop
button K on the baby unit.
6.1.3 Projector
This soothing feature allows you to switch on
the projector on the baby unit and program the
duration of projection.
1 To select the projector feature, use the + and
- buttons to move the arrow to above the
projector symbol and press OK to switch the
projector on or off.
2 To open the menu with projector options,
point the arrow at the options eld and press
OK to conrm.
15
D Note:
If you have set the volume for the lullaby
higher on the baby unit, the sound will also be
louder when you use the talk function on the
parent unit.
The ‘link’ light starts ashing green and the
message ‘TALK’ appears on the display.
2 Release the TALK button when you have
nished talking.
6.4 Night dim mode
In night dim mode, the light intensity of the lights
and the display is reduced and the volume of alert
sounds is decreased.
1 Press the night dim button to activate the
night dim mode.
The night dim mode symbol appears on the
display.
The sound level lights and the link light are
dimmed.
The backlight of the display is dimmed.
The volume of any sound alerts set on the
parent unit is reduced.
If no button is pressed for more than
2 seconds, the volume level indication
disappears and the volume setting is saved.
6.2.2 Volume off
Below the lowest volume setting, there is a
‘volume off setting.
1 Press the + button or the - button once.
The current volume level appears on the
display.
2 Press and hold the - button for more than
2 seconds to set the volume to off.
The message ‘MUTE’ and the mute symbol
appear on the display.
D
Note:
If the volume is off, only the sound level
lights show that the baby produces
sounds.
6.3 Talk function
You can use the TALK button on the parent unit
to talk to your baby (e.g. to comfort your baby).
1 Press and hold the TALK button and talk
clearly into the microphone on the front of
the parent unit from a distance of 15-30cm
(0.5-1ft).
ENGLISH
16
6.6 Battery status indications
The battery charge status is indicated on the
display by the battery status indicator and by text
messages.
6.6.1 Battery low
When the rechargeable batteries are low, the
remaining operating time is at least 30 minutes if
the baby monitor works in normal mode at the
highest settings.
1 The battery status indicator on the display is
empty and ashes.
2 The message ‘BATTERY LOW’ appears on the
display.
3 The battery status light ashes red slowly.
4 The parent unit beeps every 10 seconds in
the rst 3 minutes. Then it continues to beep
every minute.
6.6.2 Battery empty
1 If the rechargeable batteries are almost empty,
the battery status light ashes red quickly.
2 If you do not connect the parent unit to the
mains, the following happens in succession:
1 The link with the baby unit is lost.
2 The display goes out.
3 The parent unit switches off.
2 To switch back to normal operating mode,
press the night dim button again.
The night dim mode symbol disappears
from the display.
The sound level lights and the link light
return to their normal brightness.
The backlight of the display lights up fully
again.
The sound alerts go off at the normal sound
level.
6.5 Baby unit battery low alert
1 When the baby unit runs on battery power
and its batteries are low, the parent unit gives
the following signals:
The text ‘BABY UNIT’ appears on the rst
line of the message eld in the display.
The message ‘Change batteries’ scrolls
across the screen on the second line.
The parent unit beeps every 10 seconds
during the rst 3 minutes. After these
3 minutes, the parent unit beeps every
minute.
2 If you do not replace the batteries in time, the
link with the baby unit will be lost.
The message ‘Not linked’ alternates with the
message ‘Change batteries’ on the second
line of the message eld.
D
Note:
If both the batteries of the parent unit
and the baby unit run low at the same
time, rst the battery low message of the
parent unit is shown on the display. When
the parent unit is charged, the battery low
message of the baby unit appears on the
parent unit display.
17
5 The third segment in the battery status
indicator starts ashing when the rechargeable
batteries are charged to more than 50% of
their capacity.
6 When the rechargeable batteries are full, the
following happens:
The third segment in the battery status
indicator stops ashing.
The display goes on for 4 seconds and the
message ‘BATTERY FULL appears on the
display.
7 Disconnect the parent unit from the mains. It
is now ready for cordless use.
D
Note:
You can charge the parent unit when it is
switched off. In that case, the display is off. The
battery status light is on, but does not indicate
the charging status. This light remains on and solid
green as long as the parent unit is connected to
the mains.
D
Note:
If the rechargeable batteries run low very quickly,
they have reached the end of their life and you
have to replace them. To order new rechargeable
batteries, see chapter ‘Ordering accessories’.
D Note:
If you switch on the parent unit when its
rechargeable batteries are almost empty, the
display goes on. The message ‘BATTERY LOW’
appears on the display for 2 seconds before the
parent unit switches off.
6.6.3 Charging
Insert the small plug into the charger and put
the adapter in a wall socket. Place the parent unit
in the charger. When the parent unit charges, the
following happens in succession:
1 The display goes on for 4 seconds and the
text ‘CHARGING’ appears on the screen for
2 seconds.
2 The battery status is solid green when the
parent unit is connected to the mains.
3 The rst segment in the battery status
indicator starts ashing to indicate that the
rechargeable batteries are charging.
4 The second segment in the battery status
indicator starts ashing when the rechargeable
batteries are charged to more than 30% of
their capacity.
ENGLISH
18
‘Temperature low’ alert: 14°C (57°F)
’Temperature high’ alert: 35°C (95°F)
Temperature scale: Celsius
Humidity alert: off
Eco Max mode: off
Feed timer: 02:00
Feed timer: Stop
Vibration alert: off
Cry alert vibration: off
Clock: hidden
Lullaby timer: 15 min.
Projector timer: 15 min.
Baby unit
Loudspeaker volume: 4
Nightlight: off
Projector: off
Nighlight setting: manual
Lullaby: off (lullaby 1 selected)
7 Menu of the parent
unit
All functions described in the following sections can
be operated through the menu of the parent unit.
7.1 Navigating the menu
D Note:
Some menu functions only work when the baby
unit and the parent unit are linked.
1 Press the MENU button to open the menu.
The rst menu option appears on the
display.
6.7 Signal strength indicator
6.7.1 In Smart Eco mode
Smart Eco mode is the standard operating mode.
In this mode, the strength of the DECT signal
depends on the distance between the baby unit
and the parent unit.
If the signal strength indicator has 4 bars, the
connection between the baby unit and the
parent unit is excellent.
If the signal strength indicator has 1 bar or no
bar at all, the signal from the baby unit is very
weak or not available. Take the parent unit
closer to the baby unit to get a better signal.
6.7.2 In Eco Max mode
In this mode the DECT signal from the baby unit
to the parent unit is switched off.
The signal strength indicator has no bar at all
when the DECT signal is off, even when the
parent unit is within range of the baby unit
When the baby unit starts to transmit a
DECT signal because the baby is making a
sound, the display goes on and the signal
strength indicator shows the quality of the
connection between baby unit and parent
unit.
For more information on the Eco Max mode,
see ‘Eco Max mode’ in chapter ‘Menu of the
parent unit’.
6.8 Reset
This function allows you to reset the parent unit
and the baby unit to the factory default settings.
1 Switch off the unit.
2 Press and hold the - button.
3 Switch on the unit again while holding
the - button.
6.8.1 Default settings
Parent unit
Language: English
Loudspeaker volume: 3
Microphone sensitivity: 3
Night dim mode: off
Temperature alert: off
19
If all four segments are lled, the sensitivity
is at its highest level.
If all segments are empty, the sensitivity is
at its lowest.
3 Press OK to conrm the setting.
7.2.1 Sensitivity levels and indications
Icon Sensitivity Description
highest Hear everything from your
baby. The speaker of the parent
unit is continuously on.
high Hear all sounds from soft
babbling and louder. If your
baby does not make any
sound, the speaker of the
parent unit is off.
medium Hear sounds from soft cries
and louder. If your baby makes
softer sounds, the speaker of
the parent unit does not go on.
low The speaker of the parent unit
only goes on if the baby makes
loud sounds, for instance
because it is crying.
2 Use the + button to go to the next option or
the - button to go to the previous option.
D
Note:
The arrow on the display indicates in which
direction you can navigate.
3 Press the OK button to conrm your
selection.
D
Note:
Press the MENU button if you want to leave the
menu without making any changes. If there is no
input in the menu for more than 20 seconds, the
menu closes automatically.
7.2 Sensitivity
This option in the parent unit menu allows you to
set the microphone sensitivity on the baby unit.
The microphone sensitivity determines what noise
level the baby unit picks up, e.g. you will want to
hear when your baby cries, but you may be less
interested in its babbling
1 Select ‘Sensitivity’ in the menu with the + and
- buttons and press OK to conrm.
2 Use the + and - buttons to increase or
decrease the microphone sensitivity. The
sensitivity indication on the display has four
segments.
ENGLISH
20
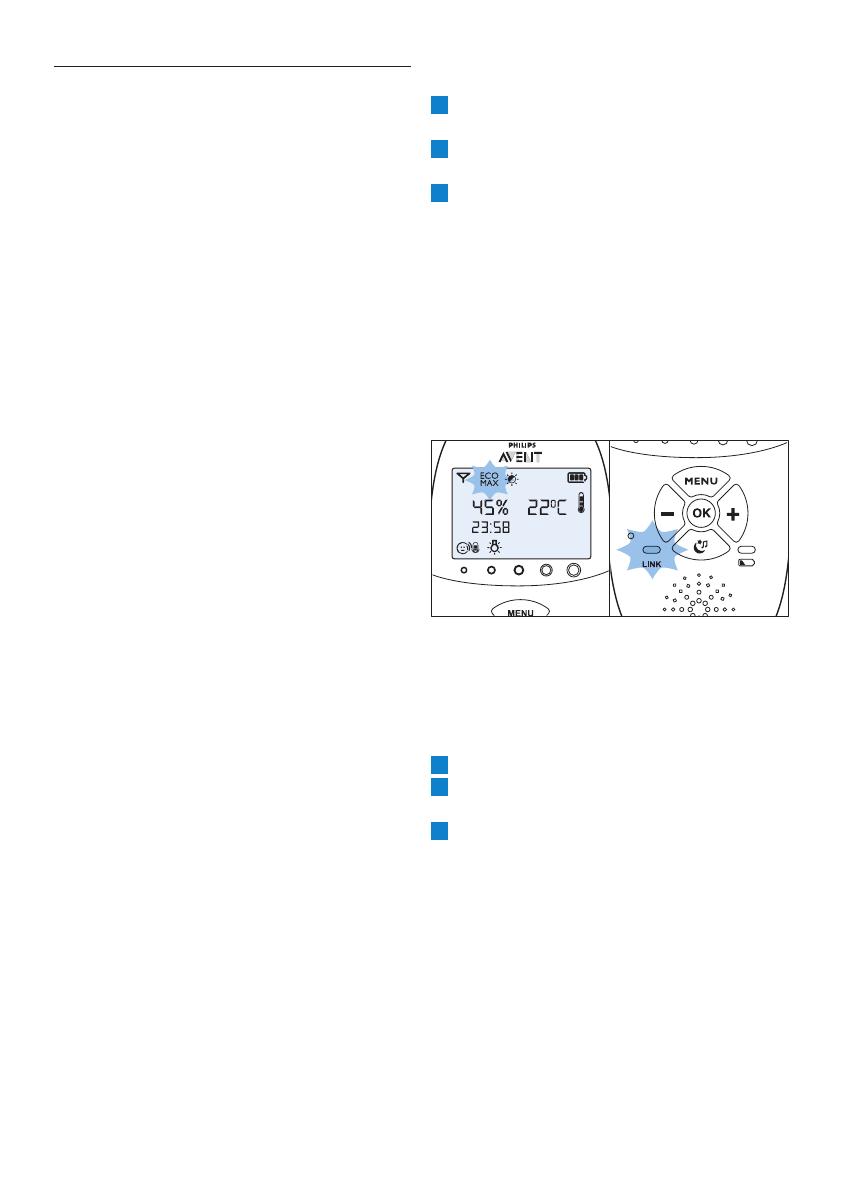
7.3.2 Activating Eco Max mode
1 Select ‘Eco Max’ in the menu with the + and -
buttons and press OK to conrm.
2 When the display shows ‘Turn On’, press OK
to switch on the Eco Max mode.
3 The warning message ‘!No alert if out of
range, OK?’ appears on the display. Press OK
to conrm.
D
Note:
The warning message scrolls across the display
twice. If you do not press OK, the parent
unit leaves the menu and the Eco Max mode
remains off.
The Eco Max indication ashes on the
display. The ‘link’ light ashes green slowly.
When the parent unit receives a signal from
the baby unit because the baby makes a
sound, the ‘link’ light turns solid green again.
7.3.3 Deactivating Eco Max mode
1 Press the MENU button
2 Use the + and - buttons to select ‘Eco Max’
and press OK to conrm.
3 Use the + and - buttons to select ‘Turn Off
and press OK to conrm.
7.3 Eco Max mode
This baby monitor has Smart Eco that
automatically reduces the DECT signal from the
baby unit as the distance between parent unit
and baby unit becomes shorter. By reducing radio
transmission, it helps to save energy.
If you want to save even more energy and to stop
radio transmission, activate the Eco Max mode
in the menu of the parent unit. In this mode, the
DECT signal of the baby unit is switched off. As
soon as the baby makes a sound, the DECT signal
of the baby unit automatically switches on again.
C
Caution:
In Eco Max mode, the parent unit receives
feedback from the baby unit with a delay. When
yourbabymakesasound,thebabyunitrsthas
to reactivate radio transmission before it can
send feedback to the parent unit.
7.3.1 Please note the following:
Before you select the Eco Max mode in the
menu of the parent unit, make sure that the
parent unit and baby unit are within operating
range, see section ‘Operating range’ in chapter
‘Using the baby monitor’. In Eco Max mode
you do not receive feedback when the parent
unit is out of range of the baby unit. You can
check the link by pressing any button on the
parent unit.
If there is no radio transmission from the baby
unit to the parent unit in Eco Max mode, the
sound level lights are off. The sound level lights
go on when the baby unit reactivates radio
transmission because the baby makes a sound
above the selected sensitivity level.
If you want to operate the baby monitor in
Eco Max mode, make sure the microphone
sensitivity is set between level 1 and level 3.
If the microphone sensitivity is set at level
4, the baby unit does not switch off radio
transmission in Eco Max mode.
21
7.4.2 Setting the feed timer alert
1 After step 5 in ‘Setting and using the feed
timer’, select ‘Timer Alert’ with the + and -
buttons. Press OK to conrm.
2 Use the + and - buttons to choose one of the
alert options. The options available are sound
only, sound and vibration and vibration only.
Press OK to conrm.
3 Select ‘xx:xx Start’ with the + and - buttons
and press OK to activate the feed timer
function.
4 When the feed timer alert goes off, press any
key to stop the feed timer and the feed timer
alert.
7.4.3 Repeat the feed timer
1 After step 5 in ‘Setting and using the feed
timer’ or after setting the feed timer alert,
select ‘Timer repeat’ with the + and - buttons.
Press OK to conrm.
2 Choose ‘Repeat ON’ or ‘Repeat OFF’ and
press OK to conrm.
3 Select ‘xx:xx Start’ with the + and - buttons
and press OK to activate the feed timer
repeat function.
Instead of the normal timer symbol, the
timer repeat on symbol appears on the
display.
4 When you press any key to stop the feed
timer alert or if the alert stops automatically
after 2 minutes, the feed timer starts counting
down again.
7.4 Feed timer
You can set the feed timer to alert you that it is
time to feed your baby. The timer can be set from
1 minute to 23 hours and 59 minutes.
7.4.1 Setting and using the feed timer
1 Select ‘Feed Timer’ in the menu with the +
and - buttons and press OK to conrm.
2 Select ‘Set Timer’ with the + and - buttons and
press OK to start setting the timer.
The hour indication starts ashing on the
display.
3 Set the hour and press OK to conrm.
The minutes indication starts ashing on the
display.
4 Set the minutes and press OK to conrm.
5 Select ‘xx:xx Start’ with the + and - buttons.
Press OK to conrm.
The timer symbol appears on the display.
The timer starts counting down.
6 When the timer has reached 00:00, the feed
timer alert goes off, the timer symbol starts
ashing on the display and the message
‘TIMER END’ scrolls across the display.
7 Press any key to stop the alert. If you do not
stop the alert, it stops automatically after
2 minutes.
ENGLISH
22
If the temperature is below the set range,
the temperature alert symbol on the
display has only one segment and ashes.
The message ‘TOO COLD’ appears on the
display.
If the temperature is above the set range,
the temperature alert symbol on the
display has three segments and ashes. The
message ‘TOO HOT’ appears on the display.
7.4.4 Stopping the timer
1 Press the menu button and select ‘Feed Timer’.
2 Use the + and - buttons to select ‘Stop &
Reset’ and press OK to conrm.
7.5 Temperature
A baby sleeps comfortably at a temperature range
between 16°C/61°F and 20°C/68°F. You can set
a minimum and maximum temperature range
and an alert to warn you that the temperature is
outside the set minimum and maximum range.
1 Select ‘Temperature’ in the menu with the +
and - buttons and press OK to conrm.
2 Select ‘Temp Range’ with the + and - buttons
and press OK to conrm.
The minimum temperature indication starts
ashing on the display.
3 Use the + and - buttons to set the minimum
temperature range between 10°C/50°F and
19°C/66°F. Press OK to conrm.
The maximum temperature indication starts
ashing on the display.
4 Use the + and - buttons to set the
maximum temperature range between
22°C/72°F and 37°C/99°F. Press OK to
conrm.
5 Select ‘Alert’ with the + and - buttons. Press
OK to conrm and to start setting the
temperature alert option.
6 Use the + and - buttons to select one of the
alert options. The options available are sound
only, sound and vibration, vibration only and
display only. Press OK to conrm.
After you have conrmed your choice of the
alert option, the temperature alert symbol
appears on the display.
7 Select ‘Temp Scale’ with the + and - buttons.
Press OK to conrm and to start setting the
temperature scale.
8 Select ‘Celsius’ or ‘Fahrenheit’ and press OK to
conrm.
The temperature in the set scale appears
on the display. If the temperature is within
the set range, the temperature alert symbol
has two segments.
  • Page 1 1
  • Page 2 2
  • Page 3 3
  • Page 4 4
  • Page 5 5
  • Page 6 6
  • Page 7 7
  • Page 8 8
  • Page 9 9
  • Page 10 10
  • Page 11 11
  • Page 12 12
  • Page 13 13
  • Page 14 14
  • Page 15 15
  • Page 16 16
  • Page 17 17
  • Page 18 18
  • Page 19 19
  • Page 20 20
  • Page 21 21
  • Page 22 22
  • Page 23 23
  • Page 24 24
  • Page 25 25
  • Page 26 26
  • Page 27 27
  • Page 28 28
  • Page 29 29
  • Page 30 30
  • Page 31 31
  • Page 32 32
  • Page 33 33
  • Page 34 34
  • Page 35 35
  • Page 36 36
  • Page 37 37
  • Page 38 38
  • Page 39 39
  • Page 40 40
  • Page 41 41
  • Page 42 42
  • Page 43 43
  • Page 44 44
  • Page 45 45
  • Page 46 46
  • Page 47 47
  • Page 48 48
  • Page 49 49
  • Page 50 50
  • Page 51 51
  • Page 52 52
  • Page 53 53
  • Page 54 54
  • Page 55 55
  • Page 56 56
  • Page 57 57
  • Page 58 58
  • Page 59 59
  • Page 60 60
  • Page 61 61
  • Page 62 62
  • Page 63 63
  • Page 64 64
  • Page 65 65
  • Page 66 66
  • Page 67 67
  • Page 68 68
  • Page 69 69
  • Page 70 70
  • Page 71 71
  • Page 72 72
  • Page 73 73
  • Page 74 74
  • Page 75 75
  • Page 76 76
  • Page 77 77
  • Page 78 78
  • Page 79 79
  • Page 80 80
  • Page 81 81
  • Page 82 82
  • Page 83 83
  • Page 84 84
  • Page 85 85
  • Page 86 86
  • Page 87 87
  • Page 88 88
  • Page 89 89
  • Page 90 90
  • Page 91 91
  • Page 92 92
  • Page 93 93
  • Page 94 94
  • Page 95 95
  • Page 96 96
  • Page 97 97
  • Page 98 98
  • Page 99 99
  • Page 100 100
  • Page 101 101
  • Page 102 102
  • Page 103 103
  • Page 104 104
  • Page 105 105
  • Page 106 106
  • Page 107 107
  • Page 108 108
  • Page 109 109
  • Page 110 110
  • Page 111 111
  • Page 112 112
  • Page 113 113
  • Page 114 114
  • Page 115 115
  • Page 116 116
  • Page 117 117
  • Page 118 118
  • Page 119 119
  • Page 120 120
  • Page 121 121
  • Page 122 122
  • Page 123 123
  • Page 124 124
  • Page 125 125
  • Page 126 126
  • Page 127 127
  • Page 128 128
  • Page 129 129
  • Page 130 130
  • Page 131 131
  • Page 132 132
  • Page 133 133
  • Page 134 134
  • Page 135 135
  • Page 136 136
  • Page 137 137
  • Page 138 138
  • Page 139 139
  • Page 140 140
  • Page 141 141
  • Page 142 142
  • Page 143 143
  • Page 144 144
  • Page 145 145
  • Page 146 146
  • Page 147 147
  • Page 148 148
  • Page 149 149
  • Page 150 150
  • Page 151 151
  • Page 152 152
  • Page 153 153
  • Page 154 154
  • Page 155 155
  • Page 156 156
  • Page 157 157
  • Page 158 158
  • Page 159 159
  • Page 160 160
  • Page 161 161
  • Page 162 162
  • Page 163 163
  • Page 164 164
  • Page 165 165
  • Page 166 166
  • Page 167 167
  • Page 168 168
  • Page 169 169
  • Page 170 170
  • Page 171 171
  • Page 172 172
  • Page 173 173
  • Page 174 174
  • Page 175 175
  • Page 176 176
  • Page 177 177
  • Page 178 178
  • Page 179 179
  • Page 180 180
  • Page 181 181
  • Page 182 182
  • Page 183 183
  • Page 184 184
  • Page 185 185
  • Page 186 186
  • Page 187 187
  • Page 188 188
  • Page 189 189
  • Page 190 190
  • Page 191 191
  • Page 192 192
  • Page 193 193
  • Page 194 194
  • Page 195 195
  • Page 196 196
  • Page 197 197
  • Page 198 198
  • Page 199 199
  • Page 200 200
  • Page 201 201
  • Page 202 202
  • Page 203 203
  • Page 204 204
  • Page 205 205
  • Page 206 206
  • Page 207 207
  • Page 208 208
  • Page 209 209
  • Page 210 210
  • Page 211 211
  • Page 212 212
  • Page 213 213
  • Page 214 214
  • Page 215 215
  • Page 216 216
  • Page 217 217
  • Page 218 218
  • Page 219 219
  • Page 220 220
  • Page 221 221
  • Page 222 222
  • Page 223 223
  • Page 224 224
  • Page 225 225
  • Page 226 226
  • Page 227 227
  • Page 228 228
  • Page 229 229
  • Page 230 230
  • Page 231 231
  • Page 232 232
  • Page 233 233
  • Page 234 234
  • Page 235 235
  • Page 236 236
  • Page 237 237
  • Page 238 238
  • Page 239 239
  • Page 240 240
  • Page 241 241
  • Page 242 242
  • Page 243 243
  • Page 244 244
  • Page 245 245
  • Page 246 246
  • Page 247 247
  • Page 248 248
  • Page 249 249
  • Page 250 250
  • Page 251 251
  • Page 252 252
  • Page 253 253
  • Page 254 254
  • Page 255 255
  • Page 256 256
  • Page 257 257
  • Page 258 258
  • Page 259 259
  • Page 260 260
  • Page 261 261
  • Page 262 262
  • Page 263 263
  • Page 264 264
  • Page 265 265
  • Page 266 266
  • Page 267 267
  • Page 268 268
  • Page 269 269
  • Page 270 270
  • Page 271 271
  • Page 272 272
  • Page 273 273
  • Page 274 274
  • Page 275 275
  • Page 276 276
  • Page 277 277
  • Page 278 278
  • Page 279 279
  • Page 280 280
  • Page 281 281
  • Page 282 282
  • Page 283 283
  • Page 284 284
  • Page 285 285
  • Page 286 286
  • Page 287 287
  • Page 288 288
  • Page 289 289
  • Page 290 290
  • Page 291 291
  • Page 292 292
  • Page 293 293
  • Page 294 294
  • Page 295 295
  • Page 296 296
  • Page 297 297
  • Page 298 298
  • Page 299 299
  • Page 300 300
  • Page 301 301
  • Page 302 302
  • Page 303 303
  • Page 304 304
  • Page 305 305
  • Page 306 306
  • Page 307 307
  • Page 308 308
  • Page 309 309
  • Page 310 310
  • Page 311 311
  • Page 312 312
  • Page 313 313
  • Page 314 314
  • Page 315 315
  • Page 316 316
  • Page 317 317
  • Page 318 318
  • Page 319 319
  • Page 320 320
  • Page 321 321
  • Page 322 322
  • Page 323 323
  • Page 324 324
  • Page 325 325
  • Page 326 326
  • Page 327 327
  • Page 328 328
  • Page 329 329
  • Page 330 330
  • Page 331 331
  • Page 332 332
  • Page 333 333
  • Page 334 334
  • Page 335 335
  • Page 336 336
  • Page 337 337
  • Page 338 338
  • Page 339 339
  • Page 340 340
  • Page 341 341
  • Page 342 342
  • Page 343 343
  • Page 344 344
  • Page 345 345
  • Page 346 346
  • Page 347 347
  • Page 348 348
  • Page 349 349
  • Page 350 350
  • Page 351 351
  • Page 352 352
  • Page 353 353
  • Page 354 354
  • Page 355 355
  • Page 356 356
  • Page 357 357
  • Page 358 358
  • Page 359 359
  • Page 360 360
  • Page 361 361
  • Page 362 362
  • Page 363 363
  • Page 364 364
  • Page 365 365
  • Page 366 366
  • Page 367 367
  • Page 368 368
  • Page 369 369
  • Page 370 370
  • Page 371 371
  • Page 372 372
  • Page 373 373
  • Page 374 374
  • Page 375 375
  • Page 376 376
  • Page 377 377
  • Page 378 378
  • Page 379 379
  • Page 380 380
  • Page 381 381
  • Page 382 382
  • Page 383 383
  • Page 384 384
  • Page 385 385
  • Page 386 386
  • Page 387 387
  • Page 388 388
  • Page 389 389
  • Page 390 390
  • Page 391 391
  • Page 392 392
  • Page 393 393
  • Page 394 394
  • Page 395 395
  • Page 396 396
  • Page 397 397
  • Page 398 398
  • Page 399 399
  • Page 400 400

Avent ECOUTE-BEBE SDC620 User manual

Category
Babyphones
Type
User manual
This manual is also suitable for

Ask a question and I''ll find the answer in the document

Finding information in a document is now easier with AI