Page is loading ...

Copyright © 2018, Baby Trend, Inc. EFC48FF062818
Store this manual in the pocket provided
on the side of the Car Seat Base.
1-800-328-7363
(8:00am ~ 4:30pm PST)
www.babytrend.com
Baby Trend, Inc.
1607 S. Campus Ave.
Ontario, CA 91761
Carefully read and understand all instructions and warnings in
this manual. Failure to properly use this Car Seat increases the
risk of SERIOUS INJURY or DEATH in a sudden stop or crash.
KEEP INSTRUCTIONS FOR FUTURE USE.
Store this manual in the pocket provided on the back of the seat.
OWNER’S MANUAL
Para instrucciones en Español, conéctese a
www.babytrend.com o llamar al: 1-800-328-7363.
www.babytrend.com
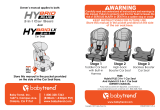
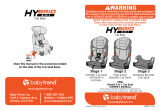
WARNING
Stage
1
Toddler Car Seat
with Built-in
Harness
Stage
2
High-back Booster
Car Seat
Stage
3
Backless Booster
Car Seat
Owner’s manual applies to:
Para instrucciones en Español, conéctese a
www.babytrend.com o llamar al: 1-800-328-7363.
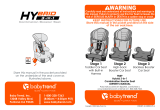
Stage 1
Toddler Car Seat
with Built-in
Harness
Carefully read and understand all instructions and warnings in
this manual. Failure to properly use this Car Seat increases the
risk of SERIOUS INJURY or DEATH in a sudden stop or crash.
FC48
Hybrid PLUS 3-in-1 Car Seat And Hybrid LX 3-in-1 Car Seat
OWNER’S MANUAL
WARNING
Stage 2
High-back
Booster Car Seat
Stage 3
Backless Booster
Car Seat
KEEP INSTRUCTIONS FOR FUTURE USE.
Store this manual in the pocket provided
on the side of the car seat base.
www.babytrend.com

1.0 General Warnings and Information..............................................3
2.0 WARNINGS................................................................................5
3.0 Features and Benets
3.1 Toddler Car Seat..........................................................................9
3.2 Toddler Car Seat........................................................................10
3.3 High-back Booster Car Seat......................................................11
3.4 Backless Booster Car Seat........................................................12
4.0 Preparing Car Seat for Use
4.1 Assemble the Back Support.......................................................13
4.2 Determine the Use Mode and
Prepare the Car Seat for Your Child............................................13
4.3 Select a Vehicle Seating Location to
Install the Car Seat....................................................................14
4.4 Proper Use Check List...............................................................15
5.0 Weight and Height Recommendations
5.1 Car Seat Use Modes.................................................................16
5.2 Toddler Car Seat Use
(WITH Built-in Harness System)................................................17
5.3 High-back Booster Car Seat Use
(WITHOUT Built-in Harness System)........................................18
5.4 Backless Booster Car Seat Use
(WITHOUT Built-in Harness System)........................................19
6.0 Selecting a Vehicle Seating Location.........................................20
6.1 Overall Considerations for Selecting
a Seating Location......................................................................21
6.2 Seating Locations to Avoid.........................................................23
7.0 Toddler Car Seat (WITH Built-in Harness System)
Installation and Use
7.1 Proper Installation ..................................................................24
7.2 Installation Options Based on Child’s Weight
and Installation Method ..........................................................25
7.3 Belt Routing Options for Installation
7.3.1 FRONT ENTRY Belt Routing..............................................26
7.3.2 REAR ENTRY Belt Routing................................................27
7.4 Installation WITH UAS
Table of Contents
Table of Contents
7.4.1 Installation - UAS FRONT ENTRY Belt Routing.................27
7.4.2 Installation - UAS REAR ENTRY Belt Routing...................32
7.5 Installation WITH Lap/Shoulder Belt
7.5.1 Installation - Lap/Shoulder Belt FRONT ENTRY
Belt Routing........................................................................36
7.5.2 Installation - Lap/Shoulder Belt REAR ENTRY
Belt Routing........................................................................41
7.6 Installation WITH Lap Belt only
7.6.1 Installation - Lap Belt only FRONT ENTRY Belt Routing.....45
7.6.2 Installation - Lap Belt only REAR ENTRY Belt Routing......49
7.7 Securing your Child................................................................53
8.0 Booster Car Seat (WITHOUT Built-in Harness System)
Installation and Use....................................................................58
8.1 High-back Booster Car Seat (WITHOUT
Built-in Harness System) Installation and Use...........................59
8.2 Backless Booster Car Seat (WITHOUT
Built-in Harness System) Installation and Use...........................64
9.0 Vehicle Seat Belts
9.1 Check that the Vehicle Seat Belt is Safe to Use..........................68
9.2 Safe Seat Belt Systems.............................................................69
9.3 Unsafe Seat Belt Systems...........................................................71
10.0 Operation and Adjustments
10.1 Assembly and Removal of Back Support..................................75
10.2 Changing Harness Strap Adjustment.........................................76
10.3 Changing Harness Strap Height.................................................78
10.4 Harness Removal and Assembly...............................................81
10.5 Adjusting the Head Support........................................................86
10.6 Assembly and Removal of Vehicle Shoulder Belt Positioner.......86
11.0 Additional Information
11.1 Certications...............................................................................89
11.2 Installation and Use on Aircraft...................................................89
11.3 Vehicle Classes.........................................................................89
12.0 Cleaning and Maintenance.........................................................90
13.0 Replacement Parts......................................................................93
14.0 How to Register your Car Seat..................................................94

1.0 General Warnings and Information
3
WARNING TO PARENTS AND CAREGIVERS
Proper use is required! Even if using this car seat seems
easy to gure out, it is very IMPORTANT TO READ AND
UNDERSTAND THE INFORMATION PROVIDED WITH THIS
CAR SEAT AND IN YOUR VEHICLE OWNER’S MANUALS!
• Failure to follow these instructions and information provided on the Car
Seat labels can result in a child striking the vehicle’s interior during a
sudden stop or crash.
- Your child’s safety depends on proper installation and use of this
car seat. Read and understand all information in this owner’s
manual and on product labels before using this car seat.
- Improper use of the car seat can result in serious
injury or death from a sudden stop or crash.
The ultimate safety of your child depends on the proper and secure
installation of the Car Seat in your vehicle. Proper installation
requires that you read and understand this entire manual and
your vehicle’s owner’s manual before placing your child in the
seat. DO NOT allow others to install or use this Car Seat unless
they completely understand its proper installation and use.
Your child’s safety depends on:
1. Choosing the correct use mode for your child’s weight and
height.
2. Choosing the best location within your vehicle for installing the
Car Seat. Seating positions with frontal Air Bags must be avoided
if possible.
3. Properly installing seat and securing your child.
a. Toddler Use Mode
- Requires proper routing of UAS or the vehicle seat
4
belts and using Top Tether. Always secure the top tether.
- Always properly position harness belts on child.
- Always snugly adjust harness belts around child.
- Car Seat must stay tightly secured in vehicle.
b. Booster Use Mode
- Requires proper routing of vehicle lap/shoulder belt.
- Always properly position the vehicle belts on your child and
snugly adjust the vehicle belts around child.
NOTE: Not all vehicle seat belts or vehicle seats can be used with
this car seat.
No car seat can guarantee protection from injury in every
situation, but proper use helps reduce the risk of serious injury
or death.
NEED HELP?
Contact Baby Trend’s Customer Service Department at 1-800-328-7363
with any questions concerning your car seat. Please have the model
number and manufactured in (date) on your car seat available when
calling or contact one of the following resources:
For recall information, call Transport Canada at 1-800-333-0371 (toll
free), 613-998-8616 (Ottawa area) or go to http://www.tc.gc.ca/eng/
motorvehiclesafety/safedrivers-childsafety-notices-menu-907.htm
1.0 General Warnings and Information

5
Failure to follow these instructions and Car Seat labels can result
in child striking the vehicle’s interior during a sudden stop or
crash.
• Use this Car Seat only with children who weigh between 10 and
45 kg. (22 and 100 lbs) and whose height is between 74 and
145 cm (29 and 57 in.) and who are capable of sitting upright
unassisted.
• Child must be at least 1 year old and 10 kg (22 lbs.) to use
this Car Seat.
• Proper installation of the Car Seat in your vehicle and proper
securing of your child in the Car Seat are essential to ensure
the safety of your child. Your child can be injured in a sudden
stop or crash if not properly secured in the Car Seat or if the
Car Seat is not properly installed in the vehicle.
• Use this Car Seat forward-facing only, with child facing the front
of the vehicle.
• Never use this Car Seat in a vehicle seating
location that has a Frontal Air Bag unless
recommended in the vehicle owner’s manual.
If your vehicle is equipped with a
front passenger side Air Bag, please refer to
the vehicle’s owner’s manual for additional
information about Air Bags and child safety
seat installation.
2.0 WARNINGS
• Toddler Use Mode:
-
Secure this car seat with the vehicle’s Universal Anchorage
System (UAS) if available or with a vehicle belt.
- Always secure Top Tether provided with this child restraint.
- Always use proper belt routing based on child’s weight.
- Snugly adjust harness around child.
- Adjust harness strap height to child’s shoulder height.
- Use Body Insert for smaller child.
- Discontinue use of Body Insert when child’s shoulders are
above Harness Strap Slots in second row up from the
bottom on the back support.
• Booster Use Mode:
- Use only with children that are 3 years old and weigh at
least 18 kg (40 lbs).
- Snugly adjust the vehicle’s lap/shoulder belt around child.
- Properly position the vehicle’s lap/shoulder belt on child.
Lap belt is low on child’s hips and contacting thighs and
shoulder belt is centered on shoulder.
- Use only the vehicle’s lap/shoulder belt system to restrain
a child.
- Never use only a lap belt to secure child in the Booster
Car Seat.
- Use back support as long as possible.
- Never use Body Insert when using Booster Car Seat.
• Never leave your child unattended, even for a moment.
• Never put a Car Seat in a vehicle front seat location unless
specically recommended in vehicle owner’s manual.
6
2.0 WARNINGS

7
• This Car Seat is designed and tested to accommodate a child
of a specic range of WEIGHT and HEIGHT. Using the Car Seat
for a child whose weight or height is outside of these limits will
increase the risk of death or serious injury in the event of a
crash (see Section 5.0 of this manual for WEIGHT and HEIGHT
limits for this car seat).
• DO NOT dress your child in bulky clothing or other garments
that will hinder the harness from being properly latched
between your child’s legs and belts being snugly adjusted
around your child.
• Not all vehicle seat belts or seating locations can be used with
this Car Seat. Read vehicle owner’s manual and “Vehicle Seat
Belts” section in this manual.
• Some vehicles do not have any safe locations for this Car Seat
to be installed. Please refer to both this manual and your
vehicle owner’s manual for complete information for proper,
safe installation of this Car Seat.
• This Car Seat is certied for use in motor vehicles and for
use on aircraft in Toddler Car Seat use mode. DO NOT use this
Car Seat in the home, on boats or in other non-certied
applications.
• DO NOT use accessories or parts other than those provided
by Baby Trend, Inc. Use of accessories or parts from other
manufacturers could alter the performance and safety of the
Car Seat.
8
• The Car Seat may become very hot if left in direct sunlight. Your
child may suffer burns from hot components. Always check the
Car Seat for hot surfaces that may come into contact with
your child before placing your child in the Car Seat. We suggest
that you cover the Car Seat with a blanket or towel if it will be
subject to direct sunlight while you are away from the vehicle.
• This Car Seat is constructed of plastic that can deform over
time if left with any object in the seat while stored. DO NOT
leave heavy objects in the Car Seat while not in use. DO NOT
store the seat in the trunk of your car with heavy objects on it
or with pressure on the Car Seat from the trunk lid.
• Discontinue use of the Harness System and Back Support after
6 years and the Booster Seat Base after 10 years from the date
of manufacture printed on the label on the bottom of the Seat
Base.
• DO NOT use Car Seat if it has been in a crash, it must be
replaced. A crash can cause unseen damage and using it again
could result in serious injury or death.
• DO NOT use Car Seat if it is damaged or is missing parts.
• Always secure the car seat to the vehicle, even when not
occupied. An unrestrained car seat can injure other occupants
in the event of a sudden stop or crash.
2.0 WARNINGS 2.0 WARNINGS

3.0 Features and Benets
3.1 Toddler Car Seat
(WITH Built-in Harness System)
9
3.0 Features and Benets
3.2 Toddler Car Seat
(WITH Built-in Harness System)
10
Harness Strap
Covers
Toddler Shoulder
Belt Guide
Body
Insert
Harness Clip
Toddler Shoulder
Belt Guide
Seat Base
Harness
Adjuster
Strap
Harness Buckle
Armrest
Cup Holder
Harness Straps
Buckle
Tongues
Armrest
Back Support
Head Support
Tummy
Pad
Owner’s Manual
Storage Pocket
(under pad)
Crotch
Strap
Head Support
Pad
Head Support
Release Lever
Top Tether
Hook
Harness Strap
Slots
Belt Path
Opening
Belt Path
Opening
Tether/UAS
Storage
Harness Strap
Connector Plate
Tether/UAS
Storage
UAS Lower
Anchor Belt
UAS
Connector
Head Support (Type 1)
UAS Adjuster
Back Support
Seat Base
Top Tether Strap
Tether Adjuster
Owner’s
Manual
Storage
Pocket
(under pad)
Head Support (Type 2)

3.3 High-back Booster Car Seat
(WITHOUT Harness System)
Seat Base
11
3.0 Features and Benets 3.0 Features and Benets
3.4 Backless Booster Car Seat
(WITHOUT Harness System and Back Support)
12
Seat Base
Armrest
Booster
Shoulder
Belt Guide
Seat Base
Pad
Head Support
Pad
Armrest
Head Support
Booster
Shoulder
Belt Guide
Back Support
Pad
Seat Base
Pad
Seat Base
Armrest
Armrest
Cup Holder
Cup Holder
Shoulder Belt
Positioner Assembly
(Stored in Owner’s
Manual Storage Pocket)
Loop End
Shoulder
Belt Guide
Owner’s Manual
Storage Pocket
(under pad)
Owner’s Manual
Storage Pocket
(under pad)

4.0 Preparing Car Seat for Use
13
The steps to prepare the Car Seat for use with your child are
outlined below and described in detail in this owner’s manual.
4.1 Assemble the Back Support
Before using your Car Seat in your vehicle, you must assemble
the Back Support to the Seat Base (see “Assembly and Removal
of Back Support” section).
4.2 Determine the Use Mode and Prepare the Car Seat
for your Child
Toddler Car Seat WITH Built-in Harness System 10 to 22.7 kg
(22 - 50 lbs.) (see “Weight and Height Recommendations”
section).
- Use Body Insert with smaller child.
- Harness strap height must be at or
just above child’s shoulder.
- Adjusttheharnessstrapheighttot
your child (see “Changing Harness Strap
Height” section).
- Discontinue use of Body Insert when
child’s shoulders are above Harness
Strap Slots in second row up from the
bottom on the back support.
High-back Booster Car Seat WITHOUT Harness System
18 to 45 kg (40 - 100 lbs.) (see “Weight and Height
Recommendations” section).
- Remove the harness system for Booster Car Seat use
(see “Harness Removal and Assembly” section).
- Remove Body Insert.
4.0 Preparing Car Seat for Use
14
- Adjust head support for your child (see”Adjusting the Head
Support” section).
Backless Booster Car Seat WITHOUT Harness System
18 to 45 kg (40 - 100 lbs.) (see “Weight and Height
Recommendations” section).
- Remove the harness system for Booster Car Seat use
(see “Harness Removal and Assembly” section).
- Remove Body Insert.
- Remove Back Support (see “Assembly and Removal of
Back Support” section).
4.3 Select a Vehicle Seating Location to Install the
Car Seat
Toddler Car Seat WITH Built-in Harness System
• Select a vehicle seating location with a tether anchor. Always
secure with top tether.
Note: The belt routing for installation is dependent on child’s
WEIGHT. Use “Installation Options Based on Child’s Weight
and Installation Method” information in “Toddler Car Seat (WITH
Built-in Harness System) Installation and Use” Section.
Booster Car Seat WITHOUT Harness System
• Select a vehicle seating location with a lap/shoulder belt.
• Never use a vehicle seating location with only a lap belt.

4.0 Preparing Car Seat for Use
15 16
4.4 Proper Use Check List
Toddler Car Seat (WITH Harness)
√ Car seat is securely installed in vehicle.
√ The correct belt routing is used based on the
child’s weight and installation method.
√ Top Tether is secured.
√ Harness straps are in harness slots at or just above child’s
shoulders.
√ Harness straps are routed between back of Back Support and
the UAS or vehicle seat belt when installed using “Front
Entry” belt routing.
√ Harness is snugly adjusted around child.
√ Discontinue use of Body Insert when child’s shoulders are
above Harness Strap Slots in second row up from the bottom on
the back support.
Booster Car Seat (WITHOUT Harness)
√ Child is at least 3 years old and 18 kg (40 lbs).
√ Lap and shoulder belts are snugly adjusted around child.
√ Lapbeltislowandatonhipsandcontactingthighs.
√ Shoulder belt is centered on shoulder.
√ Child is sitting up, not slouching down under vehicle lap belt.
√ Shoulder belt is not under arm or behind back of child.
√ Top of child’s ears are below top of head support when
Back Support is used or below top of vehicle seat back or
vehicle headrest.
√ Remove Body Insert.
WARNING!
DEATH or SERIOUS INJURY can occur:
• FAILURE TO USE CHILD RESTRAINT IN A MANNER
APPROPRIATE FOR YOUR CHILD’S SIZE MAY INCREASE
THE RISK OF SERIOUS INJURY OR DEATH.
5.1 Car Seat Use Modes
This Car Seat has three different use modes for the weight and height
ranges as listed below. Instructions for the proper use of this child re-
straint differ greatly for each use mode. Be sure you are using the child
restraint in the correct mode and with the correct features for your child
asidentiedinthisowner’smanual.
1. Toddler Car Seat (WITH Built-in Harness System)
10 - 22.7 kg (22 - 50 lbs.) and 1 year old.
2. High-back Booster Car Seat (WITHOUT Harness System)
18 - 45 kg (40 - 100 lbs.) and 3 years old.
3. Backless Booster Car Seat (WITHOUT Harness System and
Back Support) 18 - 45 kg (40 - 100 lbs.) and 4 years old.
5.0 Weight and Height Recommendations

17
5.0 Weight and Height Recommendations
5.2 TODDLER CAR SEAT USE
(WITH Built-in Harness System)
Child MUST meet all of the following requirements
to use the Toddler Car Seat mode:
• Child must be at least 1 year
old and able to sit upright
unassisted and
• Weigh between 10 and
22.7 kg (22 and 50 lbs.) and
• Child’s height is between
74 and 122 cm (29 and 48 in.) and
• Top of child’s shoulders are
at or below top harness slots.
Baby Trend and the American Academy of
Pediatrics recommend using a Car Seat
WITH Built-in Harness as long as possible
before changing to a Booster Car Seat.
The Toddler Car Seat mode should be used
until the child exceeds either 22.7 kg (50 lbs.),
122 cm (48 in.), or shoulders are above top
harness slots.
Note: If child’s shoulders are above the top harness slots, child is too
large to use built-in harness system. Discontinue use of Body
Insert when child’s shoulders are above Harness Strap Slots in
second row up from the bottom on the back support.
5.0 Weight and Height Recommendations
18
5.3 HIGH-BACK BOOSTER CAR SEAT USE
(WITHOUT Built-in Harness System)
Child MUST meet all of the following requirements
to use the High-back Booster Car Seat mode:
• Child must be at least 3 years
of age and
• Child’s weight is between
18 and 45 kg
(40 and 100 lbs.) and
• Child’s height is between
96 and 127 cm
(38 and 50 in.).
Baby Trend and the American Academy of Pediatrics recommend
using a High-back Booster Car Seat as long as possible before
changing to a Backless Booster Car Seat. The High-back Booster
CarSeatshouldbeuseduntilthechild’sshouldersdonott
comfortably under the side wings of the Head Support.
Parents are advised that the Back Support and Head Support of the
High-back Booster Car Seat provide incremental crash protection in
frontal and side impact crashes. Removing the Back Support and
Head Support earlier than necessary also removes the incremental
crash protection.

19
5.0 Weight and Height Recommendations
5.4 BACKLESS BOOSTER CAR SEAT USE
(WITHOUT Built-in Harness System)
Child MUST meet all of the following requirements
to use the Backless Booster Car Seat mode:
• Child must be at least 4 years
of age and
• Child’s weight is between
18 and 45 kg (40 and 100 lbs.)
and
• Child’s height is between
107 and 145 cm (42 and 57 in.) and
• Top of child’s ears must be
below top of vehicle seat back
or vehicle headrest.
Baby Trend and the American Academy of Pediatrics recommend
using a Backless Booster Car Seat until the child reaches a standing
height of 145 cm (57 in.) before changing to secure the child with a
vehicle seat belt, without a booster car seat.
DEATH or SERIOUS INJURY can occur:
• TO AVOID INJURIES FROM WHIPLASH, TOP OF
CHILD’S EARS MUST BE BELOW TOP EDGE OF
VEHICLE SEAT BACK OR VEHICLE HEADREST.
20
6.0 Selecting a Vehicle Seating Location
WARNING!
WARNING!
• There are many different types of vehicles, vehicle seat belt
systems, or other occupant restraint systems in use today.
Accordingly, this manual can only give guidelines for proper
installation in your vehicle. In addition to this manual, you
must also read and understand the vehicle owner’s manual,
which should address use of child restraints. If your vehicle
owner’s manual does not address the installation of child
restraints, please contact your local vehicle dealer, or the
vehicle’s manufacturer to obtain this information before using
this Car Seat.
Not every seating location within a vehicle may be safe for the
installation of this Car Seat. In fact, some vehicles have no
seating location that is safe for the installation of a Car Seat.
Improper placement of this Car Seat within a vehicle will increase
the risk of death or serious injury in a sudden stop or crash.
See “Vehicle Seat Belts” section for more information on vehicle
seat belts.
Please follow the instructions in this manual and in your vehicle
owner’s manual carefully to ensure proper location and installation
of this Car Seat. If you are uncertain about the proper location of
the Car Seat within the vehicle, contact your vehicle manufacturer
directly or through their dealer before using this seat. You are also
invited to call Baby Trend at 1-800-328-7363 for additional
information or assistance.

21
6.1 Overall Considerations for Selecting A
Seating Location
• Please review your vehicle owner’s manual to determine the best
locationforeachCarSeatusemode,anyspecicinstructionsfor
Car Seat installation, or to determine if any locations are unsafe for
Car Seat installation. If you do not have the vehicle owner’s manual
or the owner’s manual does not address child car seat installation,
please contact the vehicle manufacturer to obtain this information
before using the Car Seat.
• Use rear vehicle seating position
whenever possible. According to
accident statistics, children are safer
when properly restrained in rear vehicle
seating positions, rather than front seating positions. Whenever
possible, this Car Seat should be secured in the rear, center seating
position. The rear center position sometimes is equipped with a
vehicle lap belt only and CANNOT be used when this Car Seat
is used as a booster seat WITHOUT the built-in safety harness
system.
•Onlyuseavehiclefrontseatinglocationifspecicallyallowedin
vehicle owner’s manual and following all instructions in the vehicle
owner’s manual.
• Use a vehicle seating location that has a tether anchor.
Installation with Top Tether is required.
a. Baby Trend requires using the Top Tether provided with this
car seat. Installation of a car seat using the Top Tether can
make getting a secure installation easier and can reduce the
risk of injury in a crash.
6.0 Selecting a Vehicle Seating Location
UAS
The Universal Anchorage System (UAS) is designed to make
installation of child car seats easier by allowing child restraints
to be installed without using the vehicle’s seat belt system.
Since September 1, 2002, at least two rear seating positions of all cars,
mini vans, and light trucks come equipped with lower child restraint
anchor points located between a vehicle’s seat cushion and seat back.
These vehicles are also equipped with at least 3 top tether anchorages
located behind the vehicle seat. Together, the lower anchors and top
tether make up the UAS. All child restraints manufactured since Sep-
tember 1, 2002 have lower anchor and top tether attachments which
will connect to the vehicle’s UAS. Read your vehicle owner’s manual
for exact locations, identication and requirements for use with a
child restraint.
ONLY use UAS to secure your car seat in
a seating position recommended by the
vehicle manufacturer for UAS installation.
Refer to the vehicle owner’s manual for the
vehicle’s top tether anchor locations. Vehicle
anchoragesshouldbeidentiedbyoneof
the symbols shown to the right.
The Hybrid 3-in-1 Toddler Car Seat
(WITH Harness) can be used with
UAS to the maximum weight for
harness use - 22.7 kg (50 lbs.).*
The Hybrid 3-in-1 Booster Car Seat
(WITHOUT Harness) may be secured to
vehicle with UAS in the Booster
use mode to 45 kg (100 lbs.).
* IMPORTANT: Some vehicle manufacturers have lower
weight ratings for UAS lower anchors when used with a
car seat with an internal harness. Consult your vehicle owner’s
manual or contact the vehicle manufacturer for limits on your vehicle’s
UAS lower anchors.
22
6.0 Selecting a Vehicle Seating Location
UAS Lower
Anchor
Vehicle Top
Tether Anchor
Points
UAS Lower
Anchor
Top Tether
Anchor

6.2 Seating Locations to Avoid
DO NOT use this Car Seat in the following seating locations.
• Never use this Car Seat in a vehicle seating
location that has an Active Frontal Air Bag unless
recommended in the vehicle owner’s manual. If
your vehicle is equipped with a front passenger
Air Bag, please refer to the vehicle’s owner’s
manual for additional information about Air Bags
and child safety seat installation.
• DO NOT use this Car Seat in any vehicle seat
that faces to the rear of the vehicle.
• DO NOT use this Car Seat in any vehicle seat
that faces to the side of the vehicle.
• DO NOT use this Car Seat in a vehicle seating location that has a
vehicle seat back that does not lock in position. A vehicle seat back
that folds forward must lock to prevent it from moving forward in a
sudden stop or crash.
6.0 Selecting a Vehicle Seating Location
23
24
7.0 Toddler Car Seat (With Built-in
Harness) Installation and Use
7.1 Proper Installation
WARNING!
• Proper installation is required.
The belt routing for securing
this Car Seat in a vehicle is
dependent on the child’s WEIGHT.
• Secure this child restraint with
the Top Tether strap and either
the UAS lower anchor belt or the
vehicle belt as instructed in this
owner’s manual.
• UAS or vehicle seat belt must
stay tightly adjusted around
Car Seat at all times.
• UAS or vehicle seat belt MUST be routed through Back
Support of Car Seat when using harness system.
• Snugly adjust harness provided with the
Car Seat around child.
• Belt routing for installation MUST be
checked and revised, if necessary, when
child’s WEIGHT reaches 18.1 kg (40 lbs).
• Harness straps must be through harness
strap slots at or just above child’s shoulders.
• Never place UAS or vehicle seat belt in
front of child when using harness system.
Top
Tether

Note:
- Baby Trend requires using the Top Tether provided with this
Car Seat.
- Installation of a car seat using the Top Tether can make getting
a secure installation easier and can reduce the risk of injury in a
crash.
7.3 Belt Routing Options for Installation:
7.3.1 FRONT ENTRY Belt Routing
• Start by sliding the UAS belt
or vehicle seat belt under the
Armrest .
• From the front of the car seat,
insert the UAS connector or
the vehicle seat belt latch plate
into the Belt Path Opening in the
Back Support .
• Pull the UAS or vehicle seat
belt through Belt Path Opening
and across the back of Back
Support, over the Harness Straps,
and to the Belt Path Opening
on the opposite side .
• From the back of the Back Support, insert the UAS connector or
the vehicle seat belt latch plate into the Belt Path Opening in the
Back Support .
• Pull the UAS or vehicle seat belt through and slide the belt under
the Armrest on the opposite side .
7.0 Toddler Car Seat (With Built-in
Harness) Installation and Use
25
The belt path routing used to secure this car seat into
a vehicle is dependent on the child’s WEIGHT and
installation method.
- Belt routing for installation and use with children 10 to 18 kg
(22 to 40 lbs.) differs from the belt routing for installation and use
with children 18.1 to 22.7 kg (40 to 50 lbs.). See chart below and
“Belt Routing Options for Installation” section for “FRONT ENTRY”
and “REAR ENTRY” belt routing information.
7.2 Installation Options Based on
Child’s Weight and Installation Method
Use the table below to determine the proper belt routing based on
your child’s weight and installation method.
Child’s Weight Installation Method Belt Routing
Children
10 to 18 kg
(22 to 40 lbs.)
UAS Rear Entry
Lap/Shoulder Belt Rear Entry
Lap Belt Only Rear Entry
Children
18.1 to 22.7 kg
(40 to 50 lbs.)
UAS Front Entry
Lap/Shoulder Belt Front Entry
Lap Belt Only Front Entry
7.0 Toddler Car Seat (With Built-in
Harness) Installation and Use
26
1
Armrest
Belt Path
Openings
Top
Tether
5
4
5
4
3
3
2
2
1
Route UAS or vehicle seat belt
over top of Harness Straps.

To secure car seat in vehicle:
1. If Back Support is not attached, assemble the
Back Support (see “Assembly and Removal of
Back Support” section).
2. If Harness is not attached, assemble the Harness.
(see “Harness Removal and Assembly” section).
3. Adjust the harness strap height for your
child – Harness straps MUST be at or just
above the child’s shoulders (see
“Changing Harness Strap Height” section).
4. Route the UAS Lower Anchor Belt using
the “FRONT ENTRY” belt routing as
shown in Section 7.3.1.
- Route UAS Lower Anchor Belt
7.3.2 REAR ENTRY Belt Routing
• From the rear of the car seat,
insert the UAS connector or
the vehicle seat belt latch plate
into the Belt Path Opening in the
Back Support .
• Pull the UAS or vehicle seat belt
through the Belt Path Opening to the
front of the car seat. Slide the belt under
the seat pad and across the front of the
Back Support to the Belt Path Opening
on the opposite side .
• From the front of the Back
Support, insert the UAS
connector or the vehicle seat belt
latch plate into the Belt Path Opening
in the Back Support and pull the
UAS or vehicle seat belt through .
7.4 Installation WITH UAS
7.4.1 Installation - UAS FRONT ENTRY Belt Routing
• Use this installation method when using with
children 18.1 to 22.7 kg (40 to 50 lbs.).
27
7.0 Toddler Car Seat (With Built-in
Harness) Installation and Use
Back
Support
Belt Path
Openings
1
1
2
3
2
3
7.0 Toddler Car Seat (With Built-in
Harness) Installation and Use
28
WARNING!
• Only use the car seat UAS in vehicle seating positions
designated by the vehicle manufacturer as UAS
use positions
and that have anchor spacing of 280 mm (11 inches).
• Harness straps MUST be routed between back of Back
Support and the UAS belt when installed using “FRONT
ENTRY” belt routing.
• The car seat must be held tightly by the UAS Lower Anchor
Belt and Top Tether.
• Never attach more than one UAS Lower Anchor Connector or
Top Tether Hook to a vehicle anchorage unless recommended
in the vehicle owner’s manual.
• Top Tether MUST be secured.
Top
Tether
FRONT
ENTRY
Belt
Routing
Route UAS or vehicle seat belt
over top of Harness Straps

over top of the Harness Straps so that
Harness Straps are routed between
back of Back Support and UAS Belt.
5. Place Top Tether Strap over the top of the
Head Support and rest inside seating area.
6. Place the Car Seat on the vehicle seat in a seating
location equipped with UAS and centered between
the UAS anchorages (see “Selecting a
Vehicle Seating Location” section).
7. If the vehicle seat back is adjustable, adjust
into the upright position or the position
speciedinthevehicleowner’s
manual for use with a car seat.
8. Attach the UAS connectors on the
Lower Anchor Belt to the vehicle UAS
anchorages and . Listen for
the “click” when the connectors
lock onto the vehicle anchorage.
9. Pull to check that the connectors
are securely attached .
10. Place knee inside seat and while
pressing down, pull on the free end of the
UAS Lower Anchor Belt to tighten the
UAS Lower Anchor Belt around the car seat.
29
7.0 Toddler Car Seat (With Built-in
Harness) Installation and Use
30
7.0 Toddler Car Seat (With Built-in
Harness) Installation and Use
1 2
3
1
3
UAS
Connector
2
Top
Tether
11. Attach Top Tether Hook to vehicle tether
anchor and . Listen for the “click”
when the tether hook locks onto the
vehicle tether anchor.
12. Pull on the Top Tether Strap to check that
the Tether Hook is securely attached .
13. Pull on free end of Top Tether Strap until
all slack is removed from the Top Tether .
14. Check for a secure installation by
grasping the car seat armrests and
pushing side-to-side and front-to-back.
The car seat should not move more
than 2.5 cm (1 inch) in either direction.
• If the car seat moves more than
2.5 cm (1 inch), retighten the UAS belt
and Top Tether and test again.
• If the car seat moves less than 2.5 cm (1 inch),
installation is complete. However if the
car seat still moves more than 2.5 cm (1 inch),
try another seating position, installing with a
vehicle belt or see the “Vehicle Seat Belts” section
and check your vehicle owner’s manual for
information on securing car seats.
1
1
2
1 2
1
2
3
4
3
4
Top
Tether
2

31
7.0 Toddler Car Seat (With Built-in
Harness) Installation and Use
32
7.0 Toddler Car Seat (With Built-in
Harness) Installation and Use
7.4.2 Installation - UAS
REAR ENTRY Belt Routing
• Use this installation method when using with
children 10 to 18 kg (22 to 40 lbs.).
To secure car seat in vehicle:
1. If Back Support is not attached, assemble the Back Support
(see “Assembly and Removal of Back Support” section).
2. If Harness is not attached, assemble the Harness
(see “Harness Removal and Assembly” section).
3. Adjust the harness strap height for your child
– Harness straps MUST be at or just above the
child’s shoulders (see “Changing Harness
Strap Height” section).
WARNING!
• Only use the car seat UAS in vehicle seating
positions designated by the vehicle manufacturer for use
with UAS and that have anchor spacing of 280 mm (11 inches).
• The car seat must be held tightly by the UAS Lower Anchor
Belt and Top Tether.
• UAS Lower Anchor Belt routing must be changed to Front
Entry when child’s WEIGHT is 18.1 kg (40 lbs.) or more.
• Never attach more than one UAS Connector or Top
Tether Hook to a vehicle anchorage unless recommended in
the vehicle owner’s manual.
To remove car seat:
1. Loosen Top Tether by pressing the button
on Tether Adjuster and sliding belt through
adjuster .
2. Unhook Top Tether Hook from vehicle tether
anchor. Press up on retainer , unhook
Tether Hook , and remove .
3. Loosen UAS Lower Anchor Belt by
putting knee in seat and while pressing
down , press the button on UAS
Adjuster and slide belt through
adjuster.
4. Unhook UAS Connectors from vehicle
anchors. Press up on retainer ,
unhook Tether Hook , and remove .
NOTE: When removing the UAS
Connector, rotating the connector
90º can assist in removal from
vehicle anchor.
1
2
3
4
1
2
1
2
2
3
1
2
3
1
2
3
4
1
Tether
Adjuster

10. Place knee inside seat and while
pressing down, pull on the free end of the
UAS Lower Anchor Belt to tighten the UAS
Lower Anchor Belt around the Car Seat.
Note: Routing free end of UAS belt through Belt
Path Opening and then pulling to tighten
makes tightening the UAS belt easier.
11. Attach Top Tether Hook to vehicle tether
anchor and . Listen for the “click” when
the tether hook locks onto the vehicle tether
anchor.
12. Pull on the Top Tether Strap to check that
Top Tether Hook is securely attached .
13. Pull on free end of Top Tether Strap until all
slack is removed from top tether .
14. Check for a secure installation by grasping
the car seat armrests and pushing side-to-side
and front-to-back. The car seat should not
move more than 2.5 cm (1 inch) in either
direction.
• If the car seat moves more than
2.5 cm (1 inch), retighten the UAS
belt and test again.
• If the car seat moves less than 2.5 cm (1 inch),
installation is complete. However if the car seat still
moves more than 2.5 cm (1 inch), try another seating
position, installing with a vehicle belt, or see the
“Vehicle Seat Belts” section and check your vehicle
owner’s manual for information on securing car seats.
4. Route the UAS lower anchor belt using
the “REAR ENTRY” belt routing as shown
in Section 7.3.2.
5. Place Top Tether over top of Head Support and
rest inside seating area.
6. Place the car seat on the vehicle seat in
a seating location equipped with UAS
and centered between the UAS
anchorages (see “Selecting a Vehicle
Seating Location” section).
7. If the vehicle seat back is adjustable, adjust
into the upright position or the position
speciedinthevehicleowner’smanual
for use with a car seat.
8. Attach the UAS Connectors on the UAS
Lower Anchor Belt to the vehicle UAS
anchorages and . Listen for the “click”
when the connectors lock onto the vehicle
anchorage.
9. Pull to check that the connectors are
securely attached .
33
7.0 Toddler Car Seat (With Built-in
Harness) Installation and Use
34
7.0 Toddler Car Seat (With Built-in
Harness) Installation and Use
REAR
ENTRY
Belt
Routing
1
2
1
2
1
2
3
4
Top Tether
1 2
3
4
Top Tether
UAS
Connector
3
1 2
1
3
2

35
7.0 Toddler Car Seat (With Built-in
Harness) Installation and Use
7.5 Installation WITH Lap/Shoulder Belt
7.5.1 Installation - Lap/Shoulder Belt
FRONT ENTRY Belt Routing
• Use this installation method when installing with
children 18.1 to 22.7 kg (40 to 50 lbs.).”
36
7.0 Toddler Car Seat (With Built-in
Harness) Installation and Use
To remove car seat:
1. Loosen Top Tether by pressing the button
on Tether Adjuster and sliding belt through
adjuster .
2. Unhook Top Tether Hook from vehicle tether
anchor. Press up on retainer , unhook
Tether Hook , and remove .
3. Loosen UAS Lower Anchor Belt by
putting knee in seat and while pressing
down , press the button on UAS
Adjuster and slide belt through
adjuster .
4. Unhook UAS Connectors from vehicle
anchors. Press up on retainer ,
unhook UAS Connector , and remove .
NOTE: When removing the UAS
Connector, rotating the connector
90º can assist in removal from
vehicle anchor.
1
2
3 4
1
2
1
2
2
3
1
2 3
1
To secure car seat in vehicle:
1. If the Back Support is not attached, assemble
the Back Support (see “Assembly and
Removal of Back Support” section).
2. If Harness is not attached, assemble the Harness
(see “Harness Removal and Assembly” section).
3. Store UAS Connectors on back
of seat.
WARNING!
• Vehicle seat belt system MUST stay tightly adjusted around
car seat at all times. If vehicle seat belt does not stay tight,
read vehicle owner’s manual and “Vehicle Seat Belts” section
in this manual.
• Harness straps MUST be routed between back of the Back
Support and the vehicle lap/shoulder belt when installed
using “FRONT ENTRY” belt routing.
UAS Connectors
2
3
4
1
Tether
Adjuster

4. Adjust the harness strap height for
your child – Harness straps MUST be at or
just above the child’s shoulders (see “Changing
Harness Strap Height” section).
5. Place Top Tether over the top of the Head
Support and rest inside seating area.
6. Place the car seat on the vehicle seat in a
seating location equipped with Lap/Shoulder
belt and centered between the Lap/Shoulder
belt anchorages (see “Selecting a Vehicle
Seating Location” section).
7. If the vehicle seat back is adjustable,
adjust into the upright position or the
positionspeciedinthevehicleowner’s
manual for use with a car seat.
8. Pull the vehicle Lap/Shoulder belt out
and route through the car seat using
the “FRONT ENTRY” belt routing as
shown in Section 7.3.1 and buckle
the vehicle seat belt.
- Lap belt section of the vehicle
Lap/Shoulder Belt must be
routed under armrest and
shoulder belt section must be
over the top of the armrest.
- Route Vehicle Lap/Shoulder Belt over
top of the Harness Straps so that
Harness Straps are routed between
back of Back Support and vehicle belt.
9. Pull to check that the vehicle buckle is
securely locked.
10. Position the vehicle shoulder belt on the
side of the car seat nearest the vehicle
buckle over the top of the armrest and
route it through the Toddler Shoulder
Belt Guide.
Move the shoulder belt on the side
opposite the vehicle buckle up between
the Head Support and top of Back
Support as shown.
11. For vehicles with switchable retractors,
pull the shoulder belt all the way out to
switch the retractor into the locking retractor
mode and release the shoulder belt allowing
it to retract.
12. Place knee inside seat and while pressing
down , pull on the vehicle shoulder belt just
above vehicle buckle to tighten the vehicle
lap belt around the car seat.
37
7.0 Toddler Car Seat (With Built-in
Harness) Installation and Use
7.0 Toddler Car Seat (With Built-in
Harness) Installation and Use
38
Top
Tether
FRONT ENTRY
Belt Routing
1
2
1
2
Top
Tether
Toddler
Shoulder
Belt
Guide
Shoulder
belt on side
opposite
vehicle buckle
Harness Straps must be
between back of Back Support
and Lap/Shoulder Belt.
Shoulder
Belt
Lap Belt
/