Carefree 12V Pop-Up Camper Lift Installation guide
- Type
- Installation guide

P3008301AV Printed in USA October, 2008
Installation Manual
COVER ASSEMBLY
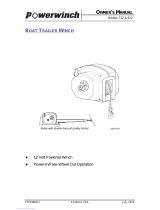
For the Powerwinch Motorized Folding Camper Winch
pwFCW103
The Cover Assembly for the Powerwinch Motorized Folding Camper
Winch is available as an option and ordered separately from the winch.
The cover is designed to fit most general applications but may not fit all
camper styles. Consult your dealer before purchasing. Many camper
manufacturer's also offer cover options.
PRIOR TO INSTALLING THE COVER
1. Install and adjust the winch per the instructions in the Folding Camper Winch
Owner's manual. Ensure that the winch is operating correctly.
2. Lower the camper top completely.
3. Disconnect the battery cables to the winch.
4. Place wheel chocks under the wheels to prevent the camper from moving.
Powerwinch 2145 W. 6th Avenue Broomfield, CO 80020
by Carefree of Colorado 303-469-3324 ♦ www.powerwinch.com

COVER INSTALLATION POWERWINCH
2
COVER INSTALLATION
Bracket
#10 x 3/8 Screw
(2 plcs)
1/4 x 1/2 Screw
and Nut (2 plcs)
#10 x 3/8 Screw
#10 x 3/8 Screw
(3 plcs)
Trim Molding
Front Cover
Bottom Cover
pwFCW010
1. Attach the cover bracket to the winch using two (2) each 1/4-20 x 1/2 screws
and nuts. Make sure that the bracket is oriented as shown in the diagram.
2. Screw two (2) #10 x 3/8 self tapping screws into the bracket. These screws
anchor the bracket and prevent it from pivoting.
3. Press the trim molding onto the back edge of the front cover.
4. If installing the switch in the cover, follow the directions on page
3 then return to
step 5 below.
5. Gently press the cover between the bracket and the upper lip of the
mounting plate. Align the holes in the cover with the top holes in the
bracket.
6. Secure the cover to the bracket using two (2) #10 x 3/8 self tapping screws.
7. Check that the wire harnesses are routed away from any moving parts such as the
gear train and cable and secure to the frame using nylon ties or equivalent.
8. Place the bottom cover on the bottom of the top cover and align the three (3)
attachment holes.
9. Attach the bottom cover using three (3) #10 x 3/8 self tapping screws. Use care
to not over tighten the screws. Over tightening can cause the plastic to strip
out.
Tip: Install the front screw first then install the two side screws.
10. Check that all fasteners and wire cables are secure then attach the winch
power cables to the battery. The
RED wire with the 50 amp circuit breaker
goes to the
POSITIVE (+) terminal of the battery/ the BLACK wire to the
NEGATIVE (-) terminal.
This completes the cover installation for the Powerwinch Folding Camper Winch.

POWERWINCH COVER INSTALLATION
3
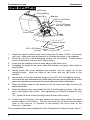
OPTIONAL SWITCH INSTALLATION
These directions are if the switch is to be mounted in the cover if there is not a
suitable frame location.
Drill a 15/32” Hole
Using the Dimple as
a Drill Center.
Switch
Switch Plate
Switch Boot
pwFCW011
Front Cover
1. Locate the dimple in the right side of the top cover. This is the drill center for
the switch.
2. Drill a 15/32" hole into the cover.
3. Clean and dry the surface then peel off the paper backing from the switch
plate and adhere the switch plate over the hole. The hole in the plate must
align with the hole drilled in step 2.
4. Set the cover next to the winch so that the switch cable can reach the hole in
the cover.
5. Mount the switch using the supplied jamb nuts and the rubber switch boot.
Orient the switch so that the notch in the switch aligns with the tab in the
hole of the switch plate.
6. Return to step 5 on the previous page.

COVER INSTALLATION POWERWINCH
4
www.powerwinch.com
-
 1
1
-
 2
2
-
 3
3
-
 4
4


Carefree 12V Pop-Up Camper Lift Installation guide
- Type
- Installation guide
Ask a question and I''ll find the answer in the document
Finding information in a document is now easier with AI
Related papers
Other documents
-
 Powerwinch 667391000 Owner's manual
-
WARRIOR H-EN 15000 Winch User manual
-
 Powerwinch 912 Owner's manual
-
Dodge Ram Power Wagon Owner's manual
-
RAM 3500 Owner's manual
-
-
 Baja Marine YEAR 2006 User manual
-
-
-
Bayliner 1996 Capri OB Owner's manual


