Page is loading ...

Width - 150 (180)cm
Depth - 90cm
Height - 75cm
Important – Please read these instructions fully before starting assembly
Customer Helpline: 0345 640 0800
Assembly Instructions - Please keep for future reference
Dimensions
Issue 1 - 27/03/15
Shenley Extendable Table
If you need help or have damaged or missing parts, call the
392/2628

1
Assembly Instructions
Close table
6
Step 1
To release Safety lock
To secure Safety lock
1
2
3
1 2
3
SAFETY LOCK INSTRUCTION.
Step 2
Step 3
Safety and Care Advice
Important – Please read these instructions fully before starting assembly
Care and maintenance
• Check you have all the
components and tools listed on
page 2 and 3.
• Remove all fittings from the
plastic bags and separate them
into their groups.
• Keep children and animals
away from the work area, small
parts could choke if swallowed.
• Make sure you have enough
space to layout the parts before
starting.
• Only clean using a damp cloth
and mild detergent, do no use
bleach or abrasive cleaners.
• From time to time check that
there are no loose screws on
this unit.
• This product should not be
discarded with household waste.
Take to your local authority
waste disposal centre.
• Assemble the item as close
to its final position (in the same
room) as possible.
• Assemble on a soft level
surface to avoid damaging the
unit or your floor.
• Parts of the assembly will be
easier with 2 people.
• Dispose of all packaging
carefully and responsibly.
• To reduce
the likelihood of
damaging your
product please
ensure that your
power drill is set on a low torque
setting.
• During assembly do not stand
or put weight on the product,
this could cause damage.
Handy Hints
• Assemble all parts and bolts
loosely during assembly, only
once the product is complete
should you fully tighten the bolts.
• Reguraly check and ensure
that all bolts and fittings are
tightend properly.
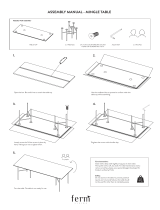
Release safety locks
(see safety lock instruction
below) Hold the top of
table to lift the table up and
pull the table tops out as
shown by the arrows.
a:
Close the extension
leaves.
b:
Hold the table top
to push on both sides of
tables as shown by the
arrows. Use safety locks
to ensure table tops will
not move while using.
(see safety lock instruction
below)
c:
a:
b:
c:

2
Components - Parts
Please check you have all the parts listed below
Table top x 1
Leg x 4
If you have damaged or missing components,
call the
Customer Helpline: 0345 640 0800
1
2
Assembly Instructions
5
Open table
To release Safety lock
To secure Safety lock
1
2
3
1 2
3
SAFETY LOCK INSTRUCTION.
Step 3
Step 2
Step 1
Release safety locks
(see safety lock instruction
below) Hold the top of
table to lift the table up and
pull the table tops out as
shown by the arrows.
a:
Close the extension
leaves.
b:
Hold the top of table
to push on both sides of
tables as shown by the
arrows. Use safety locks
to ensure table tops will
not move while using.
(see safety lock instruction
below)
c:

Components -
Fittings
Please check you have all the fittings listed below
Note :The quantities below are the correct amount to complete the assembly. In some cases more
fittings may be supplied than are required.
C
Spring washer x 8
D
Washer x 8
Allen key x 1
A
3
4
B
Bolt x 8
Assembly Instructions
a:
b:
Step 1
b:
2 people are required
for this next stage.
A
B
C
If you need help or have damaged or missing parts, call the Customer Helpline: 0345 640 0800
Assembly is complete.
1
2
2
2
2
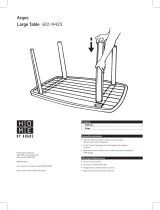
Place table top upside
down being careful not to
scratch the table top
(lift the product within its
cardboard packaging will
assist you being able
to do this)
Attach the legs
(x4) to each of the
corners, by first step
insert spring washers
and washers into all
the bolts . Then screw
the bolts through the
corner blocks and into the
holes in the legs .
Tighten bolts by using the
allen key .
A
C
a:
2
D
2
A
B
Fully tighten all bolts.
Turn the table upright and
place on desired location.

Dining Chair
Assembly Instructions - Please keep for future reference 258/1905
Important
- Please read these instructions fully before starting assembly
If you need help or have damaged or missing parts, call the Customer Helpline:
Argos = 0345 640 0800
Issue 1 - 13/04/15
Dimensions
Width - 44cm
Depth - 56cm
Height - 95cm
237/9791
391/5525
417/6181
424/2778
Stabilyne seat:
Patented, Recyclable & just plain TOUGH!

• Check you have all the
components and tools listed on
the following pages.
• Remove all fittings from the
plastic bags and separate them
into their groups.
• Keep children and animals
away from the work area, small
parts could choke if swallowed.
• Make sure you have enough
space to layout the parts before
starting.
• During assembly do not stand
or put weight on the product, this
could cause damage.
• Assemble the item as close to
its final position (in the same
room) as possible.
• Assemble on a soft level
surface to avoid damaging the
unit or your floor.
• Parts of the assembly will be
easier with 2 people.
• Do not stand on the chair.
• Do not use the chair as a step
ladder.
• Unit weight: 5.3 kgs.
• Maximum safe weight of user:
110kgs.
• To reduce the
likelihood of
damaging your
product please
ensure that your
power drill is set on a low torque
setting.
1
Safety and Care Advice
Important - Please read these instructions fully before starting assembly
Care and maintenance
Handy Hints
• Only clean using a damp cloth
and mild detergent, do no use
bleach or abrasive cleaners.
• From time to time check that
there are no loose screws on
this unit.
• This product should not be
discarded with household
waste. Take to your local
authority waste disposal centre.
• Assemble all parts and bolts
loosely during assembly, only
once the product is complete
should you fully tighten the
bolts.
• Regularly check and ensure
that all bolts and fittings are
tightend properly.

2
Components - Parts
Please check you have all the parts listed below
If you have damaged or missing components, call the
Customer Helpline: Argos = 0345 640 0800
Components - Fittings
Please check you have all the fittings listed below
Backrest
(36 x 10.5 x 95cm)
Note: The quantities below are the correct amount to complete the assembly. In some cases more fittings
may be supplied than are required.
1 Seat
(44 x 41.5 x 17cm)
2 Leg x 2
(3 x 3 x 43cm)
3
A
M6 x 50mm Bolt with
spring washer & flat washer x 11
B
Allen key x 1
C
Foot pad x 4

3
Assembly Instructions
2
Assembly Instructions
Step 1
Step 2
Attaching legs
Insert the legs into the
holes of the seat as
shown and fix using bolts
with spring washers & flat
washers .
Important:
Fasten bolts
using allen key
but do not fully
tighten at this
stage.
Use oval head of
allen key when
tigthening bolts
on corner
positions.
Opening cloth cover
Place the backrest on
a flat protected surface.
Carefully peel off bottom
cloth cover of seat by
pulling the cloth from the
back side of the seat as
shown.
3
2
B
A
2
Cloth cover
2
2
3
3
3
A
A
A
A
A
A

4
Assembly Instructions
1
3
3
Step 3
Step 4
Attaching foot pads
Remove backing from
foot pads and carefully
position on the bottom of
the legs & as
shown.
Attaching the seat
Place the backrest on
a flat protected surface
as shown.
Position the seat on
the backrest as
shown and fix using bolts
with spring washers & flat
washers .
Important:
Fasten bolts
using allen key
but do not fully
tighten at this
stage.
Use oval head of
allen key when
tigthening bolts
on corner
positions.
C
B
A
2
1
1
1 3
C
C
C
C
C
3
A
A
A
A
A
A
A
A
A
A
2
2
1
1

5
If you need help or have damaged or missing parts, call the Customer Helpline:
Argos = 0345 640 0800
B
Aligning & securing the
legs
Carefully turn the chair
upright and place on a
flat surface.
a: Tighten all bolts using
allen key .
Note: Use oval head of
allen key when tigthening
bolts on corner positions.
Note: This step is
essential to prevent the
chair from wobbling due
to uneven legs.
b: Carefully sit on the
chair and make
adjustments to ensure
the legs are flat even on
the floor.
c: After the sitting test,
re-tighten bolts again if
any adjustment is
needed.
Note: It is highly
recommended to
re-tighten all bolts after
using the chair for 7
days.
Note: Keep allen key to
re-tighten bolts when
required.
d: Re-attaching the
bottom cloth cover
Re-attach the bottom
cloth cover as shown.
B
Assembly is complete.
B
Assembly Instructions
Step 5
a:
b:
c:
d:
/