Warwick TUBEPATH 10.1 User manual
- Category
- Supplementary music equipment
- Type
- User manual
This manual is also suitable for
Warwick TUBEPATH 10.1
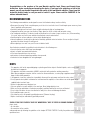
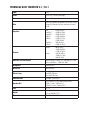
Below you will find brief product information for Warwick TUBEPATH 10.1. The Warwick TUBE PATH 10.1 is a 500-watt tube-driven bass amplifier. It features a hybrid design, with a tube preamp and a transistor power amp. This gives you the best of both worlds: the warm, natural sound of tubes with the power and headroom of a solid-state amp.
The TUBE PATH 10.1 has a wide range of features to help you dial in the perfect sound for your bass. These include:
- A 5-band EQ with switchable mid frequencies
- A contour control for boosting or cutting the low end
- A bright switch for adding extra treble
Warwick TUBEPATH 10.1
Below you will find brief product information for Warwick TUBEPATH 10.1. The Warwick TUBE PATH 10.1 is a 500-watt tube-driven bass amplifier. It features a hybrid design, with a tube preamp and a transistor power amp. This gives you the best of both worlds: the warm, natural sound of tubes with the power and headroom of a solid-state amp.
The TUBE PATH 10.1 has a wide range of features to help you dial in the perfect sound for your bass. These include:
- A 5-band EQ with switchable mid frequencies
- A contour control for boosting or cutting the low end
- A bright switch for adding extra treble


-
 1
1
-
 2
2
-
 3
3
-
 4
4
-
 5
5
-
 6
6
-
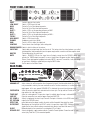 7
7
-
 8
8
-
 9
9
-
 10
10
-
 11
11
-
 12
12


Warwick TUBEPATH 10.1 User manual
- Category
- Supplementary music equipment
- Type
- User manual
- This manual is also suitable for
Warwick TUBEPATH 10.1
Below you will find brief product information for Warwick TUBEPATH 10.1. The Warwick TUBE PATH 10.1 is a 500-watt tube-driven bass amplifier. It features a hybrid design, with a tube preamp and a transistor power amp. This gives you the best of both worlds: the warm, natural sound of tubes with the power and headroom of a solid-state amp.
The TUBE PATH 10.1 has a wide range of features to help you dial in the perfect sound for your bass. These include:
- A 5-band EQ with switchable mid frequencies
- A contour control for boosting or cutting the low end
- A bright switch for adding extra treble
Ask a question and I''ll find the answer in the document
Finding information in a document is now easier with AI
Related papers
-
Warwick TUBEPATH 5.1 Owner's manual
-
-
-
-
-
-
-
-
-
Other documents
-
Winegard HD-9095P User manual
-
 Bad Cat X-TREME TONE Operating instructions
-
Fender Passport® Studio Powered Monitor Speaker System Owner's manual
-
Rockboard Power Block User manual
-
Engl Poweramp 50/50 E840 Owner's manual
-
Yamaha EMX 68S User manual
-
Crate Amplifiers BT-350 User manual
-
 Gallien-Krueger Fusion 550 Owner's manual
-
 Gallien-Krueger Neo 1001/212 Owner's manual
-


