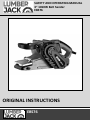
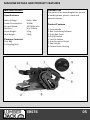
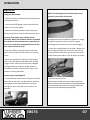
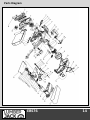
Lumberjack EBS76 is a powerful 3-inch belt sander that delivers 1010 watts of power for demanding sanding tasks. It features a variable speed control dial that allows you to adjust the sanding speed from 850 to 1800 meters per minute, ensuring optimal performance for different materials and applications. The ergonomic design of the sander provides a comfortable grip and reduces fatigue during prolonged use, while the dust collection system helps maintain a clean work environment.
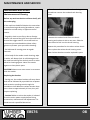
Lumberjack EBS76 is a powerful 3-inch belt sander that delivers 1010 watts of power for demanding sanding tasks. It features a variable speed control dial that allows you to adjust the sanding speed from 850 to 1800 meters per minute, ensuring optimal performance for different materials and applications. The ergonomic design of the sander provides a comfortable grip and reduces fatigue during prolonged use, while the dust collection system helps maintain a clean work environment.


-
 1
1
-
 2
2
-
 3
3
-
 4
4
-
 5
5
-
 6
6
-
 7
7
-
 8
8
-
 9
9
-
 10
10
-
 11
11
-
 12
12
-
 13
13
-
 14
14
-
 15
15
-
 16
16


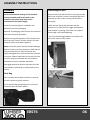
Lumberjack EBS76 is a powerful 3-inch belt sander that delivers 1010 watts of power for demanding sanding tasks. It features a variable speed control dial that allows you to adjust the sanding speed from 850 to 1800 meters per minute, ensuring optimal performance for different materials and applications. The ergonomic design of the sander provides a comfortable grip and reduces fatigue during prolonged use, while the dust collection system helps maintain a clean work environment.
Ask a question and I''ll find the answer in the document
Finding information in a document is now easier with AI
Related papers
-
Lumberjack EBS100VS User manual
-
Lumberjack OS125 Owner's manual
-
-
-
-
-
Lumberjack VSJ100 Owner's manual
-
-
Lumberjack DTJ300 User manual
-
Other documents
-
 GARDEN JACK PWV1500 3 In 1 Pressure Washer Wet and Dry User manual
-
 GARDENJACK GWP1100 Owner's manual
-
ALDI FERREX User manual
-
Walter RAIL-MATE Owner's manual
-
 GARDENJACK PWV1500 Owner's manual
-
Powerplus POWE40040 Owner's manual
-
Wen 6515T User manual
-
 Erbauer ERB378SDR Original Instructions Manual
-
Clarke CBS2 Operating instructions
-
Chicago Electric 96435 Set Up And Operating Instructions Manual


