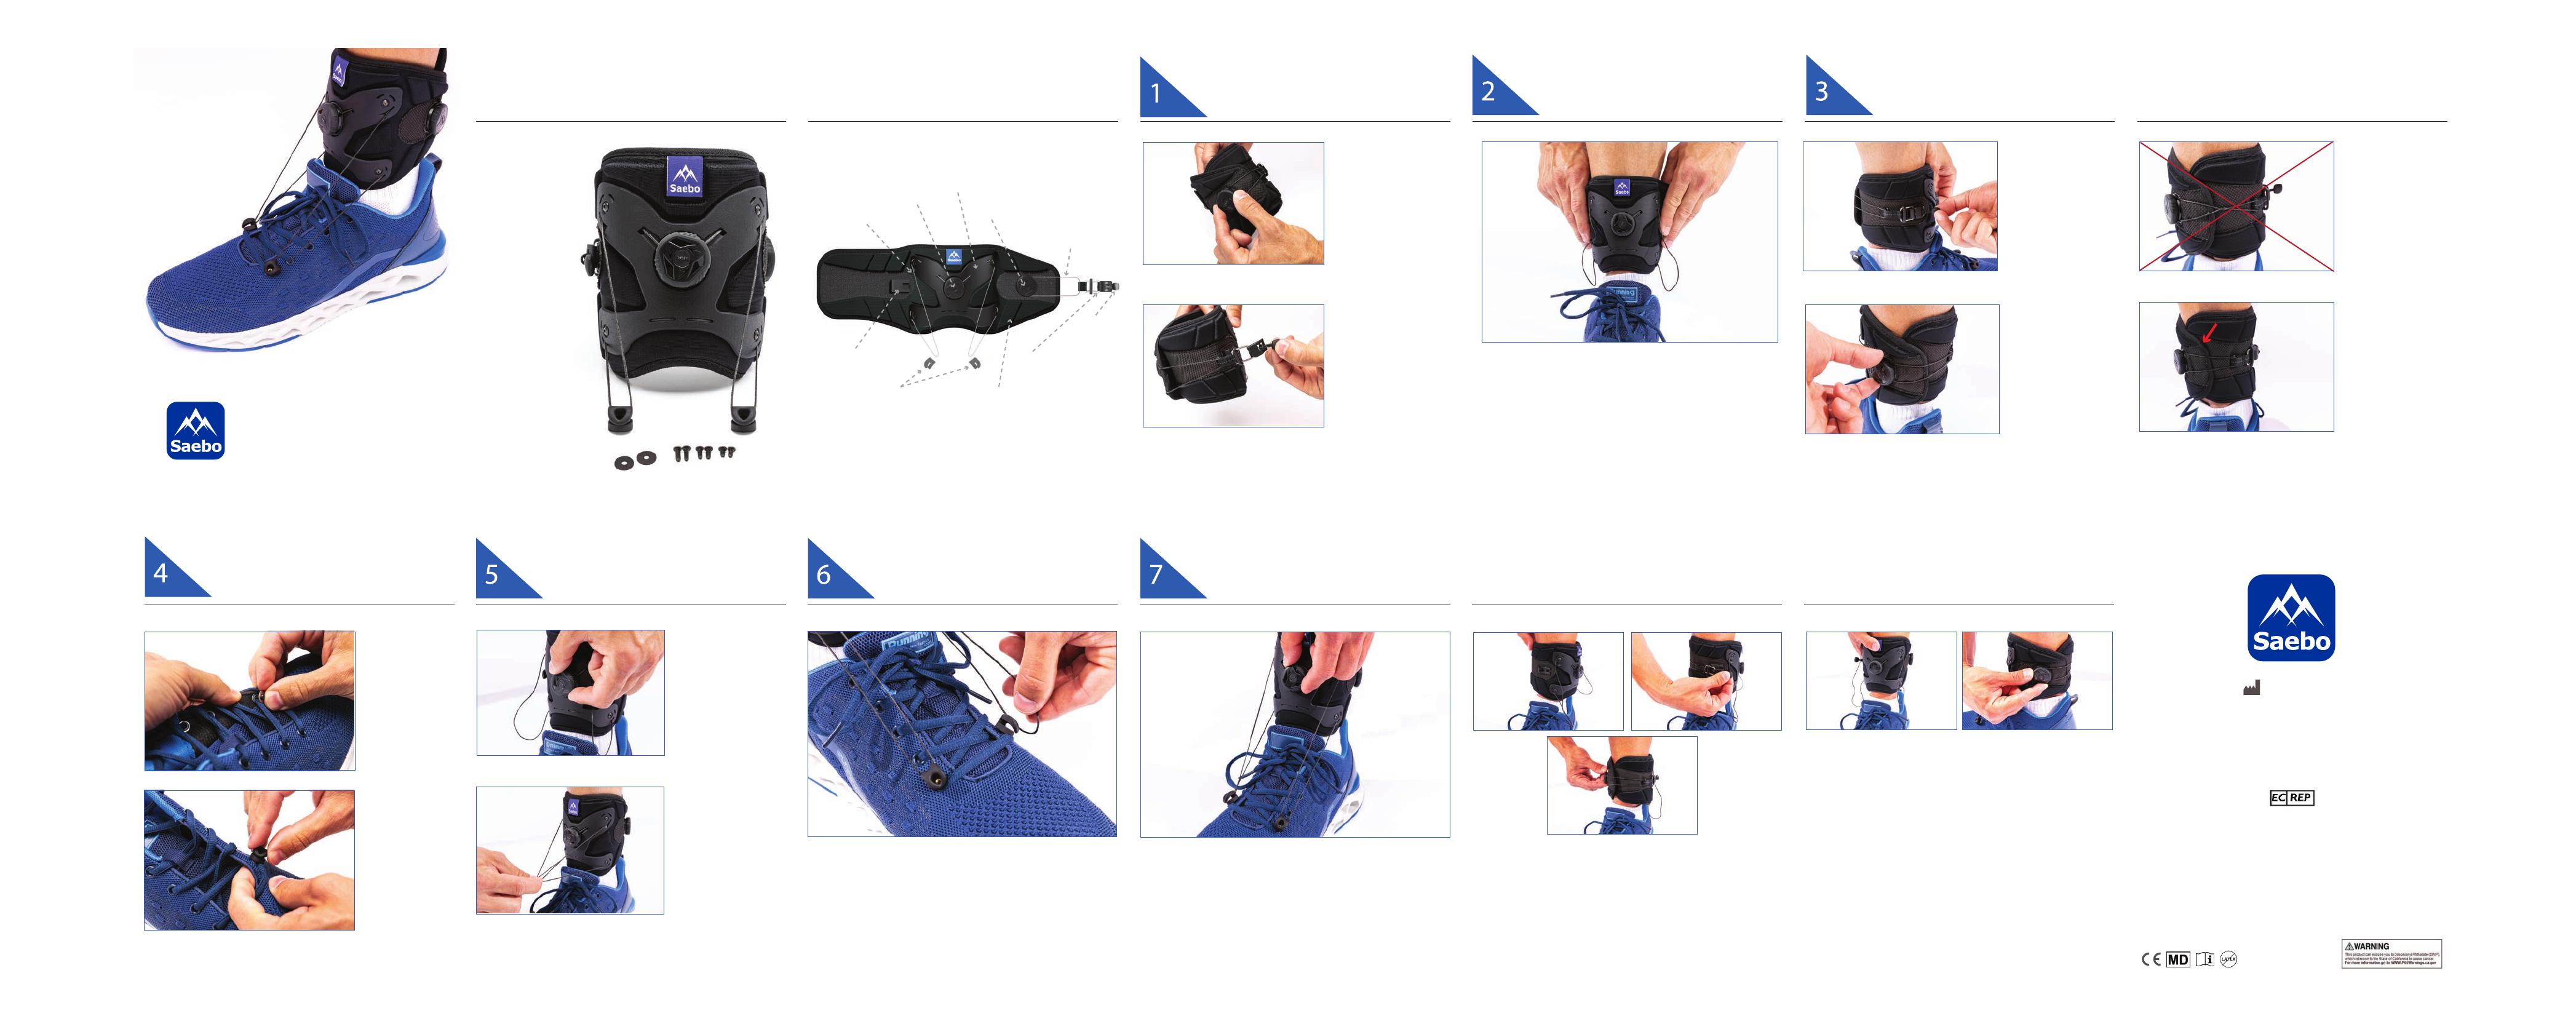
SaeboStep
INSTRUCTIONS
Saebo, Inc.
2459 Wilkinson Blvd., Suite 120-B
Charlotte, NC 28208
888-942-5751
www.saebo.com
UNPACKING THE DEVICE
(1) Brace
(2) Eyelet Hooks
(2) 5/16” Screws
(2) 1/4” Screws
(2) 3/8” Screws
(2) Washers
PARTS OF THE BRACE OPEN ANKLE CUFF POSITION THE DEVICE SECURE ANKLE CUFF
LOOSEN FRONT CORD
ATTACH EYELET HOOKS ATTACH CORD TO EYELET HOOKS TIGHTEN FRONT CORD USING ONE HAND
SEE THE VIDEOS
Visit our website to see instructional videos
including how to punch new eyelets into
practically any type of footwear.
www.saebo.com/saebostep
Consult your doctor concerning your condition
and the use of this brace.
Too loosen the
Ankle Cuff Cord,
turn Ankle Cuff Dial
counterclockwise.
Grab Pull Tab
and pull until
the Magnetic
Fastener
becomes
disconnected
from the base.
Place the SaeboStep around the ankle with the
Front Dial centered to your shoe and the blue
Saebo logo positioned at the top.
Grab Pull Tab
that is attached
to the end of the
Ankle Cuff Cord
and connect to
magnetic base.
You will hear a
click when
secured.
Turn Ankle Cuff
Dial clockwise
until the Cuff
is fit snugly.
Note 1: Make
sure the Ankle
Cuff Cord is
not twisted.
Note 2: The Cuff on
the dial side should
overlap the Cuff on
the magnetic side.
SECURE ANKLE CUFF CONTINUED
Insert proper
Screw and
Washer into
shoe eyelet.
Stabilize the head
of the screw with
your finger while
securely twisting
the Eyelet Hook
with other hand.
Position the open
end of the Eyelet
Hook toward the
front of the shoe.
Turn Front Dial
counterclockwise.
Pull left and right
Front Cords, ideally
at the same time,
downward toward
the shoe. Attach Cord onto the Eyelet Hook openings. Wind the dial by turning clockwise until the Front Cord
is tight and you have the lift and angle desired.
1 Rotate Ankle Cuff so Magnetic Fastener and Ankle
Cuff Dial are near the front for easier access.
2 Attach Magnetic Fastener to Base.
3 Tighten Ankle Cuff Cord by winding the Ankle Cuff Dial
clockwise.
4 Rotate brace back to the proper position with the
Saebo logo facing the front.
5 Finish tightening the Ankle Cuff Cord by winding the
Ankle Cuff Dial clockwise until you feel a snug fit.
1 2
3
4 5
Front Cord
Front Dial
Brace Plate
Ankle Cuff Dial
Ankle Cuff Cord
Magnetic Base
Eyelet Hooks Contoured Comfort Fit
Magnetic Fastener
Pull Tab
European Healthcare & Device Solutions (Ireland) Ltd.
www.europeandevicesolutions.co.uk
Australian Sponsor:
Ausmedic Australia Pty Ltd
Unit 3, 3 Basalt Road Pemulwuy NSW
2145 1300 473 422
Performhealth.com.au

