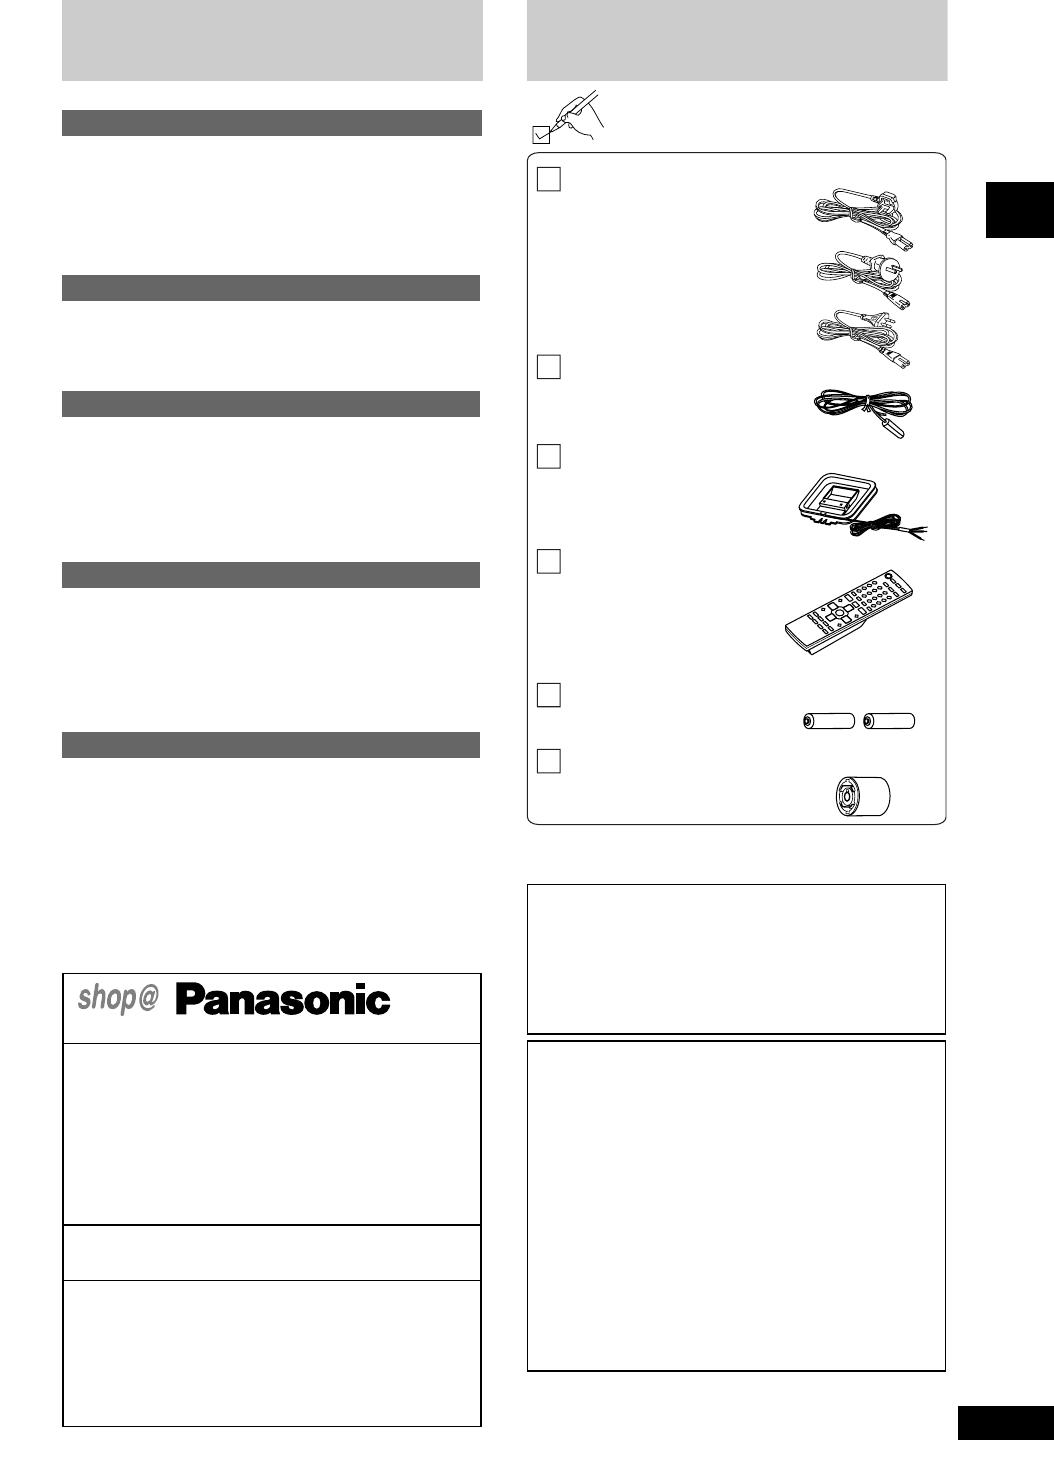
Panasonic SCPM29 Operating instructions

Category
Cassette players
Type
Operating instructions
RQT7377-2B
E EB GN
CD Stereo System
Operating Instructions
Model No. SC-PM29
Before connecting, operating or adjusting this product, please
read these instructions completely.
Please keep this manual for future reference.
Note:
“EB” on the packaging indicates the United Kingdom.
Table of contents
Before use
Caution for AC Mains Lead......................2
Safety precautions ...................................3
Supplied accessories...............................3
The remote control...................................4
Placement of speakers.............................4
Connections..............................................4
Front panel controls.................................6
Demo function ..........................................7
Setting the time.........................................7
Auto-off function ......................................7
Listening operations
CDs: CD-DA and MP3/WMA.....................8
Other ways of playing CD's ...................12
The radio: manual tuning.......................17
The radio: preset tuning ........................18
Cassette tapes ........................................19
Recording operations
Making a recording.................................20
Timers and others
Using the timers .....................................22
Using the sound quality settings..........24
Convenient functions.............................25
Using an external unit............................25
Reference
Speci cations .........................................26
When moving the unit............................26
Maintenance............................................26
Troubleshooting guide........... Back cover
2
RQT7377
Caution for AC Mains Lead
(For United Kingdom)
(“EB” area code model only)
For your safety, please read the following text carefully.
This appliance is supplied with a moulded three pin mains plug for
your safety and convenience.
A 5-ampere fuse is tted in this plug.
Should the fuse need to be replaced please ensure that the
replacement fuse has a rating of 5-ampere and that it is approved
by ASTA or BSI to BS1362.
Check for the ASTA mark
or the BSI mark on the body of the
fuse.
If the plug contains a removable fuse cover you must ensure that it
is re tted when the fuse is replaced.
If you lose the fuse cover the plug must not be used until a
replacement cover is obtained.
A replacement fuse cover can be purchased from your local dealer.
CAUTION!
IF THE FITTED MOULDED PLUG IS
UNSUITABLE FOR THE SOCKET OUTLET IN
YOUR HOME THEN THE FUSE SHOULD BE
REMOVED AND THE PLUG CUT OFF AND
DISPOSED OF SAFELY.
THERE IS A DANGER OF SEVERE ELECTRICAL
SHOCK IF THE CUT OFF PLUG IS INSERTED INTO
ANY 13-AMPERE SOCKET.
If a new plug is to be tted please observe the wiring code as stated
below.
If in any doubt please consult a quali ed electrician.
IMPORTANT
The wires in this mains lead are coloured in accordance with the
following code:
Blue: Neutral, Brown: Live.
As these colours may not correspond with the coloured markings
identifying the terminals in your plug, proceed as follows:
The wire which is coloured Blue must be connected to the terminal
which is marked with the letter N or coloured Black or Blue.
The wire which is coloured Brown must be connected to the
terminal which is marked with the letter L or coloured Brown or Red.
WARNING: DO NOT CONNECT EITHER WIRE TO THE EARTH
TERMINAL WHICH IS MARKED WITH THE LETTER E, BY
THE EARTH SYMBOL
OR COLOURED GREEN OR
GREEN/YELLOW.
THIS PLUG IS NOT WATERPROOF–KEEP DRY.
Before use
Remove the connector cover.
How to replace the fuse
The location of the fuse differ according to the type of AC mains
plug (figures A and B). Confirm the AC mains plug fitted and follow
the instructions below. Illustrations may differ from actual AC mains
plug.
1. Open the fuse cover with a screwdriver.
2. Replace the fuse and close or attach the fuse cover.
Dear customer
Thank you for purchasing this product.
The circled letters (e.g.,
a
) in the illustrations are for the
assistance of our valued customers in Europe. They are
not referred to in this manual.
System SC-PM29
Main unit SA-PM29
Speakers SB-PM29
Inside of
product
Produktets
innside
Tuotteen
sisällä
CAUTION!
THIS PRODUCT UTILIZES A LASER.
USE OF CONTROLS OR ADJUSTMENTS OR
PERFORMANCE OF PROCEDURES
OTHER THAN THOSE SPECIFIED
HEREIN MAY RESULT IN HAZARDOUS
RADIATION EXPOSURE.
DO NOT OPEN COVERS AND DO NOT REPAIR
YOURSELF. REFER SERVICING TO QUALIFIED
PERSONNEL.
THIS UNIT IS INTENDED FOR USE IN MODERATE
CLIMATES.
The socket outlet shall be installed near the equipment
and easily accessible or the mains plug or an
appliance coupler shall remain readily operable.
This product may receive radio interference caused
by mobile telephones during use. If such interference
is apparent, please increase separation between the
product and the mobile telephone.
Figure A
Figure B
Fuse cover
Figure A
Fuse
(5 ampere)
Figure B
Fuse
(5 ampere)
Before use
Side of
product
3
RQT7377
1 AC mains lead
For the United Kingdom:
RJA0053-3X
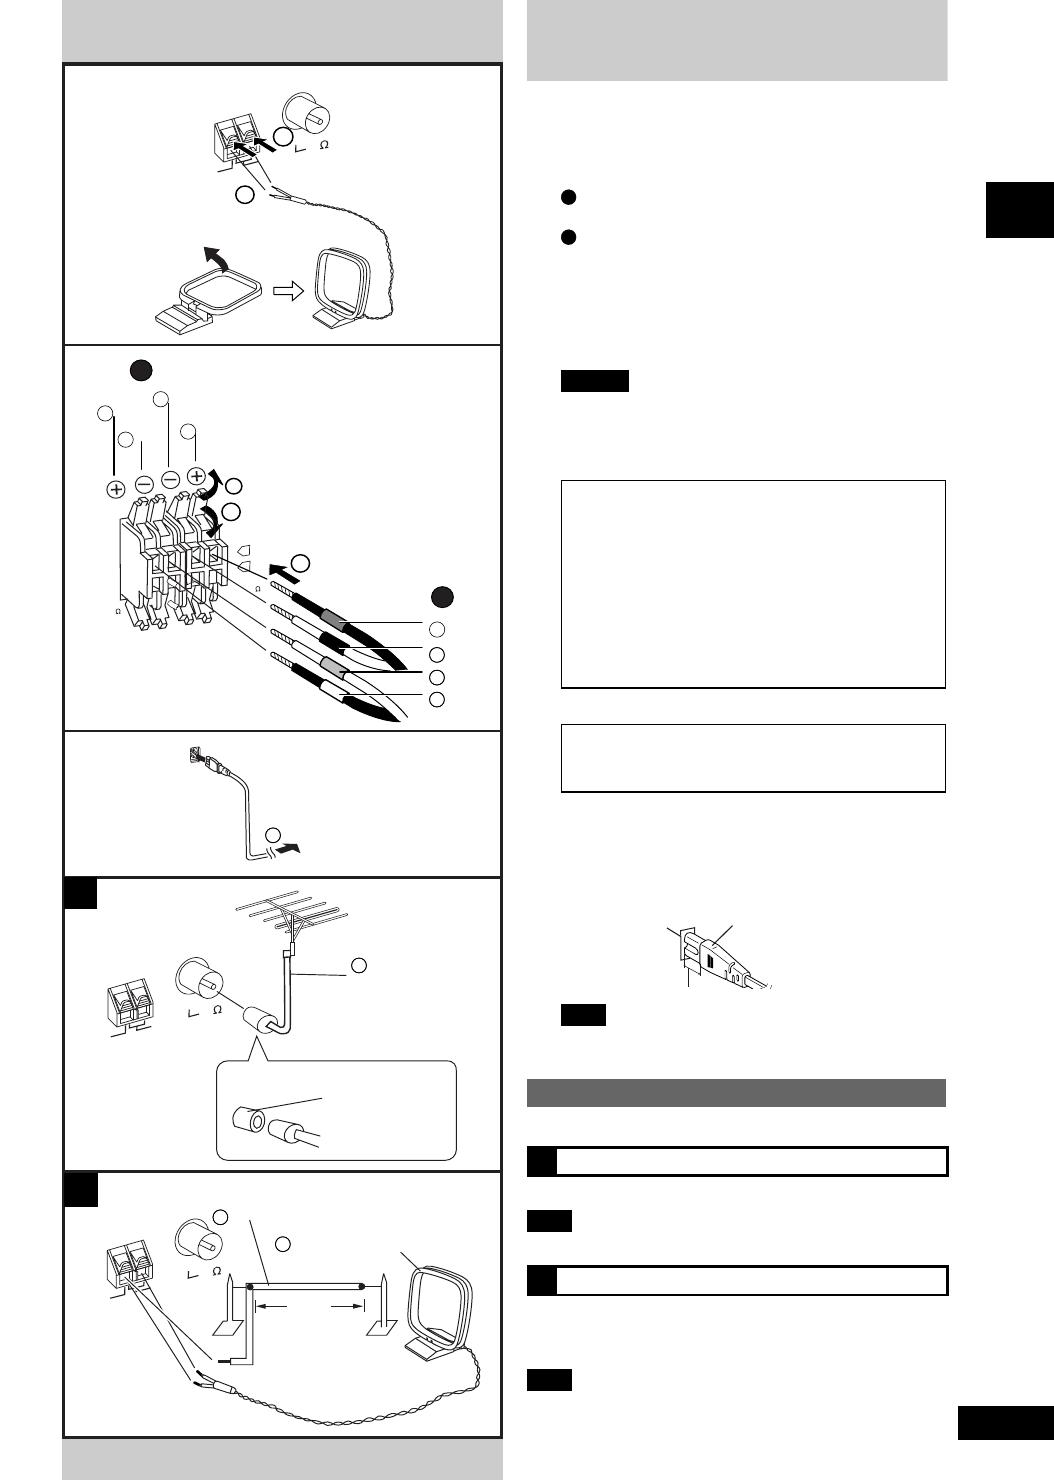
1 FM indoor antenna: RSA0007-L
1 AM loop antenna: N1DAAAA00001
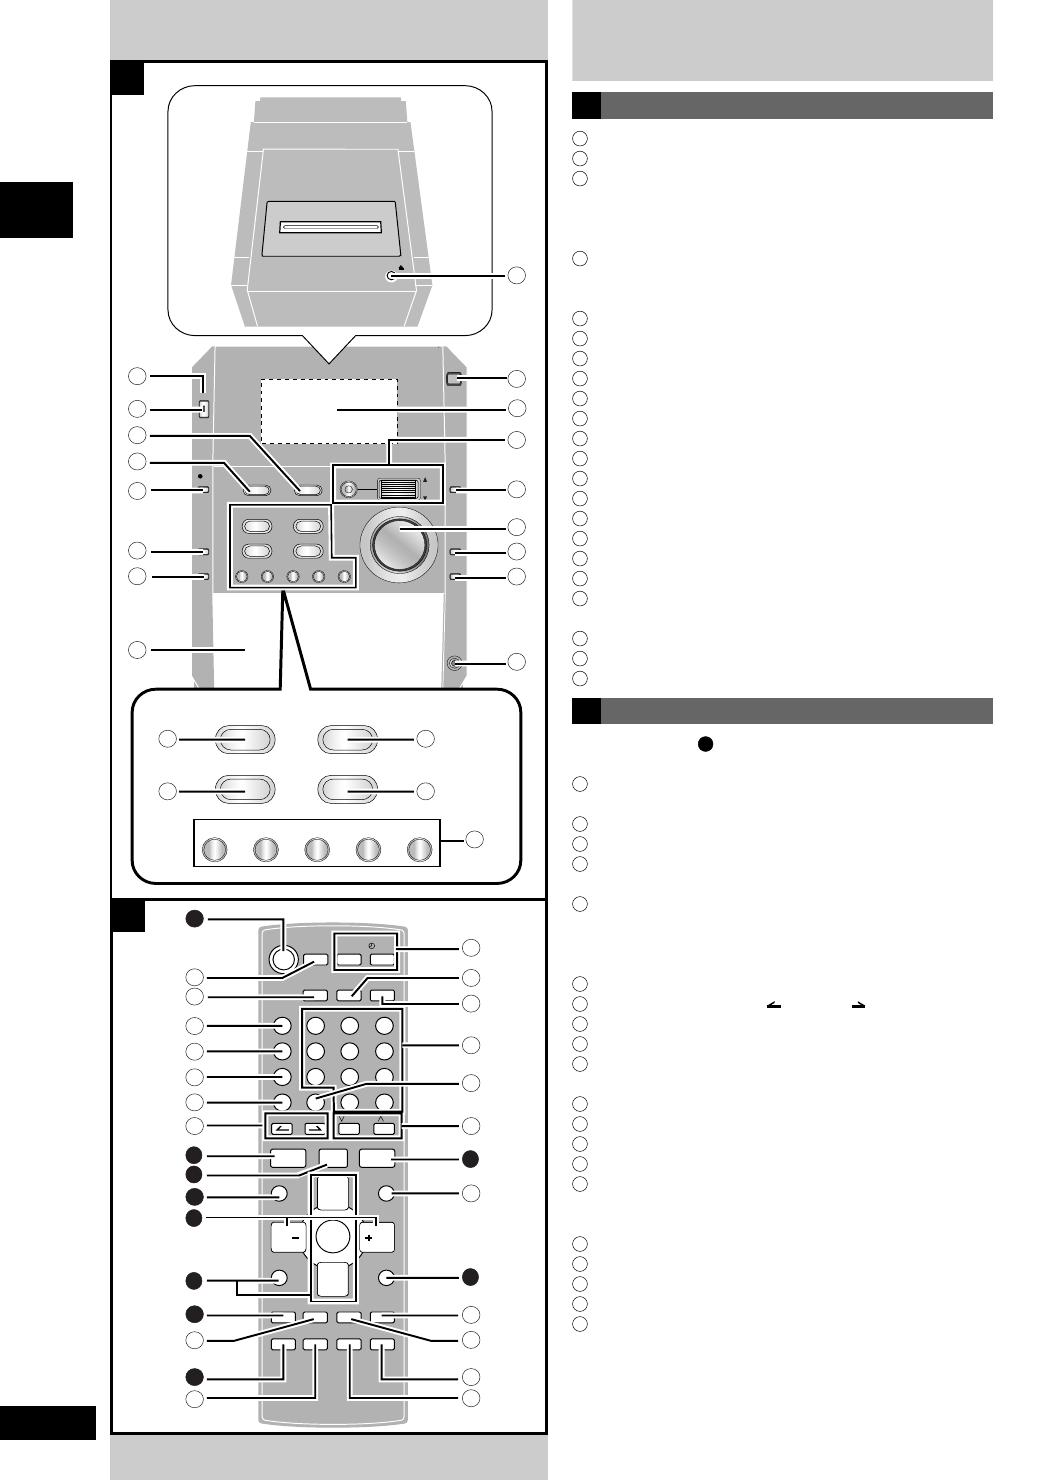
1 Remote control: N2QAJB000096
2 Batteries
Safety precautions
Placement
Set the unit up on an even surface away from direct sunlight, high
temperatures, high humidity, and excessive vibration. These conditions
can damage the cabinet and other components, thereby shortening the
unit’s service life.
Place it at least 15 cm away from wall surfaces to avoid distortion
and unwanted acoustical effects.
Do not place heavy items on the unit.
Voltage
Do not use high voltage power sources. This can overload the unit
and cause a re.
Do not use a DC power source. Check the source carefully when
setting the unit up on a ship or other place where DC is used.
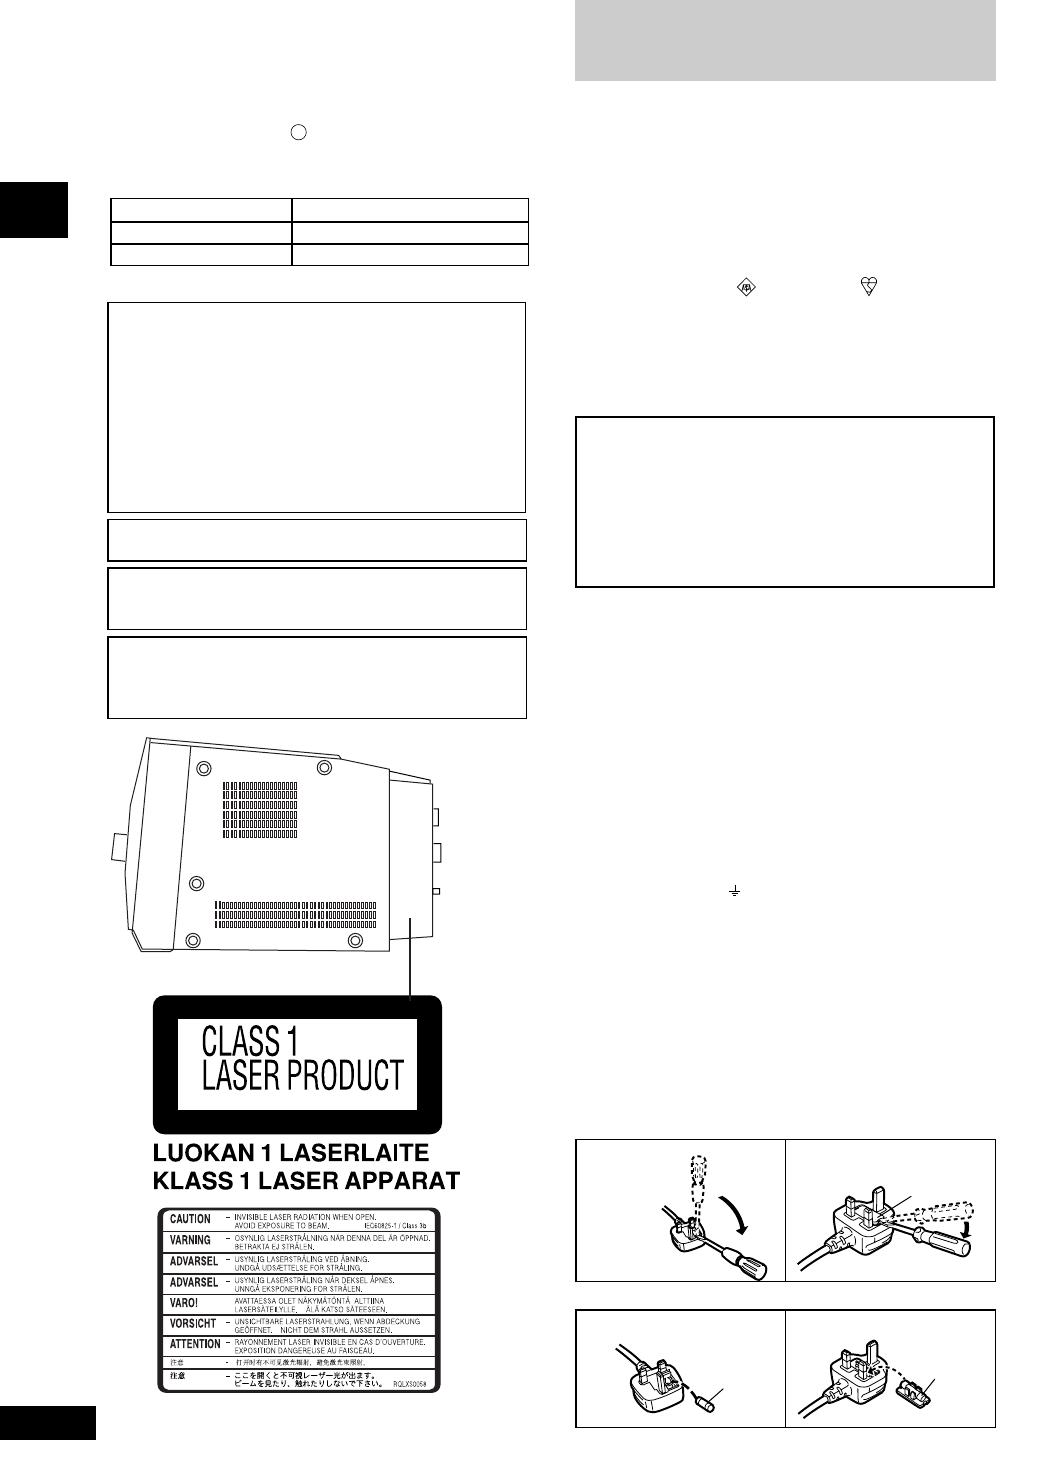
AC mains lead protection
Ensure the AC mains lead is connected correctly and not damaged.
Poor connection and lead damage can cause re or electric shock. Do
not pull, bend, or place heavy items on the lead.
Grasp the plug rmly when unplugging the lead. Pulling the AC
mains lead can cause electric shock.
Do not handle the plug with wet hands. This can cause electric
shock.
Foreign matter
Do not let metal objects fall inside the unit. This can cause electric
shock or malfunction.
Do not let liquids get into the unit. This can cause electric shock or
malfunction. If this occurs, immediately disconnect the unit from the
power supply and contact your dealer.
Do not spray insecticides onto or into the unit. They contain
ammable gases which can ignite if sprayed into the unit.
Service
Do not attempt to repair this unit by yourself. If sound is interrupted,
indicators fail to light, smoke appears, or any other problem that is not
covered in these instructions occurs, disconnect the AC mains lead
and contact your dealer or an authorized service center. Electric shock
or damage to the unit can occur if the unit is repaired, disassembled or
reconstructed by unquali ed persons.
Extend operating life by disconnecting the unit from the power
source if it is not to be used for a long time.
For the United Kingdom and Republic of Ireland
www.panasonic.co.uk (for UK customers only)
Order accessory and consumable items for your product
with ease and con dence by telephoning our Customer
Care Centre Mon-Friday 9:00am-5:30pm. (Excluding public
holidays.)
Or go on line through our Internet Accessory ordering
application.
Most major credit and debit cards accepted.
All enquiries transactions and distribution facilities are
pro-vided directly by Panasonic UK Ltd.
It couldn’t be simpler!
Customer Care Centre
For UK customers: 08705 357357
For Republic of Ireland customers: 01 289 8333
Technical Support
For UK customers: 0870 1 505610
This Technical Support Hot Line number is for Panasonic
PC software related products only.
For Republic of Ireland, please use the Customer Care
Centre number listed above for all enquiries.
For all other product related enquiries, please use the
Customer Care Centre numbers listed above.
Supplied accessories
Please check and identify the supplied
accessories.
Use the numbers indicated when asking for replacements.
WARNING:
TO REDUCE THE RISK OF FIRE, ELECTRIC
SHOCK OR PRODUCT DAMAGE, DO NOT
EXPOSE THIS APPARATUS TO RAIN, MOISTURE,
DRIPPING OR SPLASHING AND THAT NO
OBJECTS FILLED WITH LIQUIDS, SUCH AS
VASES, SHALL BE PLACED ON THE APPARATUS.
CAUTION!
DO NOT INSTALL OR PLACE THIS UNIT IN A
BOOKCASE, BUILT-IN CABINET OR IN ANOTHER
CONFINED SPACE. ENSURE THE UNIT IS WELL
VENTILATED. TO PREVENT RISK OF
ELECTRIC SHOCK OR FIRE HAZARD DUE TO
OVERHEATING, ENSURE THAT CURTAINS AND
ANY OTHER MATERIALS DO NOT OBSTRUCT
THE VENTILATION VENTS.
DO NOT OBSTRUCT THE UNIT’S VENTILATION
OPENINGS WITH NEWSPAPERS, TABLECLOTHS,
CURTAINS, AND SIMILAR ITEMS.
DO NOT PLACE SOURCES OF NAKED FLAMES,
SUCH AS LIGHTED CANDLES, ON THE UNIT.
DISPOSE OF BATTERIES IN AN
ENVIRONMENTALLY FRIENDLY MANNER.
For Australia and New Zealand:
K2CJ2DA00010
For other areas:
K2CQ2CA00002
1 Antenna plug adaptor
(
For the United Kingdom only
):
(K1YZ02000013)
Before use
4
RQT7377
A
The remote control
Batteries
Insert so the poles (+ and -) match those in the remote
control.
Do not use rechargeable type batteries.
Do not:
mix old and new batteries.
use different types at the same time.
heat or expose to ame.
take apart or short circuit.
attempt to recharge alkaline or manganese batteries.
use batteries if the covering has been peeled off.
Mishandling of batteries can cause electrolyte leakage which
can damage items the uid contacts and may cause a re.
Remove if the remote control is not going to be used for a long
period of time. Store in a cool, dark place.
Use
Aim at the remote control sensor, avoiding obstacles, at a
maximum range of 7 m directly in front of the unit.
For the remote control sensor position, page 6.
B
Placement of speakers
Speakers are designed identically so that no left or right
channel orientation is necessary.
Note
Keep your speakers at least 10 mm away from the
system for proper ventilation.
These speakers do not have magnetic shielding. Do
not place them near televisions, personal computers or
other devices easily in uenced by magnetism.
To avoid damage to the speakers, do not touch the
speaker cones if you have taken the nets off.
C
Connections
Plug the AC mains lead into a household mains socket
only after all other connections have been made.
To prepare the AM loop antenna wire and speaker
cords, twist the vinyl cover tip and pull off.
1 Connect the FM indoor antenna.
Tape to a wall or column, where reception is best.
For the best reception:
An FM outdoor antenna is recommended (
page 5).
A
C
B
3
2
2
1
1
(R)
(L)
2
3
1
4
AM ANT
FM ANT
EXT
LOOP
75
R6, AA, UM-3
a
Adhesive tape
b
FM indoor antenna
(included)
Before use
5
RQT7377
Connections
2 Connect the AM loop antenna.
Stand the antenna up on its base. Keep loose antenna
cord away from other wires and cords.
3 Connect the speaker cables.
A
Con rm the colors of the tags on the ends of the
cords.
B
For White tags:
Connect to grey terminals.
For Blue, Black and Red tags:
Connect so tag colours match the terminal colours.
Cords with white and blue tags are for high frequency.
Cords with red and black tags are for low frequency.
Incorrect connection can damage the unit.
Caution
Use only the supplied speakers.
The combination of the main unit and speakers provide
the best sound. Using other speakers can damage the
unit and sound quality will be negatively affected.
Caution
Use the speakers only with the recommended
system.
Failure to do so may lead to damage to the
ampli er and/or the speakers, and may result
in the risk of re. Consult a quali ed service
person if damage has occurred or if you
experience a sudden change in performance.
Do not attach these speakers to walls or
ceilings.
4 Connect the AC mains lead.
FOR THE UNITED KINGDOM ONLY
READ THE CAUTION FOR THE AC MAINS LEAD
ON PAGE 2 BEFORE CONNECTION.
Insertion of Connector
Even when the connector is perfectly inserted, depending on
the type of inlet used, the front part of the connector may jut
out as shown in the drawing.
However there is no problem using the unit.
Appliance inlet Connector
Approx. 3.5 mm
Note
The included AC mains lead is for use with this unit
only. Do not use it with other equipment.
Optional antenna connections
Use an outdoor antenna if reception is poor.
A
FM outdoor antenna
Disconnect the FM indoor antenna.
Note
The antenna should be installed by a competent technician.
B
AM outdoor antenna
Leave the AM loop antenna connected. Run a piece of
vinyl-covered wire horizontally along a window or other
convenient location.
Note
Disconnect the outdoor antenna when the unit is not in use.
Do not use the antenna during a lightning storm.
2
3
4
2
A
B
1
3
R
L
HIGH (6
)
LOW (6
)
A
B
5-12m
AM ANT
FM ANT
EXT
LOOP
75
AM ANT
FM ANT
EXT
LOOP
75
1
AM ANT
FM ANT
EXT
LOOP
75
2
i
To household mains socket
a
Grey
e
Red
f
Black
g
Blue
h
White
c
Black
b
Blue
d
Red
j
FM outdoor
antenna
(not included)
k
AM outdoor antenna (not included)
l
AM loop antenna (included)
For the United Kingdom
Use the included
antenna plug
adaptor
Before use
6
RQT7377
Front panel controls
A Main unit
1
Cassette open button (OPEN ;) ..............................19
2
Remote control signal sensor
3
Standby/on switch (8 )..............................................7
Press to switch the unit from on to standby mode or
vice versa. In standby mode, the unit is still consuming
a small amount of power.
4
AC supply indicator (AC IN)
This indicator lights when the unit is connected to the
AC mains supply.
5
Re-master button (RE-MASTER)..............................24
6
Super sound EQ button (S.SOUND EQ) ..................24
7
Recording start/pause button (*/ h REC) ..............21
8
Aux button (AUX) ......................................................25
9
CD check button (CD CHECK) ...................................8
10
CD trays
11
Display
12
Play list button and jog control (PLAY LIST)....11, 13
13
Return button (RETURN) ..........................................11
14
Volume control ............................................................8
15
CD change button (; CD CHANGE) ..........................8
16
CD tray open/close button (; OPEN/CLOSE)...........8
17
Headphone jack (PHONES) ......................................25
18
Tuner/band select button (TUNER/BAND) ..............17
19
Stop/program clear and demonstration button
(STOP g, -DEMO) ..............................................7, 8, 19
20
CD play/pause button (CD q/ h )...............................8
21
Tape play/direction button (TAPE 7)...................19
22
Disc direct play buttons (CD 1 - CD 5).......................8
B Remote Control
Buttons such as
3
function the same as the controls on
the main unit.
23
Sleep timer, Auto off button
(SLEEP, - AUTO OFF )...........................................7, 23
24
Title input button (TITLE IN) .....................................12
25
Disc button (DISC).....................................................13
26
CD Program/clear, tuner preset button
(PROGRAM) .........................................................14, 18
27
Play mode select button
(PLAY MODE).............................................8, 15, 17, 21
Use this for selecting CD play mode, tune mode, and
FM mode.
28
Repeat button (REPEAT) ..........................................15
29
Album select buttons (
ALBUM ).........................8
30
Intro button (INTRO)..................................................15
31
Preset EQ/Manual EQ button (SOUND) ...................24
32
Clock/Timer operation buttons
(CLOCK/TIMER, zPLAY/REC)..............................7, 22
33
Display button (DISPLAY) ............................11, 12, 13
34
Dimmer button (DIMMER).........................................25
35
Numbered, character buttons ............................12, 13
36
Delete button (DEL).............................................12, 14
37
CD skip/search, tape fast-forward/rewind/TPS, tune
preset channel select, time adjust buttons
(u 2/REW, i 1/FF) ..............................7, 8, 17, 19
38
Stop/program clear button (g CLEAR) .........8, 14, 19
39
Title search button (TITLE SEARCH).......................16
40
Marker memory/recall button (MARKER)................16
41
Muting button (MUTING)...........................................25
42
Surround button (SURROUND)................................24
- DEMO
CD 1 CD 2 CD 3 CD 4 CD 5
STOP
g
TUNER/BAND
CD
q
/
h
TAPE
7
DOWN
VOLUME
UP
PUSH
ENTER
PHONES
PLAY LIST
S.SOUND EQ RE-MASTER
AUX
CD
CHECK
RETURN
AC IN
/ h
REC
CD
CHANGE
;
OPEN/
CLOSE
;
ENTER
^
DEL
DISPLAY DIMMER
AUX
CLEAR
PLAY LIST
INTRO
MARKER
TITLE
SEARCH
RE-MASTER
RETURN
ALBUM
TITLE IN
123
7
0
89
10
4
56
>
=
SOUND
SURROUND
MUTING
S.SOUND EQ
u
i
g
DISC ABC DEF
PROGRAM GHI JKL MNO
PLAY MODE PQRS TUV WXYZ
REPEAT SPACE l"#
SLEEP
- AUTO OFF
CLOCK/
TIMER
PLAY/
REC
TUNER/
BAND
q
q
TAPE
7
CD
q
/
h
VOL VOL
/REW /FF
- DEMO
CD 1 CD 2 CD 3 CD 4 CD 5
STOP
g
TUNER/BAND
CD
q
/
h
TAPE
7
A
B
1
5
6
7
8
9
10
11
12
13
14
15
16
17
18
19
20
21
22
23
24
25
26
27
28
29
30
31
32
33
3
4
3
34
35
36
37
38
39
40
41
42
18
21
14
12
20
5
8
13
6
OPEN
2
8
Before use
7
RQT7377
5
4
3
2
1
5
4
3
2
1
5
4
3
2
1
- DEMO
STOP
g
- DEMO
CD 1 CD 2 CD 3 CD 4 CD 5
STOP
g
TUNER/BAND
CD
q
/
h
TAPE
7
DOWN
VOLUME
UP
PUSH
ENTER
PHONES
PLAY LIST
S.SOUND EQ RE-MASTER
AUX
CD
CHECK
RETURN
AC IN
/
h
REC
8
CD
CHANGE
;
OPEN/
CLOSE
;
SLEEP
- AUTO OFF
AUTO OFF
C
/REW
/FF
ENTER
^
DEL
DISPLAY DIMMER
AUX
CLEAR
PLAY LIST
INTRO
MARKER
TITLE
SEARCH
RE-MASTER
RETURN
ALBUM
TITLE IN
123
7
0
89
10
4 56
>
=
SOUND
SURROUND
MUTING
S.SOUND EQ
u
i
g
DISC ABC DEF
PROGRAM GHI JKL MNO
PLAY MODE PQRS TUV WXYZ
REPEAT SPACE l"#
SLEEP
- AUTO OFF
PLAY/
REC
TUNER/
BAND
q
q
TAPE
w
q
CD
q
/
h
VOL VOL
CLOCK/
TIMER
SLEEP
- AUTO OFF
u
i
/REW /FF
A
4
1
3
2, 4
B
CLOCK/
TIMER
CLOCK/
TIMER
/REW
/FF
A
Demo function
When the unit is rst plugged in, a demonstration of its
functions may be shown on the display.
If the demo setting is off, you can show a demonstration by
selecting "DEMO ON".
Press and hold [STOP g, -DEMO].
Each time you do this:
DEMO OFF (off) DEMO ON (on)
Select “DEMO OFF” to reduce power consumption in the
standby mode.
B
Setting the time
This is a 24-hour clock.
The example shows how to set the clock for 18:30 (6:30
pm).
1 Press [^] to turn the unit on.
2 Press [CLOCK/TIMER] to select "CLOCK".
Each time you press the button:
CLOCK zPLAY zREC
Original display
3 Within 7 seconds:
Press [u 2/REW] or [i 1/FF] to set the
time.
Press and hold to change the time faster.
4 Press [CLOCK/TIMER].
The time is set and the original display is restored.
Displaying the clock:
Press [CLOCK/TIMER].
The clock is shown for about 7 seconds.
Note
The clock may lose or gain some time over a period.
Readjust if necessary.
C
Auto-off function
When CD or tape is selected as the source
To save power, the unit turns off if it is left unused for 10
minutes.
This function does not work if the source is tuner or AUX.
Press and hold [SLEEP, -AUTO OFF].
"AUTO OFF" is shown on the display.
To cancel
Press and hold [SLEEP, -AUTO OFF] again to clear "AUTO
OFF" from the display.
For your reference
The setting is maintained even if the unit is turned off.
"AUTO OFF" disappears from the display if either tuner or
AUX is selected as the source but continues to function
normally.
Before use
8
RQT7377
CDs: CD-DA and MP3/WMA
1
Press [CD 1] - [CD 5] to select the desired
disc tray.
The unit comes on and play starts if there is a CD in
the tray.
2 Press [; OPEN/CLOSE] to open the disc
tray.
Put a CD label-up on the tray as shown, one CD per
tray.
Press again to close the tray.
Repeat steps 1 and 2 to put CDs in the other trays.
3 Press [PLAY MODE] to select "1 DISC", "ALL
DISC" or "1 ALBUM (MP3/WMA only)".
Each time you press the button:
1 DISC ALL DISC 1 TRACK 1 ALBUM (MP3/WMA)
A RANDOM (CD-DA) 1 RANDOM (CD-DA)
1 DISC 1-Disc mode
ALL DISC All-Disc mode: play from the disc you
select through to the disc before, e.g.,
3
4 5 1 2.
1 ALBUM 1-Album mode (MP3/WMA only):
press
[ALBUM
or
] to select the album
4 Press [CD q/ h] to start play.
5 Adjust the volume.
Main unit Remote control
Stop Press [STOP g, -DEMO] Press [g CLEAR]
Pause Press [CD q/ h]
Press [CD q/ h] again to resume play.
Skip Turn the Jog control
down (backward) or up
(forward)
Press [u 2/REW] (backward)
or [i 1/FF] (forward)
Search Press and hold [u 2/REW]
(backward) or
[i 1/FF] (forward) during
play or pause
To change discs
While one CD is playing, you can change the CDs in the
other trays.
1
Press [; CD CHANGE].
2
Press [CD 1] - [CD 5] to select the tray.
Press [; CD CHANGE] again to close the tray.
To check which CDs are in the trays (CD CHECK)
A
Press [CD CHECK].
The tray with a CD being played will not open.
If the player is stopped, all trays will open.
Press [CD CHECK] again to close the trays.
Do not remove or insert CDs during a CD check.
Do not pull out the trays during a CD check.
8-cm CDs cannot be checked.
You cannot change to or open other trays when in
program play mode.
2
4
5
A
ENTER
^
DEL
DIMMER
AUX
CLEAR
PLAY LIST
INTRO
MARKER
TITLE
SEARCH
RE-MASTER
RETURN
TITLE IN
123
7
0
89
10
4
56
>
=
SOUND
MUTING
S.SOUND EQ
u
i
g
DISC ABC
PROGRAM GHI JKL MNO
PQRS TUV WXYZ
REPEAT SPACE l"#
SLEEP
- AUTO OFF
CLOCK/
TIMER
PLAY/
REC
TUNER/
BAND
q
q
CD
q
/
h
/REW /FF
CD
q
/
h
OPEN/
CLOSE
;
DOWN
VOLUME
UP
1DISC
5
4
3
2
1
5
4
3
2
1
1DISC
5
4
3
2
1
CD CHECK
- DEMO
CD 1 CD 2 CD 3 CD 4 CD 5
STOP
g
TUNER/BAND
CD
q
/
h
TAPE
7
DOWN
VOLUME
UP
PUSH
ENTER
PHONES
PLAY LIST
S.SOUND EQ RE-MASTER
AUX
CD
CHECK
RETURN
AC IN
/
h
REC
8
OPEN/
CLOSE
;
1
3
CD
CHANGE
;
CD
CHANGE
;
PLAY MODE
4
2
5
1
DEMO
STOP
CLEAR
/REW
/FF
,
3
CD 1 CD 2 CD 3 CD 4 CD 5
ALBUM
ALBUMALBUM
c
CD indicator
d
Track number
e
Elapsed play time
b
Tray number
a
Jog control
Listening operations
9
RQT7377
CDs: CD-DA and MP3/WMA
A CD selection and care
Only play CDs with COMPACT disc DIGITAL AUDIO
trademark (see
A
).
Note on CD-R and CD-RW
This unit can play CD-R and CD-RW recorded with CD-DA
or WMA/MP3. Use an audio recording disc for CD-DA
and nalize (a process performed after recording that
enables this unit to play audio CD-R/RW) it when you nish
recording. The unit may not be able to play some discs due
to the condition of the recording.
Do not;
use irregularly shaped CDs. (
B
)
attach extra labels and stickers.
use CDs with labels and stickers that are coming off or
with adhesive exuding from under labels and stickers. (
C
)
attach scratch-proof covers or any other kind of
accessory.
write anything on the CD.
clean CDs with liquids. (Wipe with a soft, dry cloth.)
use CDs printed with label printers available on the
market.
To prevent damage
Always observe the following points.
Set the system on a at, level surface.
Do not set it on top of magazines, inclined surfaces, etc.
Do not move the system while tray is opening/closing, or
when loaded. Always unload all CDs before moving the
system.
Do not put anything except a CD in the tray.
Do not use cleaning CDs or CDs which are badly
warped or cracked.
Do not disconnect the AC mains lead from the household
mains socket during CD changing operation.
Windows Media, and the Windows
logo are trademarks, or registered
trademarks of Microsoft Corporation
in the United States and/or other
countries.
WMA is a compression format
developed by Microsoft Corporation.
It achieves the same sound quality
as MP3 with a le size that is smaller
than that of MP3.
MPEG Layer-3 audio decoding technology licensed from
Fraunhofer IIS and Thomson multimedia.
HighMAT and the HighMAT logo
are either trademarks or registered
trademarks of Microsoft Corporation
in the United States and/or other
countries.
Listening operations
10
RQT7377
CDs: CD-DA and MP3/WMA
MP3 and WMA
The folder and le names you enter on the computer
become the album and track names on this unit.
There can be a maximum of 400 albums and 999 tracks.
Folders that do not contain MP3/WMA are skipped.
This unit is compatible with multisession, but if the
number of sessions is large, it may take longer for play
to start.
Disc format
Discs must conform to ISO9660 level 1 or 2 (except for
extended formats).
File format
MP3 les must have the extension “.MP3” or “.mp3”.
WMA les must have the extension “.WMA” or “.wma”.
To play in a certain order
Pre x the folder and le names with 3-digit numbers in the
order you want to play them.
Files may not be recorded in numbered order if the
pre xes have different numbers of digits, for example:
1track.mp3, 2track.mp3, 10track.mp3.
However, some writing software may also cause recording
to occur in a different order.
Limitations on MP3/WMA play
This unit is not compatible with packet-write format.
This unit is not compatible with ID3 tags.
If you have recorded MP3/WMA on the same disc as
CD-DA, only the format recorded in the rst session can
be played.
Recordings will not necessarily be played in the order
you recorded them.
You cannot search while playing MP3/WMA. Program
play works only within a single disc.
You cannot play protected WMA tracks (“TRACK
PROTECTED” appears). Consult the creator of the
software you used to record the WMA tracks for details.
Noise may occur when playing WMA les.
HighMAT
HighMAT is a new way of recording and managing MP3
and WMA on CD-R/RW.
The unit plays the tracks in play lists that you create on
your computer, sorting them by artist, album, and genre.
A
Menu (a list of items you can use to nd play lists)
B
Play lists
C
Group (a group of tracks within a play list)
Menus can have up to 8 levels.
You will need a computer running on Windows XP to
create discs with HighMAT.
(Continued on next page)
001
002
003
001track.mp3
002track.mp3
003track.mp3
001track.mp3
002track.mp3
003track.mp3
004track.mp3
001track.mp3
002track.mp3
003track.mp3
PLAY LIST 1
001track.mp3
002track.mp3
003track.mp3
004track.mp3
MENU 1 MENU 1
MENU 2
MENU 2
MENU 3 MENU 3
GROUP 1
GROUP 2
PLAY LIST 2
PLAY LIST 3
A A B
C
a
Example MP3 disc
c
Example HighMAT disc with MP3
b
root
Listening operations
11
RQT7377
CDs: CD-DA and MP3/WMA
Using HighMAT menus and play lists
“HighMAT” appears to show that you can use these
features.
Preparation: Press [CD q/ h] and then [g CLEAR].
Remote control
1 Press [PLAY LIST].
The CD selection screen appears and the play mode
switches to 1 Disc.
2 Press [e] or [r] to select the CD-R/RW.
[ENTER]
3 Press [e] or [r] to select the method of play.
[ENTER]
MENU Find a play list in the HighMAT menu
PLAYLIST Select and play play lists
WMA/MP3 Select and play MP3/WMA
4 Press [e] or [r] to select the menu, play list,
or track.
[ENTER]
Repeat this step if you are using the menus.
Play starts when you select a play list or track.
Main unit
1
Press [PLAY LIST].
2
Turn the jog control to select and press it to con rm to
do steps 2, 3, and 4 above.
To return to the previous display
Press [RETURN].
To select a group
Press
[ALBUM
or ]
during play.
To cancel partway
Press [g CLEAR].
During play: The play list selection screen reappears.
In the stop mode: The original display appears.
HighMAT titles
The various titles you can enter for HighMAT discs scroll
across the unit’s display after you start play.
To show the information again when playing a play list,
press and hold [DISPLAY].
1
2
PLAY LIST
ENTER
q
q
3
ENTER
q
q
4
ENTER
q
q
2,3,4
1
CLEAR
ENTER
^
DEL
DIMMER
AUX
CLEAR
INTRO
MARKER
TITLE
SEARCH
RE-MASTER
RETURN
ALBUM
TITLE IN
1
23
7
0
89
10
4
56
>
=
SOUND
SURROUND
MUTING
S.SOUND EQ
u
i
g
DISC ABC DEF
PROGRAM GHI JKL MNO
PLAY MODE PQRS TUV WXYZ
REPEAT SPACE l"#
SLEEP
- AUTO OFF
CLOCK/
TIMER
PLAY/
REC
TUNER/
BAND
q
q
TAPE
w
q
CD
q
/
h
VOL VOL
/REW /FF
PLAY LIST
RETURN
ALBUM
ENTER
- DEMO
CD 1 CD 2 CD 3 CD 4 CD 5
STOP
g
TUNER/BAND
CD
q
/
h
TAPE
7
DOWN
VOLUME
UP
PUSH
ENTER
PHONES
PLAY LIST
S.SOUND EQ RE-MASTER
AUX
CD
CHECK
RETURN
AC IN
/
h
REC
8
CD
CHANGE
;
OPEN/
CLOSE
;
DISPLAY
DISPLAY
1 2
1 DISC
5
4
3
2
1
5
4
3
2
1
WMA
HighMAT
WMA
5
4
3
2
1
HighMAT
WMA
WMA
5
4
3
2
1
HighMAT
WMA
WMA
1 DISC
1 DISC
1 DISC
Listening operations
12
RQT7377
Other ways of playing CDs
Finding tracks to play with lists
(CD-DA and MP3/WMA)
Show disc, album, and track titles, then select to start play.
You will need to enter the titles for commercial CDs.
The unit can record the titles for 100 CDs, 25 track titles
per CD, and 32 characters per title.
Entering CD titles (CD-DA)
Remote control only
Preparation: Press [CD q/ h] and then [g CLEAR].
1 While stopped:
Press [TITLE IN].
2 Press [u 2/REW] or [i 1/FF] to select the
title type and track number.
[ENTER]
DISC TITLE Disc title
ART NAME Artist title
TR TITLE Track title
3 Enter the title ( "Entering characters" below.)
[ENTER]
Repeat steps 2 and 3 to enter other titles.
4 Press [TITLE IN].
Entering characters
1
Press the numbered button to select the character.
The characters change each time you press a button.
Button Characters Button Characters
1 1 6 M N O 6
2 A B C 2 7 P Q R S 7
3 D E F 3 8 T U V 8
4 G H I 4 9 W X Y Z 9
5 J K L 5 0 0
>
=
10
space
! “ # $ % & ’ ( ) * + , – . / : ; = ? _ ||
2
Press [i 1/FF] to enter the character.
Repeat steps
1
and
2
to enter the title.
To move the cursor
Press [u 2/REW] or [i 1/FF].
Editing characters
Press [u 2/REW] to move the cursor over a character,
then enter the correct character.
Deleting a character
Move the cursor over the character and press [DEL].
To change a title
Enter the title again from the beginning.
To check titles
Press [DISPLAY] while stopped.
Each time you press the button:
Disc Title Artist title
Track titles appear during play or when you skip tracks
while stopped. (Nothing is shown if you only enter spaces.)
To delete titles
1
While stopped, press [DEL].
“TITLE ERASE?” appears.
2
Press [ENTER] three times.
All the titles you entered for the CD are deleted, starting
with the most recent. Repeat to delete the titles on other
CDs.
To cancel, press [g CLEAR]
(Continued on next page)
1
2
ENTER
^
DEL
DISPLAY DIMMER
AUX
CLEAR
PLAY LIST
INTRO
MARKER
TITLE
SEARCH
RE-MASTER
RETURN
ALBUM
TITLE IN
1
23
7
0
89
10
4
56
>
=
SOUND
SURROUND
MUTING
S.SOUND EQ
u
i
g
DISC ABC DEF
PROGRAM GHI JKL MNO
PLAY MODE PQRS TUV WXYZ
REPEAT SPACE l"#
SLEEP
- AUTO OFF
CLOCK/
TIMER
PLAY/
REC
TUNER/
BAND
q
q
TAPE
7
CD
q
/
h
VOL VOL
/REW /FF
3
3
TITLE IN
4
TITLE IN
u
i
/REW /FF
1
23
7
0
89
10
456
>
=
ABC DEF
GHI JKL MNO
PQRS TUV WXYZ
SPACE l"#
ENTER
ENTER
1DISC
5
4
3
2
1
1DISC
5
4
3
2
1
1DISC
5
4
3
2
1
1DISC
5
4
3
2
1
1,4
2
DISPLAY
DEL
ENTER
Listening operations
13
RQT7377
Other ways of playing CDs
A
Track search
Preparation: Press [CD q/ h] and then [g CLEAR].
Remote control
1 While stopped:
Press [PLAY LIST].
2 Press [e] or [r] to select the title and press
[ENTER].
First select the disc or album title.
With HighMAT, press [e] or [r] to select the method
of play ( step 3, page 11).
Repeat as often as necessary to select and play the
track.
Main unit
1
Press [PLAY LIST].
2
Turn the jog control to select and press it to con rm to
do step 2 above.
To return to the previous display
Press [RETURN].
B
Direct access play (CD-DA and MP3/WMA)
Start play from a speci c track.
Remote control
1 Press [DISC].
2 Within 10 seconds:
Press [1] - [5] to select the disc you want.
For MP3/WMA, after this press
[ALBUM
or ]
to select the album.
3 Press the numbered button(s) to select and
play the track.
For two-digit numbers, press [
>
=
10] once then the
two digits.
For three-digit numbers, press [
>
=
10] twice then the
three digits.
Note
You cannot use this feature with program play, 1-Disc
Random, and All-Disc Random modes.
C CD display (CD-DA and MP3/WMA)
Show various types of information during play or recording.
Remote control
Press [DISPLAY].
Each time you press the button:
Elapsed play time Remaining play time
Note
CD-DA
When track number 25 or greater is playing, remaining play
time display shows “--:--”.
1
2
2
1
A
B
C
ENTER
^
DEL
DIMMER
AUX
CLEAR
INTRO
MARKER
TITLE
SEARCH
RE-MASTER
ALBUM
TITLE IN
1
23
7
0
89
10
4
56
>
=
SOUND
SURROUND
MUTING
S.SOUND EQ
u
i
g
DISC ABC DEF
PROGRAM GHI JKL MNO
PLAY MODE PQRS TUV WXYZ
REPEAT SPACE l"#
SLEEP
- AUTO OFF
CLOCK/
TIMER
PLAY/
REC
TUNER/
BAND
q
q
TAPE
7
CD
q
/
h
VOL VOL
/REW /FF
ENTER
^
DEL
DISPLAY DIMMER
AUX
CLEAR
PLAY LIST
INTRO
MARKER
TITLE
SEARCH
RE-MASTER
RETURN
ALBUM
TITLE IN
1
23
7
0
89
10
4
56
>
=
SOUND
SURROUND
MUTING
S.SOUND EQ
u
i
g
DISC
ABC DEF
PROGRAM GHI JKL MNO
PLAY MODE PQRS TUV WXYZ
REPEAT SPACE l"#
SLEEP
- AUTO OFF
CLOCK/
TIMER
PLAY/
REC
TUNER/
BAND
q
q
TAPE
7
CD
q
/
h
VOL VOL
/REW /FF
PLAY LIST
PLAY LIST
q
q
ENTER
23
1
DISC
1
23
7
0
89
10
456
>
=
ABC DEF
GHI JKL MNO
PQRS TUV WXYZ
SPACE l"#
1
23
45
ABC DEF
GHI JKL
DISPLAY
1
DISPLAY
- DEMO
CD 1 CD 2 CD 3 CD 4 CD 5
STOP
g
TUNER/BAND
CD
q
/
h
TAPE
7
DOWN
VOLUME
UP
PUSH
ENTER
PHONES
PLAY LIST
S.SOUND EQ RE-MASTER
AUX
CD
CHECK
AC IN
/
h
REC
8
CD
CHANGE
;
OPEN/
CLOSE
;
RETURN
RETURN
RETURN
RETURN
DISPLAY
3
2
5
4
3
2
1
5
4
3
2
1
1DISC
5
4
3
2
1
PLAY LIST
a
Jog control
Listening operations
14
RQT7377
Other ways of playing CDs
Program play (CD-DA and MP3/WMA)
Program up to 24 tracks to play.
Remote control only
Preparation: Press [CD q/ h] and then [g CLEAR].
CD-DA
1 Press [PROGRAM].
2 Press [DISC].
3 Within 10 seconds:
Press [1] - [5] to select the disc.
4 Press the numbered button(s) to select the
track.
For two-digit numbers, press [
>
=
10] once then the
two digits.
For three-digit numbers, press [
>
=
10] twice then the
three digits.
Repeat steps 2 through 4 to program other tracks.
5 Press [CD q/ h] to start play.
MP3/WMA (within a single disc)
1
Press [PROGRAM].
2
Press
[ALBUM
or
] to select the album.
3
Press [u 2/REW] or [i 1/FF] to select the track
and press [ENTER].
Repeat steps
2
and
3
to program other tracks.
4
Press [CD q/ h].
To Action
cancel program play Press [PROGRAM] in the stop mode.
Programmed contents will be saved in
memory.
Your program is retained in memory
for about 1 week if the system is
unplugged.
replay your program 1) Press [PROGRAM].
2) Press [CD q/ h].
check program
contents
Press [u 2/REW] or [i 1/FF] when
“PGM” is displayed.
To check while programming, press
[PROGRAM] twice after “PGM” appears,
then press
[u 2/REW] or [i 1/FF].
add to the program Repeat steps 2 through 4.
clear the last track Press [DEL].
clear all programmed
tracks
Press [g CLEAR].
“CLEAR ALL?” is displayed.
Within 5 seconds, press the button again
to clear all tracks.
When “FULL” appears
No further tracks can be programmed.
Note
You can program tracks that are not actually on the CDs
that are not in the play position, but the unit clears these
items from the program during play.
During program play, you can search forward or
backward only within the current track.
During program play, skipping is always in the
programmed order, whether forward or backward.
Even if you create a program that contains both CD-DA
and MP3/WMA, only the CD-DA tracks are played.
You cannot change to or open other trays when in
program play mode.
1
4
5
2
3
ENTER
^
DEL
DISPLAY DIMMER
AUX
CLEAR
PLAY LIST
INTRO
MARKER
TITLE
SEARCH
RE-MASTER
RETURN
TITLE IN
1
23
7
0
89
10
4
56
>
=
SOUND
SURROUND
MUTING
S.SOUND EQ
g
DISC
ABC DEF
PROGRAM
GHI JKL MNO
PLAY MODE PQRS TUV WXYZ
REPEAT SPACE l"#
SLEEP
- AUTO OFF
CLOCK/
TIMER
PLAY/
REC
TUNER/
BAND
q
q
TAPE
7
CD
q
/
h
VOL VOL
u
i
/REW /FF
DISC
PROGRAM
CD
q
/
h
123
7
0
89
10
456
>
=
ABC DEF
GHI JKL MNO
PQRS TUV WXYZ
SPACE l"#
1
23
45
ABC DEF
GHI JKL MNO
PQRS TUV
DEL
DEL
5
4
3
2
1
5
4
3
2
1
5
4
3
2
1
5
4
3
2
1
5
4
3
2
1
PGM
PGM
PGM
PGM
PGM
4
3
2
1
5
g
CLEAR
ENTER
/REW
/FF
,
ALBUM
ALBUM
a
Speci ed track number
b
Program order
Listening operations
15
RQT7377
Other ways of playing CDs
A Random play (CD-DA)
Play all the tracks on a single CD or all the tracks on all the
CDs randomly.
Remote control only
Preparation: Press [CD q/ h] and then [g CLEAR].
1 Press [PLAY MODE] to select the mode.
Each time you press the button:
1 DISC ALL DISC 1 TRACK
A RANDOM 1 RANDOM
1 RANDOM 1-Disc Random mode
A RANDOM All-Disc Random mode
2 Press [CD q/ h].
Random play will start.
To cancel
While stopped, press [PLAY MODE] to select “1 DISC” or
“ALL DISC”.
Note
You cannot skip to tracks which have been played.
You can search forward or backward only within the
current track.
B Repeat play (CD-DA and MP3/WMA)
Repeat play according to the current play mode.
Remote control only
Before or during play:
Press [REPEAT].
“REPEAT ON” and “x” are displayed.
To cancel
Press [REPEAT] again.
Playing one track repeatedly
1
Press [PLAY MODE] to select “1 TRACK”.
2
Press [u 2/REW] or [i 1/FF] to select the track
you want.
3
Press [REPEAT].
4
Press [CD q/ h].
C INTRO function (MP3/WMA)
Find an album by listening to the rst track of all albums in
the current disc for 10 seconds each.
Remote control only
Preparation: Press [CD q/ h] and then [g CLEAR].
1 Press [INTRO].
INTRO function starts.
(INTRO function cancels after playing the rst track in
the last album.)
2 While the album is playing
Press [CD q/ h]
Play continues from the rst track of the album.
To stop during the process
Press [INTRO] or [g CLEAR].
1DISC
ALL DISC
ALL DISC
1DISC
RND
RND
1TR
7
7
PLAY MODE
PLAY MODE
u
i
/REW /FF
/REW
/FF
,
7
Listening operations
16
RQT7377
Other ways of playing CDs
A Marking a track (CD-DA and MP3/WMA)
Remote control only
Mark tracks to make it easier to nd and play them later.
You can mark one track on each of the discs loaded.
To mark a track
While playing the track
Press and hold [MARKER] until "STORING"
blinks on the display.
The selected track is stored.
If there was a marked track on the disc, it is replaced.
To recall and play a marked track
During play or stop:
Press [MARKER].
Note
The marker memory clears when you open the CD tray.
You cannot use this function during program, 1-Disc
Random and All-Disc Random play.
Using titles to nd tracks and albums to
play (MP3/WMA)
Enter up to 10 characters for an album or title search.
Remote control only
Preparation: Press [CD q/ h] and then [g CLEAR].
1 Press [TITLE SEARCH] to select “ALBUM” or
“TRACK”.
Each time you press the button:
ALBUM TRACK
Original Display
ALBUM Search for an album
TRACK Search for a track
2 Enter the characters of a keyword for the
title.
( “Entering characters”, page 12)
3 Press [ENTER].
The search starts and then a match is displayed.
To see other matches, press [u 2/REW] or
[i 1/FF].
If there is no match, “NOT FOUND” appears.
4 Press [CD q/ h] to start play.
Title search mode is cancelled.
To cancel partway through
Press [g CLEAR].
For your reference
The unit remembers the title you entered and it appears
again the next time you press [TITLE SEARCH].
Press [DEL] to delete unwanted characters.
3
1
A
B
ENTER
^
DEL
DISPLAY DIMMER
AUX
CLEAR
PLAY LIST
INTRO
MARKER
TITLE
SEARCH
RE-MASTER
RETURN
ALBUM
TITLE IN
1
23
7
0
89
10
4
56
>
=
SOUND
SURROUND
MUTING
S.SOUND EQ
g
DISC ABC DEF
PROGRAM GHI JKL MNO
PLAY MODE PQRS TUV WXYZ
REPEAT SPACE l"#
SLEEP
- AUTO OFF
CLOCK/
TIMER
PLAY/
REC
TUNER/
BAND
q
q
TAPE
7
CD
q
/
h
VOL VOL
u
i
/REW /FF
CD
q
/
h
MARKER
TITLE
SEARCH
ENTER
4
4
1
3
1
23
7
0
89
10
4
56
>
=
ABC DEF
GHI JKL MNO
PQRS TUV WXYZ
SPACE l"#
ENTER
^
DEL
DISPLAY DIMMER
AUX
CLEAR
PLAY LIST
INTRO
MARKER
TITLE
SEARCH
RE-MASTER
RETURN
ALBUM
TITLE IN
SOUND
SURROUND
MUTING
S.SOUND EQ
g
DISC
PROGRAM
PLAY MODE
REPEAT
SLEEP
- AUTO OFF
CLOCK/
TIMER
PLAY/
REC
TUNER/
BAND
q
q
TAPE
7
CD
q
/
h
VOL VOL
DEL
CLEAR
g
u
i
/REW /FF
/REW
/FF
,
1
23
7
0
89
10
4
56
>
=
ABC DEF
GHI JKL MNO
PQRS TUV WXYZ
SPACE l"#
1DISC
5
4
3
2
1
MP3
1DISC
5
4
3
2
1
MP3
Listening operations
B
17
RQT7377
The radio: manual tuning
1
Press [TUNER/BAND] to select “FM” or “AM”.
The unit comes on automatically.
Each time you press the button: FM AM
2 Press [PLAY MODE] on the remote control to
select “MANUAL”.
Each time you press the button:
MANUAL PRESET
3 Press [u 2/REW] or [i 1/FF] to select the
frequency of the required station.
On the main unit, turn the Jog control.
“ST” is displayed when a stereo FM broadcast is being
received.
Press and hold [u 2/REW] or [i 1/FF] until the
frequency starts scrolling to start automatic tuning.
Tuning stops when a station is found.
4 Adjust the volume.
If noise is excessive in FM
Press and hold [PLAY MODE] to display “MONO”.
This mode improves sound quality if reception is weak, but
broadcasts will be heard in monaural.
To cancel, press and hold [PLAY MODE] again.
MONO is also cancelled if the frequency is changed.
Turn off “MONO” for normal listening.
A
RDS broadcasting
(Continental Europe and the United Kingdom only)
This unit can display the text data transmitted by the radio
data system (RDS) available in some areas.
If the station you are listening to is transmitting RDS
signals, “RDS” will light up on the display.
Displaying the name of a broadcasting station or
a program type
Press [DISPLAY].
Every time you press the button:
Frequency
Station Name (PS) Program type (PTY)
Program type displays
NEWS
AFFAIRS
INFO
SPORT
EDUCATE
DRAMA
CULTURE
SCIENCE
VARIED
POP M
ROCK M
M.O.R M
1)
LIGHT M
CLASSICS
OTHER M
WEATHER
FINANCE
CHILDREN
SOCIAL A
RELIGION
PHONE IN
TRAVEL
LEISURE
JAZZ
COUNTRY
NATIONAL
OLDIES
FOLK M
DOCUMENT
TEST
ALARM
1)
Middle of the road music
Note
RDS displays may not be available if reception is poor.
Sound is momentarily interrupted if you load/unload
tapes while listening to an AM broadcast.
To change the AM frequency step (9 kHz 10 kHz)
Press and hold [TUNER/BAND] on the main unit for 12 seconds to
change the step to suit your area.
Note
After changing the “allocation” setting, the frequencies you
previously preset in the memory will be cleared.
2
3
4
1
ENTER
^
DEL
DISPLAY DIMMER
AUX
CLEAR
PLAY LIST
INTRO
MARKER
TITLE
SEARCH
RE-MASTER
RETURN
ALBUM
TITLE IN
1
23
7
0
89
10
4
56
>
=
SOUND
SURROUND
MUTING
S.SOUND EQ
u
i
g
DISC ABC DEF
PROGRAM GHI JKL MNO
PQRS TUV WXYZ
REPEAT SPACE l"#
SLEEP
- AUTO OFF
CLOCK/
TIMER
PLAY/
REC
TUNER/
BAND
q
q
TAPE
7
CD
q
/
h
VOL VOL
/REW
/FF
PLAY MODE
u
i
/REW /FF
TUNER/BAND
DOWN
VOLUME
UP
PLAY MODE
- DEMO
CD 1 CD 2 CD 3 CD 4 CD 5
STOP
g
TUNER/BAND
CD
q
/
h
TAPE
7
DOWN
VOLUME
UP
PHONES
PLAY LIST
S.SOUND EQ RE-MASTER
AUX
CD
CHECK
RETURN
AC IN
/
h
REC
8
CD
CHANGE
;
OPEN/
CLOSE
;
A
ENTER
^
DEL
DISPLAY DIMMER
AUX
CLEAR
PLAY LIST
INTRO
MARKER
TITLE
SEARCH
RE-MASTER
RETURN
ALBMU
TITLE IN
1
23
7
0
89
10
4
56
>
=
SOUND
SORROUND
MUTING
S.SOUND EQ
u
i
g
DISC ABC DEF
PROGRAM GHI JKL MNO
PLAY MODE PQRS TUV WXYZ
REPEAT SPACE l"#
SLEEP
- AUTO OFF
CLOCK/
TIMER
PLAY/
REC
TUNER/
BAND
q
q
TAPE
w
q
CD
q
/
h
VOL VOL
/REW /FF
DISPLAY
RDS
PS RDS
PTY RDS
5
4
3
2
1
5
4
3
2
1
5
4
3
2
1
5
4
3
2
1
MHz
MHz
MHz
4
1
3
2
PUSH
ENTER
a
Jog control
Listening operations
18
RQT7377
The radio: preset tuning
Remote control only
There are two methods of presetting stations.
Automatic presetting: All the stations the tuner can
receive are preset.
Manual presetting: You can select the stations to preset
and the order they are preset in.
Up to 15 stations each can be set in the FM and AM bands.
Preparation: Press [TUNER/BAND] to select “FM” or “AM”.
A Automatic presetting
Do the following once each for FM and AM.
Preparation:
Tune to the frequency where presetting is to begin (
page 17).
Press and hold [PROGRAM].
The tuner presets all the stations it can receive into the
channels in ascending order. When nished, the last
station memorized is tuned in.
B Manual presetting
Preset the stations one at a time.
1
Press [PROGRAM] then press [u 2/REW] or
[
i 1/FF] to tune to the required station.
2
Press [PROGRAM] then press [u 2/REW] or
[
i 1/FF] to select a channel.
3
Press [PROGRAM].
The station occupying a channel is erased if another station
is preset in that channel.
C Selecting channels
Press the numbered buttons to select the
channel.
For channels 1 to 9, press the corresponding number.
For channels 10 to 15, press [
>
=
10], then the two digits.
OR
1
Press [PLAY MODE] to select “PRESET”.
2
Press [u 2/REW] or [i 1/FF] to select the
channel.
On the main unit, turn the Jog control.
A
B
ENTER
^
DEL
DISPLAY DIMMER
AUX
CLEAR
PLAY LIST
INTRO
MARKER
TITLE
SEARCH
RE-MASTER
RETURN
ALBUM
TITLE IN
1
23
7
0
89
10
4
56
>
=
SOUND
SURROUND
MUTING
S.SOUND EQ
u
i
g
DISC ABC DEF
PROGRAM GHI JKL MNO
PLAY MODE PQRS TUV WXYZ
REPEAT SPACE l"#
SLEEP
- AUTO OFF
CLOCK/
TIMER
PLAY/
REC
TUNER/
BAND
q
q
TAPE
7
CD
q
/
h
VOL VOL
/REW /FF
C
ENTER
^
DEL
DISPLAY DIMMER
AUX
CLEAR
PLAY LIST
INTRO
MARKER
TITLE
SEARCH
RE-MASTER
RETURN
ALBUM
TITLE IN
1
23
7
0
89
10
4
56
>
=
SOUND
SURROUND
MUTING
S.SOUND EQ
u
i
g
DISC ABC DEF
PROGRAM GHI JKL MNO
PLAY MODE PQRS TUV WXYZ
REPEAT SPACE l"#
SLEEP
- AUTO OFF
CLOCK/
TIMER
PLAY/
REC
TUNER/
BAND
q
q
TAPE
7
CD
q
/
h
VOL VOL
/REW /FF
PROGRAM
1
23
7
0
89
10
456
>
=
ABC DEF
GHI JKL MNO
PQRS TUV WXYZ
SPACE l"#
PLAY MODE
u
i
/REW /FF
u
i
/REW /FF
TUNER/BAND
5
4
3
2
1
5
4
3
2
1
MHz
5
4
3
2
1
MHz
MHz
PGM
PGM
a
Preset channel
b
Preset channel
Listening operations
19
RQT7377
Cassette tapes
1
Press [; OPEN], insert a cassette with the
tape facing out.
The unit comes on automatically.
Make sure the cassette is fully inserted and close the
lid by hand.
2 Press [PLAY MODE] on the remote control to
select the reverse mode.
Every time you press the button:
v / $
v
One side plays.
/
Both sides play.
$
Both sides are played repeatedly until you press
[STOP g, -DEMO].
3 Press [TAPE 7] to start playback.
Every time you press the button : p o
o : The forward side (front) plays.
p : The reverse side plays.
4 Adjust the volume.
To stop
Press [STOP g, -DEMO].
One-touch play
When the system is OFF and a tape is already inserted,
play starts automatically when you press [TAPE 7].
Cassette tape selection and care
Use normal position tapes.
High position and metal position tapes can be played,
but the unit will not be able to do full justice to the
characteristics of these tapes.
Tapes exceeding 100 minutes are thin and can break or
get caught in the mechanism.
Tape slack can get caught up in the mechanism and
should be wound up before the tape is played.
Endless tapes can get caught up in the deck’s moving
parts if used incorrectly.
To fast-forward or rewind the tape
Press [
u 2/REW] (rewind) or [i 1/FF]
(forward) in the stop mode.
On the main unit, turn the Jog control.
To nd the beginning of a program
(TPS: Tape Program Sensor)
TPS nds the beginning of a track and resumes play from
there. Each press increases the number of tracks skipped,
up to a maximum of 9.
Press [u 2/REW] (rewind) or [i 1/FF]
(forward) during play.
On the main unit, turn the Jog control.
Note
The TPS function searches for silent parts of about 4
seconds in length which are normally found between
tunes. As a result, it may not function properly in the
following cases:
With short silent parts
When noise occurs between tunes
With silent parts found within tunes
1
3
2
4
ENTER
^
DEL
DISPLAY DIMMER
AUX
CLEAR
PLAY LIST
INTRO
MARKER
TITLE
SEARCH
RE-MASTER
RETURN
ALBUM
TITLE IN
1
23
7
0
89
10
4
56
>
=
SOUND
SURROUND
MUTING
S.SOUND EQ
u
i
g
DISC ABC DEF
PROGRAM GHI JKL MNO
PQRS TUV WXYZ
SPACE l"#
SLEEP
- AUTO OFF
CLOCK/
TIMER
PLAY/
REC
TUNER/
BAND
q
q
TAPE
7
CD
q
/
h
VOL VOL
/REW /FF
TAPE
7
DOWN
VOLUME
UP
OPEN
- DEMO
CD 1 CD 2 CD 3 CD 4 CD 5
STOP
g
TUNER/BAND
CD
q
/
h
TAPE
7
DOWN
VOLUME
UP
PHONES
PLAY LIST
S.SOUND EQ RE-MASTER
AUX
CD
CHECK
RETURN
AC IN
/
h
REC
8
CD
CHANGE
;
OPEN/
CLOSE
;
B
B
/
REW
/
FF,
5
4
3
2
1
5
4
3
2
1
5
4
3
2
1
4
3
DEMO
STOP
,
OPEN
1
PUSH
ENTER
PLAY MODE
2
PLAY MODE
c
Insert inside the
guides
b
Forward side
a
Jog
control
Listening operations
20
RQT7377
Making a recording
Before recording
Types of tapes which can be recorded correctly
Use normal position tapes.
High position and metal position tapes can be used, but the
unit will not be able to record or erase them correctly.
Erasure prevention
A
The illustration shows how to remove the tabs to prevent
recording. To record on the tape again, cover as shown.
The effect of volume and sound quality on
recording
These have no effect on recording.
They can be changed for playback.
To erase a recorded sound
B
1
Press [TAPE 7] and then [STOP g, -DEMO].
2
Insert the recorded cassette with the tape facing out.
3
Press [PLAY MODE] to select the reverse mode.
4
Press [*/ h REC].
Your attention is drawn to the fact that recording
pre-recorded tapes or discs or other published or
broadcast material may infringe copyright laws.
C Preparatory steps
Do these steps before each recording.
Wind up the leader tape so recording can begin immediately.
1 Press [; OPEN] and insert a cassette with
the tape facing out.
Make sure the cassette is fully inserted and close the
lid by hand.
The tape direction is automatically set to “ o”.
To record on the reverse side
Press [TAPE 7] twice, then press [STOP g,
-DEMO].
2 Press [PLAY MODE] on the remote control to
select the reverse mode.
Every time you press the button:
v / $
v
One side only records.
/ $
Both sides are recorded. (forward
reverse).
$ ” automatically changes to “/ ” when you press
[*/ h REC].
C
- DEMO
CD 1 CD 2 CD 3 CD 4 CD 5
STOP
g
TUNER/BAND
CD
q
/
h
TAPE
7
DOWN
VOLUME
UP
PUSH
ENTER
PHONES
PLAY LIST
S.SOUND EQ RE-MASTER
AUX
CD
CHECK
RETURN
AC IN
/
h
REC
8
CD
CHANGE
;
OPEN/
CLOSE
;
- DEMO
CD 1 CD 2 CD 3 CD 4 CD 5
STOP
g
TUNER/BAND
CD
q
/
h
TAPE
7
DOWN
VOLUME
UP
PUSH
ENTER
PHONES
PLAY LIST
S.SOUND EQ RE-MASTER
AUX
CD
CHECK
RETURN
AC IN
/
h
REC
8
CD
CHANGE
;
OPEN/
CLOSE
;
OPEN
A
B
B
B
1
2
OPEN
5
4
3
2
1
PLAY MODE
1
3
1
4
ENTER
^
DEL
DISPLAY DIMMER
AUX
CLEAR
PLAY LIST
INTRO
MARKER
TITLE
SEARCH
RE-MASTER
RETURN
ALBUM
TITLE IN
1
23
7
0
89
10
4
56
>
=
SOUND
SURROUND
MUTING
S.SOUND EQ
u
i
g
DISC ABC DEF
PROGRAM GHI JKL MNO
PLAY MODE PQRS TUV WXYZ
REPEAT SPACE l"#
SLEEP
- AUTO OFF
CLOCK/
TIMER
PLAY/
REC
TUNER/
BAND
q
q
TAPE
7
CD
q
/
h
VOL VOL
/REW /FF
ENTER
^
DEL
DISPLAY DIMMER
AUX
CLEAR
PLAY LIST
INTRO
MARKER
TITLE
SEARCH
RE-MASTER
RETURN
ALBUM
TITLE IN
1
23
7
0
89
10
4
56
>
=
SOUND
SURROUND
MUTING
S.SOUND EQ
u
i
g
DISC ABC DEF
PROGRAM GHI JKL MNO
PQRS TUV WXYZ
REPEAT SPACE l"#
SLEEP
- AUTO OFF
CLOCK/
TIMER
PLAY/
REC
TUNER/
BAND
q
q
TAPE
7
CD
q
/
h
VOL VOL
/REW /FF
2
PLAY MODE
e
Adhesive tape
b
Tab for side B
c
Tab for side A
a
Side A
d
To re-record
Normal tape
Recording operations
  • Page 1 1
  • Page 2 2
  • Page 3 3
  • Page 4 4
  • Page 5 5
  • Page 6 6
  • Page 7 7
  • Page 8 8
  • Page 9 9
  • Page 10 10
  • Page 11 11
  • Page 12 12
  • Page 13 13
  • Page 14 14
  • Page 15 15
  • Page 16 16
  • Page 17 17
  • Page 18 18
  • Page 19 19
  • Page 20 20
  • Page 21 21
  • Page 22 22
  • Page 23 23
  • Page 24 24
  • Page 25 25
  • Page 26 26
  • Page 27 27
  • Page 28 28

Panasonic SCPM29 Operating instructions

Category
Cassette players
Type
Operating instructions

Ask a question and I''ll find the answer in the document

Finding information in a document is now easier with AI