AEG L60260MFL User manual

Category
Washing machines
Type
User manual

This manual is also suitable for

AEG L60260MFL is a user-friendly washing machine designed to provide effective and efficient laundry care. With its various programs and features, it caters to a wide range of fabrics and cleaning needs. The machine features a spacious 6kg capacity, allowing you to wash larger loads in one go. It comes equipped with a user-friendly control panel that displays relevant information such as program duration and delay start options. The AEG L60260MFL excels in energy efficiency, earning an A+++ rating, helping you save on utility bills while contributing to a greener environment.

AEG L60260MFL is a user-friendly washing machine designed to provide effective and efficient laundry care. With its various programs and features, it caters to a wide range of fabrics and cleaning needs. The machine features a spacious 6kg capacity, allowing you to wash larger loads in one go. It comes equipped with a user-friendly control panel that displays relevant information such as program duration and delay start options. The AEG L60260MFL excels in energy efficiency, earning an A+++ rating, helping you save on utility bills while contributing to a greener environment.

L 60260 MFL
L 60460 MFL
EN User manual
CONTENTS
1. SAFETY INFORMATION . . . . . . . . . . . . . . . . . . . . . . . . . . . . . . . . . . . . . . . . . . . . . . . . . . . . . . 3
2. SAFETY INSTRUCTIONS . . . . . . . . . . . . . . . . . . . . . . . . . . . . . . . . . . . . . . . . . . . . . . . . . . . . . . 4
3. PRODUCT DESCRIPTION . . . . . . . . . . . . . . . . . . . . . . . . . . . . . . . . . . . . . . . . . . . . . . . . . . . . . 6
4. CONTROL PANEL . . . . . . . . . . . . . . . . . . . . . . . . . . . . . . . . . . . . . . . . . . . . . . . . . . . . . . . . . . . 6
5. PROGRAMMES . . . . . . . . . . . . . . . . . . . . . . . . . . . . . . . . . . . . . . . . . . . . . . . . . . . . . . . . . . . . . 7
6. CONSUMPTION VALUES . . . . . . . . . . . . . . . . . . . . . . . . . . . . . . . . . . . . . . . . . . . . . . . . . . . . . 9
7. OPTIONS . . . . . . . . . . . . . . . . . . . . . . . . . . . . . . . . . . . . . . . . . . . . . . . . . . . . . . . . . . . . . . . . . 10
8. BEFORE FIRST USE . . . . . . . . . . . . . . . . . . . . . . . . . . . . . . . . . . . . . . . . . . . . . . . . . . . . . . . . . 11
9. DAILY USE . . . . . . . . . . . . . . . . . . . . . . . . . . . . . . . . . . . . . . . . . . . . . . . . . . . . . . . . . . . . . . . . 12
10. HELPFUL HINTS AND TIPS . . . . . . . . . . . . . . . . . . . . . . . . . . . . . . . . . . . . . . . . . . . . . . . . . . . 15
11. CARE AND CLEANING . . . . . . . . . . . . . . . . . . . . . . . . . . . . . . . . . . . . . . . . . . . . . . . . . . . . . . 16
12. TROUBLESHOOTING . . . . . . . . . . . . . . . . . . . . . . . . . . . . . . . . . . . . . . . . . . . . . . . . . . . . . . . 20
13. TECHNICAL DATA . . . . . . . . . . . . . . . . . . . . . . . . . . . . . . . . . . . . . . . . . . . . . . . . . . . . . . . . . . 22
FOR PERFECT RESULTS
Thank you for choosing this AEG product. We have created it to give you impeccable
performance for many years, with innovative technologies that help make life simpler –
features you might not find on ordinary appliances. Please spend a few minutes reading to get
the very best from it.
Visit our website for:
Get usage advice, brochures, trouble shooter, service information:
www.aeg.com
Register your product for better service:
www.aeg.com/productregistration
Buy Accessories, Consumables and Original spare parts for your appliance:
www.aeg.com/shop
CUSTOMER CARE AND SERVICE
We recommend the use of original spare parts.
When contacting Service, ensure that you have the following data available.
The information can be found on the rating plate. Model, PNC, Serial Number.
Warning / Caution-Safety information
General information and tips
Environmental information
Subject to change without notice.
2
www.aeg.com
1. SAFETY INFORMATION
Before the installation and use of the appliance, careful-
ly read the supplied instructions. The manufacturer is
not responsible if an incorrect installation and use cau-
ses injuries and damages. Always keep the instructions
with the appliance for future reference.
1.1 Children and vulnerable people safety
WARNING!
Risk of suffocation, injury or permanent disability.
This appliance can be used by children aged from 8
years and above and persons with reduced physical,
sensory or mental capabilities or lack of experience
and knowledge if they have been given supervision or
instruction concerning use of the appliance in a safe
way and understand the hazards involved.
Do not let children play with the appliance.
Keep all packaging away from children.
Keep all detergents away from children.
Keep children and pets away from the appliance door
when it is open.
If the appliance has a child safety device, we recom-
mend you activate it.
Cleaning and user maintenance shall not be made by
children without supervision.
1.2 General Safety
Before maintenance, deactivate the appliance and
disconnect the mains plug from the mains socket.
Do not change the specification of this appliance.
Obey the maximum load volume of 6 kg (refer to the
“Programme chart” chapter).
ENGLISH 3
If the supply cord is damaged, it must be replaced by
the manufacturer, its service agent or similarly quali-
fied persons in order to avoid a hazard.
The operating water pressure (minimum and maxi-
mum) must be between 0,5 bar (0,05 MPa) and 8 bar
(0,8 MPa)
The ventilation openings in the base (if applicable)
must not be obstructed by a carpet.
The appliance is to be connected to the water mains
using the new supplied hose-sets. Old hose sets must
not be reused.
2.
SAFETY INSTRUCTIONS
2.1 Installation
Remove all the packaging and the
transit bolts.
Keep the transit bolts. When you
move the appliance again you must
block the drum.
Do not install or use a damaged appli-
ance.
Do not install or use the appliance
where the temperature is less than 0
°C or where it is exposed to the
weather.
Obey the installation instruction sup-
plied with the appliance.
Make sure that the floor where you in-
stall the appliance is flat, stable, heat
resistant and clean.
Do not install the appliance where the
appliance door can not be fully
opened.
Always be careful when you move the
appliance because it is heavy. Always
wear safety gloves.
Make sure that there is air circulation
between the appliance and the floor.
Adjust the feet to have the necessary
space between the appliance and the
carpet.
Electrical connection
WARNING!
Risk of fire and electrical shock.
The appliance must be earthed.
Make sure that the electrical informa-
tion on the rating plate agrees with
the power supply. If not, contact an
electrician.
Always use a correctly installed shock-
proof socket.
Do not use multi-plug adapters and
extension cables.
Make sure not to cause damage to the
mains plug and to the mains cable.
Should the appliance power supply
cable need to be replaced, this must
be carried out by our Service Centre.
Connect the mains plug to the mains
socket only at the end of the installa-
tion. Make sure that there is access to
the mains plug after the installation.
Do not pull the mains cable to discon-
nect the appliance. Always pull the
mains plug.
Do not touch the mains cable or the
mains plug with wet hands.
This appliance complies with the
E.E.C. Directives.
4
www.aeg.com
Water connection
Make sure not to cause damage to the
water hoses.
The appliance is to be connected to
the water mains using the new sup-
plied hose-sets. Old hose sets must
not be reused.
Before you connect the appliance to
new pipes or pipes not used for a long
time, let the water flow until it is clean.
The first time you use the appliance,
make sure that there is no leakage.
2.2 Use
WARNING!
Risk of injury, electrical shock,
fire, burns or damage to the ap-
pliance.
Use this appliance in a household en-
vironment.
Do not change the specification of this
appliance.
Obey the safety instructions on the
detergent packaging.
Do not put flammable products or
items that are wet with flammable
products in, near or on the appliance.
Do not touch the glass of the door
while a programme operates. The
glass can be hot.
Make sure that you remove all metal
objects from the laundry.
Do not put a container to collect pos-
sible water leakage under the appli-
ance. Contact the Service to ensure
which accessories can be used.
2.3 Care and Cleaning
WARNING!
Risk of injury or damage to the
appliance.
Before maintenance, deactivate the
appliance and disconnect the mains
plug from the mains socket.
Do not use water spray and steam to
clean the appliance.
Clean the appliance with a moist soft
cloth. Only use neutral detergents. Do
not use abrasive products, abrasive
cleaning pads, solvents or metal ob-
jects.
2.4 Disposal
WARNING!
Risk of injury or suffocation.
Disconnect the appliance from the
mains supply.
Cut off the mains cable and discard it.
Remove the door catch to prevent
children and pets to get closed in the
appliance.
ENGLISH 5
3. PRODUCT DESCRIPTION
1 2 3
5
6
7
4
1
Worktop
2
Detergent dispenser
3
Control panel
4
Door handle
5
Rating plate
6
Drain pump filter
7
Feet for the appliance level
3.1 Fixing plate kit
(4055171146)
Use this special accessory, when you in-
stall the appliance on a plinth.
It prevents the movements of the appli-
ance when it operates.
Read carefully the instructions supplied
with this accessory.
You can buy it in all approved Service.
4. CONTROL PANEL
Aus
Pflegeleicht
Koch/Bunt
+ Vorwäsche
Mix 20°
Jeans
+ Vorwäsche
LeichtbügelnFeinwäsche
Wolle/
Seide
Feinspülen
Pumpen
Baumwolle
95°
1400
60°
1200
40°
800
30°
400
U./Min.
Start/
Pause
Tem p.
Zeit-
vorwahl
Zeit
Sparen
Extra
Spülen
1 2 3
A
B
C
456789
Schleudern
30 Min.- 3 kg
Eco
1
Programme knob
2
Display
3
Wash phase indicators:
•A wash
•B rinse or spin
C – door locked
4
Start/Pause button
5
Zeitvorwahl button
6
Zeit Sparen button
7
Extra Spülen button
8
U./Min. button
9
Temp. button
6
www.aeg.com
4.1 Display
•The time area:
: the programme duration
: the delay start
: the alarm codes
: the message of error
: Programme is completed.
The delay start indicator
:
When you activate the delay, the in-
dicator comes on.
The child lock indicator
:
The indicator comes on, when you
activate this device.
4.2 Wash phase indicators
When you set a programme A and B in-
dicators come on.
A – Prewash and wash indicator
B – Rinse and spin indicator
After you have started the programme
the only indicator of the running phase
stays on. The machine starts to work.
The door is locked.
If you set the drain programme
any light comes on.
C – Door locked indicator
This indicator shows when the door can
be opened:
The indicator is on: the door cannot
be opened.
The indicator flashes: the door is
opening in some minutes.
The indicator is off: the door can be
opened.
5. PROGRAMMES
Programme
Temperature range
Type of load and soil
Maximum load, Maximum spin
Koch/Bunt
95° C - Cold
White cotton and coloured cotton (normal soil
and light soil).
6 kg, 1200 rpm (L 60260 MFL), 1400 rpm (L
60460 MFL)
Koch/Bunt + Vorwäsche
95° C - Cold
White and coloured cotton with heavy soil.
6 kg, 1200 rpm (L 60260 MFL), 1400 rpm (L
60460 MFL)
Mix 20°
1)
20 °C
Special programme for cotton, synthetic and
mixed fabrics with light soil.
Set this programme to decrease the energy
consumption.
3 kg, 800 rpm
Jeans
60 °C – Cold
Items in denim and jersey. Also for items in dark
colours.
3 kg, 1200 rpm
Pflegeleicht
60° C - Cold
Synthetic items or mixed fabric items. Normal
soil.
3 kg, 1200 rpm
ENGLISH 7
Programme
Temperature range
Type of load and soil
Maximum load, Maximum spin
Pflegeleicht + Vorwäsche
60° C - Cold
Synthetic items or mixed fabric items. Normal
soil.
3 kg, 1200 rpm
Leichtbügeln
60° C - Cold
Synthetic fabric items. Normal soil. It prevents
the laundry creases.
1 kg, 1200 rpm
Feinwäsche
40 °C - Cold
Delicate fabrics as acrylics, viscose, polyester
items. Normal soil.
3 kg, 1200 rpm
Wolle/Seide
40 °C – Cold
Machine washable wool, hand washable wool
and delicate fabrics with «hand washing» care
symbol.
2 kg, 1200 rpm
Feinspülen
Cold
To rinse and spin the laundry. All fabrics.
6 kg, 1200 rpm
Pumpen To drain the water in the drum. All fabrics.
6 kg
Schleudern To spin the laundry and to drain the water in the
drum. All fabrics.
6 kg, 1200 rpm (L 60260 MFL), 1400 rpm (L
60460 MFL)
30 Min. - 3 kg
30 °C
Cotton and synthetic items with light soil or
worn only one time.
3 kg, 1200 rpm
Baumwolle Eco
2)
60° C - 40° C
White cotton and colour-fast cotton. Normal
soil.
6 kg, 1200 rpm (L 60260 MFL), 1400 rpm (L
60460 MFL)
Aus position
To reset or cancel the programme
To activate or deactivate he appliance
1)
Make sure that the detergent is for low temperature in order to have good washing
results.
2)
Standard programmes for the Energy Label consumption values
According to regulation 1061/2010, these programmes are respectively the “standard
60° C cotton programme” and the “standard 40° C cotton programme”. They are the
most efficient programmes in terms of combined energy and water consumption for
washing normally soiled cotton laundry.
The washing temperature of the washing phase may differ from the temperature
declared for the selected programme.
Programme options compatibility
Programme U./Min.
Extra
Spülen
Zeit
Sparen
Zeitvor-
wahl
Koch/Bunt
8
www.aeg.com
Programme U./Min.
Extra
Spülen
Zeit
Sparen
Zeitvor-
wahl
Koch/Bunt + Vorwäsche
Mix 20°
Jeans
Pflegeleicht
Pflegeleicht + Vorwä-
sche
Leichtbügeln
Feinwäsche
Wolle/Seide
Feinspülen
Pumpen
Schleudern
30 Min. - 3 kg
Baumwolle Eco
6. CONSUMPTION VALUES
The data of this table are approximate. Different causes can change the da-
ta: the quantity and type of laundry, the water and ambient temperature.
Programmes Load
(Kg)
Energy con-
sumption
(kWh)
Water con-
sumption (li-
tre)
Approxi-
mate pro-
gramme
duration
(minutes)
Remaining
moisture
(%)
1)
Koch/Bunt 60
°C
6 1.3 58 125
53
2)
/ 52
3)
Koch/Bunt 40
°C
6 0.70 58 120
53
2)
/ 52
3)
Pflegeleicht
40 °C
3 0.50 45 95
35
2)
/ 35
3)
Feinwäsche 40
°C
3 0.55 60 65
35
2)
/ 35
3)
Wolle/Seide
30 °C
2 0.25 53 55
30
2)
/ 30
3)
Standard cotton programmes
Standard 60
°C cotton
6
0.78 49
175
53
2)
/ 52
3)
ENGLISH 9
Programmes Load
(Kg)
Energy con-
sumption
(kWh)
Water con-
sumption (li-
tre)
Approxi-
mate pro-
gramme
duration
(minutes)
Remaining
moisture
(%)
1)
Standard 60
°C cotton
3
0.58 32
150
53
2)
/ 52
3)
Standard 40
°C cotton
3
0.52 32
141
53
2)
/ 52
3)
Off Mode (W) Left On Mode (W)
0.10 0.98
The information given in the chart above are in compliance with the EU Com-
mission regulation 1015/2010 implementing directive 2009/125/EC.
1)
At the end of spin phase.
2)
For model L 60260 MFL .
3)
For model L 60460 MFL.
7. OPTIONS
7.1 Temperature (Temp.)
Set this option to change the default
temperature.
Indicator
= cold water.
The indicator of the set temperature
comes on.
7.2 Spin (U./Min.)
With this option you can change the de-
fault spin speed.
The indicator of the set speed comes on.
Additional spin options:
Rinse Hold
Set this option to prevent the laundry
creases.
The related indicator comes on.
There is a water in the drum when the
programme is completed.
The drum turns regularly to prevent
the laundry creases.
The door stays locked.
You must drain the water to unlock the
door.
To drain the water refer to ‘At
the end of the programme’.
7.3 Extra Rinse (Extra Spülen)
With this option you can add some rin-
ses to a washing programme.
Use this option for persons allergic to
detergents and in areas where the water
is soft.
The related indicator comes on.
7.4 Time save (Zeit Sparen)
With this option you can decrease the
programme duration.
Press this button one time to set
'Shortened duration' for items with
daily soil.
Press this button two times to set 'Ex-
tra Quick' for items with almost no
soil.
Some programmes accept only
one of the two functions.
10
www.aeg.com
7.5 Delay Start (Zeitvorwahl)
With this option you can delay the start
of a programme from 30 minutes to 20
hours.
The indicator of the option is on.
7.6 Child Lock
With this option you can prevent that the
children play with the control panel.
•To activate/deactivate this option,
press Extra Spülen and Zeit Sparen at
the same time until the indicator
comes on/goes off.
You can activate this option:
After you press Start/Pause, the op-
tions and the programme knob are
locked.
Before you press Start/Pause: the ap-
pliance cannot start.
7.7 Permanent extra rinse
With this option you can permanently
have an extra rinse when you set a new
programme.
•To activate/deactivate this option
press Temp. and U/Min. at the same
time until the indicator Extra Spülen
comes on/goes off.
7.8 Acoustic signals
The acoustic signals operate when:
The programme is completed.
The appliance has a malfunction.
To deactivate/activate the acoustic sig-
nals, press Extra Spülen and U/Min. at
the same time for 6 seconds.
If you deactivate the acoustic sig-
nals, they continue operate when
the appliance has a malfunction.
8. BEFORE FIRST USE
1.
Put 2 litre of water in the detergent
compartment for washing phase.
This activates the drain system.
2.
Put a small quantity of detergent in
the compartment for washing phase.
3.
Set and start a programme for cot-
ton at the highest temperature with-
out laundry. This removes all possi-
ble dirt from the drum and the tub.
ENGLISH 11
9. DAILY USE
9.1 Loading the laundry
1.
Open the appliance door.
2.
Put the laundry in the drum, one
item at a time. Shake the items be-
fore you put them in the appliance.
Make sure not to put too much laun-
dry in the drum.
3.
Close the door.
CAUTION!
Make sure that no laundry stays
between the seal and the door.
There is a risk of water leakage or
damage to the laundry.
9.2 Using detergent and additives
Measure out the detergent and the
fabric conditioner.
Carefully close the detergent drawer.
Detergent compartment for prewash phase.
Detergent compartment for washing phase.
Compartment for liquid additives (fabric conditioner, starch).
Flap for powder or liquid detergent.
12
www.aeg.com
Liquid or powder detergent
1. 2.
A
3.
B
4.
Position A for powder detergent (factory setting).
Position B for liquid detergent.
When you use the liquid detergent:
Do not use gelatinous or thick liquid detergents.
Do not put more liquid then the maximum level.
Do not set the prewash phase.
Do not set the delay start.
9.3 Setting a programme
1.
Turn the programme knob and set
the programme:
The indicator Start/Pause flashes.
The display shows the programme
duration.
2.
If necessary, change the tempera-
ture, the spin speed, the cycle dura-
tion, or add available options. When
you activate an option, the indicator
of the set option comes on.
If you set something incorrect,
the display shows the message
Err.
9.4 Starting a programme
without the delay start
Press Start/Pause button:
The indicator of button Start/Pause
stops to flash. The indicator
is on.
The programme starts and the door
locks.
The programme time decreases with
steps of one minute.
ENGLISH 13
9.5 Starting a programme with
the delay start
Press Zeitvorwahl again and again un-
til the display shows the delay you
want to set.
Press Start/Pause:
The appliance starts the countdown.
The indicator
goes on.
When the countdown is completed,
the programme starts automatically.
You can change or cancel the de-
lay start before you press Start/
Pause. After pressing Start/Pause
you can only cancel the delay.
To cancel the delay start:
1.
Press Start/Pause to set the appli-
ance to PAUSE.
2.
Press Zeitvorwahl. The display shows
.
3.
Press Start/Pause again to start the
programme immediately.
9.6 Interrupting a programme
and changing the options
You can change only some options be-
fore they operate.
1.
Press Start/Pause. The indicator
flashes.
2.
Change the options.
3.
Press Start/Pause again. The pro-
gramme continues.
9.7 Cancelling a programme
1.
Turn the programme knob to Ein/
Aus position to cancel the pro-
gramme and to deactivate the appli-
ance.
2.
Turn the programme knob again to
activate the appliance. Now, you can
set a new washing programme.
The appliance does not drain the
water.
9.8 Opening the door
While a programme or the delay start
operates, the appliance door is locked.
The indicator
is on.
CAUTION!
If the temperature and level of
the water in the drum are too
high, you cannot open the door.
Open the appliance door when the
delay start operates:
1.
Press the Start/Pause to pause the
appliance.
2.
Wait until the door lock indicator
goes off.
3.
You can open the door.
4.
Close the door and press the Start/
Pause again. The delay start contin-
ues to operate.
Open the appliance door when the
programme operates:
1.
Turn the programme knob to Ein/
Aus position to deactivate the appli-
ance.
2.
Wait for some minutes and then
open the appliance door.
3.
Close the appliance door.
4.
Set the programme again.
9.9 At the end of the
programme
The appliance stops automatically.
The acoustic signals operate.
In the display
comes on.
The indicator of Start/Pause goes off.
The door lock indicator goes off.
1.
Turn the programme knob to Ein/
Aus position.
2.
Remove the laundry from the appli-
ance. Make sure that the drum is
empty.
3.
Keep the door ajar, to prevent the
mildew and odours.
4.
Close the water tap.
The washing programme is
completed, but there is water in the
drum:
The drum turns regularly to prevent
the creases in the laundry.
The door lock indicator is on. The
door stays locked.
You must drain the water to open the
door.
14
www.aeg.com
To drain the water:
1.
Set the Pumpen or the Schleudern
programme.
2.
Press Start/Pause. The appliance
drains the water and spins.
3.
When the programme is completed
and the door lock indicator goes off,
you can open the door
4.
Turn the programme knob to Ein/
Aus position to deactivate the appli-
ance.
Stand by : once the programme has fin-
ished after a few minutes the energy sav-
ing system will be enabled. The bright-
ness of the display is reduced. By press-
ing any button the appliance will come
out of the energy saving status.
10. HELPFUL HINTS AND TIPS
10.1 The laundry load
Divide the laundry in: white, coloured,
synthetics, delicates and wool.
Obey the washing instructions that are
on the laundry care labels.
Do not wash together white and col-
oured items.
Some coloured items can discolour
with the first wash. We recommend
that you wash them separately for the
first times.
Button up pillowcases, close zippers,
hooks and poppers. Tie up belts.
Empty the pockets and unfold the
items.
Turn inside out multilayered fabrics,
wool and items with painted illustra-
tions.
Remove hard stains.
Wash with a special detergent heavy
soil stains.
Be careful with the curtains. Remove
the hooks or put the curtains in a
washing bag or pillowcase.
Do not wash in the appliance :
Laundry without hems or with cuts
Underwired bras.
Use a washing bag to wash small
items.
A very small load can cause balance
problems with the spin phase. If this
occurs, adjust manually the items in
the tub and start the spin phase again.
10.2 Stubborn stains
For some stains, water and detergent is
not sufficient.
We recommend that you remove these
stains before you put the items in the
appliance.
Special stain removers are available. Use
the special stain remover that is applica-
ble to the type of stain and fabric.
10.3 Detergents and additives
Only use detergents and additives
specially made for washing machines.
Do not mix different types of deter-
gents.
To help the environment, do not use
more than the correct quantity of de-
tergent.
Obey the instructions that you find on
the on packaging of these products.
Use the correct products for the type
and colour of the fabric, the pro-
gramme temperature and the level of
soil.
If your appliance has not the deter-
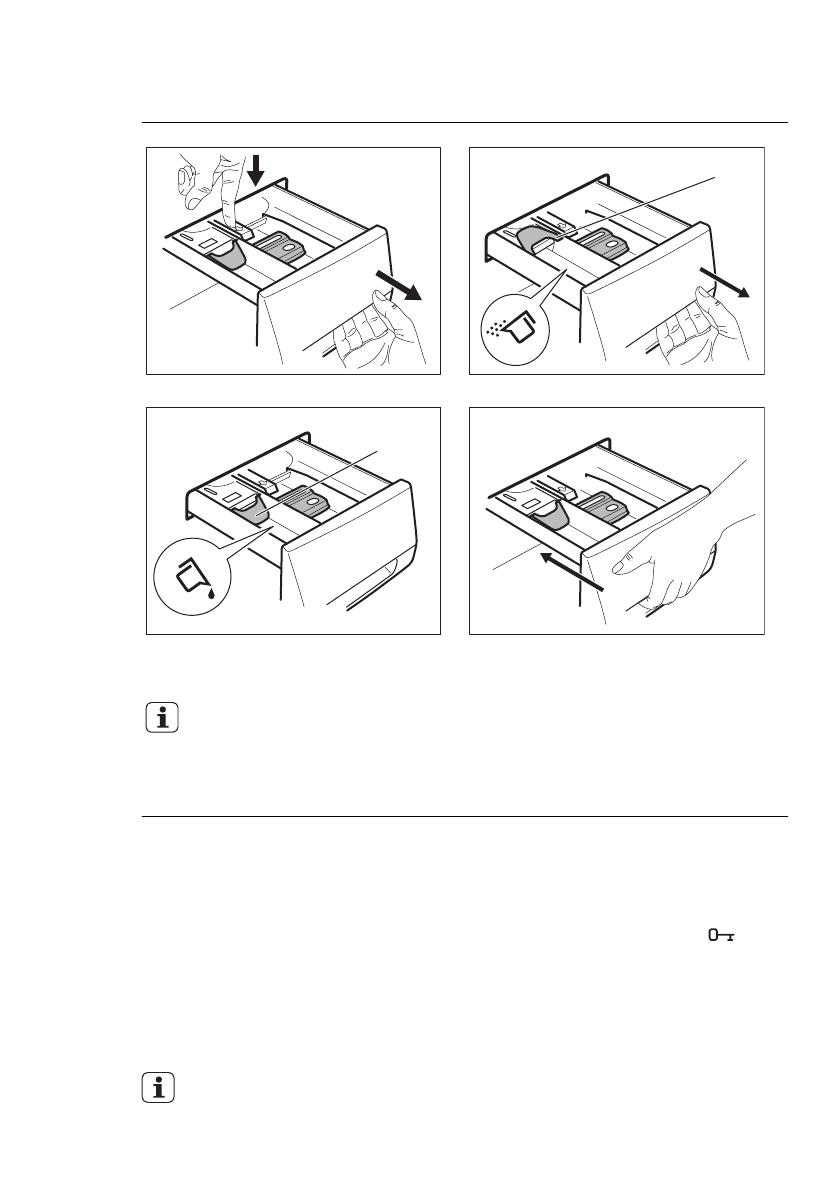
gent dispenser with the flap device,
add the liquid detergents with a dos-
ing ball.
10.4 Ecological hints
Set a programme without the prewash
phase to wash laundry with normal
soil.
Always start a washing programme
with the maximum load of laundry.
ENGLISH 15
If necessary, use a stain remover when
you set a programme with a low tem-
perature.
To use the correct quantity of the de-
tergent, check the water hardness of
your domestic system
10.5 Water hardness
If the water hardness in your area is high
or moderate, we recommend that you
use a water softener for washing ma-
chines. In areas where the water hard-
ness is soft it is not necessary to use a
water softener.
To know the water hardness in your area,
contact your local water authority.
Use the correct quantity of the water
softener. Obey the instructions that you
find on the packaging of the product.
11. CARE AND CLEANING
WARNING!
Before maintenance, disconnect the ap-
pliance from the mains supply.
11.1 External cleaning
Clean the appliance only with soap and
warm water. Fully dry all the surfaces.
CAUTION!
Do not use alcohol, solvents or
chemical products.
11.2 Descaling
If the water hardness in your area is high
or moderate, we recommend that you
use a water softener for washing ma-
chines.
Regularly examine the drum to prevent
limescale and rust particles.
To remove rust particles use only special
products for washing machine. Do this
separately from the laundry wash.
Always obey the instructions that
you find on the packaging of the
product.
11.3 Maintenance wash
With the low temperature programmes it
is possible that some detergent stays in
the drum. Make regularly a maintenance
wash. To do this:
Remove the laundry from the drum.
Set the cotton programme with the
highest temperature with a small
quantity of detergent.
11.4 Door seal
Regularly examine the seal and remove
all objects from the inner part.
16
www.aeg.com
11.5 Cleaning the detergent dispenser
1.
1
2
2.
3. 4.
11.6 Cleaning the drain filter
WARNING!
Do not clean the drain filter if the
water in the appliance is hot.
1.
2.
2
11
ENGLISH 17
3. 4.
2
1
5.
1
2
6.
7. 8.
2
1
9.
18
www.aeg.com
11.7 Cleaning the inlet hose and the valve filter
1.
1
2
3
2.
3. 4.
45°
20°
11.8 Emergency drain
Because of a malfunction, the appliance
cannot drain the water.
If this occurs, do steps (1) through (9) of
'Cleaning the drain filter'.
If necessary, clean the pump.
When you drain the water with the emer-
gency drain procedure, you must acti-
vate again the drain system:
1.
Put 2 litres of water in the main wash
compartment of the detergent dis-
penser.
2.
Start the programme to drain the
water.
11.9 Frost precautions
If the appliance is installed in an area
where the temperature can be less than
0° C, remove the remaining water from
the inlet hose and the drain pump.
1.
Disconnect the mains plug from the
mains socket.
2.
Close the water tap.
3.
Remove the water inlet hose.
4.
Put the two ends of the inlet hose in
a container and let the water flow
out of the hose.
5.
Empty the drain pump. Refer to the
emergency drain procedure.
6.
When the drain pump is empty, in-
stall the inlet hose again.
WARNING!
Make sure that the temperature
is more than 0 °C before you use
the appliance again.
The manufacturer is not responsi-
ble for damages caused by low
temperatures.
ENGLISH 19
12. TROUBLESHOOTING
The start of the appliance does not oc-
cur or it stops during operation.
First try to find a solution to the problem
(refer to the table). If not, contact the
service centre.
With some problems, the acoustic
signals operate and the display shows
an alarm code:
- The appliance does not fill with
water.
- The appliance does not drain
the water.
- The appliance door is open or
not closed correctly. Please check the
door!
- The mains supply is unstable.
Wait until the mains supply is stable.
WARNING!
Deactivate the appliance before
you do the checks.
Problem Possible solution
The programme does
not start.
Make sure that the mains plug is connected to the
mains socket.
Make sure that the appliance door is closed.
Make sure that there is not a damaged fuse in the fuse
box.
Make sure that the Start/Pause has been pressed.
If the delay start is set, cancel the setting or wait for the
end of countdown.
Deactivate the Child Lock function if it is on.
The appliance does
not fill with water.
Make sure that the water tap is open.
Make sure that the pressure of the water supply is not
too low. For this information, contact your local water
authority.
Make sure that the water tap is not clogged.
Make sure that the filter of the inlet hose and the filter
of the valve are not clogged. Refer to “Care and clean-
ing”.
Make sure that the inlet hose has no kinks or bends.
Make sure that the connection of the water inlet hose
is correct.
The appliance does
not drain the water.
Make sure that the sink spigot is not clogged.
Make sure that the drain hose has no kinks or bends.
Make sure that the drain filter is not clogged. Clean the
filter, if necessary. Refer to 'Care and cleaning'.
Make sure that the connection of the drain hose is cor-
rect.
20
www.aeg.com
  • Page 1 1
  • Page 2 2
  • Page 3 3
  • Page 4 4
  • Page 5 5
  • Page 6 6
  • Page 7 7
  • Page 8 8
  • Page 9 9
  • Page 10 10
  • Page 11 11
  • Page 12 12
  • Page 13 13
  • Page 14 14
  • Page 15 15
  • Page 16 16
  • Page 17 17
  • Page 18 18
  • Page 19 19
  • Page 20 20
  • Page 21 21
  • Page 22 22
  • Page 23 23
  • Page 24 24

AEG L60260MFL User manual

Category
Washing machines
Type
User manual
This manual is also suitable for

AEG L60260MFL is a user-friendly washing machine designed to provide effective and efficient laundry care. With its various programs and features, it caters to a wide range of fabrics and cleaning needs. The machine features a spacious 6kg capacity, allowing you to wash larger loads in one go. It comes equipped with a user-friendly control panel that displays relevant information such as program duration and delay start options. The AEG L60260MFL excels in energy efficiency, earning an A+++ rating, helping you save on utility bills while contributing to a greener environment.

Ask a question and I''ll find the answer in the document

Finding information in a document is now easier with AI