Bauknecht BLIMS 9100 PT User guide

Category
Kitchen & houseware accessories
Type
User guide
Руководство по эксплуатации и
техобслуживанию
BLIMS 9100
EN1
YOUR SAFETY AND THAT OF OTHERS IS PARAMOUNT
This manual and the appliance itself provide important safety warnings, to be read and observed at all
times.
All safety warnings give specific details of the potential risk present and
indicate how to reduce risk of injury, damage and electric shock
resulting from improper use of the appliance. Carefully observe the
following instructions:
- The appliance must be disconnected from the power supply before
carrying out any installation work.
- Installation and maintenance must be carried out by a qualified
technician, in compliance with the manufacturers instructions and
local safety regulations. Do not repair or replace any part of the
appliance unless specifically stated in the user manual.
- Power cable replacement must be carried out by qualified
electrician. Contact an authorizes service centre.
- Regulations require that the appliance is earthed.
- The power cable must be long enough for connecting the
appliance, once fitted in its housing, to the main power supply.
- For installation to comply with current safety regulations, an all-
pole disconnect switch with minimum contact gap of 3 mm must
be utilized.
- Do not use multiple plug adaptors if the oven is fitted with a plug.
- Do not use extension leads.
- Do not pull the power supply cable.
- The electrical components must not be accessible to the user after
installation.
- If the surface of the induction plate is cracked, do not use it and
switch off the appliance to avoid the possibility of electric shock
(onyl for models with induction function).
IMPORTANT SAFETY INSTRUCTIONS
This is the danger symbol, pertaining to safety, which alerts users to potential risks to themselves
and others.
All safety warnings are preceded by the danger symbol and the following terms:
DANGER
Indicates a hazardous situation which, if not avoided, will cause serious
injury.
WARNING
Indicates a hazardous situation which, if not avoided, could cause serious
injury.
EN2
- Do not touch the appliance with any wet part of the body and do
not operate it when barefoot.
- This appliance is designed solely for use as a domestic appliance for
cooking food. No other type of use is permitted (e.g.: heating
rooms). The Manufacturer declines all responsibility for
inappropriate use or incorrect setting of the controls.
- This appliance can be used by children aged from 8 years and
above and persons with reduced physical, sensory or mental
capabilities or lack of experience and knowledge if they have been
given supervision or instruction concerning use of the appliance in
a safe way and understand hazards involved. Children shall not play
with the appliance. Cleaning and user maintenance shall not be
made by children without supervision.
- The accessible parts of the appliance may become very hot during
use. Young children should be kept away from the appliance and
supervised to ensure that they do not play with it.
- The appliance and its accessible parts become hot during use. Care
should be taken to avoid touching heating elements. Children less
than 8 years old shall be kept away, unless continuously supervised.
- During and after use, do not touch the heating elements or interior
surfaces of the appliance - risk of burns. Do not allow the appliance
to come into contact with cloths or other flammable materials until
all the components have cooled sufficiently.
- At the end of cooking, exercise caution when opening the
appliance door, letting the hot air or steam exit gradually before
accessing the oven. When the appliance door is shut, hot air is
vented from the aperture above the control panel. Do not obstruct
the vent apertures.
- Use oven gloves to remove pans and accessories, taking care not to
touch the heating elements.
- Do not place flammable materials in or near the appliance: a fire
may break out if the appliance is inadvertently switched on.
- Do not heat or cook sealed jars or containers in the appliance. The
pressure that builds up inside might cause the jar to explode,
damaging the appliance.
- Do not use containers made of synthetic materials.
EN3
- Overheated oils and fats catch fire easily. Always remain vigilant
when cooking foods rich in fat and oil.
- Never leave the appliance unattended during food drying.
- If alcoholic beverages are used when cooking foods (e.g. rum,
cognac, wine), remember that alcohol evaporates at high
temperatures. As a result, there is a risk that vapours released by the
alcohol may catch fire upon coming into contact with the electrical
heating element.
- Never use steam cleaning equipment.
- Do not touch the oven during the pyrolysys cycle. Keep children
away from the oven during the pyrolysis cycle (only for ovens with
Pyrolisis function).
- Only use the temperature probe recommended for this oven.
- Do not use harsh abrasive cleaners or sharp metal scrapers to clean
the oven door glass since they can scratch the surface, which may
result in shattering of the glass.
- Ensure that the appliance is switched off before replacing the lamp
to avoid the possibility of electric shock.
- Do not use aluminium foil to cover food in the cooking vessel (only
for ovens with cooking vessel supplied).
- Use protective gloves to perform all unpacking and installation
operations.
Scrapping of household appliances
- This appliance is manufactured with recyclable or reusable materials. Dispose of it in accordance with
local waste disposal regulations. Before scrapping, cut off the power supply cable.
- For further information on the treatment, recovery and recycling of household electrical appliances,
contact your competent local authority, the collection service for household waste or the store where
you purchased the appliance.
After unpacking the oven, make sure that it has not been damaged during transport and that the oven
door closes properly. In the event of problems, contact the dealer or your nearest After-sales Service. To
prevent any damage, only remove the oven from its polystyrene foam base at the time of installation.
To safely move the oven, use the handle provided in the accessories pack.
1. Insert the handle securely into the lateral holes (Fig. 1)
INSTALLATION
EN4
2. Lift the handle up as shown in Fig. 2
PREPARING THE HOUSING UNIT
Kitchen units in contact with the oven must be heat resistant (min 90°C).
Carry out all cabinet cutting work before fitting the oven in the housing and carefully remove all
wood chips and sawdust.
After installation, the bottom of the oven must no longer be accessible.
For correct appliance operation, do not obstruct the minimum gap between the worktop and the
upper edge of the oven.
ELECTRICAL CONNECTION (only in some models)
Make sure the power voltage specified on the appliance dataplate is the same as the mains voltage. The
dataplate is on the front edge of the oven (visible when the door is open).
Power cable replacement (type H05 RR-F 3 x 1.5 mm
2
) must be carried out by a qualified electrician.
Contact an authorized service centre.
The oven is programmed to operate with power absorption above 2.5 kW (indicated by "HIGH" in the
settings) which is compatible with a domestic power supply above 3kW. If the household has a lower
power supply, the setting must be lowered ("LOW" in the settings). The table below details the
recommended electrical power settings for the various countries.
GENERAL RECOMMENDATIONS
Before use:
- Remove protective cardboard pieces, protective film and adhesive labels from accessories, induction
plate and cooking vessel.
- Remove the accessories from the oven. Position the induction plate at the third level and plug it in.
Place the cooking vessel on the induction plate and fill it in with 200g of water. Select the Top
Finishing function and run the oven for approximately one hour to eliminate the smell and fumes
from the insulating materials and protective grease.
During use:
- Do not place heavy objects on the door as they could damage it.
- Do not cling to the door or hang anything from the handle.
- Do not cover the inside of the oven with aluminium foil.
- Never pour water into the inside of a hot oven; this could damage the enamel coating.
- Never drag pots or pans across the bottom of the oven as this could damage the enamel coating.
Fig. 1 Fig. 2
Country Setting
Germany High
Spain Low
Finland High
France High
Italy Low
Holland High
Norway High
Sweden High
UK Low
Belgium High
EN5
- Make sure that the electrical cables of other appliances do not touch hot parts of the oven or become
trapped in the door.
- Do not expose the oven to atmospheric agents.
- Never pour water on the induction plate when inserted into the oven or when it is hot; this could
damage the glass or the enamel coating.
- Insert and remove the induction plate carefully in order to avoid accidental damage to the glass and/
or electrical plug.
- Before using the oven in standard mode (without induction), completely remove the induction plate
from the oven. Leaving the induction plate in the oven could damage it.
After Use:
- Allow the induction plate to cool down before removal if cleaning is required. When the induction
plate is removed from the oven, ensure the supplied socket cover is used to prevent dirt entering the
electrical socket (Fig. 1).
Disposal of packing material
The packing material is 100% recyclable and is marked with the recycle symbol ( ). The various parts of
the packing must therefore be disposed of responsibly and in full compliance with local authority
regulations governing waste disposal.
Scrapping the product
- This appliance is marked in compliance with European Directive 2002/96/EC, Waste Electrical and
Electronic Equipment (WEEE).
- By ensuring this product is disposed of correctly, you will help prevent potential negative
consequences for the environment and human health, which could otherwise be caused by
inappropriate waste handling of this product.
- The symbol on the product or on the accompanying documentation indicates that it should not be
treated as domestic waste but must be taken to an appropriate collection centre for the recycling of
electrical and electronic equipment.
Energy saving
- Only pre-heat the oven if specified in the cooking table or your recipe. Induction functions do not
require pre-heating.
- When cooking using induction mode, use the supplied cooking vessel which is designed to maximize
energy saving.
- Use dark lacquered or enamelled baking moulds as they absorb heat far better.
- In standard (non-induction) mode, switch the oven off 10/15 minutes before the set cooking time. Food
requiring prolonged cooking will continue to cook even once the oven is switched off.
- This oven, which is intended to come into contact with foodstuffs, complies with European
Regulation ( ) n.1935/2004 and has been designed, manufactured and sold in conformity with the
safety requirements of the “Low Voltage” directive 2006/95/CE (which replaces 73/23/CEE and
subsequent amendments), the protection requirements of “EMC” 2004/108/CE.
Fig. 1
SAFEGUARDING THE ENVIRONMENT
DECLARATION OF CONFORMITY
EN6
The oven does not work:
Check for the presence of mains electrical power and if the oven is connected to the electrical supply.
Turn off the oven and restart it to see if the fault persists.
The electronic programmer does not work:
If the display shows the letter “ followed by a number, contact your nearest After-sales Service.
Specify in this case the number that follows the letter “ .
The induction plate does not work:
The induction plate must be used on the third shelf position only; ensure it is correctly positioned and
fully connected.
Turn the oven off and then on again. Check if the fault persists.
Before calling the After-Sales Service:
1. See if you can solve the problem yourself with the help of the suggestions given in the
Troubleshooting guide“.
2. Switch the appliance off and back on again to see if the fault persists.
If after the above checks the fault still occurs, get in touch with the nearest After-sales Service.
Always specify:
a brief description of the fault;
the type and exact model of the oven;
the service number (number after the word Service on the rating plate), located on the right hand
edge of the oven cavity (visible when the oven door is open). The service number is also indicated on
the guarantee booklet;
your full address;
your telephone number.
If any repairs are required, please contact an authorised After-sales Service (to guarantee that original
spare parts will be used and repairs carried out correctly).
Oven exterior
IMPORTANT: do not use corrosive or abrasive detergents. If any of these products accidentally
comes into contact with the appliance, clean immediately with a damp Microfibre cloth.
Clean the surfaces with a damp Microfibre cloth. If it is very dirty, add a few drops of washing up
detergent to the water. Finish off with a dry cloth.
Oven interior
IMPORTANT: do not use abrasive sponges or metallic scrapers or scourers. Over time, these can ruin
enamelled surfaces and the oven door glass.
After every use, allow the oven to cool then clean it preferably while it is still warm in order to remove
built-up dirt and stains caused by food residues (e.g. food with a high sugar content).
Use proprietary oven detergents and follow the manufacturer’s instructions to the letter.
Clean the door glass with a suitable liquid detergent. The oven door can be removed to facilitate
cleaning (see MAINTENANCE).
The top heating element of the grill (see MAINTENANCE) can be lowered (some models only) to clean
the roof of the oven.
TROUBLESHOOTING GUIDE
AFTER-SALES SERVICE
CLEANING
WARNING
- Never use steam cleaning equipment.
- Only clean the oven when it is cool to the touch.
- Disconnect the appliance from the power supply.
EN7
N.B.: during prolonged cooking of foods with a high water content (e.g. pizza, vegetables, etc.)
condensation may form on the inside of the door and around the seal. When the oven is cold, dry the
inside of the door with a cloth or sponge.
Accessories:
Soak the accessories in water with washing up detergent immediately after use, handling them with
oven gloves if still hot.
Food residues can be easily removed using a brush or sponge.
Induction Plate:
When cool to the touch, use a sponge and suitable liquid detergent for ovens or hobs. Do not clean
the induction plate in a dishwasher.
Internal Electrical Socket:
Remove the metallic plug cover; use a humidified sponge to clean the plug. Do not use metallic and/
or sharp tools.
Cooking Vessel:
Suitable for dishwashing. Alternatively, use soft sponge and suitable liquid detergent.
REMOVING THE DOOR
To remove the door:
1. Open the door fully.
2. Lift the catches and push them forwards as far as they will go (Fig. 1).
3. Close the door as far as it will go (A), lift it up (B) and turn it (C) until it is released (D) (Fig. 2).
To refit the door:
1. Insert the hinges in their seats.
2. Open the door fully.
3. Lower the two catches.
4. Close the door.
REMOVING THE SIDE GRILLES
The accessory-holder grilles are equipped with two fixing screws (fig. 1) for optimum stability.
1. Remove the screws and fixing plates on the right and left with the aid of a coin or tool.
2. To remove the grilles, lift them up (1) and turn them (2) as shown in fig. 3.
MAINTENANCE
WARNING
- Use protective gloves.
- Ensure the oven is cold before carrying out the following operations.
- Disconnect the appliance from the power supply.
Fig. 1 Fig. 2
Fig. 1 Fig. 2 Fig. 3
EN8
MOVING THE TOP HEATING ELEMENT (SOME MODELS ONLY)
1. Remove the side accessory holder grilles (Fig. 4).
2. Pull the heating element out a little (Fig. 5) and lower it (Fig. 6).
3. To reposition the heating element, lift it up, pulling it slightly towards you, making sure it comes to
rest on the lateral supports.
REPLACING THE OVEN LAMP
To replace the rear lamp (if present):
1. Disconnect the oven from the power supply.
2. Unscrew the lamp cover (Fig. 7), replace the lamp (see note for lamp type) and screw the lamp cover
back on.
3. Reconnect the oven to the power supply.
To replace the side lamp (if present):
1. Disconnect the oven from the power supply.
2. Remove the side accessory holder grilles, if present (Fig. 4).
3. Use a screwdriver to prise off the lamp cover (Fig. 8).
4. Replace the lamp (see note for lamp type) (Fig. 9).
5. Reposition the lamp cover, pushing it on firmly until it snaps into place (Fig. 10).
6. Refit the side accessory holder grilles.
7. Reconnect the oven to the power supply.
N.B.:
- Only use 25-40W/230V type E-14, T300°C incandescent lamps, or 20-40W/230 V type G9, T300°C
halogen lamps.
- The lamp used in the appliance is specifically designed for electrical appliances and is not suitable for
household room illumination (Commission Regulation (EC) No 244/2009).
- Lamps are available from our After-sales Service.
IMPORTANT:
- If using halogen lamps, do not handle with bare hands since fingerprints can damage them.
- Do not use the oven until the lamp cover has been repositioned.
Fig. 4 Fig. 5 Fig. 6
Fig. 7 Fig. 8 Fig. 9 Fig. 10
EN9
FOR ELECTRICAL CONNECTION, SEE THE PARAGRAPH ON INSTALLATION
The induction oven is equipped with an electrical socket on the rear wall of the oven to supply power to
the heating element inside the induction plate when plugged in.
The induction plate is designed to work together with the induction cooking vessel supplied with the oven.
Improved cooking performances and energy consumption can be achieved by using the cooking vessel
and induction plate.
1. Control panel
2. Upper heating element/grill
3. Cooling fan (not visible)
4. Dataplate (not to be removed)
5. Lamps
6. Circular heating element (not visible)
7. Fan
8. Lower heating element (not visible)
9. Door
10. Position of shelves (the number of shelves is indicated on the front of the oven)
11. Rear wall
12. Electrical socket (inside oven)
13. Induction Plate
14. Induction Plate position
N.B.:
- During cooking, the cooling fan may switch on at intervals in order to minimise energy consumption.
- At the end of cooking, after the oven has been switched off, the cooling fan may continue to run for a
while.
- When the oven door is opened during cooking, the heating elements switch off.
ACCESSORIES SUPPLIED
A. WIRE SHELF: the wire shelf can be used to grill food or as a support for pans, cake tins and other
ovenproof cooking receptacles.
B. DRIP TRAY: the drip tray is designed to be positioned under the wire shelf in order to collect fat or as
an oven tray for cooking meat, fish, vegetables, focaccia, etc.
C. BAKING TRAY: the baking tray can be used to cook bread and pastry products, as well as roast meat,
fish en papillote, etc.
D. MEAT PROBE: to measure the core temperature of food during cooking.
E. SLIDING RUNNERS: to facilitate insertion and removal of accessories.
INSTRUCTIONS FOR OVEN USE
Fig. A Fig. B Fig. C Fig. D Fig. E Fig. F Fig. G
EN10
F. COOKING VESSEL: the cooking vessel is designed to be used with the induction plate and should be
placed according to the position markings on the induction plate glass.
G. INDUCTION PLATE: to be used in induction mode only by placing it on the third shelf position and
ensuring the electrical plug is fully inserted (refer to "Inserting wire shelves and other accessories in
the oven").
The number of accessories may vary according to which model is purchased.
ACCESSORIES NOT SUPPLIED
Other accessories can be purchased separately from the After-sales Service.
INSERTING WIRE SHELVES AND OTHER ACCESSORIES IN THE OVEN
WIRE SHELVES AND OTHER ACCESSORIES:
The wire shelf and other accessories are provided with a locking mechanism to prevent their accidental
removal.
1. Insert the wire shelf horizontally, with the raised part “A” upwards (Fig. 1).
2. Angle the wire shelf when it reaches the locking position “B” (Fig. 2).
3. Return the wire shelf to the horizontal position and push it in fully to “C” (Fig. 3).
4. To remove the wire shelf proceed in reverse order.
The other accessories, like the drip tray and baking tray, are inserted in exactly the same way. The
protrusion on the flat surface enables the accessories to lock in place.
INDUCTION PLATE:
The Induction plate must be inserted at the third shelf position to allow the electrical plug to engage.
1. Use both hands to properly place the induction plate on the third shelf position (Fig. 1).
2. Use both hands to push the induction plate upto the electrical plug (Fig. 2).
3. Ensure the plug is fully engaged by firmly pushing the induction tray (Fig. 3).
COOKING VESSEL:
Place the cooking vessel on the induction plate, ensuring that the bottom of the vessel lays within the
rectangular markings on induction plate glass.
Fig. 1
Fig. 2 Fig. 3
Fig. 1 Fig. 2 Fig. 3
EN11
1. Use both hands to place the cooking vessel on the induction plate (Fig. 4).
2. Place the cooking vessel at the centre of the markings on the glass (Fig. 5).
REMOVAL OF THE COOKING VESSEL AND INDUCTION PLATE
REMOVING THE COOKING VESSEL:
IMPORTANT: The induction cooking vessel can become extremely hot. Always use oven gloves to touch
and move it.
1. Using both hands, grasp the front handle and partially remove the cooking vessel (Fig. 1).
2. Then use the lateral handles to better grasp and fully remove the cooking vessel (Fig. 2).
REMOVING THE INDUCTION PLATE:
IMPORTANT: To ensure a good electrical connection, the induction plate will be securely inserted and will
require some slight additional force to be disengaged. Do not remove the induction plate when the
cooking vessel or any other accessory is present.
Always use oven gloves when induction plate and/or oven are hot.
1. With both hands, grasp the induction plate and remove it. Some slight force will be needed to
disengage the plate from the socket (Fig. 3).
2. With both hands, remove the induction plate and store it away, carefully avoiding impacts that could
damage the glass or electrical plug (Fig. 4).
CONTROL PANEL DESCRIPTION
TOUCH KEYS: to use, simply touch the corresponding symbol (a light touch is all that is required).
On/Off (when you press on / off button to turn off the oven an acoustic signal will sound, this sound can
not be disabled)
to access the main MENU or return to the start screen
to directly access Induction MENU
Fig. 4 Fig. 5
Fig. 1 Fig. 2
Fig. 3 Fig. 4
EN12
to return to the previous screen
to browse the functions/options and change pre-set values
to select and confirm settings
to start cooking
LIST OF FUNCTIONS
After switching on the oven, press the symbol and the display will show the following indication.
Press any key to skip the message.
NOTE: The induction first alert can be disabled/enabled through the Settings Menu.
If the induction plate is already properly engaged, when oven is switched on, the induction first alert will
not be shown.
After skipping the induction first alert following indications will be shown:
A. Symbol for highlighted function
B. Highlighted function can be selected by pressing
C. Description of highlighted function
D. Further available, selectable information
DETAILS OF FUNCTION
After selecting the desired function, press button and the display will show further options and
related details.
To move between different areas, use buttons and : the cursor moves to the adjustable values,
following the order described above. Press to select the value, adjust it using and confirm
by pressing button .
NOTE: In induction mode, only Zone 3 and Zone 4 can be adjusted.
USING THE APPLIANCE FOR THE FIRST TIME - LANGUAGE SELECTION AND SETTING
THE TIME
For correct use of the oven, when it is switched on for the first time you will have to select the desired
language and set the correct time.
Proceed as follows:
1. Press : the display will show the list of the first three available languages.
2. Press buttons and to scroll down the list.
3. When the desired language is highlighted, press to select it.
After language selection, the display will flash 12:00.
4. Set the time using buttons and . To scroll through the numbers more quickly, keep the
button pressed.
5. Confirm your setting by pressing : the display will show the list of functions.
Traditional manual cooking functions
Specials
Recipes
Traditional
A
D
C
B
PREHEAT
No
GRILL POWER
Medium
COOK TIME
END TIME
Grill
--:--
--:--
Zone 1 Zone 3
Cursor
Zone 4
Zone 2
EN13
SELECTING COOKING FUNCTIONS
1. If the oven is off press button ; the display will show the cooking functions.
2. To browse the various possibilities, press buttons : the selectable function is highlighted in
white in the centre of the screen.
N.B.:for the list and description of functions, see the specific table at page18 and at page23.
If the induction plate is already properly engaged or whenever the induction plate is inserted,
only Induction Functions and Settings will be accessible through the main menu.
If the induction plate is not engaged into the oven, both standard functions MENU and
induction functions MENU will be accessible.
When the induction plate is inserted or removed, a message indicating correct engagement/
disengagement will be shown on the display.
3. Select the function by pressing button : the cooking settings are shown on the display. If the
pre-set values are those desired, press the start button , otherwise proceed as indicated above to
change them.
SETTING THE TEMPERATURE/OUTPUT OF THE GRILL (Standard Functions only)
To change the temperature or output of the grill, proceed as follows:
1. Check that the cursor is positioned next to the temperature value (zone 1); press button to
select the parameter to be changed: the temperature values flash.
2. Use buttons to change to the desired value.
3. Press button to confirm and then press . The display indicates which shelf food should be
placed on.
4. Press to start cooking.
The set temperature can also be changed during cooking by following the same procedure.
5. At the end of cooking, the end of cooking message is displayed. At this point the oven can be
switched off by pressing , or cooking can be prolonged by pressing . When switched off, the
display shows the cooling bar which indicates the temperature inside the oven.
Note: in induction mode temperature will be automatically adjusted by the oven and does not need
to be manually set.
PREHEATING THE OVEN (Standard Functions Only)
If you wish to preheat the oven before inserting food, change the oven’s default selection as follows:
1. Using buttons and , move the cursor to preheating.
2. Press button to select the setting: “No” flashes on the display.
3. To change the setting, press or : the display shows “Yes”.
PREHEAT
No
TEMPERATURE
200°C
COOK TIME
END TIME
Forced Air
--:--
--:--
PREHEAT
No
TEMPERATURE
180°C
COOK TIME
END TIME
Forced Air
--:--
--:--
Insert food on level 3
Press when done
PREHEAT
No
TEMPERATURE
180°C
COOK TIME
END TIME
Forced Air
--:--
--:--
PREHEAT
No
TEMPERATURE
180°C
COOK TIME
END TIME
Forced Air
--:--
--:--
PREHEAT
Yes
TEMPERATURE
180°C
COOK TIME
END TIME
Forced Air
--:--
--:--
EN14
4. To confirm your choice, press button .
Note: in induction mode, preheating is not required. Induction mode requires all cooking operations
to have a cold start.
FAST PREHEATING (Standard Functions Only)
If you wish to preheat the oven quickly before inserting food, change the oven’s default selection as
follows:
1. Select the fast preheating function using buttons .
2. Confirm by pressing : the settings are displayed on the screen.
3. If the proposed temperature is that desired, press , otherwise proceed as described in previous
paragraphs to change it. An acoustic signal will sound when the oven has reached the set temperature. At
the end of preheating, the oven automatically selects the conventional function .
At this point food can be placed in the oven for cooking.
4. If you wish to set a different cooking function, press and select the desired function.
SETTING COOKING TIME
This function can be used to cook food for a set length of time, from a minimum of 1 minute to the
maximum time allowed by the selected function, after which the oven switches off automatically.
1. To select the function, position the cursor next to “cooking duration” using buttons .
2. Press button to select the setting; “00:00” flashes on the display.
3. Change the value using buttons and to display the desired cooking time.
4. Confirm the selected value by pressing button .
BROWNING (Standard Functions Only)
At the end of cooking, with certain functions, the display indicates the possibility of browning the surface of
your dish. This function can only be used when cooking time has been set.
At the end of cooking time, the display shows “^ to prolong, OK to brown”. Press button , and the oven
starts a 5 minute browning cycle. This function can only be used once after cooking.
TEMPERATURE
180°C
INSERT IN
Fast Preheating
- 00:02
TEMPERATURE
180°C
INSERT IN
Preheating
- 00:02
TEMPERATURE
180°C
INSERT IN
Oven is Hot!
- 00:02
PREHEAT
No
TEMPERATURE
180°C
COOK TIME
END TIME
Forced Air
--:--
--:--
PREHEAT
No
TEMPERATURE
180°C
HH:MM
END TIME
Forced Air
--:--
- 00:00
PREHEAT
No
TEMPERATURE
180°C
HH:MM
END TIME
Forced Air
19:20
- 00:20
Browning Browning nished at 20:05
Cooking nished at 20:00
^ to prolong, OK to brown
COOK TIME
END TIME
20:05
- 00:05
EN15
SETTING END OF COOKING TIME/DELAYED START
The end of cooking time can be set, delaying the start of cooking by up to a maximum of 23 hours and
59 minutes. This can only be done once cooking time has been set. This setting is only possible when
pre-heating is not required for the selected function.
After setting cooking time, the display shows the end of cooking time (for example 19:20). To delay the end
of cooking time, and thus also the cooking start time, proceed as follows:
1. Position the cursor next to the end of cooking time using buttons .
2. Press button to select the setting: the end of cooking time flashes.
3. To delay the end of cooking time, use buttons and to set the desired value.
4. Confirm the selected value by pressing button .
5. Press button . The display indicates which shelf food should be placed on.
6. Press button to activate the function. The oven will start cooking after a period of time calculated
so as to finish cooking at the set time (for example, in the case of a dish which requires a cooking time
of 20 minutes, if the end of cooking time is set to 20:10, the oven will begin cooking at 19:50).
N.B.:During the interval before cooking starts, the oven can in any case be switched on by pressing
button .
At any time during cooking, set values (temperature, grill setting, cooking time) can be changed
using buttons and button as described in previous paragraphs.
TIMER
This function can be used only with the oven switched off and is useful, for example, for monitoring the
cooking time of pasta. The maximum time which can be set is 1 hour 30 minutes.
1. With the oven switched off, press button : the display will show “00:00:00”.
2. Press buttons and to select the desired time.
3. Press button to start the countdown. When the set time has elapsed, the display will show
“00:00:00” and an acoustic signal will sound. At this point the time can be prolonged, proceeding as
described above, or the timer can be deactivated by pressing button (the time of day will be
shown on the display).
RECIPES (Standard Functions Only)
Thanks to “intelligent sensor technology”, the oven offers 30 pre-set recipes with the ideal cooking
function and temperature.
Simply follow the recipe as regards ingredients and the method of preparation. Then, proceed as follows:
1. Select “RECIPES” using buttons and confirm with .
2. Select the dish to be cooked from the proposed list.
3. Confirm the selected dish using button .
4. Select the desired recipe using buttons .
5. Confirm by pressing : the display shows the approximate cooking time.
6. Put the food in the oven and press button . The display indicates which shelf food should be placed on.
7. Press button to start cooking. To delay the start of cooking, see the relevant paragraph.
PREHEAT
No
TEMPERATURE
180°C
HH:MM
END TIME
Forced Air
19:20
- 00:20
PREHEAT
No
TEMPERATURE
180°C
HH:MM
END TIME
Forced Air
19:20
- 00:20
PREHEAT
No
TEMPERATURE
180°C
HH:MM
END TIME
Forced Air
20:10
- 00:20
Fully automatic recipes
Traditional
Settings
Recipes
Fully automatic recipes
Vegetables
Fish
Poultry
Recipes: See cookbook for description
Chicken Breasts
Roast Chicken
CONTROL
Automatic
COOK TIME
END TIME
Roast Chicken
19:45
- 00:45
CONTROL
Automatic
COOK TIME
END TIME
Cooking
19:45
- 00:44
Insert food on level 3
Press when done
EN16
N.B.: Some dishes must be turned or stirred half way through cooking: the oven will emit an acoustic
signal and the display will indicate what action is required.
The initial cooking time displayed is merely for guidance: it can be prolonged automatically during
cooking.
Shortly before cooking time finishes, the oven prompts you to check that the food is cooked to your
satisfaction. If it is not, extra time can then be added manually using the buttons .
MEAT PROBE (Standard Functions Only)
The meat probe supplied allows you to measure the exact core temperature of food during cooking,
between 0°and 100°C, in order to ensure that food is cooked to perfection.
Based on the food being cooked, the required core temperature can be set.
It is very important to position the probe accurately in order to obtain perfect cooking results. Insert the
probe fully into the fleshiest part of the meat, avoiding bones and fatty parts (Fig. 1). For poultry, the probe
should be inserted sideways, in the middle of the breast, taking care to ensure the tip does not end up in a
hollow part (Fig. 2).
In the case of meat with very irregular thickness, check it is cooked properly before removing it from the
oven. Connect the end of the probe in the hole located on the right wall of the oven chamber.
Meat probe recipes
1. Select “Meat probe recipes using the up and down buttons and confirm by pressing
2. Select the dish to be cooked from the proposed list and confirm by pressing
N.B.:if you select “custom”, the function allows you to choose all parameters to be set. The other
recipes only allow you to insert some of these.
3. Connect the probe, put the food in the oven and press to start cooking.
N.B.:if the probe has not been connected, the display will show a message prompting you to insert it.
If it is not inserted, when you press , the oven will start a traditional cooking cycle without a set
time.
If the probe has been connected properly, the display shows a confirmation message for three seconds
followed by a screen indicating all cooking parameters, including the core temperature of the meat as
measured by the probe.
When the required core temperature for the particular food is reached, a message to that effect flashes on
the display for 3 seconds. At the end of cooking time, the oven proposes the option of prolonging cooking
time by pressing . If the button is pressed, cooking continues using the traditional mode without any
time setting. If no button is pressed, the oven waits 10 minutes before switching off, after which cooking
can no longer be prolonged.
The probe can also be used with the CONVENTIONAL, CONVECTION BAKE, FORCED AIR, TURBO GRILL,
MAXI COOKING, SLOW COOKING MEAT and SLOW COOKING FISH. If the probe is not inserted, cooking
proceeds using the traditional mode, otherwise, the display advises that the probe is not connected. The
message will display for 3 seconds, after which the oven proceeds as if the “custom” function as indicated
above has been selected.
Fig. 1 Fig. 2
Please turn food
Cooking nearly nished
Please check on food
Cooking Finished at 19:45
Press to Prolong Cooking
Automatic roasting functions
Specials
Traditional
Meat Probe Recipes
Automatic roasting functions
Roast Beef
Roast Veal
Custom
Insert Meat Probe
or press OK
Meat Probe
has been connected
TEMPERATURE
150°C
MEAT PROBE
Cooking
100°C
CURRENT
79°C
TEMPERATURE
150°C
MEAT PROBE
Temperature reached
100°C
CURRENT
100°C
EN17
INDUCTION FUNCTIONS
Thanks to the Induction Heating technology, the oven offers several cooking functions (see Function
Description table) which guarantee high cooking performances together with a very fast cooking process
and low energy consumption.
In order to ensure optimum performance, use the induction plate in combination with the supplied
stainless steel cooking vessel (see Inserting Wire Shelves and Other Accessories in the Oven for
information on how to insert both the induction plate and the cooking vessel).
To start the Induction functions etc. navigate the main menu (refer to Selecting Cooking Functions or
press the induction direct access icon).
To access the induction functions on the user interface, the induction plate must be properly inserted into
the oven.
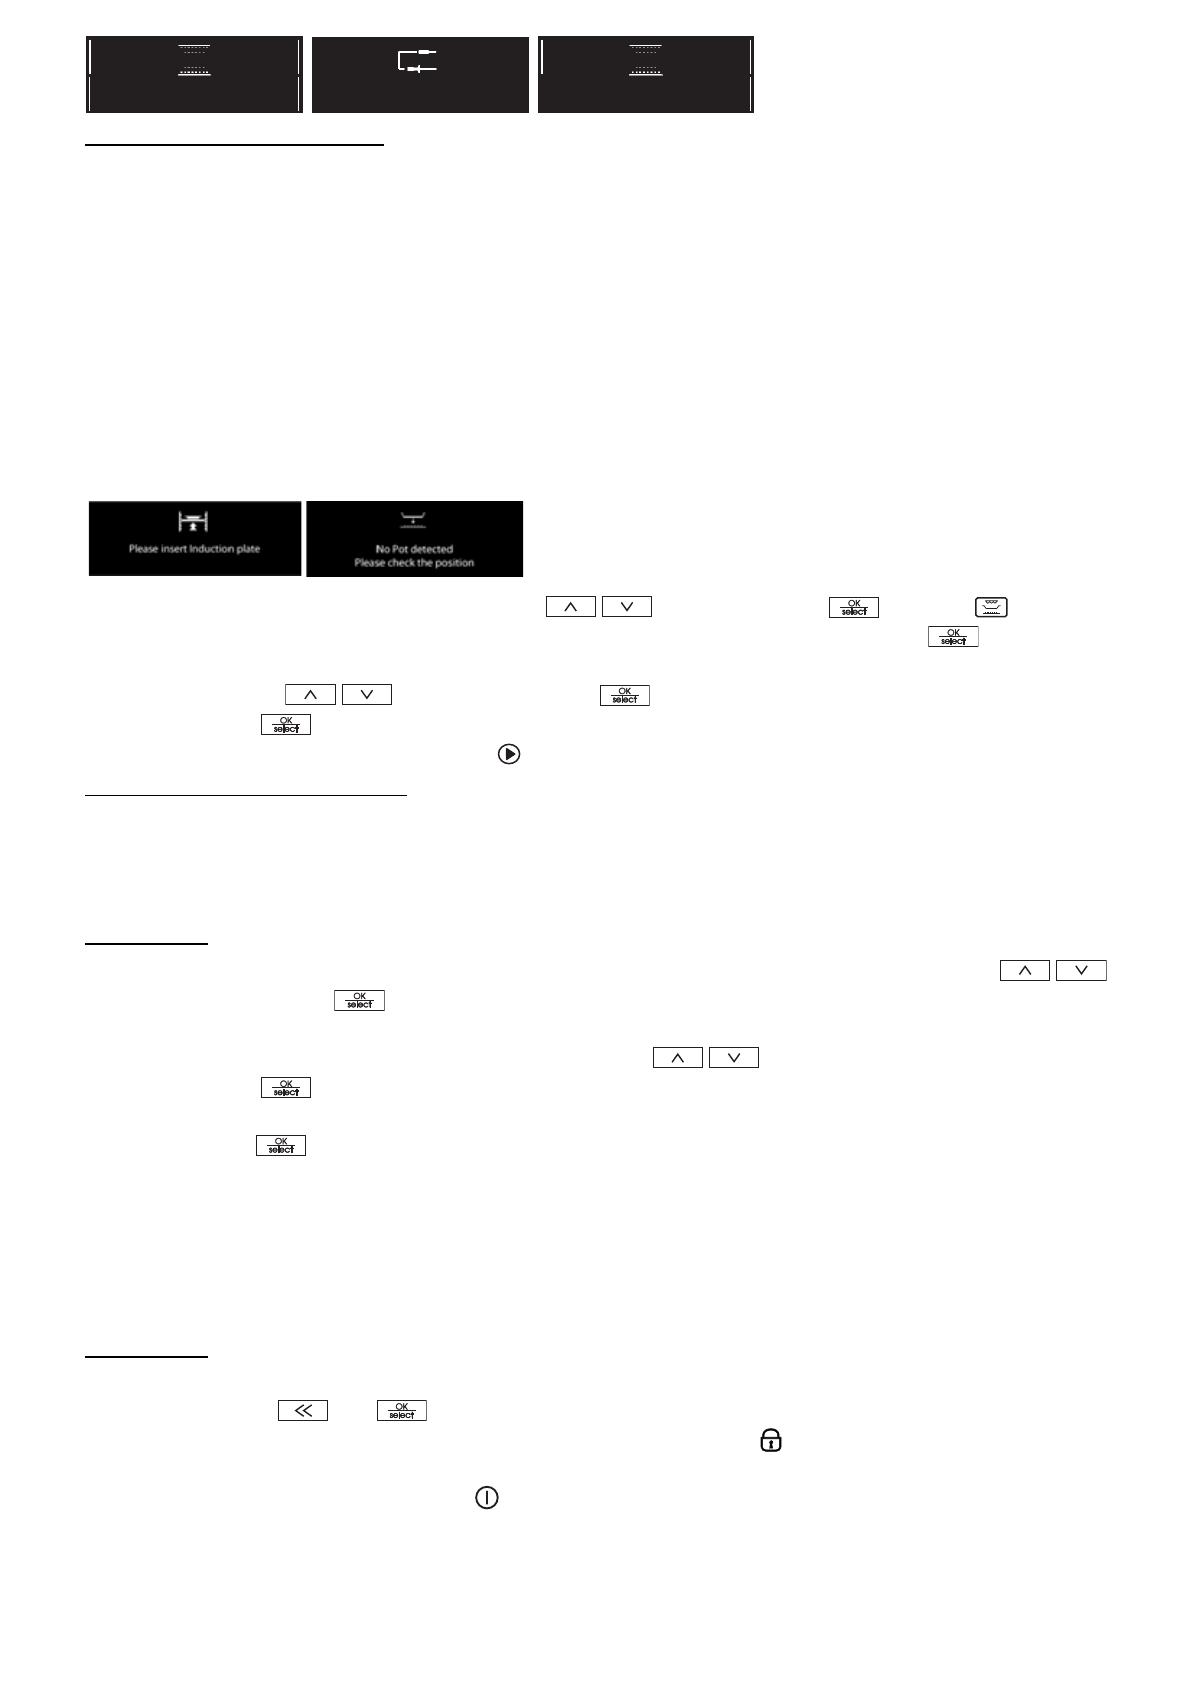
If an induction cooking cycle is required but the induction plate or cooking vessel are not inserted, the
appliance will detect the absence of one or both and will advise that they be inserted before proceeding:
1. Select Induction Functions using buttons and confirm with , or press .
2. Select the food category to be cooked from the proposed list and confirm using .
3. According to food category, further subcategory and/or food weight may be selected by scrolling the
sub menu with and confirmed with .
4. Press button to confirm.
5. Place the food in the oven and press .
6th Sense Induction Functions
Some cooking functions (Roasted Meat, Roasted Poultry and Fish) are 6th sense assisted. Given the weight
of food to be prepared, 6th sense technology cooking suggests the cooking time. Cooking time may be
adjusted to fit personal preferences and for some meat categories refers to a rare preparation (see
Induction Oven cooking tables for more details).
SETTINGS
1. To change some display settings, select “SETTINGS” from the main menu using buttons .
2. Confirm by pressing : the display shows which settings can be changed (language, time, volume
of acoustic signal, display brightness, energy saving function, power, induction first alert).
3. Select the setting you wish to change using buttons .
4. Press button to confirm.
5. Follow the instructions of the display to change the settings.
6. Press button ; a message appears on the display confirming your selection.
N.B.:When the oven is switched off, if the ECOMODE (Energy saving) function is selected (ON), the display
switches off after a few seconds, showing the clock. To view information on the display and switch the light
on again, just press any of the buttons or turn one of the knobs. During a cooking function if the ECOMODE
is activated the cavity lamp will be switched off after one minute of cooking and reactivated for each user
interaction. If, on the other hand, the function is not selected (OFF), after a few minutes the display is merely
dimmed.
KEY-LOCK
This function can be used to lock the control panel buttons.
To activate it, press and at the same time for at least 3 seconds. If activated, the functions of the
buttons are locked and the display shows a message and the symbol . This function can also be activated
during cooking. To deactivate it, repeat the above procedure. When the key-lock function is activated, the
oven can be switched off using button .
Insert Meat Probe
or press OK
PREHEAT
No
TEMPERATURE
180°C
COOK TIME
END TIME
Conventional
--:--
--:--
TEMPERATURE
150°C
MEAT PROBE
Conventional
100°C
EN18
FUNCTION DESCRIPTION TABLE
MAIN MENU
SETTINGS
Setting the display (language, time, brightness, volume of acoustic signal,
energy saving function).
RECIPES
Selecting 30 different pre-set recipes (see enclosed recipe booklet). The
oven automatically sets the optimum cooking temperature, function and
time. It is important to follow the instructions given in the recipe book
regarding preparation, accessories and which oven shelf to use.
MEAT PROBE
RECIPES
To select 7 optimal cooking modes for different types of meat. The oven
automatically sets the final core temperature of the meat selected and the
ideal oven temperature for cooking. These values are given in the specific
cooking table provided, however they can be changed manually within a
pre-set range. For correct insertion and use of the probe, follow the
instruction given in the relative paragraph. Position the meat on the 3rd
shelf, using an oven tray placed on the wire shelf or the drip tray alone. The
oven does not have to be preheated. During cooking, the oven door can
be opened to check the meat or add stock, but take care not to move the
probe.
TRADITIONAL See TRADITIONAL FUNCTIONS.
SPECIALS See SPECIALS.
INDUCTION
FUNCTIONS
See INDUCTION FUNCTIONS.
TRADITIONAL FUNCTIONS
FAST PREHEATING To preheat the oven rapidly.
CONVENTIONAL
To cook any kind of dish on one shelf only. Use the 3rd shelf. To cook pizza,
savoury pies and sweets with liquid fillings, use the 1st or 2nd shelf. The
oven does not have to be preheated.
GRILL
To grill steak, kebabs and sausages; to cook vegetables au gratin and toast
bread. Place food on the 4th or 5th shelf. When grilling meat, use the drip
tray to collect the cooking juices. Position it on the 3rd/4th shelf, adding
approx. half a litre of water. The oven does not have to be preheated.
During cooking the oven door must remain closed.
TURBO GRILL
To roast large joints of meat (legs, roast beef, chickens). Position the food
on the middle shelves. Use the drip tray to collect the cooking juices.
Position it on the 1st/2nd shelf, adding approx. half a litre of water. The
oven does not have to be preheated. During cooking the oven door must
remain closed. With this function you can also use the turnspit, if provided.
FORCED AIR
To cook a variety of food requiring the same cooking temperature on
several shelves (maximum three) at the same time (e.g.: fish, vegetables,
cakes). This function can be used to cook different foods without odours
being transferred from one food to another. Use the 3rd shelf to cook on
one shelf only, the 1st and 4th to cook on two shelves, and the 1st, 3rd and
5th to cook on three shelves. The oven does not have to be preheated.
CONVECTION BAKE
To cook meat and pies with liquid filling (savoury or sweet) on a single
shelf. Use the 3rd shelf. The oven does not have to be preheated.
  • Page 1 1
  • Page 2 2
  • Page 3 3
  • Page 4 4
  • Page 5 5
  • Page 6 6
  • Page 7 7
  • Page 8 8
  • Page 9 9
  • Page 10 10
  • Page 11 11
  • Page 12 12
  • Page 13 13
  • Page 14 14
  • Page 15 15
  • Page 16 16
  • Page 17 17
  • Page 18 18
  • Page 19 19
  • Page 20 20
  • Page 21 21
  • Page 22 22
  • Page 23 23
  • Page 24 24
  • Page 25 25
  • Page 26 26
  • Page 27 27
  • Page 28 28
  • Page 29 29
  • Page 30 30
  • Page 31 31
  • Page 32 32
  • Page 33 33

Bauknecht BLIMS 9100 PT User guide

Category
Kitchen & houseware accessories
Type
User guide

Ask a question and I''ll find the answer in the document

Finding information in a document is now easier with AI