Canon PIXMA MP260 User manual

Category
Scanner Transparancy Adapters
Type
User manual

This manual is also suitable for

How to Use This Manual Printing This Manual
MC-2746-V1.00
Basic Guide
Describes the summary of
this product.
Advanced Guide
Describes the detailed
function of this product.
Troubleshooting
Page 1 of 628 pagesMP260 series On-screen Manual
How to Use This Manual
Printing This Manual
MP-2146-V1.00
A
dvanced Guide
Contents
Overview of the Machine
Main Components
LED Display and Basic Operations
Printing from a Memory Card (MP260
series)
Printing Photos Saved on the Memory Card
Inserting the Memory Card
Setting the Language for the Photo Index Sheet
Copying
Copying Documents
Copying Photos
Fit-to-Page Copying
Scanning
Saving Scanned Data
Printing from Your Computer
Printing Photos (Easy-PhotoPrint EX)
Printing Documents (Windows)
Printing Documents (Macintosh)
Other Usages
Printing Photos from a PictBridge Compliant
Device (MP240 series)
Solution Menu and My Printer
Loading Paper / Originals
Loading Paper
Loading Originals to Copy or Scan
Routine Maintenance
When Printing Becomes Faint or Colors Are
Incorrect
Replacing a FINE Cartridge
Cleaning the Machine
Appendix
Safety Precautions
Legal Limitations on Use of Your Product and
Use of Images
Tips on How to Use Your Machine
Page 2 of 628 pagesMP240/MP260 series Basic Guide
Advanced Guide
Troubleshooting
Contents
> Overview of the Machine
Overview of the Machine
This section shows the component names of the machine and describes the basic operations you need
to know before using it.
Main Components
Front View
Rear View
Inside View
Operation Panel
LED Display and Basic Operations
Page top
Page 3 of 628 pagesOverview of the Machine
Advanced Guide
Troubleshooting
Contents
>
Overview of the Machine
> Main Components
Main Components
Front View
(1)
Document Cover
Open to load an original on the Platen Glass.
(2)
Paper Support
Raise and tip back to load paper in the Rear Tray.
(3)
Paper Guides
Slide to align with both sides of the paper stack.
(4)
Rear Tray
Load various sizes or types of paper which you can use on the machine. Two or more sheets of the same
size and type of paper can be loaded at the same time, and fed automatically one sheet at a time.
(5)
Direct Print Port (MP240 series)
Connect a PictBridge compliant device such as a digital camera when printing directly.
See
Printing Photos from a PictBridge Compliant Device (MP240 series)
.
Warning
Do not connect any equipment other than PictBridge compliant devices to the Direct Print
Port of the machine. This may cause fire, electric shock, or damage to the machine.
Caution
Do not touch the metal casing.
(6)
Paper Output Tray
Opens automatically when printing or copying starts and printed papers are ejected.
(7)
Output Tray Extension
Open to support the printouts. Open it when printing or copying.
Page 4 of 628 pagesMain Components
(8)
Platen Glass
Load an original to copy or scan.
(9)
Operation Panel
Use to change the settings of the machine or to operate it.
See
Operation Panel
.
Note
The LED and lamps on the Operation Panel other than the
Power
lamp will go out if the
machine is not operated for about 5 minutes. To restore them, press any button except the
ON
button or perform the print operation.
(10)
Card Slot Cover (MP260 series)
Open to insert a memory card.
See
Inserting the Memory Card
.
Rear View
(11)
USB Port
Plug in the USB cable to connect the machine with a computer.
Caution
Do not touch the metal casing.
Important
Do not plug in or unplug the USB cable while the machine is printing from or scanning
originals to the computer, or the computer is in the sleep mode or standby mode.
(12)
Power Cord Connector
Plug in the supplied power cord.
Inside View
Page 5 of 628 pagesMain Components
(13)
Ink Cartridge Locking Covers
Locks the FINE Cartridges into place.
(14)
Scanning Unit (Cover)
Scans originals. Open it to replace the FINE Cartridges or remove jammed paper inside the machine. When
opening the Scanning Unit (Cover), lift it with the Document Cover closed.
(15)
Access lamp (MP260 series)
Lights or flashes to indicate the memory card status.
See
Inserting the Memory Card
.
(16)
Card Slot (MP260 series)
Insert a memory card.
See
Inserting the Memory Card
.
(17)
Scanning Unit Support
Holds the Scanning Unit (Cover) being opened.
(18)
FINE Cartridge Holder
Install the FINE Cartridges.
The Color FINE Cartridge should be installed into the left slot and the Black FINE Cartridge should be installed
into the right slot.
(19)
FINE Cartridges (Ink Cartridges)
A
replaceable cartridge that is integrated with Print Head and ink tank.
Note
For details on installing the FINE Cartridges, refer to the printed manual:
Getting Started
.
Important
The area (A) indicated in the figure below may be splattered with ink. It does not affect the
performance of the machine.
Do not touch the area (A). The machine may not print properly if you touch it.
Page 6 of 628 pagesMain Components
Operation Panel
(1)
ON button / Power lamp
Turns the power on or off. Before turning on the power, make sure that the Document Cover is closed.
Note
Power and Alarm lamps
You can check the status of the machine with the
Power
lamp and
Alarm
lamp.
-
Power
lamp Off: The power is off.
-
Power
lamp lit green: The machine is ready to print.
-
Power
lamp flashing green: The machine is initializing or shutting down.
-
Alarm
lamp lit or flashing orange: An error has occurred and the machine is not ready to
print. For details, refer to the "
Troubleshooting
" in the on-screen manual:
A
dvance
d
Guide
.
-
Power
lamp flashes green once and
Alarm
lamp flashes orange once alternately: An
error that requires contacting your Canon service representative may have occurred.
For details, refer to the "
Troubleshooting" in the on-screen manual:
A
dvanced Guide
.
Important
Disconnecting the power plug
When disconnecting the power plug after turning off the power, be sure to confirm that
the
Power
lamp is not lit. If the power plug is disconnected from the wall outlet while the
Power
lamp is lit or flashing, the machine may become unable to print since the Print Head
is not protected.
(2)
LED (Light Emitting Diode)
Displays the number of copies, Maintenance menu code, or operational status such as an error code.
(3)
[+] button
Specifies the number of copies.
Page 7 of 628 pagesMain Components
(4)
Ink lamps
Lights or flashes orange when ink runs out, etc. The lamp on the left indicates the Color FINE Cartridge
status and the lamp on the right indicates the Black FINE Cartridge status.
(5)
Paper button
Switches the page size and media type.
(6)
Photo Index Sheet button (MP260 series)
Prints the Photo Index Sheet or starts scanning the Photo Index Sheet to print selected photos on the
memory card.
(7)
SCAN button
Starts scanning an original to save it on the memory card (MP260 series) or the computer.
(8)
Stop/Reset button
Cancels operations. You can also press this button to cancel operation when a print job is in progress.
(9)
Color button
*
Starts color copying. You can also press this button to finalize your selection for the menu or setting item.
(10)
Black button*
Starts black & white copying. You can also press this button to finalize your selection for the menu or
setting item.
(11)
Fit to Page button / Fit to Page lamp
Enables the Fit-to-Page copy function. You can copy an original automatically enlarged or reduced to fit the
selected page size. When the Fit-to-Page copy function is disabled, you can make copies in the same size
as an original.
(12)
(Maintenance) button
A
ccesses the Maintenance menu.
(13)
Paper lamp
Lights to indicate the selected page size and media type.
(14)
Alarm lamp
Lights or flashes orange when an error, such as paper-out or ink-out, occurs.
* In the software applications or manuals, the
Black
and
Color
buttons are collectively called the "
Start
" or "
OK
"
button.
Page top
Page 8 of 628 pagesMain Components
Advanced Guide
Troubleshooting
Contents
>
Overview of the Machine
> LED Display and Basic Operations
LED Display and Basic Operations
You can use the machine to make copies or print out without a computer.
This section describes the LED display and basic operations on the Operation Panel.
The number
1
appears on the LED normally when turning on the power.
The LED display indicates the machine status as follows.
Machine Status
LED Display
While copying
Number of copies (flashing)
While printing, scanning, or
performing maintenance
operations
(flashing in order)
When an error occurs
E
and number appear alternately.
For details on the error codes, refer to the "
Troubleshooting" in the on
-screen manual:
A
dvanced Guide
.
P
and number appear alternately.
A
n error that requires contacting your Canon service representative
may have occurred. For details, refer to the "
Troubleshooting" in the
on-screen manual:
A
dvanced Guide
.
While the Scanning Unit
(Cover) is open
(flashing)
Note
When a PictBridge compliant device such as a digital camera is connected to the machine,
C
appears on the LED (MP240 series).
Number of Copies
When copying starts, the specified number of copies appears on the LED. While copying is in progress,
the number on the LED is flashing and reduced by one to indicate the remaining number of copies to be
made.
Each time you press the [
+
] button, the number on the LED increases by one. When
F
appears, the
number of copies is set to "20". Press the [
+
] button again to return to "1".
Page 9 of 628 pagesLED Display and Basic Operations
Maintenance Codes
To perform maintenance of the machine, press the
(Maintenance) button repeatedly until the desired
code appears on the LED, and then press the Black
or
Color
button.
Maintenance
Code
Operation
See
Prints the nozzle check pattern.
Printing the Nozzle Check Pattern
Cleans the Print Head.
Cleaning the Print Head
Cleans the Print Head deeply. Cleaning the Print Head Deeply
Prints the print head alignment
sheet.
A
ligning the Print Head
Scans the print head alignment
sheet.
A
ligning the Print Head
Prints the current head position
adjustment values.
A
ligning the Print Head
Cleans the Paper Feed Roller. Cleaning the Paper Feed Roller
Cleans the inside of the machine.
Cleaning the Inside of the Machine (Bottom Plate
Cleaning)
Switches the size of paper
loaded in the Rear Tray between
A
4 and 8.5" x 11" (Letter).
(This setting is used for making
copies.)
Switching the Page Size between A4 or 8.5" x 11"
(Letter)
Sets the machine to prevent
paper abrasion.
Refer to the "Paper is Smudged/Printed Surface is
Scratched" in the "
Troubleshooting
" of the on-
screen manual:
A
dvanced Guide
.
Selects the read/write attribute of
the Card Slot (MP260 series).
Setting the Read/Write Attribute of the Card Slot
Prints the Language Selection
Sheet for the Photo Index Sheet
(MP260 series).
Setting the Language for the Photo Index Sheet
Scans the Language Selection
Sheet for the Photo Index Sheet
(MP260 series).
Setting the Language for the Photo Index Sheet
Error Codes
When an error occurs,
E
and number appear alternately on the LED to indicate the error code.
Error Code
LED Display
E
+ 1-digit number
(flashing in order)
E
+ 2-digit number
(flashing in order)
Note
For details on the error codes, refer to the "
Troubleshooting
" in the on-screen manual:
A
dvance
d
Guide
.
If an error code with
P
appears, an error that requires contacting your Canon service
representative may have occurred. For details, refer to the "
Troubleshooting
" in the on-screen
manual:
A
dvanced Guide
.
Page 10 of 628 pagesLED Display and Basic Operations
Page top
Page 11 of 628 pagesLED Display and Basic Operations
Advanced Guide
Troubleshooting
Contents
> Printing from a Memory Card (MP260 series)
Printing from a Memory Card (MP260
series)
You can print thumbnails of photos saved on the memory card on A4 or Letter-sized paper and select
photos to print.
Printing Photos Saved on the Memory Card
Inserting the Memory Card
Before Inserting the Memory Card
Inserting the Memory Card
Removing the Memory Card
Setting the Read/Write Attribute of the Card Slot
Setting the Language for the Photo Index Sheet
Page top
Page 12 of 628 pagesPrinting from a Memory Card (MP260 series)
Advanced Guide
Troubleshooting
Contents
>
Printing from a Memory Card (MP260 series)
> Printing Photos Saved on the Memory Card
Printing Photos Saved on the Memory Card
Thumbnails of photos on the memory card are printed on A4 or Letter-sized paper (this printed sheet is
called Photo Index Sheet). You can select photos, number of copies, page size, etc. on this sheet, and
print them.
For the operation, see the notes and operation procedure described in the reference page.
You need to prepare:
A
memory card on which photos are saved. See
Before Inserting the Memory Card
.
4 or Letter-sized plain paper for printing the Photo Index Sheet.
Paper for printing. See Media Types You Can Use
.
1.
Prepare for printing.
Page 13 of 628 pagesPrinting Photos Saved on the Memory Card
(1)
Turn on the power.
See
Operation Panel
.
(2)
Load two or more sheets of A4 or Letter-sized plain paper in the Rear Tray.
See
Loading Paper
.
Note
If there are more than 30 photos on the memory card, two or more Photo Index Sheets will
be printed.
(3)
Open the Paper Output Tray gently, and open the Output Tray Extension.
(4)
Insert a memory card into the Card Slot.
For the types of memory cards you can use and the locations to insert them, see
Inserting the Memory Card
.
Important
Do not remove the memory card until printing with the Photo Index Sheet is completed.
Note
When the read/write attribute of the Card Slot is set to the "Writable from PC" mode, you
cannot print photos on a memory card with the Photo Index Sheet. Set the read/write
attribute to the "Not writable from PC" mode. See Setting the Read/Write Attribute of the
Card Slot
.
2.
Make sure that no original is left on the Platen Glass, and press the
Photo Index
Sheet
button to start printing the Photo Index Sheet.
The Photo Index Sheet(s) will be printed.
Thumbnails of all photos saved on the memory card are printed in order from the latest photo first.
Important
Depending on the country or region of purchase, the Language Selection Sheet will be printed
when you press the
Photo Index Sheet
button if the language for the Photo Index Sheet has
not been selected. To set the language used to print the Photo Index Sheet, follow the
procedures from step 4 onwards in
Setting the Language for the Photo Index Sheet
.
Note
To cancel printing, press the
Stop/Reset
button.
Page 14 of 628 pagesPrinting Photos Saved on the Memory Card
3.
Fill in the appropriate circles on the Photo Index Sheet.
Fill in the appropriate circles with a dark pencil or a black ink pen to select photos to print and the print settings.
Good
Bad
(A) Check mark
(B) Line only
(C) Too light
(1)
Select the page size, media type, and layout.
Note
When printing photos using the Photo Index Sheet, you can select 4" x 6" (10 x 15 cm), 5"
x 7" (13 x 18 cm), 8.5" x 11" (LTR), or A4 for the page size.
When you select Plain Paper 8.5" x 11" (LTR) or Plain Paper A4 in Page size/Media type,
photos are printed with borders even if you select the borderless print in Layout.
(2)
Select Date / Photo Optimizer PRO / Face Brightener / Red-Eye correction as
necessary.
(3)
Fill in the circle of Print all photographs to print a copy of all photos.
* If you filled in this circle, any other circles you have filled in for the number of copies to print for each
photo will be disregarded, and only one copy each of all photos will be printed.
Fill in the circle of DPOF Print to print according to the DPOF settings on the digital camera, such as photos
to print, date, and layout settings.
* You can specify the Standard Print, Multi-Image Print, or Index Print in the DPOF settings. Available layouts
or image correction options are different depending on each print setting. For details, refer to the on-screen
manual:
A
dvanced Guide
.
(4)
Select the number of copies (fill in a circle under each photo to print).
(5)
Confirm and follow the described printing procedure.
(6)
Fill in this circle to print the same Photo Index Sheet again.
* If you filled in this circle, all other settings will be disregarded.
(7)
Be sure not to stain the bar-code.
* If the bar-code gets stained or wrinkled, the Photo Index Sheet may not be scanned properly.
Page 15 of 628 pagesPrinting Photos Saved on the Memory Card
Important
Be sure to fill in a circle for every setting item except options.
If there are two or more Photo Index Sheets, fill in all the sheets.
If the filled circles on the Photo Index Sheet are not dark enough, the machine may not scan the
settings.
4.
Scan the Photo Index Sheet, and print photos.
(1)
Load paper.
See
Loading Paper
.
Make sure that the page size and media type of the loaded paper match those specified on the Photo Index
Sheet.
(2)
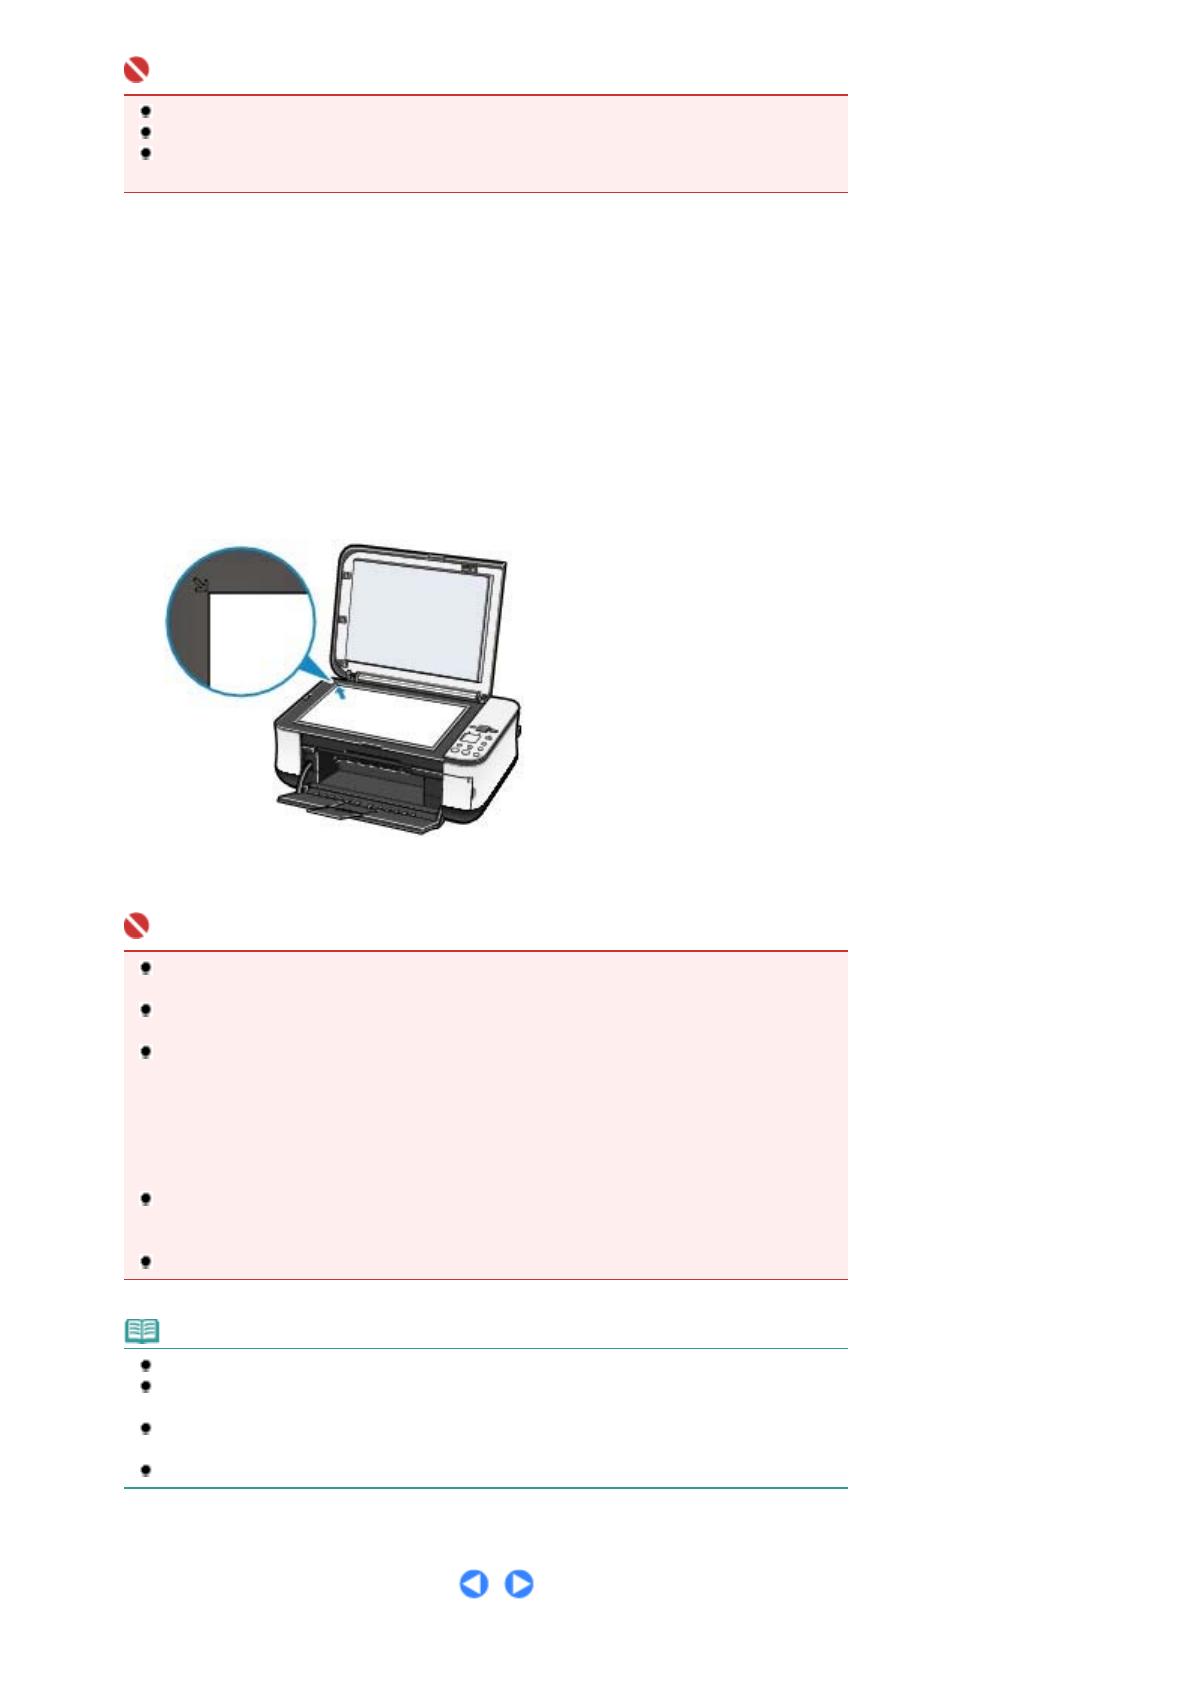
Place the Photo Index Sheet on the Platen Glass.
Place the Photo Index Sheet with the filled-in side FACING DOWN and align the sheet with the alignment
mark as shown below.
Then close the Document Cover gently.
(3)
Press the
Photo Index Sheet
button.
The Photo Index Sheet is scanned and the specified photos will be printed.
Important
Do not open the Document Cover or move the loaded Photo Index Sheet until scanning is
completed.
Be careful not to get the Photo Index Sheet dirty. If the Photo Index Sheet is stained or
wrinkled, it may not be scanned properly.
If the error code "E, 3, 2" or "E, 3, 3" appears on the LED, confirm the following.
- The Platen Glass and the Photo Index Sheet are not dirty.
- The Photo Index Sheet is placed in the correct position with the filled-in side facing down.
- You have filled in all the necessary circles on the sheet.
- Only one option is selected for items that do not accept two or more selections.
- The filled circles are dark enough.
For details, refer to the "
Troubleshooting
" in the on-screen manual:
A
dvanced Guide
.
If you selected to print according to the DPOF settings but there is no DPOF information on the
memory card, the error code "E, 3, 4" will appear on the LED. For details, refer to the "
Troubleshooting
" in the on-screen manual:
A
dvanced Guide
.
Do not remove the memory card until printing is completed.
Note
To cancel printing, press the
Stop/Reset
button.
To continue to print photos using subsequent Photo Index Sheets, repeat the procedure from
step 3.
If the memory card has been removed and then reinserted before printing photos with the
Photo Index Sheet, it may take some time before printing starts.
To remove the memory card after printing is completed, see
Removing the Memory Card
.
Page 16 of 628 pagesPrinting Photos Saved on the Memory Card
Page top
Page 17 of 628 pagesPrinting Photos Saved on the Memory Card
Advanced Guide
Troubleshooting
Contents
>
Printing from a Memory Card (MP260 series)
> Inserting the Memory Card
Inserting the Memory Card
Before Inserting the Memory Card
The following types of memory cards and image data are compatible with the machine.
Important
If you took and saved photos on a type of memory card that is not guaranteed operation to be used
on your digital camera, the image data may be unreadable on the machine or damaged. For
information on memory cards that your digital camera guarantees operation, refer to the instruction
manual supplied with your digital camera.
Format the memory card with a digital camera compliant with DCF ver. 1.0/2.0 standard. The
memory card may not be usable with the machine if it is formatted on a computer.
Memory Cards that Do Not Require a Card Adapter
SD Secure Digital memory card
SDHC memory card
MultiMediaCard (ver.4.1)
MultiMediaCard Plus (ver.4.1)
Compact Flash (CF) Card
Supports Type I/II (3.3 V)
Microdrive
Memory Stick
Memory Stick PRO
Memory Stick Duo
Memory Stick PRO Duo
Memory Cards that Require a Card Adapter
Important
Be sure to attach the special card adapters to the following memory cards before inserting to the
Card Slot.
If one of the following memory cards is inserted without the card adapter, you may not be able to
remove the memory card. In this case, refer to the "
Troubleshooting
" in the on-screen manual:
A
dvanced Guide
.
miniSD Card
*1
miniSDHC Card
*1
microSD Card
*1
microSDHC Card
*1
xD-Picture Card
*2
xD-Picture Card Type M
*2
xD-Picture Card Type H
*2
RS-MMC (ver.4.1)
*3
Memory Stick Micro
*4
*1
Use the special "SD Card Adapter".
*2
Requires purchase of a separate compact flash card adapter for xD-Picture Card.
*3
Use the special card adapter.
*4
Use the special "Memory Stick Micro Duo size Adapter".
Page 18 of 628 pagesInserting the Memory Card
Printable Image Data
This machine supports images created by DCF ver. 1.0/2.0 standard compliant digital cameras (Exif ver.
2.2/2.21 compliant, including TIFF etc.). Other image or movie types such as RAW images cannot be
printed.
Inserting the Memory Card
Note
When the read/write attribute of the Card Slot is set to the "Writable from PC" mode on the
Maintenance menu, you cannot print photos on a memory card with the Photo Index Sheet. After
using the Card Slot as the memory card drive of a computer, remove the memory card and be sure
to set the read/write attribute to the "Not writable from PC" mode.
See Setting the Read/Write Attribute of the Card Slot
.
When you use a computer to edit or enhance photos saved on a memory card, be sure to print them
from the computer. If you print the photos with the Photo Index Sheet, they may not be printed
properly.
1.
Prepare your memory card.
A
ttach a special card adapter if your memory card requires one.
See
Memory Cards that Require a Card Adapter
.
2.
Turn on the power, and open the Card Slot Cover.
3.
Insert only one memory card into the Card Slot.
The location to insert a memory card varies depending on each type of memory card. Insert your memory card
straightforward WITH THE LABELED SIDE FACING TO THE LEFT into the Card Slot, according to the insert
location in the figure below.
When the memory card is inserted properly, the
Access
lamp (A) will light up.
Be sure to attach the card adapter to the memory card with the mark * (asterisk) below, and then insert it into the
Card Slot.
For Memory Stick Duo, Memory Stick PRO Duo, or Memory Stick Micro*:
For SD Secure Digital memory card, SDHC memory card, miniSD Card*, miniSDHC Card*, microSD
Card*, microSDHC Card*, Memory Stick, Memory Stick PRO, MultiMediaCard (ver.4.1),
MultiMediaCard Plus (ver.4.1), or RS-MMC (ver.4.1)*:
Page 19 of 628 pagesInserting the Memory Card
For Compact Flash (CF), Microdrive, or xD-Picture Card*, xD-Picture Card Type M*, xD-Picture Card
Type H*:
Caution
Part of the memory card will stick out of the Card Slot, but do not force it into the slot any
further. This can damage the machine or the memory card.
Make sure that the memory card is correctly oriented before inserting it into the Card Slot. If
you force the memory card into the Card Slot in the wrong orientation, the memory card or the
machine can be damaged.
Important
Do not insert more than one memory card at a time.
4.
Close the Card Slot Cover.
Removing the Memory Card
Important
If you used the Card Slot as the memory card drive of a computer, you must perform the "safe
removal" operation on your computer before physically removing the memory card from the
machine.
- In Windows, right-click the removable disk icon and click
Eject
. If
Eject
does not appear on the
screen, make sure that the
Access
lamp is not flashing, and then remove the memory card.
- In Macintosh, drag (Mount drive) into the Trash.
1.
Open the Card Slot Cover.
2.
Make sure that the
Access
lamp is lit, and remove the memory card.
Hold the part of the memory card that is sticking out and remove it from the machine straightforward.
Caution
Do not remove the memory card while the
Access
lamp is flashing. The
Access
lamp flashes
while the machine is reading or writing data from/to the memory card. If you remove the
memory card or turn off the power while the
Access
lamp is flashing, the data saved on the
memory card can be damaged.
3.
Close the Card Slot Cover.
Page 20 of 628 pagesInserting the Memory Card
  • Page 1 1
  • Page 2 2
  • Page 3 3
  • Page 4 4
  • Page 5 5
  • Page 6 6
  • Page 7 7
  • Page 8 8
  • Page 9 9
  • Page 10 10
  • Page 11 11
  • Page 12 12
  • Page 13 13
  • Page 14 14
  • Page 15 15
  • Page 16 16
  • Page 17 17
  • Page 18 18
  • Page 19 19
  • Page 20 20
  • Page 21 21
  • Page 22 22
  • Page 23 23
  • Page 24 24
  • Page 25 25
  • Page 26 26
  • Page 27 27
  • Page 28 28
  • Page 29 29
  • Page 30 30
  • Page 31 31
  • Page 32 32
  • Page 33 33
  • Page 34 34
  • Page 35 35
  • Page 36 36
  • Page 37 37
  • Page 38 38
  • Page 39 39
  • Page 40 40
  • Page 41 41
  • Page 42 42
  • Page 43 43
  • Page 44 44
  • Page 45 45
  • Page 46 46
  • Page 47 47
  • Page 48 48
  • Page 49 49
  • Page 50 50
  • Page 51 51
  • Page 52 52
  • Page 53 53
  • Page 54 54
  • Page 55 55
  • Page 56 56
  • Page 57 57
  • Page 58 58
  • Page 59 59
  • Page 60 60
  • Page 61 61
  • Page 62 62
  • Page 63 63
  • Page 64 64
  • Page 65 65
  • Page 66 66
  • Page 67 67
  • Page 68 68
  • Page 69 69
  • Page 70 70
  • Page 71 71
  • Page 72 72
  • Page 73 73
  • Page 74 74
  • Page 75 75
  • Page 76 76
  • Page 77 77
  • Page 78 78
  • Page 79 79
  • Page 80 80
  • Page 81 81
  • Page 82 82
  • Page 83 83
  • Page 84 84
  • Page 85 85
  • Page 86 86
  • Page 87 87
  • Page 88 88
  • Page 89 89
  • Page 90 90
  • Page 91 91
  • Page 92 92
  • Page 93 93
  • Page 94 94
  • Page 95 95
  • Page 96 96
  • Page 97 97
  • Page 98 98
  • Page 99 99
  • Page 100 100
  • Page 101 101
  • Page 102 102
  • Page 103 103
  • Page 104 104
  • Page 105 105
  • Page 106 106
  • Page 107 107
  • Page 108 108
  • Page 109 109
  • Page 110 110
  • Page 111 111
  • Page 112 112
  • Page 113 113
  • Page 114 114
  • Page 115 115
  • Page 116 116
  • Page 117 117
  • Page 118 118
  • Page 119 119
  • Page 120 120
  • Page 121 121
  • Page 122 122
  • Page 123 123
  • Page 124 124
  • Page 125 125
  • Page 126 126
  • Page 127 127
  • Page 128 128
  • Page 129 129
  • Page 130 130
  • Page 131 131
  • Page 132 132
  • Page 133 133
  • Page 134 134
  • Page 135 135
  • Page 136 136
  • Page 137 137
  • Page 138 138
  • Page 139 139
  • Page 140 140
  • Page 141 141
  • Page 142 142
  • Page 143 143
  • Page 144 144
  • Page 145 145
  • Page 146 146
  • Page 147 147
  • Page 148 148
  • Page 149 149
  • Page 150 150
  • Page 151 151
  • Page 152 152
  • Page 153 153
  • Page 154 154
  • Page 155 155
  • Page 156 156
  • Page 157 157
  • Page 158 158
  • Page 159 159
  • Page 160 160
  • Page 161 161
  • Page 162 162
  • Page 163 163
  • Page 164 164
  • Page 165 165
  • Page 166 166
  • Page 167 167
  • Page 168 168
  • Page 169 169
  • Page 170 170
  • Page 171 171
  • Page 172 172
  • Page 173 173
  • Page 174 174
  • Page 175 175
  • Page 176 176
  • Page 177 177
  • Page 178 178
  • Page 179 179
  • Page 180 180
  • Page 181 181
  • Page 182 182
  • Page 183 183
  • Page 184 184
  • Page 185 185
  • Page 186 186
  • Page 187 187
  • Page 188 188
  • Page 189 189
  • Page 190 190
  • Page 191 191
  • Page 192 192
  • Page 193 193
  • Page 194 194
  • Page 195 195
  • Page 196 196
  • Page 197 197
  • Page 198 198
  • Page 199 199
  • Page 200 200
  • Page 201 201
  • Page 202 202
  • Page 203 203
  • Page 204 204
  • Page 205 205
  • Page 206 206
  • Page 207 207
  • Page 208 208
  • Page 209 209
  • Page 210 210
  • Page 211 211
  • Page 212 212
  • Page 213 213
  • Page 214 214
  • Page 215 215
  • Page 216 216
  • Page 217 217
  • Page 218 218
  • Page 219 219
  • Page 220 220
  • Page 221 221
  • Page 222 222
  • Page 223 223
  • Page 224 224
  • Page 225 225
  • Page 226 226
  • Page 227 227
  • Page 228 228
  • Page 229 229
  • Page 230 230
  • Page 231 231
  • Page 232 232
  • Page 233 233
  • Page 234 234
  • Page 235 235
  • Page 236 236
  • Page 237 237
  • Page 238 238
  • Page 239 239
  • Page 240 240
  • Page 241 241
  • Page 242 242
  • Page 243 243
  • Page 244 244
  • Page 245 245
  • Page 246 246
  • Page 247 247
  • Page 248 248
  • Page 249 249
  • Page 250 250
  • Page 251 251
  • Page 252 252
  • Page 253 253
  • Page 254 254
  • Page 255 255
  • Page 256 256
  • Page 257 257
  • Page 258 258
  • Page 259 259
  • Page 260 260
  • Page 261 261
  • Page 262 262
  • Page 263 263
  • Page 264 264
  • Page 265 265
  • Page 266 266
  • Page 267 267
  • Page 268 268
  • Page 269 269
  • Page 270 270
  • Page 271 271
  • Page 272 272
  • Page 273 273
  • Page 274 274
  • Page 275 275
  • Page 276 276
  • Page 277 277
  • Page 278 278
  • Page 279 279
  • Page 280 280
  • Page 281 281
  • Page 282 282
  • Page 283 283
  • Page 284 284
  • Page 285 285
  • Page 286 286
  • Page 287 287
  • Page 288 288
  • Page 289 289
  • Page 290 290
  • Page 291 291
  • Page 292 292
  • Page 293 293
  • Page 294 294
  • Page 295 295
  • Page 296 296
  • Page 297 297
  • Page 298 298
  • Page 299 299
  • Page 300 300
  • Page 301 301
  • Page 302 302
  • Page 303 303
  • Page 304 304
  • Page 305 305
  • Page 306 306
  • Page 307 307
  • Page 308 308
  • Page 309 309
  • Page 310 310
  • Page 311 311
  • Page 312 312
  • Page 313 313
  • Page 314 314
  • Page 315 315
  • Page 316 316
  • Page 317 317
  • Page 318 318
  • Page 319 319
  • Page 320 320
  • Page 321 321
  • Page 322 322
  • Page 323 323
  • Page 324 324
  • Page 325 325
  • Page 326 326
  • Page 327 327
  • Page 328 328
  • Page 329 329
  • Page 330 330
  • Page 331 331
  • Page 332 332
  • Page 333 333
  • Page 334 334
  • Page 335 335
  • Page 336 336
  • Page 337 337
  • Page 338 338
  • Page 339 339
  • Page 340 340
  • Page 341 341
  • Page 342 342
  • Page 343 343
  • Page 344 344
  • Page 345 345
  • Page 346 346
  • Page 347 347
  • Page 348 348
  • Page 349 349
  • Page 350 350
  • Page 351 351
  • Page 352 352
  • Page 353 353
  • Page 354 354
  • Page 355 355
  • Page 356 356
  • Page 357 357
  • Page 358 358
  • Page 359 359
  • Page 360 360
  • Page 361 361
  • Page 362 362
  • Page 363 363
  • Page 364 364
  • Page 365 365
  • Page 366 366
  • Page 367 367
  • Page 368 368
  • Page 369 369
  • Page 370 370
  • Page 371 371
  • Page 372 372
  • Page 373 373
  • Page 374 374
  • Page 375 375
  • Page 376 376
  • Page 377 377
  • Page 378 378
  • Page 379 379
  • Page 380 380
  • Page 381 381
  • Page 382 382
  • Page 383 383
  • Page 384 384
  • Page 385 385
  • Page 386 386
  • Page 387 387
  • Page 388 388
  • Page 389 389
  • Page 390 390
  • Page 391 391
  • Page 392 392
  • Page 393 393
  • Page 394 394
  • Page 395 395
  • Page 396 396
  • Page 397 397
  • Page 398 398
  • Page 399 399
  • Page 400 400
  • Page 401 401
  • Page 402 402
  • Page 403 403
  • Page 404 404
  • Page 405 405
  • Page 406 406
  • Page 407 407
  • Page 408 408
  • Page 409 409
  • Page 410 410
  • Page 411 411
  • Page 412 412
  • Page 413 413
  • Page 414 414
  • Page 415 415
  • Page 416 416
  • Page 417 417
  • Page 418 418
  • Page 419 419
  • Page 420 420
  • Page 421 421
  • Page 422 422
  • Page 423 423
  • Page 424 424
  • Page 425 425
  • Page 426 426
  • Page 427 427
  • Page 428 428
  • Page 429 429
  • Page 430 430
  • Page 431 431
  • Page 432 432
  • Page 433 433
  • Page 434 434
  • Page 435 435
  • Page 436 436
  • Page 437 437
  • Page 438 438
  • Page 439 439
  • Page 440 440
  • Page 441 441
  • Page 442 442
  • Page 443 443
  • Page 444 444
  • Page 445 445
  • Page 446 446
  • Page 447 447
  • Page 448 448
  • Page 449 449
  • Page 450 450
  • Page 451 451
  • Page 452 452
  • Page 453 453
  • Page 454 454
  • Page 455 455
  • Page 456 456
  • Page 457 457
  • Page 458 458
  • Page 459 459
  • Page 460 460
  • Page 461 461
  • Page 462 462
  • Page 463 463
  • Page 464 464
  • Page 465 465
  • Page 466 466
  • Page 467 467
  • Page 468 468
  • Page 469 469
  • Page 470 470
  • Page 471 471
  • Page 472 472
  • Page 473 473
  • Page 474 474
  • Page 475 475
  • Page 476 476
  • Page 477 477
  • Page 478 478
  • Page 479 479
  • Page 480 480
  • Page 481 481
  • Page 482 482
  • Page 483 483
  • Page 484 484
  • Page 485 485
  • Page 486 486
  • Page 487 487
  • Page 488 488
  • Page 489 489
  • Page 490 490
  • Page 491 491
  • Page 492 492
  • Page 493 493
  • Page 494 494
  • Page 495 495
  • Page 496 496
  • Page 497 497
  • Page 498 498
  • Page 499 499
  • Page 500 500
  • Page 501 501
  • Page 502 502
  • Page 503 503
  • Page 504 504
  • Page 505 505
  • Page 506 506
  • Page 507 507
  • Page 508 508
  • Page 509 509
  • Page 510 510
  • Page 511 511
  • Page 512 512
  • Page 513 513
  • Page 514 514
  • Page 515 515
  • Page 516 516
  • Page 517 517
  • Page 518 518
  • Page 519 519
  • Page 520 520
  • Page 521 521
  • Page 522 522
  • Page 523 523
  • Page 524 524
  • Page 525 525
  • Page 526 526
  • Page 527 527
  • Page 528 528
  • Page 529 529
  • Page 530 530
  • Page 531 531
  • Page 532 532
  • Page 533 533
  • Page 534 534
  • Page 535 535
  • Page 536 536
  • Page 537 537
  • Page 538 538
  • Page 539 539
  • Page 540 540
  • Page 541 541
  • Page 542 542
  • Page 543 543
  • Page 544 544
  • Page 545 545
  • Page 546 546
  • Page 547 547
  • Page 548 548
  • Page 549 549
  • Page 550 550
  • Page 551 551
  • Page 552 552
  • Page 553 553
  • Page 554 554
  • Page 555 555
  • Page 556 556
  • Page 557 557
  • Page 558 558
  • Page 559 559
  • Page 560 560
  • Page 561 561
  • Page 562 562
  • Page 563 563
  • Page 564 564
  • Page 565 565
  • Page 566 566
  • Page 567 567
  • Page 568 568
  • Page 569 569
  • Page 570 570
  • Page 571 571
  • Page 572 572
  • Page 573 573
  • Page 574 574
  • Page 575 575
  • Page 576 576
  • Page 577 577
  • Page 578 578
  • Page 579 579
  • Page 580 580
  • Page 581 581
  • Page 582 582
  • Page 583 583
  • Page 584 584
  • Page 585 585
  • Page 586 586
  • Page 587 587
  • Page 588 588
  • Page 589 589
  • Page 590 590
  • Page 591 591
  • Page 592 592
  • Page 593 593
  • Page 594 594
  • Page 595 595
  • Page 596 596
  • Page 597 597
  • Page 598 598
  • Page 599 599
  • Page 600 600
  • Page 601 601
  • Page 602 602
  • Page 603 603
  • Page 604 604
  • Page 605 605
  • Page 606 606
  • Page 607 607
  • Page 608 608
  • Page 609 609
  • Page 610 610
  • Page 611 611
  • Page 612 612
  • Page 613 613
  • Page 614 614
  • Page 615 615
  • Page 616 616
  • Page 617 617
  • Page 618 618
  • Page 619 619
  • Page 620 620
  • Page 621 621
  • Page 622 622
  • Page 623 623
  • Page 624 624
  • Page 625 625
  • Page 626 626
  • Page 627 627
  • Page 628 628

Canon PIXMA MP260 User manual

Category
Scanner Transparancy Adapters
Type
User manual
This manual is also suitable for

Ask a question and I''ll find the answer in the document

Finding information in a document is now easier with AI