Owner’s Manual Room Air Conditioner with R-410A Heat Controller
7
Owner’s Manual Room Air Conditioner with R-410A Heat Controller, Inc.
7
AIRCONDITIONERFEATURES(CONTINUED)
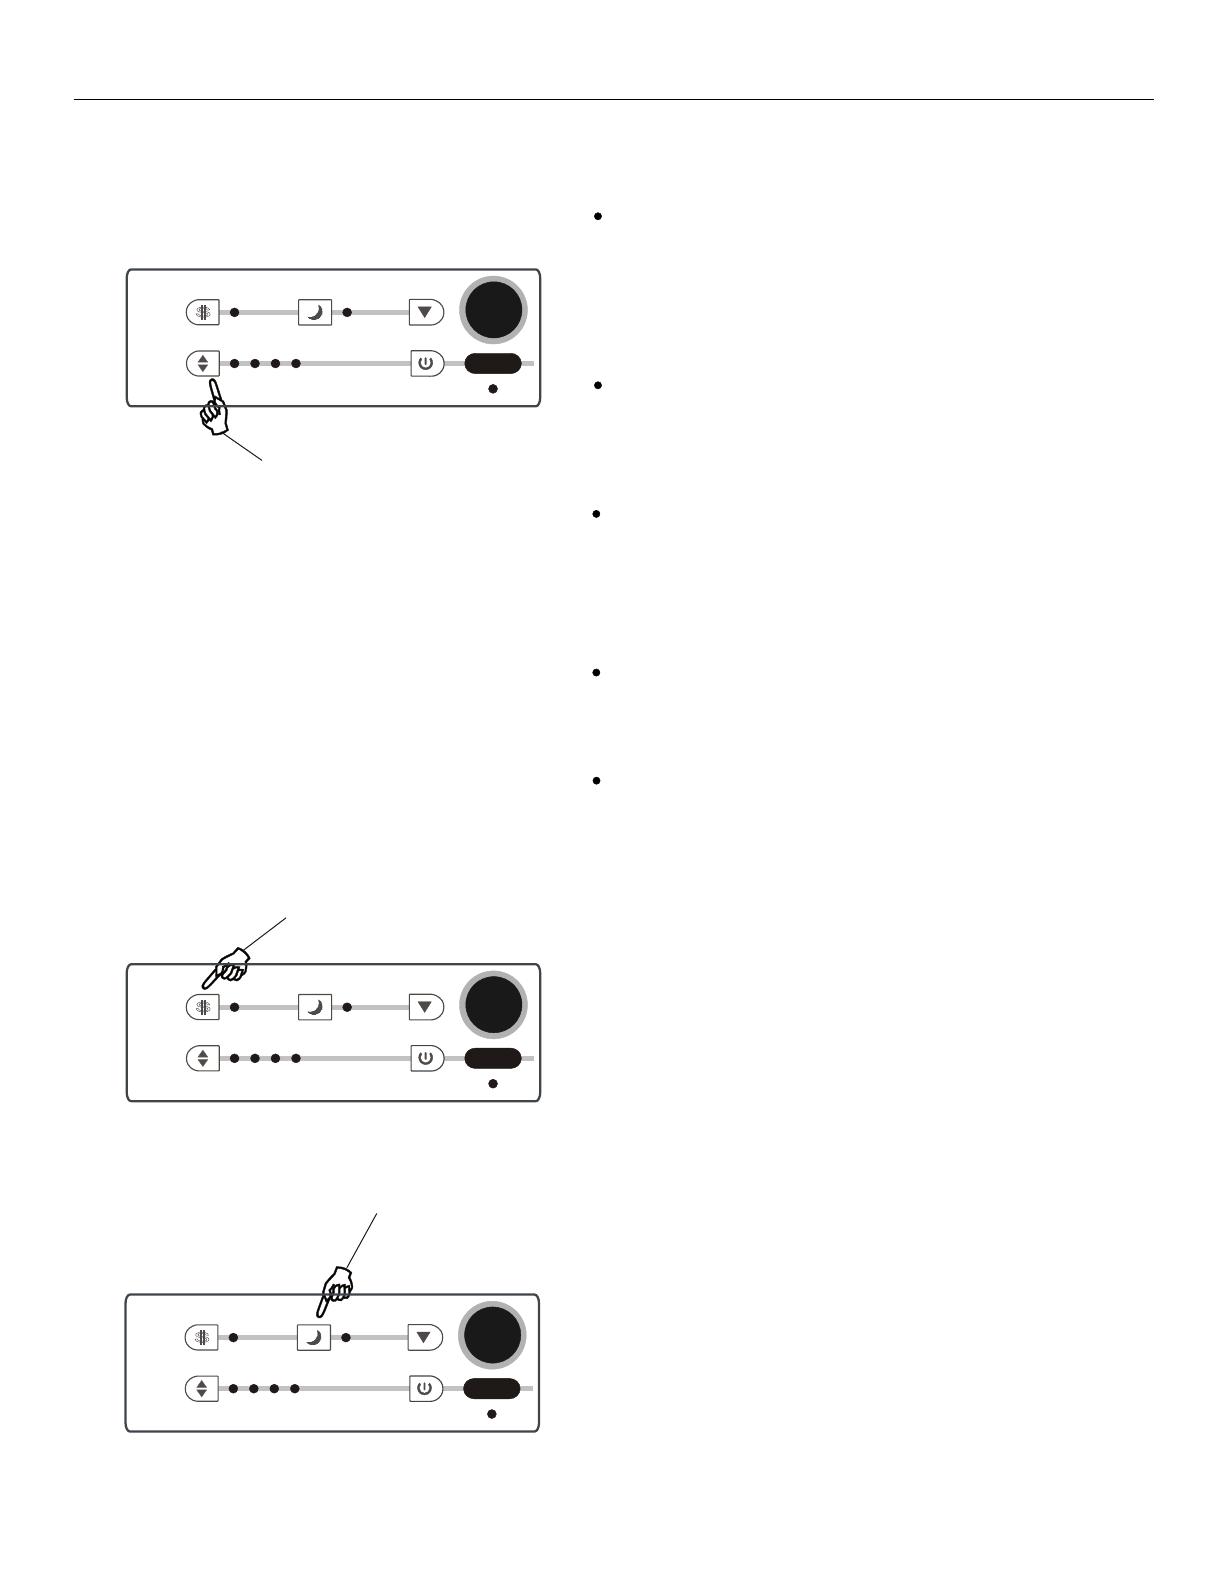
TOSELECTTHE
OPERATINGMODE:
PresstheMode
button.
DOTHIS:
Tochooseoperatingmode,presstheMode
button.Eachtimeyoupressthebutton,amode
isselectedinasequencethatgoesfrom Auto,
Cool,DryandFan. Theindicatorlightbeside
willbeilluminatedandremainedononcethe
modeisselected.
NOTE:
Tooperateon Autofeature:
Inthismode,thefanspeedcannotbeadjusted,
itstartsautomaticallyataspeedaccordingto
theroomtemperature.Iftheroomdoesnotget
toowarm,it willstayatLowspeed.
TooperateonFanOnly:
Usethisfunctiononlywhencoolingisnot
desired,suchasforroomaircirculationorto
exhauststaleair(onsomemodels).
(Remembertoopentheventduringthisfunction,
butkeepitclosedduringcoolingformaximum
coolingefficiency.) Youcanchooseanyfan
speedyouprefer.
Duringthis function,thedisplaywillshowthe
actualroomtemperature
,notthesettemper-
atureasinthecoolingmode.
TOUSETHEENERGY
SAVERFEATURE:
Pressthebutton
DOTHIS:
Inthismode,thefanwillcontinuetorunfor
3minutesafterthecompressorshutsoff. The
fanthencyclesonfor2minutesat10minute
intervalsuntilthe roomtemperatureisabove
thesettemperature,atwhichtimethe
compressorturnsbackonandcoolingstars.
NOTE:
SLEEPFEATURE:
PressSleep
button
DOTHIS:
Inthismodetheselectedtemperaturewill
increaseby2degreesF30minutesafterthe
modeisselected. Thetemperaturewillthen
increasebyanother2degreesFafteran
additional30minutes. Thisnewtemperature
willbemaintainedfor7hoursbeforeitreturns
totheoriginallyselectedtemperature. This
endstheSleepmodeandtheunitwillcontinue
tooperateasoriginallyprogrammed. The
Sleepmodeprogramcanbecancelledatany
timeduringoperationbyagainpressingthe
Sleepbutton.
NOTE:
Timer
Temp.
S
Exhaust
closed
open
Mode
Energy
Saver
Timer
on
Timer
off
Timer
Temp.
Auto Cool Dry Fan
Timer
Temp.
S
Exhaust
closed
open
Mode
Energy
Saver
Timer
on
Timer
off
Timer
Temp.
Auto Cool Dry Fan
Timer
Temp.
Timer
Temp.
Sleep
Check
Filter
ON/
OFF
Follow
Me
Auto
Med
Low
High
Fan
Clean
Air
TooperateonDrymode:
Inthismode,theairconditionerwillgenerally
operateintheformofadehumidifier.Sincethe
conditionedspaceisaclosedorsealedarea,
somedegreeofcoolingwillcontinue.
AIRCONDITIONERFEATURES(CONTINUED)
TOSELECTTHE
OPERATINGMODE:
PresstheMode
button.
DOTHIS:
Tochooseoperatingmode,presstheMode
button.Eachtimeyoupressthebutton,amode
isselectedinasequencethatgoesfrom Auto,
Cool,DryandFan. Theindicatorlightbeside
willbeilluminatedandremainedononcethe
modeisselected.
NOTE:
Tooperateon Autofeature:
Inthismode,thefanspeedcannotbeadjusted,
itstartsautomaticallyataspeedaccordingto
theroomtemperature.Iftheroomdoesnotget
toowarm,it willstayatLowspeed.
TooperateonFanOnly:
Usethisfunctiononlywhencoolingisnot
desired,suchasforroomaircirculationorto
exhauststaleair(onsomemodels).
(Remembertoopentheventduringthisfunction,
butkeepitclosedduringcoolingformaximum
coolingefficiency.) Youcanchooseanyfan
speedyouprefer.
Duringthis function,thedisplaywillshowthe
actualroomtemperature
,notthesettemper-
atureasinthecoolingmode.
TOUSETHEENERGY
SAVERFEATURE:
Pressthebutton
DOTHIS:
Inthismode,thefanwillcontinuetorunfor
3minutesafterthecompressorshutsoff. The
fanthencyclesonfor2minutesat10minute
intervalsuntilthe roomtemperatureisabove
thesettemperature,atwhichtimethe
compressorturnsbackonandcoolingstars.
NOTE:
SLEEPFEATURE:
PressSleep
button
DOTHIS:
Inthismodetheselectedtemperaturewill
increaseby2degreesF30minutesafterthe
modeisselected. Thetemperaturewillthen
increasebyanother2degreesFafteran
additional30minutes. Thisnewtemperature
willbemaintainedfor7hoursbeforeitreturns
totheoriginallyselectedtemperature. This
endstheSleepmodeandtheunitwillcontinue
tooperateasoriginallyprogrammed. The
Sleepmodeprogramcanbecancelledatany
timeduringoperationbyagainpressingthe
Sleepbutton.
NOTE:
7
Timer
Temp.
S
Exhaust
closed
open
Mode
Energy
Saver
Timer
on
Timer
off
Timer
Temp.
Auto Cool Dry Fan
Timer
Temp.
S
Exhaust
closed
open
Mode
Energy
Saver
Timer
on
Timer
off
Timer
Temp.
Auto Cool Dry Fan
Timer
Temp.
Timer
Temp.
Sleep
Check
Filter
ON/
OFF
Follow
Me
Auto
Med
Low
High
Fan
Clean
Air
TooperateonDrymode:
Inthismode,theairconditionerwillgenerally
operateintheformofadehumidifier.Sincethe
conditionedspaceisaclosedorsealedarea,
somedegreeofcoolingwillcontinue.
AIRCONDITIONERFEATURES(CONTINUED)
TOSELECTTHE
OPERATINGMODE:
PresstheMode
button.
Auto
Cool
Dry
Fan
Low
Auto
Med
High
Clean
Air
Fan
Mode
Follow
Me
Energy
Saver
On/Off
DOTHIS:
Tochooseoperatingmode,presstheModebutton.
Eachtimeyoupressthebutton,amodeisselected
inasequencethatgoesfrom Auto,Cool,Dryand
Fan. Theindicatorlightbesidewillbeilluminated
andremainedononcethemodeisselected.
NOTE:
Tooperateon Autofeature:
Inthismode,thefanspeedcannotbeadjusted,it
startsautomaticallyataspeedaccordingtothe
roomtemperature.Iftheroomdoesnotgettoo
warm,it willstayatLowspeed.
TooperateonFanOnly:
Usethisfunctiononlywhencoolingisnotdesired,
suchasforroomaircirculationortoexhauststale
air(onsomemodels).(Remembertoopenthevent
duringthisfunction,butkeepitclosedduring
coolingformaximumcoolingefficiency.) Youcan
chooseanyfanspeedyouprefer.
Duringthisfunction,thedisplaywillshowtheactual
roomtemperature,no
tthesettemperatureasinthe
coolingmode.
TOUSETHEENERGY
SAVERFEATURE:
Pressthebutton
Auto
Cool
Dry
Fan
Low
Auto
Med
High
Clean
Air
Fan
Mode
Follow
Me
Energy
Saver
On/Off
DOTHIS:
Inthismode,thefanwillcontinuetorunfor3minutes
afterthecompressorshutsoff. Thefanthencycles
onfor2minutesat10minuteintervalsuntiltheroom
temperatureisabovethesettemperature,atwhich
timethecompressorturnsbackonandCoolingStars.
NOTE:
Temp Temp
Timer
Timer
On
Off
Sleep
Check
Filter
Timer
Auto
Cool
Dry
Fan
Low
Auto
Med
High
Clean
Air
SLEEPFEATURE:
PressSleep
button
DOTHIS:
Inthismodetheselectedtemperaturewillincreaseby
4 F(2 or3 C)inthefirsthourafterthemodeisselected.
Thisnewtemperaturewillbemaintainedforanother6
hoursbeforeitreturnstotheoriginallyselected
temperature. ThisendstheSleepmodeandtheunit
willcontinuetooperateasoriginallyprogrammed.
TheSleepmodeprogramcanbecancelledatany
timeduringoperationbyagainpressingtheSleep
button.
O OO
NOTE:
7
TooperateonDrymode:
Inthismode,theairconditionerwillgenerally
operateintheformofadehumidifier.Sincethe
conditionedspaceisaclosedorsealedarea,some
degreeofcoolingwillcontinue.
starts.
In the mode, the air conditioner will generally operate in
the form of a dehumidier to remove moisture from the air.
Since the conditioned space is a closed or sealed area,
some degree of cooling will continue.
Cool, Dry and Fan. The indicator light beside each
mode will be illumniated and remain on once the mode
is selected.
TO USE THE ENERGY
SAVER FEATURE:
AIRCONDITIONERFEATURES(CONTINUED)
TOSELECTTHE
OPERATINGMODE:
PresstheMode
button.
DOTHIS:
Tochooseoperatingmode,presstheMode
button.Eachtimeyoupressthebutton,amode
isselectedinasequencethatgoesfrom Auto,
Cool,DryandFan. Theindicatorlightbeside
willbeilluminatedandremainedononcethe
modeisselected.
NOTE:
Tooperateon Autofeature:
Inthismode,thefanspeedcannotbeadjusted,
itstartsautomaticallyataspeedaccordingto
theroomtemperature.Iftheroomdoesnotget
toowarm,it willstayatLowspeed.
TooperateonFanOnly:
Usethisfunctiononlywhencoolingisnot
desired,suchasforroomaircirculationorto
exhauststaleair(onsomemodels).
(Remembertoopentheventduringthisfunction,
butkeepitclosedduringcoolingformaximum
coolingefficiency.) Youcanchooseanyfan
speedyouprefer.
Duringthis function,thedisplaywillshowthe
actualroomtemperature
,notthesettemper-
atureasinthecoolingmode.
TOUSETHEENERGY
SAVERFEATURE:
Pressthebutton
DOTHIS:
Inthismode,thefanwillcontinuetorunfor
3minutesafterthecompressorshutsoff. The
fanthencyclesonfor2minutesat10minute
intervalsuntilthe roomtemperatureisabove
thesettemperature,atwhichtimethe
compressorturnsbackonandcoolingstars.
NOTE:
SLEEPFEATURE:
PressSleep
button
DOTHIS:
Inthismodetheselectedtemperaturewill
increaseby2degreesF30minutesafterthe
modeisselected. Thetemperaturewillthen
increasebyanother2degreesFafteran
additional30minutes. Thisnewtemperature
willbemaintainedfor7hoursbeforeitreturns
totheoriginallyselectedtemperature. This
endstheSleepmodeandtheunitwillcontinue
tooperateasoriginallyprogrammed. The
Sleepmodeprogramcanbecancelledatany
timeduringoperationbyagainpressingthe
Sleepbutton.
NOTE:
7
Timer
Temp.
S
Exhaust
closed
open
Mode
Energy
Saver
Timer
on
Timer
off
Timer
Temp.
Auto Cool Dry Fan
Timer
Temp.
S
Exhaust
closed
open
Mode
Energy
Saver
Timer
on
Timer
off
Timer
Temp.
Auto Cool Dry Fan
Timer
Temp.
Timer
Temp.
Sleep
Check
Filter
ON/
OFF
Follow
Me
Auto
Med
Low
High
Fan
Clean
Air
TooperateonDrymode:
Inthismode,theairconditionerwillgenerally
operateintheformofadehumidifier.Sincethe
conditionedspaceisaclosedorsealedarea,
somedegreeofcoolingwillcontinue.
TO SELECT THE
OPERATING MODE:
Press the Mode
button.
DO THIS:
To choose operating mode, press the Mode
button. Each time you press the button, a mode
is selected in a sequence that goes from Auto,
Cool, Dry and Fan. The indicator light beside
will be illuminated and remained on once the
mode is selected.
NOTE:
To operate on Auto feature:
In this mode, the fan speed cannot be adjusted,
it starts automatically at a speed according to
the room temperature. If the room does not get
too warm, it will stay at Low speed.
To operate on Fan Only:
Use this function only when cooling is not
desired, such as for room air circulation or to
exhaust stale air(on some models).
(Remember to open the vent during this function,
but keep it closed during cooling for maximum
cooling efficiency.) You can choose any fan
speed you prefer.
During this function, the display will show the
actual room temperature, not the set temper-
ature as in the cooling mode.
TO USE THE ENERGY
SAVER FEATURE:
Press the button
DO THIS:
In this mode, the fan will continue to run for
3 minutes after the compressor shuts off. The
fan then cycles on for 2 minutes at 10 minute
intervals until the room temperature is above
the set temperature, at which time the
compressor turns back on and cooling stars.
NOTE:
SLEEP FEATURE:
Press Sleep
button
DO THIS:
In this mode the selected temperature will
increase by 2 degrees F 30 minutes after the
mode is selected. The temperature will then
increase by another 2 degrees F after an
additional 30 minutes. This new temperature
will be maintained for 7 hours before it returns
to the originally selected temperature. This
ends the Sleep mode and the unit will continue
to operate as originally programmed. The
Sleep mode program can be cancelled at any
time during operation by again pressing the
Sleep button.
NOTE:
8
AIR CONDITIONER FEATURES
MODE
ENERGY
SAVER
SLEEP
DOWN
ON/OFF
Follow me
Auto
Cool
Dry
Fan
S
MODE
ENERGY
SAVER
SLEEP
DOWN
ON/OFF
Follow me
Auto
Cool
Dry
Fan
S
MODE
ENERGY
SAVER
SLEEP
DOWN
ON/OFF
Follow me
Auto
Cool
Dry
Fan
S
To operate on Dry mode:
In this mode, the air conditioner will generally
operate in the form of a dehumidifier. Since
the conditioned space is a closed or sealed
area, some degree of cooling will continue.