Panasonic HLBT62BEPG Operating instructions
- Category
- Kitchen & houseware accessories
- Type
- Operating instructions
This manual is also suitable for

Operating Instructions & Installation Instructions
ELECTRIC BUILT-IN OVEN
FOR DOMESTIC USE ONLY
Model No.
HL-BT62S / HL-BT62B
Please read these instructions carefully before using this product, and save
this manual for future use.


1
EN
English
Contents
Instructions for use ........... 2-49
Important safety instructions ..........2-6
Environmental responsibility ..............7
Get to know your oven ....................8
Accessories ..............................9-11
Using the rack or tray ..............................10
Using the Tray rack..................................10
Using the rotisserie rod............................ 11
Using the oven ........................12-24
Before using the appliance ...................... 12
General Description ................................ 12
Warnings and general advice
for usage..................................................13
Description of the controls
on the front panel................................14-15
Operating modes .....................................16
First use ................................................... 17
Setting the current time ...........................17
Selecting a function .................................18
Modifying the preset temperature ............ 19
Switching the oven off .............................19
Using the Minute timer.......................... 20
Programmed cooking .........................21-23
Secondary menu .....................................24
Cooking with the oven .............25-37
Types of heating mode .......................25-26
Cooking advice and instructions .........27-28
To save energy ........................................29
Cooking Charts ...................................30-33
Recipes...............................................34-37
Cleaning and maintenance .......38-43
Cleaning stainless steel ........................... 38
Cleaning the glass of the lid ....................38
Ordinary daily cleaning ............................38
Cleaning the door glazing ........................ 39
Cleaning the inside of the oven ...............39
Removing guide frames...........................40
Pyrolysis: automatic oven cleaning ....41-43
Special maintenance ................ 44-48
Replacing the light bulb ...........................44
Removing the door ..................................45
Removing the internal glass panels....46-47
What to do if… ........................................ 48
Technical specications .................49
Installation instructions .... 50-53
Electrical connection........................ 50
Fixing the appliance to a cabinet ..... 51
Positioning the oven ...................52-53
Thank you for purchasing a Panasonic Oven.

2
3
EN
This appliance can be used by children
aged from 8 years and above and
persons with reduced physical, sensory or
mental capabilities or lack of experience
and knowledge if they have been given
supervision or instruction by a person
responsible for their safety concerning the
use of the appliance in a safe way and
understand the hazards involved. Children
shall not play with the appliance. Cleaning
and user maintenance shall not be made by
children without supervision.
Excess spillage must be removed before
cleaning using the pyrolytic automatic oven
cleaning function. Whilst using the pyrolytic
automatic oven cleaning function the surfaces
may get hotter than usual and children should
be kept away.
Important safety instructions

2
3
EN
English
Before starting the automatic cleaning cycle
completely remove all accessories from inside
the oven. The roof liner is not considered an
accessory and must therefore be kept inside
the oven. Remove the guide frames, (see
page 40 EN, Removing guide frames).
For correct installation of the racks and
trays supplied with this oven (see page 10
EN, Using the rack or tray).
WARNING Ensure that the appliance is
disconnected from the power supply before
replacing the lamp, to avoid the possibility of
electric shock.
WARNING The appliance and its
accessible parts may become hot during
use. Care should be taken to avoid touching
heating elements inside the oven. Young
children should be kept away. Children less
than 8 years of age shall be kept away unless
continuously supervised.
Important safety instructions

4
5
EN
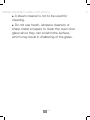
A steam cleaner is not to be used for
cleaning.
Do not use harsh, abrasive cleaners or
sharp metal scrapers to clean the oven door
glass since they can scratch the surface,
which may result in shattering of the glass.
Important safety instructions

4
5
EN
English
This manual constitutes an integral
part of the appliance. It should be kept
intact and at hand for the appliance’s
entire life cycle. It is important to
carefully read this manual and all of the
instructions contained herein before
using the appliance. Installation must
be carried out by competent persons
in accordance with the regulations in
force. This appliance is intended for
household use and complies with the
EEC directives currently in force. The
appliance has been built to carry out
the following functions: cooking food; it
is considered unsuitable for any other
use.
The manufacturer cannot be held liable
for use other than as indicated.
Do not use this appliance for heating
rooms.
Never obstruct the openings and
slits provided for ventilation and heat
dispersal.
Do not rest any weight or sit on the
open door of the appliance.
The identication plate with the
technical data, serial number and
brand name has been visibly afxed
to the appliance. Do not remove this
plate for any reason.
Before the appliance is put into
operation, all the protective lms
applied inside or outside must be
removed.
Take care that no objects are stuck in
the door of the oven.
The appliance becomes very hot during
use. Suitable heat-proof gloves should
be worn for all operations.
Use normal non-abrasive products,
including wooden or plastic utensils if
necessary. Rinse thoroughly and dry
using a soft cloth or chamois leather.
Do not allow residues of sugary foods
(such as jam) to set inside the oven
since they might damage the enamel
lining of the oven. Do not use plastic
kitchenware or containers. The high
temperatures inside the oven could
melt the plastic, and damage the
appliance.
Do not use sealed tins or containers in
the appliance. Overpressure may occur
inside the containers during cooking,
creating a danger of explosion.
Do not leave the appliance unattended
during cooking processes where fats
or oils could be released. Fats and oils
may catch re.
Do not cover the bottom of the oven
with aluminium or tinfoil sheets during
cooking and do not place pans or trays
on it to avoid damage to the enamelled
surface.
If the surfaces are still very hot during
cooking, do not pour water directly
onto the trays. The steam could
cause severe burns and damage to
enamelled surfaces.
All cooking operations must take place
with the door closed.
Important safety instructions

6
7
EN
Refer to the installation instructions
section of this manual (page 50 EN)
for the safety regulations for electric
appliances and ventilation functions. In
your interests and for your safety the
law requires that the installation and
servicing of all electrical appliances
is carried out by qualied personnel
in accordance with the regulations in
force.
Electrical appliances must always
be disconnected by suitably skilled
people. Before connecting the
appliance to the power supply, check
the data on the identication plate
against the data for the power supply
itself. Before carrying out installation/
maintenance work, make sure that
the appliance is not connected to the
power supply.
If the power supply cable is
damaged, contact our Customer
Contact Centre immediately to
arrange for it to be replaced.
It is obligatory for all electrical
equipment to be earthed according
to the methods laid down by safety
regulations.
Immediately after installation, carry
out a brief operational test. Should
the appliance not function, disconnect
it from the electricity supply and call
our Customer Contact Centre. Never
attempt to repair the appliance.
Never put inammable objects in the
oven: if it is switched on by accident,
it may cause a re.
During use the appliance becomes
very hot. Take care not to touch the
heating elements inside the oven.
Do not let children go near the
appliance when it is in operation or
play with it at any time.
Do not insert pointed metal objects
(cutlery or utensils) into any aperture
in the appliance.
Do not use a steam cleaner for
cleaning the appliance. The steam
could reach the electronics, damaging
them and causing short-circuits.
Do not modify this appliance.
Do not spray any spray products near
the electrical appliance while it is in
operation. Do not use spray products
while the product is still hot.
WARNING
The manufacturer cannot be held
liable for damage to persons
or things caused by failure to
observe the above instructions, by
interference with any part of the
appliance or by the use of non-
original spare parts.
Important safety instructions

6
7
EN
English
Information on Disposal
for Users of Waste
Electrical & Electronic
Equipment (private
households)
This symbol on the products and/or
accompanying documents
means that used electrical and
electronic products should not be
mixed with general household waste.
For proper treatment, recovery and
recycling, please take these products
to designated collection points, where
they will be accepted on a free of
charge basis.
Alternatively, in some countries you
may be able to return your products to
your local retailer upon the purchase of
an equivalent new product.
Disposing of this product correctly will
help to save valuable resources and
prevent any potential negative effects
on human health and the environment
which could otherwise arise from
inappropriate waste handling. Please
contact your local authority for further
details of your nearest designated
collection point.
Penalties may be applicable for
incorrect disposal of this waste, in
accordance with national legislation.
For business users in the
European Union
If you wish to discard electrical and
electronic equipment, please contact
your dealer or supplier for further
information.
Information on Disposal in other
Countries outside the European
Union
This symbol is only valid in the
European Union.
If you wish to discard this product,
please contact your local authorities or
dealer and ask for the correct method
of disposal.
WARNING
Do not discard the packaging or any
part of it, or leave it unattended. It
can constitute a suffocation hazard
for children, especially the plastic
bags.
Environmental responsibility

8
9
EN
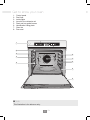
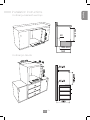
1. Control panel
2. Roof liner
3. Inside lights
4. Insert for the rotisserie rod
5. Rack and tray guide frames
6. Identication rating plate
7. Oven fan
8. Door seal
Get to know your oven
Note
This illustration is for reference only.
1
2
3
5
4
7
5
3
8
6

8
9
EN
English
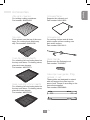
Accessories
Wire rack (2 pieces):
For holding cooking containers.
Part number: 844091603
Tray rack:
To be placed over the top of the oven
trays; for cooking foods which may
drip. Part number: 844091542
Oven tray (20 mm depth):
For collecting fat from foods placed on
the tray rack above. For baking cakes,
pizza and oven desserts.
Part number: 480370571
Deep oven tray (40 mm depth):
For collecting fat from foods placed on
the tray rack above. For baking cakes,
pizza and oven deserts.
Part number: 480370545
Rotisserie frame:
Supports the rotisserie rod.
Part number: 848413650
Rotisserie rod:
For cooking chicken and all foods
which require uniform cooking over
their entire surface.
Part number: 698130112
Plastic handle:
Screws onto the Rotisserie rod.
Part number: 764290017
Telescopic oven guides, tting
optional, (1 set):
These guides are designed to extend
with and support the oven trays for
ease of use. Please t according to the
instructions supplied.
Part number: 698590990

10
11
EN
Notes
1. Order original supplied and
optional accessories by phoning
our Customer Communications
Centre.
2. Use original Panasonic
accessories only.
Accessories
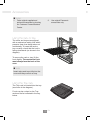
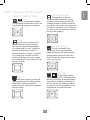
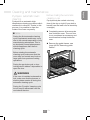
Using the rack or tray
The racks and trays are equipped
with a mechanical safety lock which
prevents them from being taken out
accidentally. To insert the rack or
tray correctly, check that the lock is
facing downwards (as shown in the
diagram).
To remove the rack or tray, lift the
front slightly. The mechanical lock
must always face the back of the
oven.
Note
Insert racks and trays fully into the
oven until they come to a stop.
Using the Tray rack
The Tray rack is inserted into the tray
(as shown in the diagram).
Foods can be cooked on the Tray
rack and the fat collected in the tray
below.

10
11
EN
English
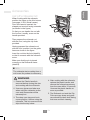
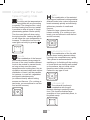
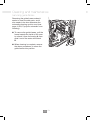
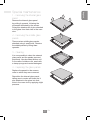
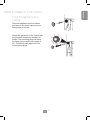
Using the rotisserie rod
When cooking with the rotisserie,
position the frame on the third runner
(see page 12 EN, Guide frames).
Once the frame is inserted, the
shaped part must sit facing outwards
(as shown in the gure).
So that you can handle the rod with
the food on it readily, screw on the
handle provided.
Then prepare the rotisserie rod
with the food, using the clip forks
provided.
Having prepared the rotisserie rod
with the food, position it on the guide
frame as shown in the gure.
Insert the rod into the hole (detail A)
so that it connects with the rotisserie
motor.
Make sure that the pin is placed
correctly on the Rotisserie frame
(detail B).
Note
The rotisserie starts cooking from a
cold oven. No preheat is necessary.
Accessories
WARNING
1. Ensure the Plastic handle is
removed before closing the door
and cooking with the rotisserie.
2. Use oven gloves and take care
when using the rotisserie as the
oven and accessories will be
extremely hot.
3. The deep oven tray must be in
runner position 1 before using the
rotisserie. This is to ensure hot fat
drips into the tray below.
4. After cooking with the rotisserie,
replace the plastic handle, and
remove the rotisserie accessory
from the oven within 15 seconds.
Unscrew the plastic handle as
soon as possible.
5. The Rotisserie rod and the Clip
Forks are very sharp and great
care should be taken both during
their use and their cleaning.

12
13
EN
Before using the appliance
Using the oven
WARNING
1. Remove any labels (apart from the
technical data plate) from trays,
dripping pans and the cooking
compartment.
2. Remove any protective lm from the
outside or inside of the appliance,
including from accessories such as
trays.
3. Before using the appliance for the
rst time, remove all accessories
from the oven compartment and
wash them as indicated in “Cleaning
and maintenance page 38 EN”.
4. Heat the empty appliance to the
maximum temperature (TURBO
280°C for 15 - 20 mins.) in order to
remove any manufacturing residues
which could affect the food with
unpleasant odours.
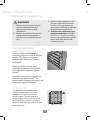
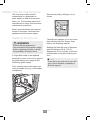
General Description
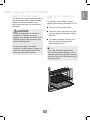
Guide frames (Oven runners)
The oven features 5 runners for
positioning trays and racks at different
heights. The insertion heights are
indicated from the bottom upwards
(see gure).
Remove the guide frames when
cleaning and replacing the light bulb
(see page 40 EN, Removing guide
frames).
Telescopic oven guides, supplied can
be tted to the guide frames. The
guides should be tted according to the
instructions supplied with them.
Cooling system
The appliance is equipped with a
cooling system which comes into
operation as soon as a cooking
function starts. The fan causes a
steady outow of air from above the
door which may continue for a brief
period of time even after the oven has
been turned off.

12
13
EN
English
Using the oven
Oven inside lights
The oven lights come on when the door is opened or any function or recipe is
selected, except for Rising
, and
.
When set to ON, the oven lights can be switched on/off by pressing
.
WARNING
All cooking operations must be
carried out with the door closed.
Notes
1. During cooking, do not cover
the bottom of the oven with
aluminium or tin foil and do
not place pans or oven trays
on it as this may damage the
enamel coating. If you wish to
use greaseproof paper, place it
so that it will not interfere with
the hot air circulation inside the
oven.
2. For the best cooking results, we
recommend placing cookware
in the centre of the rack.
3. To prevent any steam in the
oven from causing problems,
open the door in two stages:
half open (5 cm approx.) for 4-5
seconds and then fully open. If
you need to access the food,
always leave the door open for
as short a time as possible to
prevent the temperature in the
oven from falling and ruining the
food.
4. To prevent excessive amounts
of condensation from forming
on the internal glass, hot food
should not be left inside the
oven for too long after cooking.
Warnings and general
advice for usage

14
15
EN
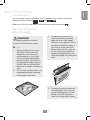
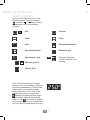
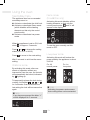
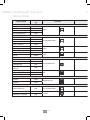
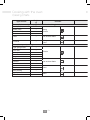
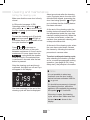
On-off key
Function selection
Temperature setting
Duration timer
Delay Start
Decrease
Increase
Minute timer
Clock set
Using the oven
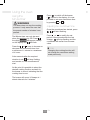
Description of the controls on the front panel
All the appliance’s control and monitoring devices are placed together on the front
panel.
Traditional
functions display
It indicates the current time, the remaining
cooking time or completion time.
Indicates the cooking temperature set or preset for the function selected.
ON/OFF Key
Central display

14
15
EN
English
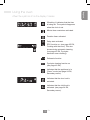
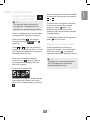
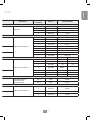
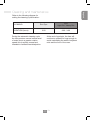
Using the oven
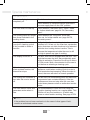
When the symbol is lit on the display it means:
If ashing, it indicates that the time
is being set. The symbol disappears
when the clock is set.
Minute timer countdown activated.
Duration timer activated.
Delay start activated.
ECO function on, (see page 25 EN,
Cooking with the oven). This also
shows during automatic cleaning
,
(
see page 42 EN, Pyrolysis:
automatic oven cleaning).
Rotisserie function.
Pyrolysis cleaning function on
(see page 42 EN).
Indicates that the appliance is in
“Demo” mode (see page 24 EN,
Secondary menu).
Indicates that the door lock is
activated.
Indicates that the child lock is
activated. (see page 24 EN,
Secondary menu).

16
17
EN
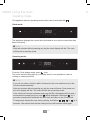
Using the oven
Operating modes
This appliance has two operating modes which can be activated with .
Clock mode:
The appliance displays the current time (activated as soon as the current time has
been conrmed).
Notes
After two minutes without pressing any key the clock display will dim. The oven
will then be in stand-by mode.
Operating mode:
From the Clock display mode, press
once.
The touch-sensitive keys light up to indicate that it is now possible to select a
cooking or cleaning function.
Notes
If you do not select a function within 20 seconds, the oven switches over to the
Clock mode automatically.
After two minutes without pressing any key the oven will enter Clock mode and
the clock display will dim. The oven will then be in stand-by mode.
If the child lock has been activated (see page 24 EN), the display will lock after 1
minute without pressing any key, and
will be displayed. Hold down for 3
seconds to temporarily deactivate the child lock and return to the Clock mode.
To temporarily release the lock during cooking, hold either
, , or
for 3
seconds. One minute after the last setting the lock will become active again.

16
17
EN
English
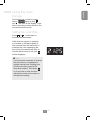
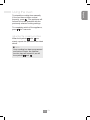
Using the oven
First use
On the rst use, or after a power
failure,
lights up and,
and
will ash in the display. To be
able to start any cooking function, the
current time must be set.
Setting the current time
Press or to decrease or
increase the time shown.
Hold down the symbol in question
to increase or decrease rapidly. A
few seconds after the last button is
pressed, the colon separating the
hours from the minutes will ash to
indicate that the time is set, and
will be displayed.
Note
It may become necessary to change
the current time, for example for
daylight saving time. Starting from
Clock mode (see “page 16 EN,
Operating modes”), hold down
for 3 seconds to enter the time
adjustment mode and increase or
decrease the setting.

18
19
EN
Using the oven
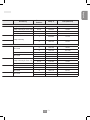
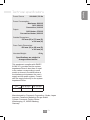
Eco
Static
Grill
Fan-assisted static
Fan-assisted grill
Defrosting (30°C)
Rising (40°C)
Circular
Turbo
Fan-assisted bottom
Rotisserie grill
Pyrolysis: See page
41 EN, automatic oven
cleaning.
Selecting a function
You can only select a function in the
Operating mode. Press the symbol
, using the or keys to select,
in sequence, one of the following
functions:
Once the desired function has been
selected, the oven will begin cooking at
the pre-set temperature. Cooking itself
is preceded by a preheating stage,
which allows the oven to heat to the
cooking temperature more quickly.
ashes to indicate that this stage
is in progress. When the preheating
stage is over,
will remain lit steadily
and a buzzer will sound to indicate that
the food can be placed inside the oven.
Page is loading ...
Page is loading ...
Page is loading ...
Page is loading ...
Page is loading ...
Page is loading ...
Page is loading ...
Page is loading ...
Page is loading ...
Page is loading ...
Page is loading ...
Page is loading ...
Page is loading ...
Page is loading ...
Page is loading ...
Page is loading ...
Page is loading ...
Page is loading ...
Page is loading ...
Page is loading ...
Page is loading ...
Page is loading ...
Page is loading ...
Page is loading ...
Page is loading ...
Page is loading ...
Page is loading ...
Page is loading ...
Page is loading ...
Page is loading ...
Page is loading ...
Page is loading ...
Page is loading ...
Page is loading ...
Page is loading ...
Page is loading ...
-
 1
1
-
 2
2
-
 3
3
-
 4
4
-
 5
5
-
 6
6
-
 7
7
-
 8
8
-
 9
9
-
 10
10
-
 11
11
-
 12
12
-
 13
13
-
 14
14
-
 15
15
-
 16
16
-
 17
17
-
 18
18
-
 19
19
-
 20
20
-
 21
21
-
 22
22
-
 23
23
-
 24
24
-
 25
25
-
 26
26
-
 27
27
-
 28
28
-
 29
29
-
 30
30
-
 31
31
-
 32
32
-
 33
33
-
 34
34
-
 35
35
-
 36
36
-
 37
37
-
 38
38
-
 39
39
-
 40
40
-
 41
41
-
 42
42
-
 43
43
-
 44
44
-
 45
45
-
 46
46
-
 47
47
-
 48
48
-
 49
49
-
 50
50
-
 51
51
-
 52
52
-
 53
53
-
 54
54
-
 55
55
-
 56
56


Panasonic HLBT62BEPG Operating instructions
- Category
- Kitchen & houseware accessories
- Type
- Operating instructions
- This manual is also suitable for
Ask a question and I''ll find the answer in the document
Finding information in a document is now easier with AI