Electrolux EFLW427UIW1 Owner's manual
- Category
- Washing machines
- Type
- Owner's manual

EN FRONT LOAD WASHER
FR LAVEUSE Á CHARGEMENT FRONTAL
ES LAVADORA DE CARGA FRONTAL
USE & CARE GUIDE
GUIDE D’UTILISATION ET D’ENTRETIEN
GUÍA DE USO Y CUIDADO
A11200102 April 2018

2
Finding Information
©2018 Electrolux Major Appliances All rights reserved.
NOTE
Registering your product with Electrolux
enhances our ability to serve you. You
can register online at www.electrolux-
appliances.com, by sending your
Product Registration Card in the mail,
or PHOTOREGISTER
SM
using a smart
phone.
See registration card for details.
Please read and save
this guide
Thank you for choosing Electrolux, our
premium brand in home appliances. This
Use & Care Guide
is part of our commit-
ment to customer satisfaction and product
quality throughout the service life of your
new appliance.
Table of contents
Electrolux serial number
Electrolux model number
Finding Information ............................... 2
Safety ................................................... 3
Features ...............................................6
Operating Instructions ..........................8
Controls and Settings .........................13
Stain Removal Guide ..........................22
Care & Cleaning ..................................24
Solutions to Common Inquiries ........... 29
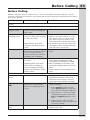
Before Calling .....................................33
Warranty Information ..........................36
NOTE
The instructions appearing in this
Use &
Care Guide
are not meant to cover every
possible condition and situation that may
occur. Common sense and caution must
be practiced when installing, operating
and maintaining any appliance.
READ ALL INSTRUCTIONS BEFORE OPERATING THIS WASHER.
SAVE THESE INSTRUCTIONS FOR FUTURE REFERENCE.
Electrolux model series*
* The series number can be found
within the Model number (example
EFLS627UTT= 600 series).
For toll free telephone support or online
support in the US and Canada contact:
U.S.
1-877-4ELECTROLUX (1-877-435-3287)
www.electroluxappliances.com
Canada
1-800-265-8352
www.electroluxappliances.ca
Purchase date
Keep a record for quick
reference
Questions?

3
WARNING
WARNING indicates a potentially haz-
ardous situation which, if not avoided,
could result in death or serious injury.
DANGER
DANGER indicates an imminently haz-
ardous situation which, if not avoided,
will result in death or serious injury.
Important Safety Instructions
Safety
WARNING - RISK OF FIRE
To reduce the risk of fire, electrical shock, or injury to persons when using this washer,
comply with the warnings listed below. Failure to comply with these Important Safety
Instructions and warnings could result in property damage, serious personal injury, or
death.
IMPORTANT
Indicates installation, operation, or main-
tenance information which is important
but not hazard-related.
CAUTION
CAUTION indicates a potentially hazard-
ous situation which, if not avoided, may
result in minor or moderate injury.
Prevent Fire
• DO NOT wash items that have been
previously cleaned in, soaked in, or
spotted with gasoline, cleaning solvents,
kerosene, cooking oils, waxes, or other
flammable or explosive substances.
DO NOT store these items on or near
the washer. These substances give off
vapors or chemical reactions that could
ignite or explode.
• DO NOT put oily or greasy rags or
clothing on top of the washer. These
substances give off vapors that could
ignite the materials.
• DO NOT add gasoline, cleaning sol-
vents, or other flammable or explosive
substances to the wash water. These
substances give off vapors that could
ignite or explode.
• Under certain conditions, hydrogen gas
may be produced in a hot water system
that has not been used for 2 weeks or
more. HYDROGEN GAS IS EXPLOSIVE.
If the hot water system has not been
used for such a period, before using the
washer, turn on all hot water faucets and
let the water flow from each for several
minutes. This will release any accumu-
lated hydrogen gas. Hydrogen gas is
flammable; DO NOT smoke or use an
open flame during this time.
• DO NOT store or use gasoline or other
flammable vapors or liquids in the vicinity
of this or any other appliance.
• Failure to comply with these warnings
could result in fire, explosion, serious
bodily injury and/or damage to the rub-
ber or plastic parts of the washer.
Safety Precautions
DO NOT attempt to install or operate
your unit until you have read the safety
precautions in this manual. Safety items
throughout this manual are labeled with a
Danger, Warning, or Caution based on the
risk type.
Definitions
This is the safety alert symbol. It is
used to alert you to potential personal
injury hazards. Obey all safety messages
that follow this symbol to avoid possible
injury or death.

4
Safety
• DO NOT continue to use the washer if
you hear squeaking, grinding, rubbing or
other unusual noises. This could be
a sign of mechanical breakdown and
lead to fire or serious injury. Contact a
qualified technician immediately.
Protect Children
• DO NOT allow children to play on or in
the washer. Close supervision of children
is necessary when the washer is used
near children. As children grow, teach
them the proper, safe use of all appli-
ances.
• Destroy the carton, plastic bag and
other packing materials after the washer
is unpacked. Children might use them
for play. Cartons covered with rugs, bed-
spreads or plastic sheets can become
airtight compartments.
• Keep laundry products out of children’s
reach. To prevent personal injury, ob-
serve all warnings on product labels.
• Before the washer is removed from
service or discarded, remove the washer
door to prevent accidental entrapment.
• Failure to comply with these warnings
could result in serious personal injuries.
Prevent Injury
• To prevent shock hazard and assure sta-
bility during operation, the washer must
be installed and electrically grounded by
a qualified service person in accordance
with local codes. Installation instructions
are packed in the washer for installer’s
reference. Refer to
Installation Instruc-
tions
for detailed grounding procedures.
If the washer is moved to a new loca-
tion, have it checked and reinstalled by
a qualified service person.
• To prevent personal injury or damage
to the washer, the electrical power
cord of the washer must be plugged
into a properly grounded and polarized
3-prong outlet. The third grounding
prong must never be removed. Never
ground the washer to a gas pipe. DO
NOT use an extension cord or an adap-
tor plug.
Grounding type wall receptacle
Power cord with
3-prong grounded plug
Do not, under
any circumstances,
cut, remove,
or bypass the
grounding prong.
WARNING
FIRE/ELECTRICAL SHOCK HAZARD
Avoid fire hazard or electrical shock. DO
NOT use an adaptor plug or extension
cord or remove grounding prong from
electrical power cord. Failure to follow
this warning can cause serious injury, fire
or death.
WARNING
HARMFUL VAPOR HAZARD
DO NOT use or mix liquid chlorine
bleach with other household chemicals
such as toilet cleaners, rust removers,
acid or products containing ammonia.
These mixtures can produce dangerous
fumes which can cause serious injury or
death.
• Follow package directions when using
laundry products. Incorrect usage can
produce poisonous gas - resulting in
serious injury or death.
• DO NOT combine laundry products
for use in 1 load unless specified on
the label.
• DO NOT mix chlorine bleach with
ammonia or acids such as vinegar.
WARNING
Improper grounding of the washer may
cause serious injury or death. Check with a
licensed electrician if you are in doubt as to
whether the appliance is properly grounded.

5
Safety
Prevent Injury And Damage To
The Washer
To prevent serious personal injury and
damage to the washer:
• All repairs and servicing must be
performed by an authorized service
technician unless specifically recom-
mended in this
Use & Care Guide
. Use
only authorized factory parts.
• DO NOT tamper with controls.
• DO NOT install or store the washer
where it will be exposed to the weather.
• DO NOT install on carpet. Install washer
on a solid floor. It may be necessary to
reinforce the floor to prevent vibration or
movement.
• To reduce the risk of electric shock,
disconnect this appliance from the
power supply before attempting any
user maintenance. Turning the controls
to the OFF position does not disconnect
this appliance from the power supply.
• To prevent injury, DO NOT reach into
the washer while parts are moving.
• This washer is equipped with an electri-
cal overload protector. The motor will
stop if it becomes overheated.
• Failure to comply with these warnings
could result in serious personal injuries.
WARNING
RISK OF INJURY
DO NOT WASH: Water resistant and
water repellent clothing or other materi-
als. Failure to follow these instructions
may result in an abnormal vibrating and
out-of-balance condition that could re-
sult in physical injury, property damage,
and/or appliance damage.

6
Features
Control
Lock
Drum Light
(select models only)
Door Latch with
Safety Lock
Cycle
Selector
Laundry Products
Dispenser
Reversible Door
(400/500/600 se
ries
models only)
Door
S
triker
Cascading
Wash Vanes
LED
Display
Stainless Steel
Wash Drum
Flexible door
gasket
Adjustable
Leveling Legs
Wide-Angle
Door Hinge
Door Stand
Ventilation
Inner glass with
small article
redistribution ramp
Serial # and
Model #
Full descriptions of all available settings and options can be found in the following
sections:
drum light
door reversibility
3 compartment
dispenser
Adaptive
Dispenser™
detergent pack
option
sanitize
stain treatment
perfect steam
wrinkle release
fast wash
300 Series
no no yes no no no no no no no
400 Series
no yes no yes no no yes no yes 20
min
500 Series
yes yes no yes yes yes yes yes yes 18
min
600 Series
yes yes no yes yes yes yes yes yes 15
min
Refer to the table below for an overview of features available for each model series.
Operating your washer ......................8
Adding Laundry Products ................10
Settings Chart - 300 Series Washer . 13
Settings Chart - 400 Series Washer . 14
Settings Chart - 500 Series Washer . 15
Settings Chart - 600 Series Washer . 16
Cycle Selection ................................ 17
Cycle Settings .................................18
Cycle Options .................................. 19
Not all cycles, options, or features listed are available on every model.

7
Features
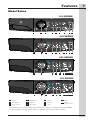
This manual covers many models and not all cycles, options, or features listed are available
on every model. Consoles shown above for reference only. Your model may differ.
400 SERIES
2 71 63 954 10
8
300 SERIES
600 SERIES
2 71 63 954
10
8
11
500 SERIES
2 71 6 954
10
8
11
2 71 63 854 9
1
power
2
LED display
3
cycle selector
4
temperature
5
soil level
6
spin speed
7
options
8
set/select
9
cancel
10
start
11
PODS
®
(select models)
Model Series
PODS
®
is a registered trademark of Procter & Gamble Company, Cincinnati OH, used under license by Electrolux.

8
Operating Instructions
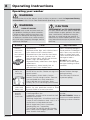
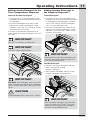
STEPS TIPS IMPORTANT
1. Sort
laundry
into loads
that can
be washed
together.
• Sort by recommended cycle and water
temperature.
• Separate white, light, and colorfast items
from dark and non-colorfast items.
• Separate items that shed lint from items
that attract lint. Casual, synthetic, knit,
and corduroy items will pick up lint from
towels, rugs, and bedspreads.
• Separate heavily soiled items from lightly
soiled items.
• Separate lacy, sheer, loosely knit, or
delicate items from durable items.
DO NOT machine wash
items containing fiberglass.
Small particles of fiberglass
left in drum may transfer to
fabrics in other loads and
cause skin irritation and/or
damage to fabrics.
DO NOT wash water
resistant and water repel-
lent type clothing or other
materials
2. Prepare
items for
washing.
• Empty pockets.
• Brush off lint and dirt. Shake out rugs and
beach towels.
• Close zippers, fasten hooks, button
buttons, and tie strings/sashes. Remove
non-washable trims and ornaments.
• Place delicate and small items (bras,
hosiery, etc.) in a mesh bag (not included).
Mend rips and tears to
prevent further damage
during washing.
Turn knit items inside out
to prevent pilling.
3. Pretreat
stains and
heavy soil.
See stain treatment function in
Cycle
Options
for your particular model or
Stain
Removal Guide
for more information.
4. Add
laundry
load to
wash tub.
• Combine large and small items in a load.
Load large items first.
• Large items should not be more than half
the total wash load.
• Washing single items is inefficient and may
cause an out-of-balance load. Add 1 or 2
similar items to help balance load.
• Wash single heavy items (comforter,
sleeping bag, etc.) separately.
• The washer can be fully loaded, but the
items should not be tightly packed. The
door should close easily.
DO NOT overload the
washer.
DO NOT WASH: Water re-
sistant and water repellent
clothing or other materials.
WARNING
To reduce the risk of fire, electric shock or injury to persons, read the Important Safety
Instructions in this
Use & Care Guide
before operating your washer.
Operating your washer
WARNING
RISK OF INJURY
DO NOT wash water resistant and wa-
ter repellent clothing or other materials.
Failure to follow these instructions may
result in an abnormal vibrating and out-
of-balance condition that could result in
physical injury, property damage, and/or
appliance damage.
CAUTION
ENTRAPMENT and TIP-OVER HAZARD
DO NOT leave the door open if there are
small children or pets present. An open
door could entice children to hang on
the door or crawl inside the washer. If
there are no small children present, you
may leave the door ajar to prevent odor
build up.

9
Operating Instructions
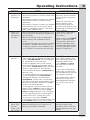
STEPS TIPS IMPORTANT
5. Add wash
products to
dispenser.
• Water conditioners, detergent boosters
and enzyme products may be added with
detergent.
• See
Adding Laundry Products
for detailed
information on the use of the product
dispensers.
• See
Adding Laundry Products
for detailed
information on the use of various wash
products (detergent, bleach, stain treat-
ment, fabric softener, etc).
Follow manufacturer’s in-
structions and recommen-
dations when using wash
products.
Open and close the dis-
penser drawer slowly.
Closing the drawer too
quickly could result in early
dispensing of the bleach or
fabric softener.
6. Select the
cycle and
settings for
the load.
• See
Cycle Selection, Cycle Settings, and
Cycle Options
for detailed descriptions of
cycle controls.
• See
Cycle Setting Charts
to determine
which settings are available for each
cycle.
• To provide the best care, not every setting
or option is available with every cycle. If
a setting or option is not available for the
cycle selected, the indicator will not light.
Follow fabric care label in-
structions on items to
be washed.
Make sure that the PODS
®
option is selected when
using models that have a
separate detergent pack
compartment. See Adding
Laundry Detergent to the
Adaptive Dispenser™
7. Start the
washer.
• Close the door and press start/pause.
The washer will not operate with the door
open. “CLOSE DOOR” will be displayed
as a reminder to close the door.
• To add a forgotten item to the washer
any time during the wash portion of the
cycle, press start/pause. When the door
unlocks, open the door, add the item,
close the door and press start/pause to
resume cycle.
• To change settings or options after the
cycle has begun, press start/pause,
change the settings, and then press
start/pause. If the cycle is not paused
first, the unit will emit several beeps when
the buttons are pressed but no changes
to the cycle will be applied.
• To change the cycle once the cycle has
begun, press cancel to cancel the cycle,
select the new cycle, and press start/
pause to begin the new cycle. Changing
a cycle selection without cancelling the
current WILL NOT change the cycle.
• To cancel a cycle, press cancel.
• A signal will sound at the end of the cycle
if the chime option is not set to mute.
DO NOT force door open.
As a safety measure, the
door will automatically lock
during the entire wash
cycle. Pause or cancel
the wash load to unlock
the door.
If the cycle is interrupted
during spin, the door lock
will not release until the tub
has stopped spinning.
If the water level is above
the bottom of the door
opening/flexible door gas-
ket, the lock will not re-
lease.
8. Remove
items from
washer
when cycle
has ended.
• Remove items when the cycle ends and
place in dryer, line dry or dry flat as di-
rected on the fabric care label.
Excess wrinkling, color
transfer or odors may
develop in items left in the
washer after the cycle has
ended.
PODS
®
is a registered trademark of Procter & Gamble Company, Cincinnati OH, used under license by Electrolux.

10
Operating Instructions
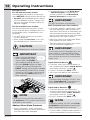
Use a low-sudsing, high efficiency
detergent to prevent oversudsing
in front load washers. Look for this
symbol on the detergent label:
For best results
Detergent, stain treatment (on select
models), liquid chlorine bleach and liquid
fabric softener will be dispensed at the
proper times in the cycle.
Use the cap or scoop provided by the
detergent manufacturer to measure
the amount recommended. Detergent
dosage may need to be adjusted for
water temperature, water hardness,
load size and soil level.
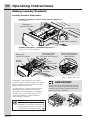
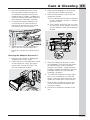
Adding Laundry Products
Product dispenser - Adaptive Dispenser™
(400, 500, and 600 Series)
Product dispenser - three compartment dispenser
(300 Series)
FPO
Liquid
Bleach
Stain
Soak/Treat
Detergent Pack
Compartment*
(500 and 600 Series)
Liquid Fabric
Softener
Detergent -
Liquid or Powder
Without Detergent
Pack Compartment
(400 Series)
IMPORTANT
Open and close the dispenser drawer
slowly. Closing the drawer too quickly
could result in early dispensing of the
bleach or fabric softener.
Laundry Product Dispensers
*Max. 2 packs per load
Detergent -
Liquid or Powder
Liquid Bleach
Liquid Fabric Softener

11
Operating Instructions
Adding Laundry Detergent to the
Three Compartment Dispenser
Liquid or Powder Detergent
• Use the cap or scoop provided by the
detergent to add recommended amount
of detergent.
• Amount of detergent may need to be
adjusted for water temperature, water
hardness, load size, and soil level. Follow
manufacturers instruction.
IMPORTANT
DO NOT mix liquids and powders.
In a three compartment dispenser use
either liquid or powder detergent. DO NOT
mix both.
IMPORTANT
DO NOT exceed MAX fill line.
IMPORTANT
DO NOT add detergent packs into the
three compartment dispenser. Detergent
packs should be added directly into the
drum.
Adding Laundry Detergent to
the Adaptive Dispenser™
Liquid Detergent
• Use the cap or scoop provided by the
detergent to add recommended amount
of detergent to the detergent compart-
ment. Pour directly into the detergent
cup, not over the blue cover.
• Amount of detergent may need to be
adjusted for water temperature, water
hardness, and load size. Follow manu-
facturers instructions.
IMPORTANT
Pour liquid into the liquid detergent cup.
DO NOT pour over the blue cover. DO
NOT exceed MAX fill line.
Powder Detergent
• Remove the liquid detergent cup and
blue cover before adding
powder detergent.
• Add powder detergent directly to the
powder detergent compartment.
IMPORTANT
Save the liquid detergent cup and blue
cover for future use. DO NOT discard it
while you are using powder detergent.
DO NOT exceed MAX fill line.
CAUTION
Keep detergent packs away from children.

12
Operating Instructions
NOTE
From time to time you may see water in
the dispenser. This is part of the normal
operation of the washer.
Adding Other Wash Products
• Color-safe bleach, water conditioner,
detergent booster and enzyme products
may be added with detergent.
IMPORTANT
DO NOT mix liquids and powders.
• Put liquid products in the Main Wash
- liquid detergent compartment or
powder products in the Main Wash -
powder detergent compartment.
IMPORTANT
Use of multi-product (detergent plus soft-
ener) sheets or color-absorbing sheets
NOT recommended. They could disable
your machine and result in unwarranted
repair costs.
Stain Treatment (on select models)
• For heavily soiled or stained loads, select
the Stain option (on select models only -
StainTreat, StainTreatII, or StainSoak) and
add the recommended amount of deter-
gent or stain treatment to stain soak/treat
compartment (on select models).
• See
Cycle Options
for information about
Stain options for your model.
• See
Stain Removal Guide
in this instruc-
tion for additional suggestions.
IMPORTANT
To prevent fabric damage, DO NOT over-
fill the “Liquid Bleach” compartment or
pour bleach directly onto the load.
Detergent Pack
For 300 and 400 series models
Add detergent pack directly to the empty
drum BEFORE placing laundry into the unit.
• DO NOT
place detergent packs directly
into the detergent drawer. The gel coat-
ing may cause the detergent drawer to
become clogged.
CAUTION
Keep detergent packs away from children.
Liquid Chlorine Bleach
• If desired, add liquid chlorine bleach to
the compartment labeled Liquid Bleach
and marked with this symbol: .
• DO NOT fill above the MAX fill line.
• Add color-safe bleach with detergent.
Liquid Fabric Softener
• If desired, pour the recommended
amount of liquid fabric softener into the
compartment labeled
Fabric Softener
and marked with this symbol: .
• DO NOT fill above the MAX fill line.
NOTE
To prevent staining, DO NOT overfill Fab-
ric Softener compartment or pour liquid
fabric softener directly on wash load.
IMPORTANT
• When using the detergent
pack compartment, make
sure to select the PODS
®
option before starting the load.
• Once the PODS
®
option has been
chosen, the washer will retain the
PODS
®
setting until manually changed.
• The washer will ALWAYS use a small
amount of HOT water to dissolve the
pack when the PODS
®
option has
been selected.
PODS
®
is a registered trademark of Procter & Gamble Company, Cincinnati OH, used under license by Electrolux.
For 500 and 600 series models
Add the recommended quantity of (one
or two) high efficiency detergent packs to
the detergent pack compartment in the
dispenser.
• DO NOT place more than two packs
into the dispenser.
• When using the fast wash cycle, only
one detergent pack should be used.
• Use of a fabric softener-dispensing ball is
not recommended in front load washers.

13
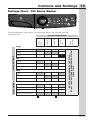
These temperature, spin speeds, soil levels and options are available with the
following cycles:
heavy
duty
normal
delicates
rinse &
spin
clean
washer
temp
hot
NO OPTIONS AVAILABLE WITH THIS CYCLE.
DO NOT LOAD ANY ITEMS IN DRUM DURING SYSTEM
CLEAN CYCLE.
warm
cold
soil
heavy
normal
light
spin
high
medium
no spin
options
extra rinse
delay start
lock
press & hold chime
= Available selections. = Factory presets. = Non-modifiable presets.
Settings Chart - 300 Series Washer
Controls and Settings
CYCLE SELECTIONS
CYCLE SETTINGS
CYCLE OPTIONS

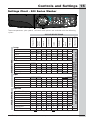
14
These temperature, spin speeds, soil levels and options are available with the
following cycles:
heavy duty
whitest
whites
normal
delicates
20
min
fast
wash
rinse & spin
clean washer
temp
hot
NO OPTIONS AVAILABLE WITH THIS CYCLE.
DO NOT LOAD ANY ITEMS IN DRUM DURING SYSTEM CLEAN CYCLE.
warm
cold
tap cold
soil
heavy
normal
light
extra light
spin
high
medium
low
no spin
options
StainTreat
extra rinse
wrinkle release
delay time
press & hold chime
control lock
= Available selections. = Factory presets. = Non-modifiable presets.
Settings Chart - 400 Series Washer
Controls and Settings
CYCLE SELECTIONS
CYCLE SETTINGS
CYCLE OPTIONS

15
These temperature, spin speeds, soil levels and options are available with the following
cycles:
heavy duty
whitest
whites
normal
activewear
colors
delicates
18
min
fast
wash
rinse & spin
clean washer
temp
sanitize
NO OPTIONS AVAILABLE WITH THIS CYCLE.
DO NOT LOAD ANY ITEMS IN DRUM DURING SYSTEM CLEAN CYCLE.
hot
warm
cold
tap cold
soil
max
heavy
normal
light
extra light
spin
max
high
medium
low
no spin
options
StainTreatII
perfect steam™
extra rinse
wrinkle release
extended refresh
delay time
press & hold chime
control lock
PODS
®
= Available selections. = Factory presets. = Non-modifiable presets.
Controls and Settings
Settings Chart - 500 Series Washer
CYCLE SELECTIONS
CYCLE SETTINGS
CYCLE OPTIONS
PODS
®
is a registered trademark of Procter & Gamble Company, Cincinnati OH, used under license by Electrolux.

16
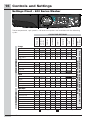
Settings Chart - 600 Series Washer
Controls and Settings
These temperature, spin speeds, soil levels and options are available with the following
cycles:
heavy duty
whitest
whites
normal
activewear
colors
delicates
15
min
fast
wash
rinse & spin
clean
washer
temp
sanitize
NO OPTIONS AVAILABLE WITH THIS CYCLE.
DO NOT LOAD ANY ITEMS IN DRUM DURING SYSTEM CLEAN CYCLE.
hot
warm
cold
tap cold
soil
solid soil
max
heavy
normal
light
spin
max
high
medium
low
no spin
options
StainSoak
perfect steam™
extra rinse
wrinkle release
extended refresh
delay time
press & hold chime
control lock
PODS
®
= Available selections. = Factory presets. = Non-modifiable presets.
CYCLE SELECTIONS
CYCLE SETTINGS
CYCLE OPTIONS
PODS
®
is a registered trademark of Procter & Gamble Company, Cincinnati OH, used under license by Electrolux.

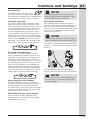
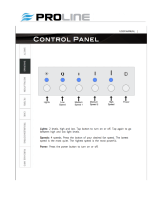
17
Controls and Settings
Cycle Selection
Press the power button to turn on the
unit. Then, turn the cycle selector in either
direction or press the cycles button (de-
pendent on model) to scroll to the desired
cycle. The indicator light for that cycle will
be illuminated.
The estimated cycle time will appear
on the LED display and indicator lights
adjacent to the default settings (water
temperature, final spin speed, and soil
level) will illuminate for the cycle selected.
See
Washer Settings Chart
for default
settings for each cycle.
Cycle settings and cycle options can
be changed using the temp, spin and
soil buttons. See
Cycle Settings
and
Cycle Options
for detailed directions and
descriptions of available settings.
To change the cycle once the cycle has
begun, press cancel, select a new cycle,
and press start again.
NOTE
Turning the cycle selector knob without
canceling the cycle first, will not change
the cycle.
NOTE
For spin only cycle deselect extra rinse.
For drain only cycle select no spin.
See
Cycle Options
for rinse options and
Cycle Settings
for spin settings.
20
min
fast wash (400 Series model)
Quickly wash a small, lightly soiled load
in 20 minutes.
18
min
fast wash (500 Series model)
Quickly wash a small, lightly soiled load
in 18 minutes.
15
min
fast wash (600 Series model)
Quickly wash a small, lightly soiled load
in 15 minutes.
heavy duty
Use this cycle for heavily soiled, durable
garments - ex. towels, sports gear, or
fabric tote bags. For best soil and stain
removal, use the hottest water safe for the
fabrics being washed.
whitest whites (on select models)
Use this cycle for white fabrics and lightly
colored clothing. Refer to fabric care label
for use of liquid chlorine bleach.
normal
Use this load for light to normally soiled
cottons, linens, towels, shirts, jeans and
mixed loads.
activewear (on select models)
Use this cycle for lightweight, synthetic
athletic apparel.
colors (on select models)
Use this cycle for lightly soiled, dark,
or highly dyed fabrics which may be
susceptible to dye loss.
delicates
Use this cycle for lightly soiled knits and
delicates which require gentle washing.
rinse & spin
Select rinse & spin for loads that need a
cold water rinse or to add fabric softener
that may have been omitted in a regu-
lar cycle. Add the fabric softener to the
dispenser compartment. Select the spin
speed appropriate for the load.
For best results
Follow the fabric care
label instructions
on items to be
washed.
To stop the cycle, press cancel.
The appropriate washing temperature
will automatically be indicated for the
cycle selected. To change the preset
temperature, press the temp button to
scroll to the desired setting. Select a wash
water temperature according to fiber
content, colorfastness and soil level.
Cycle Settings
Washing Temperature
Follow the fabric care label in-
structions on items to be washed.
For best results
NOTE
Using PODS
®
setting may increase fast
wash time by several minutes.
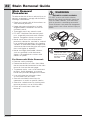
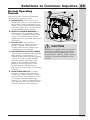
clean washer
To clean and freshen the washer,
perform the clean washer cycle. If you
wish to begin the cycle, empty the
drum, add bleach and press start/pause.
This maintenance cycle removes residue
that may cause odor. See
Inside Routine
Cleaning (Preventive)
for detailed
instructions.

18
Controls and Settings
To protect your fabrics, not all temperatures
are available with every cycle. If a tem-
perature is not appropriate for the cycle,
it cannot be selected and will not be lit by
pressing the temp button.
The temperature selected for the cycle
will be remembered and recalled each
time that cycle is selected in the future.
All wash water temperatures are auto-
matically regulated to maximize deter-
gent effectiveness and improve washing
performance. The water heater setting and
its distance from the washer, water usage in
other parts of the home, and seasonally low
ground water temperature in some geo-
graphic areas can affect water temperature.
sanitize (on select models)
Use the sanitize setting to clean and
sanitize heavily soiled, colorfast fabrics
including towels, bedding, cloth diapers,
and children’s clothing.
It is recommended that you set your water
heater to 120° F (49° C) or higher to en-
sure proper performance during this cycle.
If the setting is lower or the load is extra
large, the cycle time may be extended.
When used with the heavy duty and
whitest whites cycles, the sanitize setting
will kill 99.9% of bacteria with no carryover
of bacteria between loads. No bleach or
harsh chemicals are needed, but higher
temperatures are required. Please check
fabric care labels to prevent damage.
NOTE
The heavy duty and whitest whites with
sanitize setting cycles have been de-
signed to meet the requirements of NSF
P172 protocol for sanitization efficacy.
The wash water is heated by an internal
boost heater to a maximum of 152° F (67° C)
as the load tumbles. Cold water is added to
cool down the load prior to drain and spin.
As a precaution, the washer door remains
locked when the water temperature
reaches 130° F (55° C)
hot
Use this setting for heavily soiled white or
colorfast cottons and blends.
warm
Use this setting for normally soiled white
or colorfast cottons or blends.
cold
Some warm water will automatically blend
with cold tap supply to achieve a precise
cold. Use this setting for lightly soiled
non-colorfast items, knits, delicates,
and hand washables.
tap cold (on select models)
Wash and rinse temperatures are
equivalent to temperature of cold tap
supply. Use this selection for fabrics
and colors that are prone to dye transfer.
For use with cold water detergents.
NSF Protocol P172
Sanitization Performance of Residential
and Commercial, Family-Sized Clothes
Washers
Adjust the wash time based on the soil
level of each load. Solid soil (on select
models), max (on select models), heavy,
normal, light and extra light (on some
models) soil levels are available.
Soil Level
NOTE
If the voltage at your outlet is under 110v,
the internal heater may not adequately
heat the wash water. If the cycle is inter-
rupted while the water is heating, the
final temperature of the wash water may
be lower and sanitation may be reduced.
NOTE
If the wash cycle is paused or cancelled
while the internal drum temperature
is above 130° F (55° C), the door will
remain locked until it cools. You may
manually perform a rinse & spin cycle to
cool the internal temperature sooner.
NOTE
The washer will ALWAYS use a small
amount of HOT water to dissolve the
pack when the PODS
®
option has been
selected.
PODS
®
is a registered trademark of Procter & Gamble Company, Cincinnati OH, used under license by Electrolux.

19
Controls and Settings
Cycle Options
Max (on select models), high, medium
and low (on some models) spin speeds
are available for each cycle. The spin
speed and/or duration of final spin vary
from model to model and cycle to cycle.
Increasing the spin speed will extract more
water, decrease drying time and conserve
energy. Decreasing the spin speed will
reduce wrinkling.
Select low spin speed (on some models) to
gently spin items that should be line dried.
Use no spin to omit the final spin at the
end of the cycle. The load will be very wet.
Remove items from the wash drum to drip
dry or select a spin only cycle to remove
excess water at a more convenient time.
Spin Speed
The default options for each cycle will
automatically be chosen when a cycle is
selected. To protect fabrics, not all options
are available for all cycles. If an option is
not available for a cycle, the indicator will
not light.
options
select
de-select
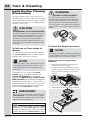
Selecting Options
Press the option button to scroll though
the options until the indicator light for the
desired option flashes, then press select.
The indicator light will illuminate when
the option has been selected. Follow the
same steps to deselect an option. The
indicator light will turn off when the option
is deselected.
NOTE
If changes to the settings or options are
attempted after the cycle starts, you will
hear several beeps when the buttons are
pressed. To change the settings or op-
tions, press start/pause, make the new
selections and press start/pause again.
All settings or options selected for the
cycle, except sanitize (on select models),
perfect steam
TM
(on select models),
and stain treatment options, will be
remembered and recalled each time that
cycle is selected in the future. To return to
factory settings, press and hold soil and
options buttons at the same time and
hold for 3 seconds until the confirmation
signal sounds. To prevent unintentional
Stain Treatment options
(on select models)
Your washer is equipped with powerful
stain treatment tools. Depending on your
model, use one of the options below to
deal with tough stains on your garments.
See step 5 in the
Operating Your Washer
section in this guide for details on adding
stain additives to the dispenser.
StainTreat (400 Series Washer)
Select this option to add a short initial
wash period to available cycles using
the stain treatment additives in the stain
soak/treat compartment. After the stain
wash phase, the load will automatically
advance to the main wash cycle.
StainTreatII (500 Series Washer)
Select this option when available and
rotate the cycle selector to rotate through
the stain types below. Stain treatment and
main detergent will recirculate in the agitat-
ing load for approximately 20 minutes and
then the washer will advance to the main
wash cycle.
• Any Stain
Recirculating wash solution will be
heated by boost heater.
• Blood
Recirculating wash solution will NOT
be heated by boost heater to prevent
setting blood stains.
• Chocolate
Stain wash time is extended with additional
heating by boost heater.
StainSoak (600 Series Washer)
Similar to StainTreatII above with the
added feature of detergent/treatment
mixing with SmartBoost pump technol-
ogy before the Stain washing phase.
perfect steam
TM
(on select models)
Select this option to add approximately 20
minutes of tumbling in steam.
NOTE
• Steam may not necessarily be visible
inside drum during a steam wash cycle.
• Steam may not be present during entire
steam wash cycle.
and accidental exposure of delicate mate-
rial to excess heat or unexpected steam,
the sanitize, perfect steam
TM
and all
stain treatment options will need to be
reselected each time.

20
Controls and Settings
extra rinse
Use this option when additional rinsing is
desired to remove excess dirt and detergent.
It is recommended for heavily soiled loads or
if household members have sensitive skin.
wrinkle release (on select models)
After the final spin, the washer will perform
a “dry” agitation to loosen the garments
from the side of the drum.
extended refresh (on select models)
Select extended refresh if you will be
unable to remove the load right after the
cycle is complete. The washer recognizes
the load has sat too long and will do a
rinse and spin to keep the load fresh for
up to 12 hours. When you are ready to
remove the load during the extended
refresh segment, you must press cancel
to end the cycle and open the door.
PODS
®
(on select models)
Select this option when using a detergent
pack in a model equipped with a PODS
®
button (on select dispenser only). This
option will divert the flow of water to the
detergent pack compartment optimizing
the detergent pack performance.
Control Options
control lock
To lock the controls between cycles,
scroll to the control lock option and
press select. The control lock icon
will show on the LED display. To unlock the
controls scroll to the control lock option again
and press select. Use this feature to reduce
the likelihood of accidental operation by chil-
dren. Washer cycles will not run when
Control Lock is activated.
IMPORTANT
• If steam is selected, rinse tempera-
tures will be elevated.
• If the wash cycle is paused or can-
celled during a steam cycle, the door
will remain locked until it cools. You
may manually perform a rinse & spin
cycle to cool the internal temperature
sooner.
• During a steam cycle, steam exiting
from the rear vent of the washer is
normal and not cause for alarm.
Wash Cycle Options
Chime
A signal will sound at the end of each
cycle (and periodically during extended
refresh) if option is activated.
To mute or unmute the chime, press and
hold the select button for 3 sec. This will
not affect any of the other button tones.
options
select
de-select
hold ‘select’ 3 s to mute/unmute
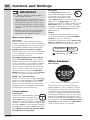
Other Features
LED display
delay time
Use delay time to delay the
start of the washing cycle from
30 minutes to 12 hours. After
selecting the delay time option,
press select button to scroll to the desired
delay time. The delay time icon will il-
luminate on the LED display to indicate the
delay time option is activated, The time
will begin counting down on the LED display
once the washer start/pause button has
been pressed.
PODS
®
is a registered trademark of Procter & Gamble Company, Cincinnati OH, used under license by Electrolux.
The estimated total cycle time will be dis-
played when the cycle is selected. The time
may increase if water pressure is low, over-
sudsing occurs or the load becomes unbal-
anced. The approximate time remaining will
be displayed during the cycle. As the washer
progresses through the cycle phases, the
row of cycle phase indicators lights up under
the cycle time. The eco, control lock, close
door, mute (some models) and delay time
will also appear on this LED display.
Icons may vary according to model.
Page is loading ...
Page is loading ...
Page is loading ...
Page is loading ...
Page is loading ...
Page is loading ...
Page is loading ...
Page is loading ...
Page is loading ...
Page is loading ...
Page is loading ...
Page is loading ...
Page is loading ...
Page is loading ...
Page is loading ...
Page is loading ...
Page is loading ...
Page is loading ...
-
 1
1
-
 2
2
-
 3
3
-
 4
4
-
 5
5
-
 6
6
-
 7
7
-
 8
8
-
 9
9
-
 10
10
-
 11
11
-
 12
12
-
 13
13
-
 14
14
-
 15
15
-
 16
16
-
 17
17
-
 18
18
-
 19
19
-
 20
20
-
 21
21
-
 22
22
-
 23
23
-
 24
24
-
 25
25
-
 26
26
-
 27
27
-
 28
28
-
 29
29
-
 30
30
-
 31
31
-
 32
32
-
 33
33
-
 34
34
-
 35
35
-
 36
36
-
 37
37
-
 38
38


Electrolux EFLW427UIW1 Owner's manual
- Category
- Washing machines
- Type
- Owner's manual
Ask a question and I''ll find the answer in the document
Finding information in a document is now easier with AI
Related papers
-
Electrolux EFLS627UTT Owner's manual
-
Electrolux EIFLW50LIW User manual
-
Electrolux WAVE-TOUCH 137356900 A User guide
-
-
Electrolux EFLS617SIW0 Owner's manual
-
-
Electrolux EWMGD70JRR User manual
-
Electrolux EWFLS70J SS User guide
-
-
Other documents
-
 Bloomsz 9484 User manual
-
LG WM5000HVA Owner's manual
-
Frigidaire FFFS5115PA User manual
-
-
LG WM4370HKA Owner's manual
-
Frigidaire FRFW3700LW0 Owner's manual
-
LG WM8100HVA Owner's manual
-
LG Electronics WM1388HW User manual
-
LG WM4270HVA/00 Owner's manual
-
 Proline Range Hoods PLJW 129.30 User manual

