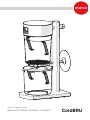
Marco ColdBRU 1000950 User manual
- Category
- Coffee making accessories
- Type
- User manual
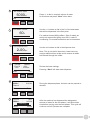
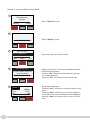
Marco ColdBRU 1000950 is a high-quality coffee brewing machine that uses cold water to extract coffee flavors, resulting in a smooth, less acidic brew. With its precise calibration and programmable settings, you can create and save your own customized coffee recipes, ensuring consistent results every time. The machine's intuitive interface and easy-to-clean design make it a user-friendly option for coffee enthusiasts seeking a flavorful and refreshing cold brew.
Marco ColdBRU 1000950 is a high-quality coffee brewing machine that uses cold water to extract coffee flavors, resulting in a smooth, less acidic brew. With its precise calibration and programmable settings, you can create and save your own customized coffee recipes, ensuring consistent results every time. The machine's intuitive interface and easy-to-clean design make it a user-friendly option for coffee enthusiasts seeking a flavorful and refreshing cold brew.


-
 1
1
-
 2
2
-
 3
3
-
 4
4
-
 5
5
-
 6
6
-
 7
7
-
 8
8
-
 9
9
-
 10
10
-
 11
11
-
 12
12
-
 13
13
-
 14
14
-
 15
15
-
 16
16
-
 17
17
-
 18
18
-
 19
19
-
 20
20


Marco ColdBRU 1000950 User manual
- Category
- Coffee making accessories
- Type
- User manual
Marco ColdBRU 1000950 is a high-quality coffee brewing machine that uses cold water to extract coffee flavors, resulting in a smooth, less acidic brew. With its precise calibration and programmable settings, you can create and save your own customized coffee recipes, ensuring consistent results every time. The machine's intuitive interface and easy-to-clean design make it a user-friendly option for coffee enthusiasts seeking a flavorful and refreshing cold brew.
Ask a question and I''ll find the answer in the document
Finding information in a document is now easier with AI
Related papers
Other documents
-
Bunn IC3 DBC® Installation guide
-
-
Bunn Crescendo®, 120/208-240V Installation guide
-
-
-
Bunn ICB Twin Platinum Edition™, 120/240V Stainless Installation guide
-
-
-
-