Page is loading ...

INSTRUCTION MANUAL
Compressor Wine Cooler
18-Bottle/ 30-Bottle / 46-Bottle/ 157-Bottle
MODEL: KRC-18SZB/ KRC-30SZB/ KRC-46DZB/ KRC-157DZB
Please read carefully and follow all safety rules and operating instructions.

- 2 -
Content
1. Your Wine Cooler ………………………………………………………………………………………… 3
2. Technical Dat a…………………………………………………………………………… ……………… 7
3. Safety Precautions…….……………………………………………………………………………………9
4. Important Precautions……………….……………………………………………………………………9
5. Installation Instructions………………………………………………………………………………….9
6. Operating Your Wine Cooler………………………………….…………………………………………..14
7. Care and Maintenance………………………………………………………………………………….14
8. Trouble Shootings………………………………………………………………………………………….15

- 3 -
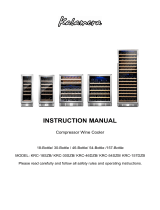
Your Wine Cooler
KRC-18SZB
1. NTC Point
2. Light Switch
3. Temperature Display
4. Light
5. Celsius/Fahrenheit Switch
6. Temperature Setting
7. Fan
8. Exhaust Window
9. Shelf
10. Body
11. Exhaust Window
12. Adjustable Legs
13. Glass
14. Door Seal
15. Handle
16. Water Box
17. Lower Hinge
18. Lock

- 4 -
KRC-30SZB
1. NTC Point
2. Light Switch
3. Temperature Display
4. Light
5. Celsius/Fahrenheit Switch
6. Temperature Setting
7. Fan
8. Exhaust Window
9. Shelf
10. Body
11. Exhaust Window
12. Adjustable Legs
13. Glass
14. Door Seal
15. Handle
16. Water Box
17. Lower Hinge
18. Lock

- 5 -
KRC-46DZB
1. NTC Point
2. Light
3. Fan
4. Exhaust Window
5. Upper Zone Temperature Display
6. Lower Zone Temperature Display
7. Celsius/Fahrenheit Switch
8. Upper Zone Temperature Setting
9. Lower Zone Temperature Setting
10. Light Switch
11. Shelf
12. Body
13. Exhaust Window
14. Adjustable Legs
15. Glass
16. Door Seal
17. Handle
18. Lower Hinge
19. Lock

- 6 -
KRC-157DZB
1. NTC Point
2. Light
3. Fan
4. Exhaust Window
5. Upper Zone Temperature Display
6. Lower Zone Temperature Display
7. Celsius/Fahrenheit Switch
8. Upper Zone Temperature Setting
9. Lower Zone Temperature Setting
10. Light Switch
11. Shelf
12. Body
13. Exhaust Window
14. Adjustable Legs
15. Glass
16. Door Seal
17. Handle
18. Lower Hinge
19. Lock

- 7 -
Technical Data
Model No.
KRC-18SZB
KRC-30SZB
Capacity
70L
90L
Voltage
110V
110V
Rated Current
1.5A
1.5A
Frequency
60Hz
60Hz
Protection Class
I
I
Climate Class
T/ST/N/SN
T/ST/N/SN
Input Power
90W
90W
Power Consumption(KW.h/24h)
0.51 KW.h/24h
0.51 KW.h/24h
Temperature Control Range
40°F-66°F
40°F-66°F
Net Weight
63.9 lbs
72.8 lbs
Gross Weight
83.8 lbs
94 lbs
Product Size(W×H×D)
11.6 x 33.9 x 22.4 inches
14.9 x 33.9 x 22.4 inches
Packing Size(W×H×D)
14.8 x 40.5 x 26 inches
18 x 40.5 x 26 inches
Model No.
KRC-46DZB
KRC-157DZB
Capacity
150L
450L
Voltage
110V
110V
Rated Current
1.5A
1.5A
Frequency
60Hz
60Hz
Protection Class
I
I
Climate Class
T/ST/N/SN
T/ST/N/SN
Input Power
90W
90W
Power Consumption(KW.h/24h)
0.51 KW.h/24h
0.51 KW.h/24h
Temperature Control Range
Upper zone:40-50°F
Lower zone: 50-66°F
Upper zone:40-50°F
Lower zone: 50-66°F
Net Weight
104 lbs
221.8 lbs
Gross Weight
138 lbs
251.3 lbs
Product Size(W×H×D)
23.4 x 33 x 22.4 inches
23.4 x 69.6 x 26.8 inches
Packing Size(W×H×D)
26.8 x 40.5 x 25.7 inches
26.8 x 76.2 x 30.1 inches

- 8 -
Electrical Circuit Diagram
KRC-18SZB & KRC-30SZB
Electrical Circuit Diagram
KRC-46DZB & KRC-157DZB

- 9 -
Safety Precautions
PLEASE READ all instructions before installing, operating, or servicing the appliance.
Danger and Warning: Failure to follow this safety statement will result in severe personal injury or death,
property or equipment damage.
RISK OF CHILD ENTRAPMENT. Before you throw away your old refrigerator or freezer, take off the doors and
leave shelves in place so children may not easily climb inside.
SHOCK HAZARD - Electrical Grounding required.
Never attempt to repair or perform maintenance on the unit until the electricity has been disconnected.
Never remove the round grounding prong from the plug and never use a two-prong grounding adaptor.
Altering, cutting of power cord, removal of power cord, removal of power plug, or direct wiring can cause
serious injury, fire or loss of property and life, and will void the warranty.
Never use an extension cord to connect power to the unit.
Always keep the working area dry.
Important Precautions
Do not lift unit by door handle.
Do keep the door closed before installing into cabinet.
Be sure the kick-plate on the front bottom is free from obstruction. Obstructing free airflow can cause the unit to
malfunction and will void the warranty.
Failure to clean the condenser every six months can cause the unit to malfunction.
Allow unit temperature to stabilize for 24 hours before use.
Do not block any internal fans.
Use only genuine supplier's replacement parts. Imitation parts can damage the unit, affect its operation or
performance and may void the warranty.
Installation Instructions
Before using your wine cooler:
Remove the exterior and interior packing
Before connecting the appliance to the power outlet, let it stand upright for approximately 2
hours. This will reduce the possibility of malfunction in the cooling system from handling during transportation.
Clean the interior surface with lukewarm water using a soft cloth.
Place your appliance on a floor that is strong enough to support the appliance when it is fully loaded.
To level your appliance, adjust the front legs at the bottom of the appliance.
To install the door handle:
For shipment, the door handle has been stored inside of the unit binding to the wood shelves. To install the
handle, the door gasket should be gently pulled back where it covers the screw holes for the handle, then the
handle should be attached by screwing into place with the two screws which are packed in the box with this
Instruction Manual and other spare parts.
To reduce the risk of fire, electrical shock, or injury when using your
appliance, follows these basic precautions;

- 10 -
To reverse the door swing:
As you received your wine cooler, the door swings open at the left. If you wish to reverse the swing so that the
door opens from the right, it is most important to have at least one other person to help. It is very dangerous
to try to reverse the door swing by yourself, without anybody’s help the door might fall and the glass might
be broken, which is terribly dangerous
Now, unscrew the upper door hinge while the second person hold the door. Remove the upper hinge and
carefully lift the door off the bottom hinge. Unscrew the bottom hinge and install it on the left side of the unit.
Flip the door around so that the handle is on the right side and slip the door over the bottom hinge. Reattach
the door by screwing the top hinge into the holes provided on the upper left surface of the unit. Make
adjustments as necessary to be sure the door is aligned properly.
Suggest cabinet dimension:
KRC-18SZB

- 11 -
KRC-30SZB
KRC-46DZB

- 12 -
KRC-157DZB
Spare parts details:
KRC-18SZB & KRC-30SZB & KRC-46DZB:
Spare parts
Picture
Use
Upper hinge
To switch the door open from right.
Bottom hinge
To switch the door open from right.
Screw *2
For the handle installation.

- 13 -
Gasket *2
For the handle installation.
Key *2
To lock the door.
Big rubber plug *1
To cover the lock hole on the top of
door.
Round rubber plug
(KRC-18SZB & KRC-30SZB 2pcs,
KRC-46DZB 3pcs)
To cover the holes on the left front
corner of the body.
Water box (Only for KRC-18SZB and
KRC-30SZB.)
The water box is at the bottom inside
the wine cooler. If you feel wine
cooler inside is dry, you could have
some water in it to increase humidity.
KRC-157DZB:
Spare parts
Picture
Use
Bottom hinge
To switch the door to open from
right.(The original upper hinge could
be applied in swing the door.)
Screw *2
For the handle installation.
Gasket *2
For the handle installation.
Key *2
To lock the door.
Big rubber plug *1
To cover the lock hole on the top of
door.

- 14 -
Operating Your Wine Cooler
The Control Panel:
KRC-18SZB & KRC-30SZB
How to use the press-buttons on the Display Panel:
To control the temperature, press UP or DOWN button. Each press would adjust the temperature by 1°C
between 5~18°C or 1°F between 40~66°F.
To turn on or off the internal LED lighting, press LIGHT button on the right side.
To switch the temperature display from Celsius Degree to be Fahrenheit Degree or vice versa, press C/F button.
KRC-46DZB & KRC-157DZB
To control the upper zone temperature, press UP or DOWN button on the left side. Each press would adjust the
temperature by 1°C between 5~10°C or 1°F between 40~50°F.
To control the lower zone temperature, press UP or DOWN button on the right side. Each press would adjust the
temperature by 1°C between 10~18°C or 1°F between 50~66°F.
To turn on or off the internal LED lighting, press LIGHT button on the right side.
To switch the temperature display from Celsius Degree to be Fahrenheit Degree or vice versa, press C/F button.
Care And Maintenance
Cleaning your wine cooler
Unplug the wine cooler and remove the bottles.
Wash the inside with warm water or baking soda solution. The solution should be about 2 tablespoons of baking
soda to a quart of water.
The outside of wine cooler should be cleaned with mild detergent or warm water.
Draw out the water box at the bottom, and wash it.
Moving your wine cooler
Remove all the bottles.
Securely tape down all loose items inside your wine cooler.
Turn the leveling legs up to the base to avoid damage.
Tape the door.
Be sure the wine cooler stays in the upright position during transportation.

- 15 -
Trouble Shootings
You can solve many common wine cooler problems easily, saving you the cost of a possible service call. Try the
suggestion below to see if you can solve the problem before calling the service center.
PROBLEM
POSSIBLE CAUSE
Wine cooler do not operate.
Not plugged in using different voltage. The circuit
breaker tripped or a blown fuse.
Wine cooler is not cold enough.
Check the temperature control setting.
The door is open too often.
The door is not closed completely.
The door seal does not seal properly.
The wine cooler does not have the correct
clearance.
The light does not work.
Main control board does not work.
PCB Problem.
There is some problem with the plug.
Vibrations.
Check to assure that the wine cooler is leveled.
The wine cooler seems to make to
much noise
The wine cooler is not leveled.
Check the fan.
The door will not close properly.
The wine cooler is not leveled.
The doors were reversed and not properly installed.
The seal is weak.
The shaves out of position.
LED could not display.
Main control board does not work.
PCB Problem.
There is some problem with the plug.
LED display error.
Weak quality of display.
Temperature point is out off.
Buttons are not functional.
Temperature controller panel is damaged.

/