Page is loading ...

4
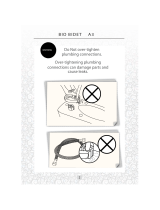
IMPORTANT
Please be advised that the provided cold water T-valve should be
installed at the fill valve under the toilet tank, and NOT at the cold
water supply coming from the wall.
Check Water Supply Line
Check the water supply line that connects the toilet
tank fill valve to the water shuto valve at the wall.
If it is a rigid pipe, you will need to purchase a flexible water
supply hose to replace it before installing the FreshSpa Comfort+.
The length of the hose may vary and the top connection size
should be ⁄" ballcock to connect to the T-valve that you will install
under the toilet tank and the bottom connection will vary (most
common are ⁄" and ½” female compression).
Before Installation
PRODUCT INSTALLATION

5
Installation
PRODUCT INSTALLATION
Please read these instructions carefully before installing
your FreshSpa Comfort+. Failure to do so could result in
flooding, leaking or damage to the product.
1. Existing Toilet Seat Removal
a. Lift hinge covers and use flathead or Phillips
head screwdriver to remove the mounting bolts.
Alternatively, you may need to loosen mounting
bolts underneath the seat.
b. Remove the toilet seat and set the seat, mounting
bolts and hardware aside.
2. Turn O Water Supply Valve and Flush Toilet
a. Turn water supply valve o to stop the flow of water.
b. Flush toilet and hold down handle to completely
empty tank.
c. Disconnect water supply hose from toilet tank.
Do not disconnect from the water supply valve.
3. Connect Cold Water T-Valve to the Toilet Tank Fill Valve
a. Install the ⁄" cold water T-valve with one or both
of the large rubber washers to the incoming water
connection on the bottom of your toilet tank.
b. Connect the cold water supply line coming from the
wall to the bottom of the T-valve.
4. Connect Bidet Hose to T-Valve
Connect one end of the braided metal cold water
bidet hose to the remaining open side of the
installed T-valve.
Step 3a
Step 3b
Step 1b
Step 2c
Step 4

6
Installation
PRODUCT INSTALLATION
Installing the Bidet Attachment
1. Install Adjustable Mounting Brackets into the Bidet
Attachment. Place circular mounting brackets into the
circular openings of the bidet attachment.
2. Install Bidet Attachment on Toilet
a. Place bidet attachment on the toilet so the
nozzle is as close to the back of the toilet bowl
as it will go. This will vary by toilet.
b. Make sure the adjustable brackets line up with
the holes in the toilet fixture. You may need to
rotate the adjustable brackets accordingly to line
them up properly.
c. Replace the toilet seat on top of bidet attachment
and secure using original toilet seat hardware.
Make sure to tighten so that the bidet attachment
and seat do not move.
3. Connect Bidet Hose to Bidet Attachment
Connect the open end of bidet hose to the Cold
connection under the bidet attachment.
4. Turn on Water Supply & Check for Leaks
a. Open the main water supply valve slowly and
check for leaks.
b. Wait 5-10 minutes, check again, and if there are
no leaks, continue.
Step 1
Step 2b
Step 2c
Step 3
NOTE: If there is any leaking, check all rubber washers
and make sure all water connections are tight and
secure. If necessary, you can use plumbers tape for any
leaking connections.
TIP: If spray direction is off-center after installation,
unscrew the bolts, reposition the attachment slightly
forward, and secure back in place. Depending on your
preferences or body composition, the perfect position
may require some readjustment.
/