Page is loading ...

DESCRIPTION
Ultraflex LFT is a premium, nonsag, large-and-heavy-tile mortar (formerly known as
“medium-bed mortar”) and thin-set mortar designed for large-format and heavy
tile and stone for interior/exterior floor, wall and countertop installations. This
mortar has a high content of unique dry polymer, resulting in excellent adhesion
to the substrate and tile. It is formulated with Easy Glide Technology
™
for ease of
application.
FEATURES AND BENEFITS
• Polymer-enriched for high performance and deformability
• Nonsag formula for large-format tile and stone in wall applications
• Nonslump for large-format and heavy tile and stone in floor applications
• For thicker bond coats from 3/32" to 1/2" (2,5 to 12 mm)
• Smooth and creamy consistency makes it easy to apply.
INDUSTRY STANDARDS AND APPROVALS
• ISO 13007: Classification C2TES1P1
• ANSI: Exceeds ANSI A118.4TE, ANSI A118.11 and A118.15TE requirements
LEED v4 Points Contribution LEED Points
Environmental Product Declaration (EPD):
TCNA Industry Average for Mortars* ................................................1/2 point
Health Product Declaration (HPD)* ..........................................Up to 2 points
* Using this product may help contribute to LEED certification of projects in the
categories shown above. Points are awarded based on contributions of all project
materials.
WHERE TO USE
• Interior/exterior residential and commercial installations on floors and
walls in dry and wet areas (see wall specifications under “Limitations”)
• Installation of ceramic and porcelain tile; cultured stone; quarry tile; pavers;
Saltillo tile; and most types of marble, granite and natural stone
LIMITATIONS
• Install only at temperatures between 40°F and 95°F (4°C and 35°C).
• Do not use for moisture-sensitive stone (green marble; some limestone
and granite), agglomerate tiles, cultured marble or resin-backed tiles.
Instead, use suitable epoxy or urethane adhesives. See the respective
Technical Data Sheets for more information.
• Do not use over dimensionally unstable substrates such as hardwood
flooring, oriented strand board (OSB), substrates containing asbestos,
or metal. See the “Suitable Substrates” section.
• To use directly over gypsum-based patching or leveling substrates, apply
a suitable primer/sealer before use. See the technical bulletin “Tiling over
gypsum” in the Related Documents section of the Tile & Stone Installation
Systems page on MAPEI’s Website.
• Do not use for transparent or translucent glass tile.
• For light-colored and translucent natural stone, a white mortar is
recommended.
• Consult building code requirements for use on exterior commercial
building facades.
• Installations of tile over nonporous surfaces, such as waterproofing
membranes and existing tile, may require extended setting/curing times.
Dimensionally weak stone (limestone, travertine) is limited to thin-set
applications only.
Premium, Large-and-Heavy-
Tile Mortar with Polymer
Ultra
e
x
™
L
F
T
™
Ultraex
™
LF
T
™
March 13, 2018

SUITABLE SUBSTRATES
• Concrete (cured for at least 28 days)
• Masonry cement block, brick, cement mortar beds,
render coats and leveling coats
• Cement backer units (CBUs) – see manufacturer’s
installation guidelines
• Gypsum wallboard and plaster – interior walls in dry
areas only (priming may be required). See MAPEI’s
“Surface preparation requirements” reference guide
in the Related Documents section of the Tile & Stone
Installation Systems page on MAPEI’s Website.
• APA Group 1 and CANPLY 0121 exterior-grade
plywood (interior, residential and light-commercial
floors and countertops in dry conditions only)
• Properly prepared vinyl composition tile (VCT), vinyl
and cutback residue (interior installations)
• Properly prepared existing ceramic and porcelain tile,
quarry tile and pavers (interior and dry conditions only)
• MAPEI waterproofing, crack-isolation, sound-reduction
and uncoupling membranes
Consult MAPEI’s Technical Services Department for installation
recommendations regarding substrates and conditions not listed.
SURFACE PREPARATION
• All substrates should be structurally sound, stable, dry,
clean and free of any substance or condition that may
reduce or prevent proper adhesion.
• Substrates to receive thin porcelain tiles must be
perfectly flat. When installing thin-body porcelain
tile, consult the recommendations regarding surface
preparation, trowel selection and mechanical edge-
leveling systems in MAPEI’s reference guides for
thin-body porcelain tile 3 to 6 mm thick for walls, and
4,5 to 6 mm thick for floors. These reference guides can be
found in the Related Documents section of the Tile & Stone
Installation Systems page on MAPEI’s Website.
• See the “Surface preparation requirements” reference
guide in the Related Documents section of the Tile &
Stone Installation Systems page on MAPEI’s Website.
MIXING
Before product use, take appropriate safety precautions.
Refer to the Safety Data Sheet for details.
1. Pour clean, potable water into a clean mixing container.
2a. For nonsag/nonslump applications: Use about 6.5 to 7.5
U.S. qts. (6,15 to 7,10 L) of water.
2b. For MAPEI uncoupling and peel-and-stick membranes:
Use about 7.5 to 8 U.S. qts. (7,10 to 7,57 L) of water.
3. Gradually add 50 lbs. (22,7 kg) of powder while slowly
mixing.
4. Use a low-speed mixing drill (at about 300 rpm), with an
angled cross-blade mixer or auger mixer. Mix thoroughly
until the mixture becomes a smooth, homogenous, lump-
free paste. Avoid prolonged mixing.
5. Let mixture stand (“slake”) for 5 minutes.
6. Remix.
7. If the mixture becomes heavy or stiff, remix it without
adding more liquid.
PRODUCT APPLICATION
Read all installation instructions thoroughly before installation.
1. Choose a notched trowel (see “Approximate Coverage”
chart) with sufficient depth to achieve greater than
85% mortar contact to both the tile and substrate for all
interior applications, and greater than 95% for exterior
installations, commercial floor and wet applications. It may
be necessary to back-butter the tile in order to meet these
requirements. (Refer to ANSI A108.5 specifications and
TCNA handbook guidelines.)
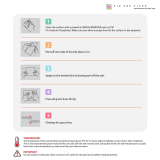
2. With pressure, apply a coat by using the trowel’s flat
side to key the mortar into the substrate.
3. Apply additional mortar, combing it in a single direction
parallel to the tile’s shortest dimension, with the trowel’s
notched side. If thin tile is being installed, it should
be placed so that the troweled ridges on its back are
oriented in the same parallel direction as the trowel
ridges on the substrate.
4. Spread only as much mortar as can be tiled before the
product skins over. Open time can vary with jobsite
conditions.
5. Place the tiles firmly into the wet mortar. Push the tiles
back and forth in a direction perpendicular to trowel
lines, to collapse the mortar ridges and help achieve
maximum coverage. Ensure proper contact between
the mortar, tile and substrate by periodically lifting a
few tiles to check for acceptable coverage.
6. Remove excess mortar from the joint areas so that at
least 2/3 of the tile depth is available for grouting (see
ANSI A108.10 guidelines).
EXPANSION AND CONTROL
JOINTS
• Provide for expansion and control joints as specified
per TCNA Method EJ171 or TTMAC Specification Guide
09 30 00, Detail 301MJ. Do not cover expansion joints
with mortar.
CLEANUP
• Clean tools and tile while the mortar is fresh, using
only water.
PROTECTION
• Do not disturb the installation, allow light traffic or grout
any tiles for at least 24 to 48 hours.
• Protect the installation from general traffic for at least
72 hours, and from heavy traffic for at least 7 days.
• Protect the installation from rain for 72 hours, and from
freezing for 21 days.
• Cure for 28 days before water immersion
Note: When working in cold temperatures, protect tilework
for an extended time for this dry-set mortar to cure before
grouting and/or allowing traffic.
Ultra
e
x
™
L
F
T
™
Ultra
ex
™
LF
T
™

Ultra
e
x
™
L
F
T
™
Ultra
ex
™
LF
T
™
ISO 13007 Classication
Classication Code Classication Requirement Test Characteristic
C2 (cementitious, improved adhesive)
≥ 145 psi (1 MPa) after standard
aging, heat aging, water immersion
and freeze/thaw cycles
Using porcelain tile
T (vertical slip resistance) ≤ 0.019" (0,5 mm) Using porcelain tile
E (extended open time) ≥ 72.5 psi (0,5 MPa) after 30 minutes Using glazed ceramic wall tile
S1 (normal deformation of mortar) ≥ 0.1" (2,5 mm) -----------
P1 (normal adhesion to plywood) ≥ 72.5 psi (0,5 MPa) Using porcelain tile
ANSI Specication*
Test Method Specication Standard Test Results
ANSI A118.11 – shear strength,
quarry tile to plywood
> 150 psi (1,03 MPa)
at 28 days
170 to 310 psi
(1,17 to 2,14 MPa)
ANSI A118.15E – extended open time
≥ 72.5 psi (0,5 MPa)
at 30 minutes
Pass
ANSI A118.15 – shear strength,
impervious ceramic (porcelain) mosaics
> 400 psi (2,76 MPa)
at 28 days
Pass
ANSI A118.15 – shear strength,
glazed wall tile
> 450 psi (3,10 MPa)
at 7 days
570 to 780 psi
(3,93 to 5,38 MPa)
ANSI A118.15 – shear strength,
quarry tile to quarry tile
> 150 psi (1,03 MPa)
at 28 days
310 to 450 psi
(2,14 to 3,10 MPa)
ANSI A118.15T – sag on vertical
surfaces
< 0.02" (0,5 mm)
at 20 minutes
Pass
* Anything that meets A118.15 by definition exceeds A118.4.
Shelf Life and Application Properties (before mixing)
Shelf life
1 year when stored in original, unopened packaging at
73°F (23°C)
Colors Gray, white
Application Properties at 73°F (23°C) and 50% relative humidity
Open time** 30 to 35 minutes
Pot life** 4 hours
Time before grouting (walls)** 8 to 16 hours
Time before grouting (floors)** 24 hours
VOCs (Rule #1168 of California’s SCAQMD) 0 g per L
** Open time, pot life and time before grouting vary based on jobsite conditions.
Packaging
Size and Color
Bag: 50 lbs. (22,7 kg), gray
Bag: 50 lbs. (22,7 kg), white

We proudly support the following industry organizations:
MAPEI Headquarters of North America
1144 East Newport Center Drive
Deerfield Beach, Florida 33442
1-888-US-MAPEI (1-888-876-2734) /
(954) 246-8888
Technical Services
1-800-992-6273 (U.S. and Puerto Rico)
1-800-361-9309 (Canada)
Customer Service
1-800-42-MAPEI (1-800-426-2734)
Services in Mexico
0-1-800-MX-MAPEI (0-1-800-696-2734)
Edition Date: March 8, 2018
PR: 5627 MKT: 18-1224
For the most current BEST-BACKED
SM
product data and warranty information, visit www.mapei.com.
All Rights Reserved. Printed in the USA. © 2018 MAPEI Corporation.
RELATED DOCUMENTS
Reference Guide: “Surface preparation requirements”
for tile and stone installation systems**
Technical Bulletin: “Tiling over gypsum”**
** At www.mapei.com
Refer to the SDS for specific data related to health and safety as
well as product handling.
LEG A L NO TICE
The contents of this Technical Data Sheet (“TDS”)
may be copied into another project-related
document, but the resulting document shall not
supplement or replace requirements per the
TDS in effect at the time of the MAPEI product
installation. For the most up-to-date TDS and
warranty information, please visit our website at
www.mapei.com. ANY ALTERATIONS TO THE
WORDING OR REQUIREMENTS CONTAINED
IN OR DERIVED FROM THIS TDS SHALL
VOID ALL RELATED MAPEI WARRANTIES.
Before using, the user must determine the
suitability of our products for the intended use,
and the user alone assumes all risks and liability.
ANY CLAIM SHALL BE DEEMED WAIVED
UNLESS MADE IN WRITING TO US WITHIN
FIFTEEN (15) DAYS FROM DATE IT WAS,
OR REASONABLY SHOULD HAVE BEEN,
DISCOVERED.
Ultra
e
x
™
L
F
T
™
Ultra
ex
™
LF
T
™
Approximate Coverage* per 50 lbs. (22,7 kg)
Typical Trowel Coverage
1/4" x 1/4" x 1/4"
(6 x 6 x 6 mm)
85 to 95 sq. ft.
(7,90 to 8,83 m²)
1/4" x 3/8" x 1/4"
(6 x 10 x 6 mm)
65 to 75 sq. ft.
(6,04 to 6,97 m²)
1/2" x 1/2" x 1/2"
(12 x 12 x 12 mm)
40 to 50 sq. ft.
(3,72 to 4,65 m²)
3/4" x 9/16" x 3/8"
(19 x 14 x 10 mm)
35 to 40 sq. ft.
(3,25 to 3,72 m²)
* Trowel dimensions are width/depth/space. Actual coverages will vary according to substrate profile and tile type.
/