Edirol EDIROL PCR-800 Owner's manual

Category
Musical Instruments
Type
Owner's manual
1
1
2
3
3
3
2
1
2
3
4
4
?
Other side
Read this first
Microsoft and Windows are registered trademarks of Microsoft Corporation.
Windows® is known o cially as: “Microsoft® Windows® operating system.
The screen shots in this document are used in compliance with the guidelines of the Microsoft Corporation.
Apple and Macintosh are registered trademarks of Apple Computer, Inc.
Mac OS is a trademark of Apple Computer, Inc.
VST is a trademark of Steinberg Media Technologies AG.
All product names mentioned in this document are trademarks
or registered trademarks of their respective owners.
The explanations in this manual include illustrations that depict what should typically be shown by
the display. Note, however, that your unit may incorporate a newer, enhanced version of the system
(e.g., includes newer sounds), so what you actually see in the display may not always match what
appears in the manual.
04451001 1MP
Before using this unit, carefully read the sections entitled: “USING THE UNIT
SAFELY” and “IMPORTANT NOTES. These sections provide important informa-
tion concerning the proper operation of the unit. Additionally, in order to
feel assured that you have gained a good grasp of every feature provided by
your new unit, This Owner’s manual should be read in its entirety. The manual
should be saved and kept on hand as a convenient reference.
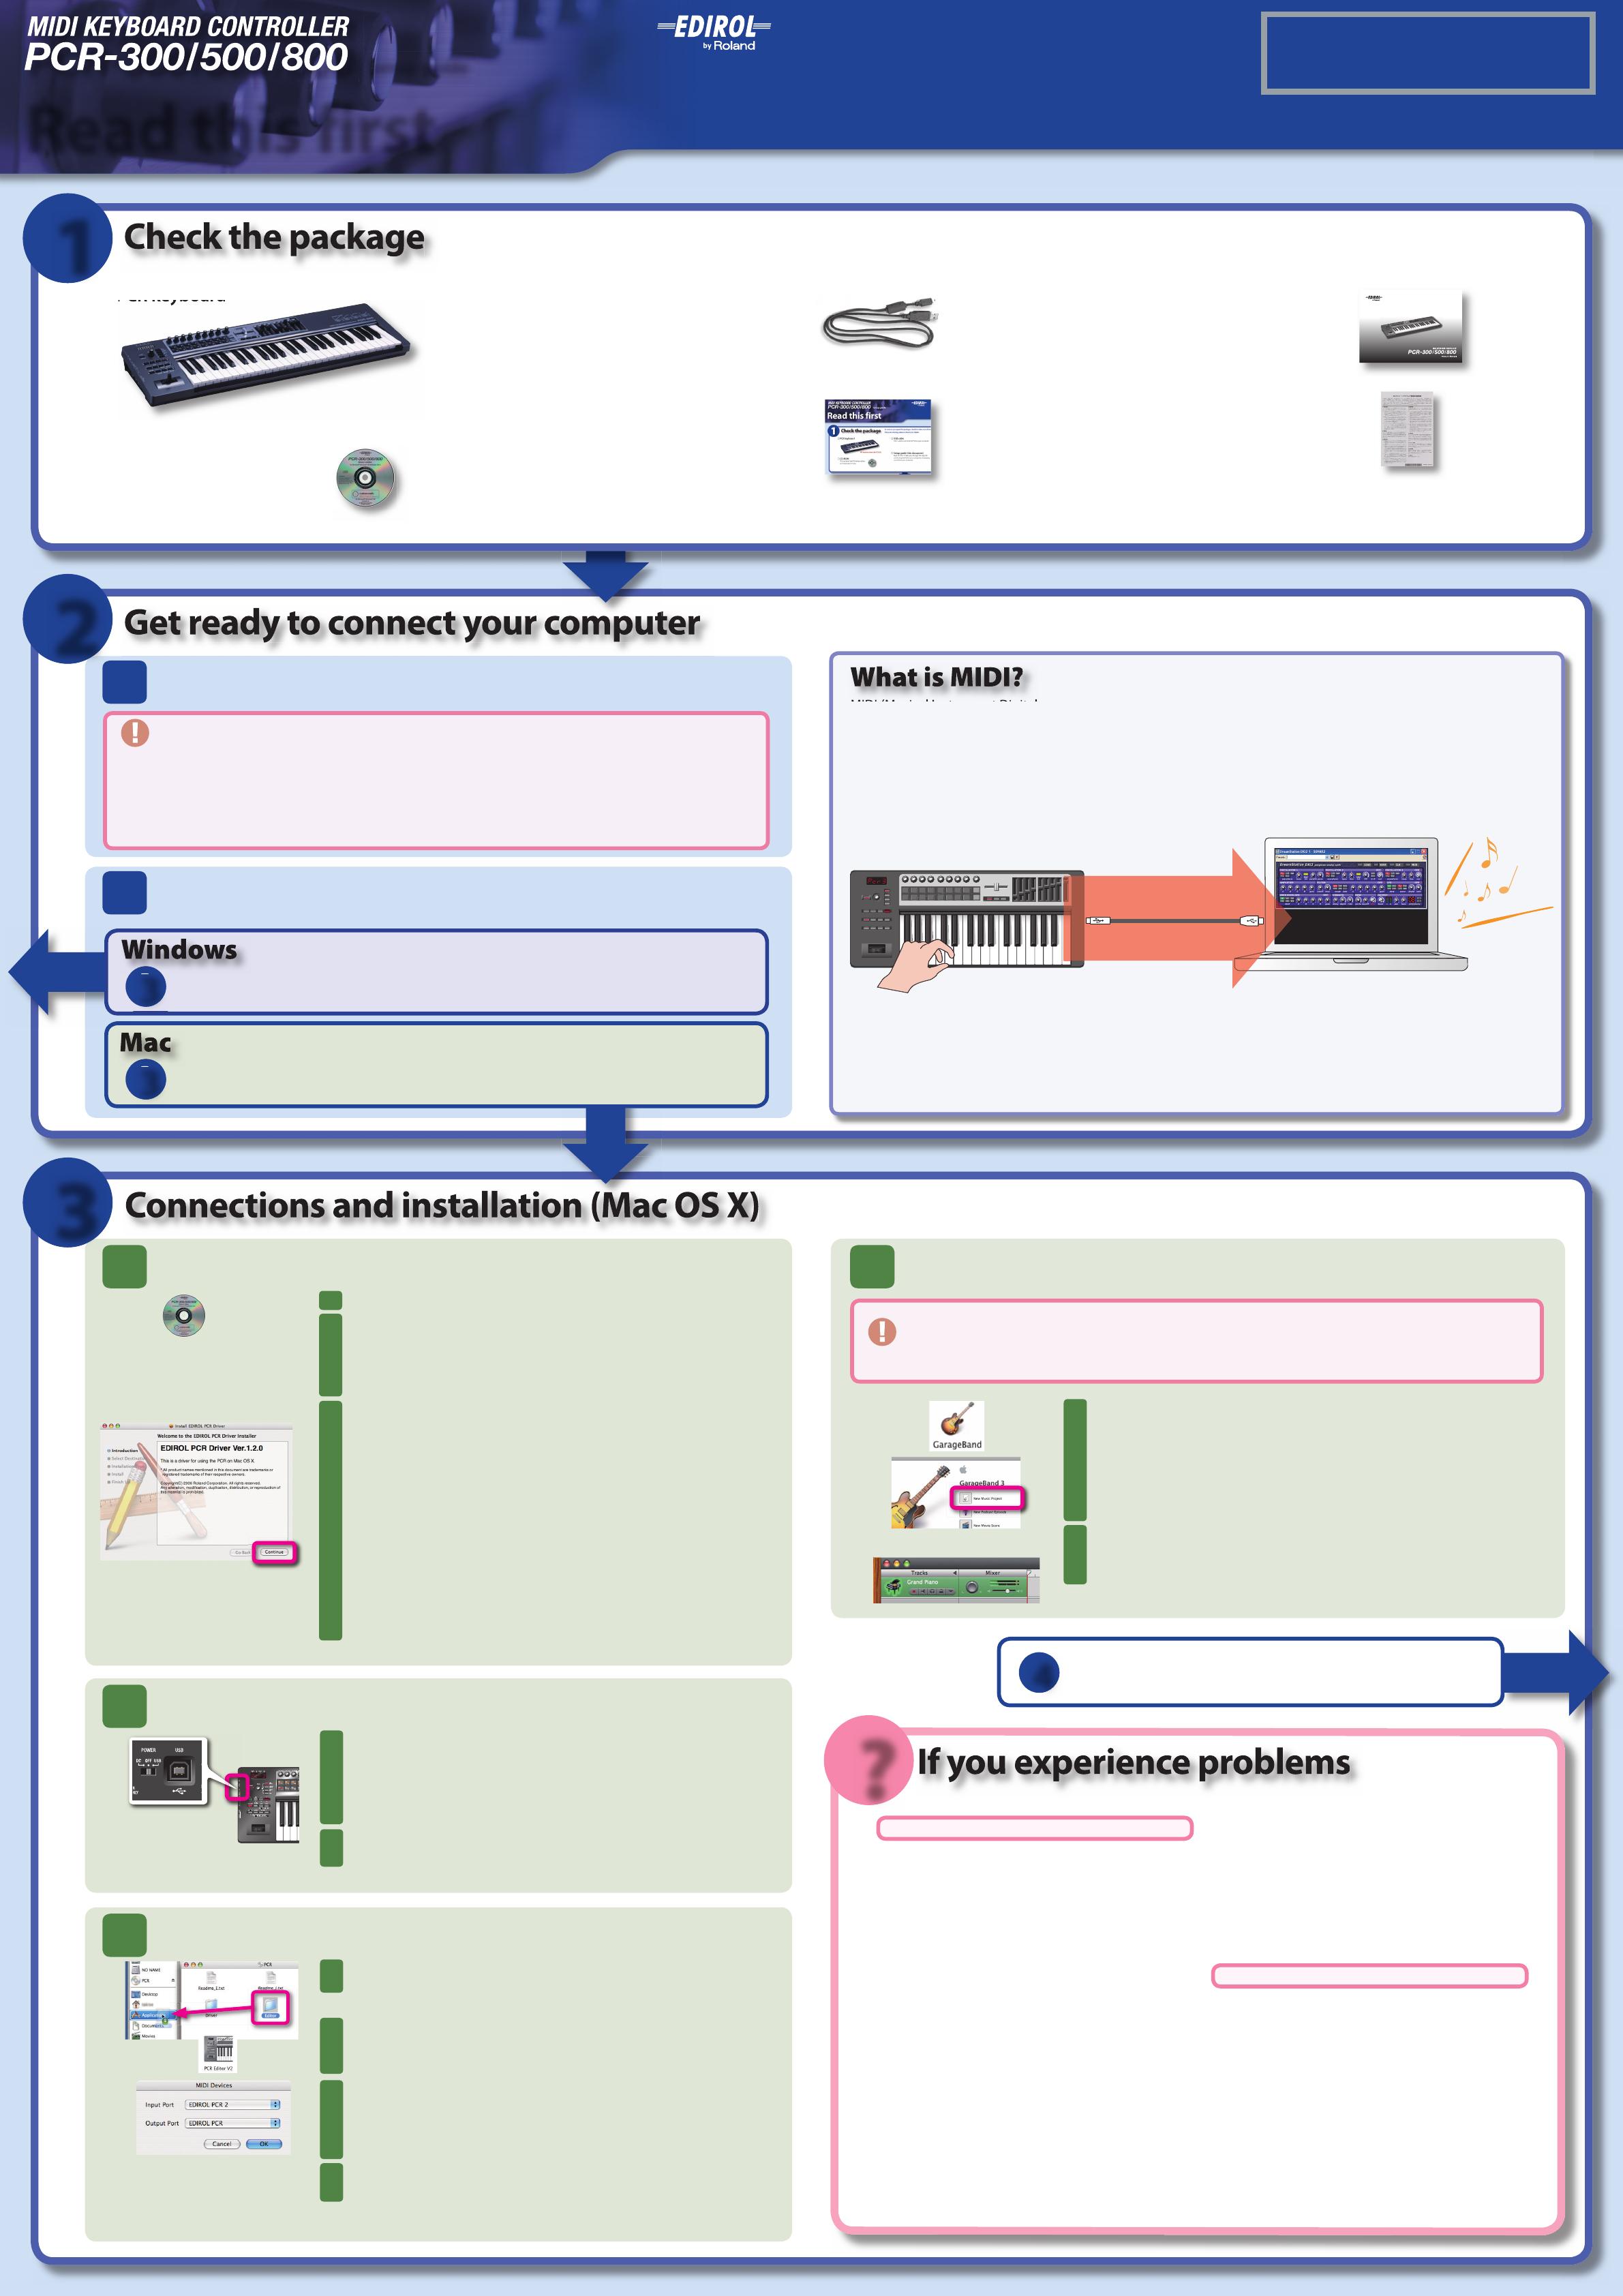
Setup guide
MIDI (Musical Instrument Digital Interface) is a universal standard that allows electronic musical instruments and com-
puters to exchange performance data.
MIDI makes it possible to convey, to another musical instrument, an ongoing description of exactly whats happening
during a performance. For example, a C key on a keyboard has been pressed using a certain amount of velocity (volume),
the instrument sound has been changed to “violin, the volume has been lowered, or the pitch has been raised and low-
ered. In other words, MIDI is a language that musical instruments can use to communicate with each other.
Since MIDI messages are just signals that specify how a performance should occur, you’ll need a MIDI sound generator
(such as a software synthesizer) in order to produce sound in response to these messages.
the software synthesizer running on the computer, and the software synthesizer responds by sounding the ‘C’ note.
Virtually all software synthesizers and DAW (Digital Audio Workstation) software in the world can use MIDI.
* DAW software collectively refers to music production software such as the included Cakewalk LE Suite.
You can use the PCRs keyboard to play software synthesizers, strike the pads to play a sampler, and use the sliders and
knobs to control your DAW software as if you were using a mixer.
Play ‘C’ ‘C’ is sounded
USB cable
Message that ‘C’ was played
software
synthesizer
MIDI messages
PCR keyboard
CD-ROM
This contains the PCR driver, editor,
and Cakewalk LE Suite.
USB cable
This is used to connect the PCR to your computer.
Setup guide (this document)
Read this  rst. It takes you through the steps for
connecting the PCR to your computer, and playing
sound from your computer.
Owners manual
This explains all the functionality of the PCR.
Roland software license agreement
You must read this before you unseal the included
CD-ROM.
In the interest of improvement, the appearance of this product and the included items are subject to change without notice.
The software owner’s manual and CD-ROM are not available for sale or replacement should you lose them. Please take care to keep them safe.
As soon as you open the package, check to make sure all items have been included.
If any are missing, please contact your dealer.
If your system does not work as you expect, or if you don’t hear sound, check the following items.
Disconnect your USB devices
Disconnect all USB cables from your computer except for a USB keyboard and/or USB mouse (if used).
Don’t connect the PCR to your computer yet.
Close all software
Close all software thats running on your computer, including background programs such as antivirus software.
Log on to your computer using a user account that has administrative privileges
In order to install the included software, you’ll need to log on with a user account that has administrative privileges.
Make preparations
Choose the following step according
to the operating system youre using
Install the driver
Insert the included CD-ROM into your Mac.
Start up the installer for the Mac driver.
On the desktop, double-click
“PCR.
Double-click the
“Driver”
folder.
Double-click
“PCRUSBDriver.pkg.
Click [Continue] as directed in the “Install EDIROL PCR Driver” window.
The
“Install EDIROL PCR Driver”
window will appear.
Click
[Continue]
as directed in the window.
When
“Select a Destination”
appears, select your boot partition
and click
[Continue]
.
When
“Easy Install on Macintosh HD ”
appears, click
[Install]
(or
[Upgrade]
).
If a con rmation dialog box appears, enter the password for your
computer and click [OK].
When the message
“When you install this software ...
appears,
click
[Continue Installation]
.
When the message
The software was successfully installed”
ap-
pears, click
[Restart]
to restart your Mac.
This completes installation of the driver.
1
2
1.
2.
3.
3
1.
2.
3.
4.
5.
Connect the PCR to your Mac
Connect the PCR to your Mac using the USB cable.
Set the PCR’s power switch
(POWER)
to the
OFF”
position.
Use the USB cable to connect the PCR to your Mac.
You must connect the PCR to a USB connector on the Mac itself. (Don’t
connect the PCR to the USB connector of your computer keyboard.)
Turn on the power of the PCR.
Set the PCR’s power switch
(POWER)
to the
“USB”
position.
The PCR is now connected to your Mac.
1
1.
2.
2
1.
Install PCR Editor
From the CD-ROM, drag and drop the
[PCR Editor V2]
folder within the
[Editor]
folder into the
[Applications]
folder.
This completes installation of the PCR Editor.
Start up PCR Editor.
From the Mac Finder, navigate to the
[Applications]
[PCR Editor V2]
folder, and double-click
PCR Editor V2
.
Make MIDI device settings.
In PCR Editor, select the
[Options]
menu item
[MIDI Devices...]
.
In the MIDI Devices dialog box, make the settings shown in the
illustration and then click
[OK]
.
Exit PCR Editor.
From the
[PCR Editor]
menu, choose
[Quit PCR Editor]
.
This completes settings for PCR Editor.
For details on how to use PCR Editor, refer to “Using PCR Editor” in the owner’s manual.
1
2
1.
3
1.
2.
4
1.
Use GarageBand to play sounds
Start up GarageBand.
From the Mac Finder, double-click
[Applications]
[GarageBand]
.
When GarageBand starts up, select the
[File]
menu command
[New]
.
Click
“New music project.
In the window for creating a
“New project,
type a name and click
[Create]
.
Play the keyboard of the PCR.
When you play the keyboard of the PCR, you’ll hear the Grand Piano
sound that is assigned to the track in GarageBand.
If you hear sound, the PCR and Mac are connected correctly.
1
1.
2.
3.
4.
2
1.
GarageBand is software included with Apple Computer Corporation’s “iLife. If your application folder
does not contain GarageBand, you’ll need to purchase “iLife separately.
In this guide, we’ll use GarageBand 3 for our explanations. The procedure or screens may di er for
other versions.
Using the PCR in the way you want
Can’t install the driver!
Could another USB device be connected?
Be sure to disconnect all USB devices (other than a mouse
and/or keyboard) when you perform the installation. When you
connect the PCR, connect it directly to a USB connector located
on the computer itself.
If you connect the PCR to a USB connector located on your
computer keyboard, the PCR may not operate reliably.
Could other software or background software
(such as antivirus programs) be running?
The installation may not occur correctly if other programs are
running. Be sure to exit all other programs before you perform
the installation.
No sound!
Is the PCR connected correctly?
Re-connect the PCR’s USB cable to your computer.
Is the PCR’s power switch set correctly?
Make sure that the PCR’s power switch is set to the USB position.
Could the main volume of your Mac be turned
down or muted?
In “System Settings, choose Sound Output and increase the
main volume or defeat muting.
Is the sound output port set correctly on your
Mac?
In “System Settings, choose Sound Output and then select
Internal Audio.
Are you using headphones?
Make sure that your headphones are correctly connected to the
headphone jack of your Mac.
Is an audio interface connected to your Mac?
Refer to the owner’s manual for your equipment to check
whether the audio interface is set correctly.
Connections and installation (Mac OS X)
Connections and installation (Windows XP/2000)
In this step you’ll install the PCR driver and PCR Editor into your Mac, and use GarageBand to check that installation was successful.
PCR Editor is software that lets you use your Mac to create a control map (controller assignments) for the PCR.
In order to connect the PCR-300/500/800 (subsequently referred to as the PCR) to your computer and use it, you’ll need to install the driver and
make settings. First, you need to get ready for installation of the driver.
For more detailed information, refer to Troubleshooting in the owner’s manual.
The photo shows the PCR-500.
Theres no sound in applications other than Ga-
rageBand.
Depending on the application you’re using, you may need to
specify MIDI and audio input/output settings. For MIDI input/out-
put, select the PCR’s MIDI device (port 1).
Try installing the most recent version of the driver.
If the Roland website (http://www.EDIROL.net) has a more recent
version of the driver, use the most recent version.
Other side
Copyright © 2007 ROLAND CORPORATION
All rights reserved. No part of this publication may be reproduced in any form
without the written permission of ROLAND CORPORATION.
2
3
6
5
4
?
3
4
Prepare for the installation
Insert the included CD-ROM into your computer.
Start up the installer for the Windows driver.
Choose
[start]
[My Computer]
.
Double-click
“DVD/CD-ROM drive.
Double-click the
“DRIVER”
folder.
Double-click the
“SETUP
icon within the
“XP2K”
folder.
Click [Next] as directed by the “Driver Setup dialog box.
The
“Driver Setup
dialog box will open; click
[Next]
as directed in
the screen.
To begin the installation, click
[Next]
once again.
If a dialog box regarding Windows logo testing appears,
click [Continue Anyway].
If a dialog box with the message “Digital signature Not
Found appears, click [Yes].
If you are unable to continue, click the [OK] button, and then make driver
signing settings (reference) and perform the installation once again.
A dialog box with the message
“Ready to install the driver”
will
appear.
You are now ready to install the driver.
1
2
1.
2.
3.
4.
3
1.
2.
3.
Install the driver and make connections
Connect the PCR to your computer using the USB cable.
Set the PCR’s power switch
(POWER)
to the
OFF”
position.
Use the USB cable to connect the PCR to your computer.
Turn on the power of the PCR.
Set the PCR’s power switch
(POWER)
to the
“USB”
position.
The message
“Found New Hardware
will appear near the task-
bar, then the
“Found New Hardware Wizard”
will open.
If the Found New Hardware Wizard asks whether you
want to connect to Windows Update, choose “No, ... and
then click [Next].
If a dialog box with the message “Digital signature Not
Found appears, click [Yes].
Choose the installation method.
Choose
“Install the software automatically (Recommended),
and click
[Next]
.
If a dialog box regarding Windows logo testing appears,
click [Continue Anyway].
Click [Finish] to complete the installation.
Make sure that
“EDIROL PCR”
is shown, and click
[Finish]
.
In the
“Driver Setup
dialog box, click
[Close]
.
If the
Change System Settings”
dialog box appears, click
[Yes]
.
Restart Windows.
This completes installation of the driver.
1
1.
2.
2
1.
2.
3
1.
4
1.
2.
3.
4.
Make settings for background processing
To ensure that MIDI processing occurs smoothly, you’ll need to make settings as follows so that background
processing is given priority.
Windows XP users
Open the System Properties dialog box.
Choose
[start]
[Control Panel]
.
The
Control Panel”
will open.
If the screen indicates
“Pick a category,
click
[Performance and
Maintenance]
.
From
or pick a Control Panel icon,
click the
[System]
icon.
Open the System Properties dialog box.
Click the
Advanced”
tab, and in the
“Performance
eld, click
[Settings]
.
Enable “Background services.
Click the
Advanced”
tab.
In the
“Processor scheduling”
eld, select the
“Background ser-
vices”
option and click
[OK]
.
Click
[OK]
in the System Properties dialog box.
This completes settings for background processing.
Windows 2000 users
Open the System Properties dialog box.
Select
[Start]
[Settings]
[Control Panel]
.
The control panel will appear.
In
Control Panel,
double-click the
[System]
icon.
Open the Performance Options dialog box.
Click the
Advanced”
tab, and in the
“Performance
eld, click
[Performance Options]
.
Enable “Background Services.
In the
Application response”
eld, add a check mark to
[Back-
ground services]
, and click
[OK]
.
In the
“System Properties”
dialog box, click
[OK]
.
This completes settings for background processing.
1
1.
2.
3.
2
1.
3
1.
2.
3.
1
1.
2.
2
1.
3
1.
2.
Install PCR Editor
In the [EDITOR] folder of the CD-ROM, double-click “SETUP.
Click [Next] as instructed by the InstallShield wizard.
When the
“Read this”
screen appears, read the contents, and if you
consent, click
[Yes]
to indicate your agreement. If you do not consent,
you will not be able to install the software.
Choose destination location.
If you are satis ed with the default location, click
[Next]
.
If you want to install the software in a di erent location, click
[Browse]
and specify the desired location.
In the
Con rmation of installation
screen, click
[Next]
.
Click [Finish] to complete the installation.
This completes installation of PCR Editor.
Start up PCR Editor.
In Windows, choose
[start]
[All Programs]
[PCR Editor V2]
[PCR Editor V2]
.
Make MIDI device settings.
From PCR Editor’s
[Options]
menu, choose
[MIDI Devices...]
.
In the MIDI Devices dialog box, make the settings shown in the illustra-
tion and click
[OK]
.
Exit PCR Editor.
From the
[File]
menu, choose
[Exit]
.
This completes settings for PCR Editor.
For details on using PCR Editor, refer to “Using PCR Editor” in the owner’s manual.
1
2
1.
3
1.
2.
4
5
1.
6
1.
2.
7
1.
Install SONAR LE (for Windows XP users)
Within the CD-ROM, navigate to the [CAKEWALK] — [SONAR_LE] folder,
and double-click
“SETUP.
Proceed with the installation as instructed in the screen.
In the “SONAR Multi-Language Installer” dialog box, choose
[U.S. English]
and click
[OK]
.
Click
[Next]
as instructed in the screen.
In the “Register VST Plug-ins” screen, select “No, ...” and click [Next].
In the “Optional Installations” screen, check only “Windows Media Format ...”
and click [Next].
Click [Finish] to complete the installation.
When the installation is completed, SONAR LE will start up automatically.
1
2
1.
2.
3
Use SONAR LE to play sounds
Make settings at the  rst startup.
Check the online activation.
The
Online Registration
dialog box will appear. For this example,
choose
“Please remind me to register later,
and click
[OK]
.
You’ll need to obtain a registration code within 30 days of installing
SONAR LE.
Tip of the Day”
will appear; click
[Close]
.
Make MIDI device settings.
A dialog box with the message
“No MIDI Outputs Selected”
will ap-
pear, so click
[Choose MIDI Outputs Now]
.
In the
“Inputs”
eld and
Outputs”
eld of the
“MIDI Devices”
dialog
box, select the MIDI devices shown in the illustration.
Click
[OK]
to close the
“MIDI Devices”
dialog box.
Create a new project.
In the
Quick Start
dialog box, click
[Create a New Project]
.
In the
New Project File
dialog box, choose
[Normal]
and click
[OK]
.
Insert a DXi synth.
From the
[Insert]
menu, choose
[DXi synth]
[DreamStation DXi2]
.
In the
“Insert DXi Synth Options”
window, check the items shown in the
illustration, and click
[OK]
.
If the
“DreamStation DXi2
End User License Agreement”
screen ap-
pears, click
[Understood]
.
In the
“DreamStation DXi2”
screen, click
located beside Presets, and
choose
[Bass: 01-Soft Bass]
.
Play the keyboard of the PCR.
When you play the keyboard of the PCR, you’ll hear a bass sound.
If you hear sound, the PCR is correctly connected to your computer.
1
1.
1.
2.
3.
1.
2.
3.
2
1.
2.
3
1.
2.
3.
4.
4
1.
If your system does not work as you expect, or if you don’t hear sound, check the following items.
Can’t install the driver!
Could another USB device be connected?
Be sure to disconnect all USB devices (other than a mouse and/or
keyboard) when you perform the installation. When you connect
the PCR, connect it directly to a USB connector located on the
computer itself; don’t connect it to a USB hub.
Could other software or background software
(such as antivirus programs) be running?
The installation may not occur correctly if other programs are running.
Be sure to exit all other programs before you perform the installation.
No sound!
Is the PCR connected correctly?
Re-connect the PCR’s USB cable to your computer.
Is the PCR’s power switch set correctly?
Make sure that the PCR’s power switch is set to the USB position.
Could the volume of your computer be turned
down or muted?
In
“Control Panel,
choose
“Sounds and Audio Devices”
to open
“Sounds and Audio Devices Properties.
Select the
“Volume
tab and adjust the
“Device volume.
If
“Mute”
is checked, uncheck it.
For more detailed information, refer to Troubleshooting
in the owner’s manual.
You can play sounds, but somethings wrong?
Is there a delay from when you play the note until
you hear sound?
From SONAR LE’s [Options] menu, choose [Audio], and in the [Audio
Options] window, adjust the [Mixing Latency] bu er size.
Decreasing the bu er size (moving toward response speed) will
shorten the time lag, but noise or crackles may occur if the bu er
size is too small. Set this as low as possible without causing prob-
lems with the sound.
If you’re using an external audio interface rather than the built-in
sound functionality of your computer, refer to the owners manual
of the equipment you’re using.
Read this section of the owners manual!
Use control maps!
SONAR
Logic
Control Map
Cubase
:
:
etc...
SONAR
Logic
Control Map
Cubase
:
:
etc...
Use PCR Editor!
Perform!
If “Check audio devices (WDM Kernel Streaming)” occurs automatically
the  rst time you start up, click [Yes].
If checking of audio devices was successful, click [Close].
For details, refer to the owner’s manual of the audio device youre using.
In this step you’ll install the PCR driver, PCR Editor, and SONAR LE into your Windows XP/2000 computer, then use
SONAR LE to check that the installation was successful.
PCR Editor is software that lets you use your computer to create a control map (controller assignments) for the PCR.
Are you using headphones?
Make sure that your headphones are correctly connected to the
headphone jack of your computer.
Is an audio interface connected to your computer?
Refer to the owner’s manual for your equipment to check whether
the audio interface is set correctly.
Use Cakewalk LE Suite!
1
  • Page 1 1
  • Page 2 2

Edirol EDIROL PCR-800 Owner's manual

Category
Musical Instruments
Type
Owner's manual

Ask a question and I''ll find the answer in the document

Finding information in a document is now easier with AI