LIMITED ONE-YEAR WARRANTY
Warranty Coverage: This product is warranted to be free from defects in materials or
workmanship for a period of one (1) year from the original purchase date. This product
warranty is extended only to the original consumer purchaser of the product and is not
transferable. For a period of one (1) year from the date of original purchase of the prod-
uct, our Repair Center will, at its option, either (1) repair the product or (2) replace the
product with a reconditioned comparable model. These remedies are the purchaser's
exclusive remedies under this warranty.
Warranty Service: To obtain warranty service, you must call our warranty service num-
ber at 1-800-233-9054 for return instructions on how to deliver the product, in either the
original packaging or packaging affording an equal degree of protection to the Repair
Center specified below. You must enclose a copy of your sales receipt or other proof of
purchase to demonstrate eligibility for warranty coverage.
To return the appliance, ship to: To contact us, please write to, call, or email:
ATTN: Repair Center Consumer Relations Department
708 South Missouri Street PO Box 7366
Macon, MO 63552 USA Columbia, MO 65205-7366 USA
Phone: 1-800-233-9054
Email: consumer_relations@toastmaster.com
What Is Not Covered: This warranty does not cover damage resulting from misuse,
accident, commercial use, improper service or any other damage caused by anything
other than defects in material or workmanship during ordinary consumer use. This war-
ranty is invalid if the serial number has been altered or removed from the product. This
warranty is valid only in the United States and Canada.
LIMITATION ON DAMAGES: THERE SHALL BE NO LIABILITY FOR ANY INCIDEN-
TAL OR CONSEQUENTIAL DAMAGES FOR BREACH OF ANY EXPRESS OR
IMPLIED WARRANTY OR CONDITION ON THIS PRODUCT.
DURATION OF IMPLIED WARRANTIES: EXCEPT TO THE EXTENT PROHIBITED BY
APPLICABLE LAW, ALL IMPLIED WARRANTIES AND CONDITIONS, INCLUDING,
WITHOUT LIMITATION, IMPLIED WARRANTIES AND CONDITIONS OF MER-
CHANTABILITY AND FITNESS FOR A PARTICULAR PURPOSE OR USE ON THIS
PRODUCT ARE LIMITED IN DURATION TO THE DURATION OF THIS WARRANTY.
Some jurisdictions do not allow the exclusion or limitation of incidental or consequential
damages, or allow limitations on how long an implied warranty lasts, so the above limi-
tations or exclusions may not apply to you. This warranty gives you specific legal rights
and you may have other rights under the laws of your jurisdiction.
For more information on our products, visit our website: www.maxim-toastmaster.com.
©
2006 All rights reserved.
Made in China 12/06
Fast Brew
™
12 CUP COFFEE MAKER
Models MEFB6B, MEFB6W, MEFB6BCAN, MEFB6WCAN

IMPORTANT SAFEGUARDS
When using electrical appliances, basic safety precautions should always be
followed to reduce the risk of fire, electric shock, and/or injury to persons,
including the following:
1. Read all instructions.
2. Do not touch hot surfaces. Use handles or knobs.
3. To protect against fire, electric shock, and injury to persons,
do not immerse cord, plug, or Coffee Maker in water or
other liquid.
4. Close supervision is necessary when any appliance is used by or near
children.
5. Unplug from outlet when not in use and before cleaning.
Allow to cool before putting on or taking off parts, and before cleaning
the appliance.
6. Do not operate any appliance with a damaged cord or plug, or after the
appliance malfunctions, or has been damaged in any manner. Contact
Consumer Service for examination, repair or adjustment.
7. The use of accessory attachments not recommended by the appliance
manufacturer may result in fire, electric shock, or injury to persons.
8. Do not use outdoors.
9. Do not let cord hang over edge of table or counter, or touch
hot surfaces.
10. Do not place on or near a hot gas or electric burner, or in a
heated oven.
11. To disconnect, press the ON/OFF Button to turn the unit OFF, then
remove plug from wall outlet.
12. Do not use appliance for other than intended use.
13. Be certain Lids are securely in place before operating appliance.
14. Scalding may occur if the Lid is removed during the brewing cycles.
15. This Carafe is designed for use with this Coffee Maker. It must never be
used on a range top.
16. Do not set a hot Carafe on a wet or cold surface.
17. Do not use a cracked Carafe or a Carafe having a loose or weakened
handle.
18. Do not clean Carafe with cleansers, steel wool pads, or other abrasive
material.
SAVE THESE INSTRUCTIONS
For Household Use Only
1
NOTES

19
Décalcification de votre cafetière
1. Placer un filtre de papier conique no 4 dans le porte-filtre amovible.
Voir à ce que le porte-filtre amovible soit placé correctement dans
l’unité.
2. Remplir la carafe avec une solution composée de deux cuillères à
table de vinaigre blanc par litre d’eau froide. Verser la solution d’eau
et de vinaigre dans le réservoir d’eau.
3. Placer la carafe vide sur la plaque chauffante. Brancher la cafetière
et appuyer sur le bouton AUTO ON/OFF pour la mettre sous ten-
sion.
4. Laisser la cafetière sous tension jusqu’à ce que la carafe soit à
moitié pleine. Appuyer sur le bouton AUTO ON/OFF pour éteindre la
cafetière, et laisser refroidir pendant une demi-heure.
5. Après une demi-heure, remettre la solution d’eau et de vinaigre dans
la cafetière.
6. Placer la carafe vide sur la plaque chauffante. Appuyer sur le bouton
AUTO ON/OFF pour mettre la cafetière sous tension et laisser toute
la solution d’eau et de vinaigre s’écouler.
7. Jeter la solution et le filtre de papier.
8. Après avoir laissé refroidir la cafetière pendant 15 minutes, enlever
toute trace de vinaigre en versant le contenu d’une carafe pleine
d’eau froide dans le réservoir d’eau. Veiller à insérer un nouveau fil-
tre dans le porte-filtre et placer la carafe vide sur la plaque chauf-
fante. Appuyer sur le bouton AUTO ON/OFF pour mettre la cafetière
sous tension et effectuer un cycle complet.
9. À la fin du cycle, appuyer sur le bouton AUTO ON/OFF pour étein-
dre la cafetière. Jeter l’eau de la carafe. Répéter les étapes 8-9.
Débrancher la cafetière lorsque vous avez terminé.
2
ADDITIONAL
IMPORTANT SAFEGUARDS
WARNING: This appliance generates heat and escaping steam dur-
ing use. Proper precautions must be taken to prevent the risk of
burns, fires, or other injury to persons or damage to property.
1. All users of this appliance must read and understand these Use &
Care instructions before operating or cleaning this appliance.
2. The cord to this appliance should be plugged into a 120V AC
electrical outlet only.
3. Use water only in this appliance! Do not put any other liquids or food
products in this appliance. Do not mix or add anything to the water
placed in this appliance, except as instructed in the USER MAINTE-
NANCE INSTRUCTIONS to clean the appliance.
4. DO NOT attempt to move an appliance containing hot liquids. Allow
appliance to cool completely before moving.
5. Keep appliance at least 4 inches away from walls or other objects
during operation. Do not place any objects on top of appliance while
it is operating. Place the appliance on a surface that is resistant to
heat.
6. If this appliance begins to malfunction during use, press the ON/OFF
Button to turn the unit OFF, then immediately unplug the cord. Do
not use or attempt to repair the malfunctioning appliance.
7. If this appliance falls or accidentally becomes immersed in water or
any other liquid, unplug it immediately. Do not reach into the water!
Do not use this appliance after it has fallen into or has become
immersed in water. Contact Consumer Service for examination and
repair.
8. Do not leave this appliance unattended during use.
9. DO NOT put Carafe into a microwave.
10. DO NOT leave empty Carafe on Warming Plate when appliance is
turned ON, as the Carafe may crack or become otherwise damaged.
CAUTION: To prevent injury when utilizing Auto Pause and Pour,
replace Carafe within 30 seconds of removing during brewing
process.

Dépôts de minéraux et décalcification
Lorsque vous constatez une quantité excessive de vapeur ou que le
temps de préparation augmente de façon considérable, vous devez net-
toyer votre cafetière car il y a accumulation de dépôts de minéraux et de
calcaire provenant de votre eau. Si le pompage s’arrête avant que toute
l’eau n’ait été retirée de la cafetière, l’appareil a besoin d’une décalcifica-
tion.
La fréquence à laquelle vous devez décalcifier votre cafetière dépend de
la dureté de l’eau utilisée. Nous vous suggérons de détartrer votre
cafetière aux intervalles suivants:
• Eau douce : à tous les 80 cycles de préparation
• Eau dure : à tous les 40 cycles de préparation
183
Polarized Plug
This appliance has a polarized plug (one blade is wider than the other).
To reduce the risk of electric shock, this plug is intended to fit into a
polarized outlet only one way. If the plug does not fit fully in the outlet,
reverse the plug. If it still does not fit, contact a qualified electrician. Do
not attempt to modify the plug in any way.
Short Cord Instructions
A short power-supply cord is provided to reduce the risk resulting from
becoming entangled in or tripping over a longer cord.
Do not use an extension cord with this product.
Plasticizer Warning
CAUTION: To prevent Plasticizers from migrating from the finish of the
counter top or table top or other furniture, place NON-PLASTIC coasters
or place mats between the appliance and the finish of the counter top or
table top.
Failure to do so may cause the finish to darken. Permanent blemishes
may occur or stains can appear.
Electric Power
If the electrical circuit is overloaded with other appliances, your appliance
may not operate properly. It should be operated on a separate electrical
circuit from other appliances.
Coffee Yield
12 Cup Coffee Maker: 12 (5-oz.) cups.
NOTE: A 5-oz. cup is the American industry standard and is used by
most Coffee Maker manufacturers. To fill your favorite mug, fill Coffee
Maker reservoir with enough water for 4 cups (20 ounces).
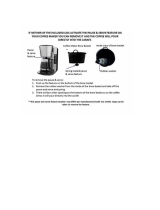
WARNING
TO REDUCE THE RISK OF FIRE OR ELECTRIC SHOCK, DO NOT
REMOVE THE BOTTOM COVER. NO USER-SERVICEABLE PARTS
INSIDE. REPAIR SHOULD BE DONE BY AUTHORIZED SERVICE PER-
SONNEL ONLY.
Page is loading ...

16
Conseils pour de meilleurs résultats
• Nous vous recommandons d’utiliser du café qui a été moulu spé-
cialement pour une cafetière filtre automatique. Ce type de café est
préparé en fonction du système de préparation de votre cafetière et
procurera une meilleure décoction, produisant un café riche et
savoureux.
• N’utiliser que des filtres coniques. Vous trouverez des filtres
coniques dans les marchés d’alimentation. Utiliser les filtres stan-
dard no 4. Ne pas utiliser de filtres en papier en forme de panier.
Nous recommandons l’utilisation de filtres coniques
Melitta no 4.
• Pour obtenir une saveur optimale, il est essentiel que la cafetière
soit propre. Par conséquent, des nettoyages réguliers effectués con-
formément aux consignes d’entretien et de nettoyage qui suivent
sont fortement recommandés.
• Toujours utiliser de l’eau fraîche et propre.
• Ranger le café moulu dans un lieu frais et sec. Une fois l’emballage
ouvert, le tenir bien scellé au réfrigérateur pour en préserver la
fraîcheur.
• Pour obtenir le meilleur café qui soit, acheter des grains entiers de
café et les moudre finement juste avant la préparation.
• Ne pas utiliser le café moulu plus d’une fois, ce qui diminuerait con-
sidérablement la saveur du café préparé.
• Réchauffer le café n’est pas recommandé, sa saveur atteignant son
maximum dès la fin du cycle d’infusion.
• Si vous utilisez la cafetière Infusion rapide autant pour le café que
pour le thé, nous vous recommandons de nettoyer à fond la carafe,
le couvercle et le porte-filtre amovible dans de l’eau savonneuse
tiède. Essuyer la pomme de douche située sous le couvercle de
l’appareil avec un chiffon humide et propre.
5
Before Brewing for the First Time
CAUTION: To protect against electric shock, do not immerse the
Coffee Maker or allow AC cord to come into contact with water or
other liquids.
1. After carefully unpacking from carton, the inside of your Coffee
Maker and Glass Carafe must be cleaned. Remove any labels from
the outer surfaces.
2. Brew 12 (5-oz.) cups of fresh water only. Follow the OPERATING
INSTRUCTIONS, but do not add coffee grounds or paper filter to the
Removable Filter Holder.
3. When all the water has brewed into the Carafe, press the AUTO
ON/OFF Button so the unit is turned OFF.
4. Allow the Coffee Maker to cool for 15 minutes, discard the water
from the Carafe, then repeat steps 2 and 3.
5. After the second pot of water has cooled, discard the water and
thoroughly wash the Removable Filter Holder, Glass Carafe and
Carafe Lid in warm, soapy water. Dry all parts thoroughly.
Coffee Filters
Cone-shaped paper filters are available locally at grocery stores and
where coffee makers are sold.
We recommend using Melitta #4 cone-shaped filters.
The use of basket-style paper filters is not recommended, since they do
not conform to the shape of the Removable Filter Holder and may cause
coffee to back up and spill over during brewing.
Page is loading ...

NOTA: Lorsque vous utilisez le mode de départ immédiat après
avoir effectué un cycle programmé, sans débrancher la cafetière, il
peut être nécessaire d’appuyer sur le bouton AUTO ON/OFF deux
fois. La première fois, le voyant lumineux clignotera; la deuxième
fois, le voyant s’allumera en permanence et la préparation com-
mencera.
8. Si vous désirez servir une tasse de thé avant que le cycle de prépa-
ration ne soit terminé, retirer simplement la carafe de la plaque
chauffante. L’égouttement cessera automatiquement. Remettre la
carafe en place sur la plaque chauffante dans les 30 secondes; l’é-
gouttement reprendra. Si la carafe n’est pas replacée sur la plaque
chauffante, l’eau chaude pourrait déborder du porte-filtre.
9. Lorsque la préparation est terminée, l’appareil change de mode afin
de garder le liquide chaud; il gardera le thé à la température requise
pour le servir. Pour garder le thé chaud, replacer la carafe sur la
plaque chauffante lorsque vous ne servez pas.
NOTA: Selon les goûts et le type de thé infusé, vous pouvez choisir
de laisser le thé infuser plus longtemps avant d’enlever le panier et
de servir.
ATTENTION: La carafe, le couvercle et le panier pour infuser le
thé sont chauds après la préparation! Soyez très vigilants
lorsque vous manipulez ces pièces.
10. Appuyer sur le bouton AUTO ON/OFF une autre fois pour éteindre
l’appareil lorsque vous ne vous en servez pas. Lorsque le cycle de
préparation est terminé, l’appareil s’éteindra automatiquement après
deux heures. L’indicateur lumineux s’éteindra.
11. Laisser refroidir la cafetière pendant 10 minutes entre les cycles.
ATTENTION: La plaque chauffante est chaude! Ne pas toucher le
bas de la carafe ni la plaque chauffante pendant la préparation ni
après celle-ci.
NOTA: La quantité de thé dans la carafe peut être légèrement inférieure
à la quantité d’eau qui a été versée dans le réservoir d’eau, car une cer-
taine quantité d’eau est absorbée par les feuilles ou les sachets de thé.
NOTA: La fonction programmable doit être réglée de nouveau après
avoir été utilisée.
147
OPERATING INSTRUCTIONS
Brewing Coffee - Immediate Start
NOTE: When brewing coffee, the Tea Infusion Basket is not need-
ed. To remove the Tea Infusion Basket, prop the Carafe Lid open
with one hand and with the other hold the rim of the Tea Infusion
Basket. The tab on the outer rim of the Tea Infusion Basket will be
aligned with the position located on the bottom side of the
Carafe Lid. Turn the Tea Infusion Basket counter-clockwise until the
tab aligns with the position located on the bottom of the
Carafe Lid. Remove the Tea Infusion Basket and close the Carafe
Lid.
1. Plug the appliance into a standard 120V AC electrical outlet.
2. Markings on the Carafe indicate the level of water required to brew
the desired number of cups. Fill the Carafe with cold tap water.
Close the Lid back into position.
NOTE: Brewing less than 4 cups is not recommended.
3. Lift up the hinged lid on the top of the unit and slowly pour water into
the Water Chamber.
4. Grasp the Removable Filter Holder and lift straight up and out of the
Filter Cavity. Insert a #4 paper coffee filter inside the Removable
Filter Holder.
We recommend using Melitta #4 cone-shaped filters.
5. Place coffee grounds in the filter, using one level tablespoon of drip
grind coffee for each cup of brewed coffee.
6. Replace the Removable Filter Holder by pushing it down into the
Filter Holder Cavity. When properly seated, the tab on the Filter
Holder will be positioned on the front of the Holder Cavity.
7. Set the Brew Strength Control to the desired strength.
8. Place the Carafe onto the Warming Plate. Make sure the Carafe is
positioned correctly on the Warming Plate under the Auto Pause and
Pour Assembly.
9. Press the AUTO ON/OFF Button once. The Indicator Light will turn
on and the brew cycle will begin.

NOTA: Selon les goûts et le type de thé utilisé, vous préférerez
peut-être laisser le thé infuser plus longtemps avant de retirer le
panier pour infuser le thé.
ATTENTION: La carafe, le couvercle et le panier pour infuser le
thé sont chauds après la préparation! Soyez très vigilants
lorsque vous manipulez ces pièces.
14. Appuyer sur le bouton AUTO ON/OFF une autre fois pour éteindre
l’appareil lorsque vous ne vous en servez pas. Lorsque le cycle de
préparation est terminé, l’appareil s’éteindra automatiquement après
deux heures. L’indicateur lumineux s’éteindra.
15. Laisser refroidir la cafetière pendant 10 minutes entre les cycles.
ATTENTION: La plaque chauffante est chaude! Ne pas toucher le
bas de la carafe ni la plaque chauffante pendant la préparation ni
après celle-ci.
NOTA: La quantité de thé dans la carafe peut être légèrement inférieure
à la quantité d’eau qui a été versée dans le réservoir d’eau, car une cer-
taine quantité d’eau est absorbée par les feuilles ou les sachets de thé.
Préparation du thé – Programmation de la
minuterie à retardement
1. Suivre les étapes 1 à 10 de « Préparation du thé – Démarrage
immédiat ».
2. Vérifier que l’heure est bien exacte (voir les instructions « Régler
l’heure » à la page 7).
3. Appuyer sur le bouton PROG une fois et relâcher. Le voyant
lumineux clignotera et l’heure indiquée sera 12 h.
4. Régler l’heure de départ en utilisant les boutons HOUR et MIN,
comme décrit précédemment dans la section « Régler l’heure ».
5. Pendant le réglage, AM et PM sur l’écran changeront automatique-
ment.
6. Appuyer de nouveau sur le bouton PROG pour compléter le réglage
de l’heure de départ.
7. Après le réglage, appuyer sur le bouton AUTO ON/OFF une fois
pour activer la fonction Programmation. Le voyant lumineux clig-
notera pour indiquer que la minuterie est réglée.
13 8
10. If you wish to serve a cup of coffee before brew cycle is
complete, simply remove Carafe from Warming Plate. Dripping will
automatically cease. Return Carafe to position on Warming Plate
within 30 seconds; dripping will resume. If the Carafe is not returned
to the Warming Plate, the coffee may overflow from the Filter Holder.
11. When brewing is completed, the Coffee Maker switches to a Keep
Warm mode which will hold coffee at the proper serving tempera-
ture. To keep the coffee hot, place the Carafe back on the Warming
Plate when not serving.
12. Press the AUTO ON/OFF Button again to turn the unit OFF when
not in use. When the brewing cycle is over, the Coffee Maker will
automatically shut off after two hours. The Indicator Light will turn off.
13. Allow the unit to cool for 10 minutes between cycles.
WARNING: Warming Plate is hot! Do not touch bottom of Carafe or
Warming Plate during or after brewing.
NOTE: The amount of coffee in the Carafe may be slightly less than the
amount of water placed in the Water Chamber, since some of the water is
absorbed by the coffee grounds.

7. Pour retirer le panier pour infuser le thé, main-
tenir le couvercle de la carafe ouvert avec une
main, et avec l’autre tenir le bord du panier
pour infuser le thé. L’onglet sur le bord
extérieur du panier pour infuser le thé sera
aligné avec la position située sur le côté
inférieur du couvercle de la carafe. Tourner le
panier pour infuser le thé dans le sens inverse
des aiguilles d’une montre jusqu’à ce que
l’onglet soit aligné avec la position
située au bas du couvercle de la carafe.
Retirer le panier pour infuser le thé et fermer
le couvercle de la carafe.
8. Placer les sachets ou les feuilles de thé dans le panier pour infuser
le thé. Voir à ce qu’aucun sachet ne dépasse du panier et, si vous
utilisez des sachets, à ce que les fils aient été enlevés.
9. Le montage du panier pour infuser le thé dans la carafe est en fait
l’inverse de l’étape 7. Placer le panier pour infuser le thé sur le côté
inférieur du couvercle de la carafe en alignant l’onglet du bord
extérieur du panier avec la position , située au bas du couver-
cle de la carafe. Tenir le panier pour infuser le thé et tourner dans le
sens des aiguilles d’une montre jusqu’à ce que l’onglet soit aligné
avec la position et se bloque. Fermer le couvercle de la
carafe.
10. Placer la carafe sur la plaque chauffante. Voir à ce que la carafe soit
bien placée sur la plaque chauffante sous le dispositif Pause et serv-
ice automatique.
11. Appuyer sur le bouton AUTO ON/OFF une fois. Le voyant lumineux
s’allumera et le cycle de préparation commencera.
12. Si vous désirez servir une tasse de thé avant que le cycle de prépa-
ration ne soit terminé, retirer simplement la carafe de la plaque
chauffante. L’égouttement cessera automatiquement. Remettre la
carafe en place sur la plaque chauffante dans les 30 secondes; l’é-
gouttement reprendra. Si la carafe n’est pas replacée sur la plaque
chauffante, l’eau chaude pourrait déborder du porte-filtre.
13. Lorsque la préparation est terminée, l’appareil change de mode afin
de garder le liquide chaud; il gardera le thé à la température requise
pour le servir. Pour garder le thé chaud, replacer la carafe sur la
plaque chauffante lorsque vous ne servez pas.
ILLUSTRATION 2:
Montage du panier pour
infuser le thé
12
Brewing Coffee - Programming Delay Timer
1. Follow steps 1 – 8 in BREWING COFFEE – IMMEDIATE START.
2. Be sure clock is set to the current time (see SETTING THE CLOCK
instructions on Page 6).
3. Press the PROG Button once and release. The Indicator Light will
flash and the time will show 12 : 00.
4. Set the desired program start time by using the HOUR and MIN
Buttons as previously described in SETTING THE CLOCK.
5. During the setting, AM/PM on the display will change
automatically.
6. Press the PROG Button again to complete the programmed start
time setting.
7. After setting, press the AUTO ON/OFF Button once to activate the
programmable function. The Indicator Light will flash to signify the
timer is set.
NOTE: When using the Immediate Start mode after a Programmed
cycle has been used, without unplugging the unit in-between, it may
be necessary to press the AUTO ON/OFF Button two times. The
first time the Indicator Light will flash; the second time the Light will
turn solid and brewing will begin.
8. If you wish to serve a cup of coffee during the brew cycle, simply
remove Carafe from Warming Plate. Dripping will automatically
cease. Return Carafe to position on Warming Plate within 30 sec-
onds; dripping will resume. If the Carafe is not returned to the
Warming Plate, the coffee may overflow from the Filter Holder.
9. When brewing is completed, the Coffee Maker switches to a Keep
Warm mode which will hold coffee at the proper serving tempera-
ture. To keep the coffee hot, place the Carafe back on the Warming
Plate when not serving.
10. Press the AUTO ON/OFF Button again to turn the unit OFF when
not in use. When the brewing cycle is over, the Coffee Maker will
automatically shut off after two hours. The Indicator Light will turn off.
11. Allow the unit to cool for 10 minutes between cycles.
WARNING: Warming Plate is hot! Do not touch bottom of Carafe or
Warming Plate during or after brewing.
9

NOTA: La quantité de café dans la carafe peut être légèrement inférieure à la
quantité d’eau qui a été versée dans le réservoir d’eau, car une certaine quan-
tité d’eau est absorbée par les grains de café.
NOTA: La fonction programmable doit être réglée de nouveau après avoir été
utilisée.
Préparation du thé – Démarrage immédiat
1. Brancher l’appareil dans une prise électrique 120 V c.a. standard.
2. Remplir la carafe avec de l’eau froide du robinet jusqu’à la marque des 11
tasses. Refermer le couvercle.
NOTA: La quantité maximale de thé qui pourra être préparée est de 11
tasses; autrement, la carafe débordera.
NOTA: Nous recommandons de ne pas préparer moins de 11 tasses de
thé.
3. Lever le couvercle à charnière situé sur le dessus de la cafetière et verser
lentement l’eau dans le réservoir d’eau.
4. Voir à ce qu’il n’y ait pas de filtre en papier dans le porte-filtre amovible. Il
n’est pas nécessaire d’avoir un filtre en papier pour préparer le thé, mais
le porte-filtre devrait néanmoins être en place. Lorsque bien placé, l’onglet
du porte-filtre sera rangé sur le devant de la cavité. Refermer le couvercle.
5. Régler le régulateur de concentration à la force voulue.
6. Le panier pour infuser le thé permet d’utiliser du thé en feuilles ou en
sachets.
Nous vous recommandons d’utiliser les quantités suivantes, en supposant
que vous préparez 11 tasses :
NOTA: Le tableau peut être modifié selon les goûts et le type de thé util-
isé.
NOTA: Si vous utilisez des sachets de thé, vous devez enlever les fils
attachés aux sachets.
Feuilles de thé 8 cuillères à thé
Sachets de thé 8 sachets
11
NOTE: The amount of coffee in the Carafe may be slightly less than the
amount of water placed in the Water Chamber, since some of the water is
absorbed by the coffee grounds.
NOTE: The programmable function must be reset after each programmed
use.
Brewing Tea - Immediate Start
1. Plug the appliance into a standard 120V AC electrical outlet.
2. Fill the Carafe with cold tap water to the 11 cup marking. Close the
Lid back into position.
NOTE: 11 cups is the maximum for brewing tea otherwise the
Carafe will overflow.
NOTE: We do not recommend brewing less than 11 cups of tea.
3. Lift up the hinged lid on the top of the unit and slowly pour water into
the Water Chamber.
4. Make sure there is no paper coffee filter inside the Removable Filter
Holder. This is not needed for the tea cycle, but the Filter Holder
must be in its proper place. When properly seated, the tab on the
Filter Holder will be positioned on the front of the Holder Cavity.
Close the lid back into position.
5. Set the Brew Strength Control to the desired strength.
6. With the Tea Infusion Basket you have the choice to use either
Loose Leaf Tea or Tea Bags.
We recommend using the following quantities, based on brewing 11
cups:
NOTE: Chart may be altered depending on individual taste prefer-
ences and the type of tea being brewed.
NOTE: If using tea bags, it is necessary to remove any strings
attached.
Loose Leaf Tea 8 teaspoons
Tea Bags 8 bags
10

Préparation du café - Programmation de la minut-
erie à retardement
1. Suivre les étapes 1 à 8 de « Préparation du café–Démarrage immédiat ».
2. Vérifier que l’heure est bien exacte (voir les instructions « Régler l’heure »
à la page 7).
3. Appuyer sur le bouton PROG une fois et relâcher. Le voyant lumineux
clignotera et l’heure indiquée sera 12 h.
4. Régler l’heure de départ en utilisant les boutons HOUR et MIN, comme
décrit précédemment dans la section « Régler l’heure ».
5. Pendant le réglage, AM et PM sur l’écran changeront automatiquement.
6. Appuyer de nouveau sur le bouton PROG pour compléter le réglage de
l’heure de départ.
7. Après le réglage, appuyer sur le bouton AUTO ON/OFF une fois pour
activer la fonction Programmation. Le voyant lumineux clignotera pour
indiquer que la minuterie est réglée.
NOTA: Lorsque vous utilisez le mode de départ immédiat après avoir
effectué un cycle programmé, sans débrancher la cafetière, il peut être
nécessaire d’appuyer sur le bouton AUTO ON/OFF deux fois. La première
fois, le voyant lumineux clignotera; la deuxième fois, le voyant s’allumera
en permanence et la préparation commencera.
8. Si vous désirez servir une tasse de café durant le cycle de préparation,
retirez simplement la carafe de la plaque chauffante. L’égouttement
cessera automatiquement. Remettez la carafe à sa place sur la plaque
chauffante dans les 30 secondes qui suivent; l’égouttement reprendra. Si
la carafe n’est pas remise sur la plaque chauffante, le café pourrait débor-
der du porte-filtre.
9. Lorsque la préparation est terminée, la cafetière change de mode afin de
garder le liquide chaud; elle gardera le café à la température requise pour
le servir. Pour garder le café chaud, replacer la carafe sur la plaque chauf-
fante lorsque vous ne servez pas.
10. Appuyer sur le bouton AUTO ON/OFF une autre fois pour éteindre l’ap-
pareil lorsque vous ne vous en servez pas. Lorsque le cycle de prépara-
tion est terminé, l’appareil s’éteindra automatiquement après deux heures.
L’indicateur lumineux s’éteindra.
11. Laisser la cafetière refroidir pendant 10 minutes entre les cycles.
ATTENTION: La plaque chauffante est chaude! Ne pas toucher le bas de
la carafe ni la plaque chauffante pendant la préparation ni après celle-ci.
10
7. To remove the Tea Infusion Basket, prop the
Carafe Lid open with one hand and with the
other hold the rim of the Tea Infusion Basket.
The tab on the outer rim of the Tea Infusion
Basket will be aligned with the position
located on the bottom side of the Carafe Lid.
Turn the Tea Infusion Basket counter-clock-
wise until the tab aligns with the posi-
tion located on the bottom of the Carafe Lid.
Remove the Tea Infusion Basket and close
the Carafe Lid.
8. Place tea bags or loose leaf tea into the Tea
Infusion Basket. Be sure that no bags are outside of the basket
opening and if using tea bags, all strings have been removed.
9. Assembly of the Tea Infusion Basket to the Carafe is basically the
reverse of Step 7. Place the Tea Infusion Basket on the bottom side
of the Carafe Lid aligning the tab on the outer rim of the Basket with
the position, located on the bottom of the Carafe Lid. Hold the
Tea Infusion Basket and turn clockwise until the tab aligns with
the position and locks into place. Close the Carafe Lid.
10. Place the Carafe onto the Warming Plate. Make sure the Carafe is
positioned correctly on the Warming Plate under the Auto Pause and
Pour Assembly.
11. Press the AUTO ON/OFF Button once. The Indicator Light will turn
on and the brew cycle will begin.
12. If you wish to serve a cup of tea before the brew cycle is
complete, simply remove Carafe from Warming Plate. Dripping will
automatically cease. Return Carafe to position on Warming Plate
within 30 seconds; dripping will resume. If the Carafe is not returned
to the Warming Plate, the hot water may overflow from the Filter
Holder.
13. When brewing is completed, the appliance switches to a Keep Warm
mode which will hold tea at the proper serving temperature. To keep
the tea hot, place the Carafe back on the Warming Plate when not
serving.
NOTE: Depending on individual taste preferences and the type of
tea being brewed, you may prefer to let the tea steep longer before
removing the Tea Infusion Basket.
CAUTION: Carafe, Lid, and Tea Infusion Basket are hot after
brewing! Use extreme care when handling these parts.
11
FIGURE 2:
Tea Infusion Basket Assembly

10. Si vous désirez servir une tasse de café avant que le cycle de pré-
paration ne soit terminé, retirer simplement la carafe de la plaque
chauffante. L’égouttement cessera automatiquement. Remettre la
carafe en place sur la plaque chauffante dans les 30 secondes; l’é-
gouttement reprendra. Si la carafe n’est pas replacée sur la plaque
chauffante, l’eau chaude pourrait déborder du porte-filtre.
11. Lorsque la préparation est terminée, la cafetière change de mode
afin de garder le liquide chaud; elle gardera le café à la température
requise pour le servir. Pour garder le café chaud, replacer la carafe
sur la plaque chauffante lorsque vous ne servez pas.
12. Appuyer sur le bouton AUTO ON/OFF une autre fois pour éteindre
l’appareil lorsque vous ne vous en servez pas. Lorsque le cycle de
préparation est terminé, l’appareil s’éteindra automatiquement après
deux heures. L’indicateur lumineux s’éteindra.
13. Laisser la cafetière refroidir pendant 10 minutes entre les cycles.
ATTENTION: La plaque chauffante est chaude! Ne pas toucher le
bas de la carafe ni la plaque chauffante pendant la préparation ni
après celle-ci.
NOTA: La quantité de café dans la carafe peut être légèrement
inférieure à la quantité d’eau qui a été versée dans le réservoir d’eau, car
une certaine quantité d’eau est absorbée par les grains de café.
9
14. Press the AUTO ON/OFF Button again to turn the unit OFF when
not in use. When the brewing cycle is over, the appliance will
automatically shut off after two hours. The Indicator Light will turn off.
15. Allow the unit to cool for 10 minutes between cycles.
WARNING: Warming Plate is hot! Do not touch bottom of Carafe or
Warming Plate during or after brewing.
NOTE: The amount of tea in the Carafe may be slightly less than the
amount of water placed in the Water Chamber, since some of the water is
absorbed by the loose leaf tea or tea bags.
Brewing Tea - Programming Delay Timer
1. Follow steps 1 – 10 in BREWING TEA – IMMEDIATE START.
2. Be sure clock is set to the current time (see SETTING THE CLOCK
instructions on Page 6).
3. Press the PROG Button once and release. The Indicator Light will
flash and the time will show 12 : 00.
4. Set the desired program start time by using the HOUR and MIN
Buttons as previously described in SETTING THE CLOCK.
5. During the setting, AM/PM on the display will change automatically.
6. Press the PROG Button again to complete the programmed start
time setting.
7. After setting, press the AUTO ON/OFF Button once to activate the
programmable function. The Indicator Light will flash to signify the
timer is set.
NOTE: When using the Immediate Start mode after a Programmed
cycle has been used, without unplugging the unit in-between, it may
be necessary to press the AUTO ON/OFF Button two times. The
first time the Indicator Light will flash; the second time the Light will
turn solid and brewing will begin.
8. If you wish to serve a cup of tea before the brew cycle is complete,
simply remove Carafe from Warming Plate. Dripping will automatical-
ly cease. Return Carafe to position on Warming Plate within 30 sec-
onds; dripping will resume. If the Carafe is not returned to the
Warming Plate, the hot water may overflow from the Filter Holder.
9. When brewing is completed, the appliance switches to a Keep Warm
mode which will hold the tea at the proper serving temperature. To
keep the tea hot, place the Carafe back on the Warming Plate when
not serving.
12

MODE D’EMPLOI
Préparation du café – Démarrage immédiat
NOTA: Pour préparer le café, le panier pour infuser le thé n’est pas
utile. Pour le retirer, maintenir ouvert le couvercle de la carafe avec
une main et, avec l’autre, tenir le bord du panier pour infuser le thé.
L’onglet sur le bord extérieur du panier pour infuser le thé sera
aligné avec la position située sur le côté inférieur du couver-
cle de la carafe. Tourner le panier pour infuser le thé dans le sens
inverse des aiguilles d’une montre jusqu’à ce que l’onglet soit aligné
avec la position située au bas du couvercle de la carafe.
Retirer le panier pour infuser le thé et fermer le couvercle de la
carafe.
1. Brancher l’appareil dans une prise électrique 120 V c.a. standard.
2. Les marques sur la carafe indiquent le niveau d’eau nécessaire pour
préparer le nombre de tasses désiré. Remplir la carafe avec de l’eau
froide du robinet. Refermer le couvercle.
NOTA: Il n’est pas recommandé de préparer moins de 4 tasses de
café.
3. Lever le couvercle à charnière situé sur le dessus de la cafetière et
verser lentement l’eau dans le réservoir d’eau.
4. Saisir le porte-filtre amovible, le soulever et le sortir de la cavité.
Insérer un filtre en papier no 4 dans le porte-filtre amovible.
Nous recommandons l’utilisation de filtres coniques Melitta no 4.
5. Mettre le café moulu dans le filtre, en mesurant une cuillérée à table
rase par tasse de café désirée.
6. Replacer le porte-filtre amovible en le poussant dans la cavité
prévue à cet effet. Lorsqu’il sera correctement placé, l’onglet du
porte-filtre sera placé sur le devant de la cavité.
7. Régler le régulateur de concentration à la force voulue.
8. Placer la carafe sur la plaque chauffante. Voir à ce que la carafe soit
bien placée sur la plaque chauffante sous le dispositif Pause et serv-
ice automatique.
9. Appuyer sur le bouton AUTO ON/OFF une fois. Le voyant lumineux
s’allumera et le cycle de préparation commencera.
8
NOTE: Depending on individual taste preferences and the type of
tea being brewed, you may prefer to let the tea steep longer before
removing the Tea Infusion Basket and serving.
CAUTION: Carafe, Lid, and Tea Infusion Basket are hot after
brewing! Use extreme care when handling these parts.
10. Press the AUTO ON/OFF Button again to turn the unit OFF when
not in use. When the brewing cycle is over, the appliance will
automatically shut off after two hours. The Indicator Light will turn off.
11. Allow the unit to cool for 10 minutes between cycles.
WARNING: Warming Plate is hot! Do not touch bottom of Carafe or
Warming Plate during or after brewing.
NOTE: The amount of tea in the Carafe may be slightly less than the
amount of water placed in the Water Chamber, since some of the water is
absorbed by the loose leaf tea or tea bags.
NOTE: The programmable function must be reset after each programmed
use.
13

Régler l’heure
1. Brancher la cafetière dans une prise de 120 V ~ 60 Hz. L’écran indi-
quera 12 h et continuera à clignoter jusqu’à ce que l’heure soit
réglée.
2. Appuyer sur le bouton HOUR jusqu’à l’obtention de l’heure voulue
(la petite aiguille sera à la bonne position). Pendant le réglage, l’indi-
cation AM/PM sur l’écran changera automatiquement.
3. Appuyer sur le bouton MINUTE jusqu’à l’obtention de la minute
voulue (la grande aiguille sera à la bonne position). L’écran devrait
maintenant indiquer la bonne heure et la trotteuse devrait bouger.
ILLUSTRATION 1:
Panneau de réglage
7
Voyant lumineux
14
Auto Pause and Pour Feature
The Auto Pause and Pour feature allows you to pour a cup of coffee or
tea before brewing is complete. Simply remove the Carafe from the
Warming Plate. Always keep the Lid on the Carafe down when pouring
the coffee.
IMPORTANT: When using the Auto Pause and Pour feature while the
Coffee Maker is still brewing, the Carafe must be replaced on the
Warming Plate, under the Filter Holder Cavity within 30 seconds to pre-
vent the Filter Holder from overflowing.
Replacing the Carafe will restart the brew-
ing process.
Brew Strength Feature
Use the Brew Strength feature to control
the desired strength of your coffee or tea.
This feature regulates the flow of water to
either slow down or speed up the brewing
process depending on the strength you
desire. Simply adjust the Brew Strength
Control on the top of the lid before start-
ing each brew cycle to achieve desired
strength.
To Brew a Second Pot of Coffee or Tea
To brew a second pot of coffee or tea, turn the appliance OFF for
10 minutes and allow it to cool. Empty used coffee grounds or loose leaf
tea / tea bags and repeat steps for brewing.
CAUTION: Failure to allow appliance to cool completely may cause
water to overheat and spray hot steam. The hot steam can cause
severe burns.
FIGURE 3:
Brew Strength Control

6
Avant la première utilisation
ATTENTION: Afin de réduire le risque de décharge électrique, ne
pas plonger la cafetière dans l’eau ou dans tout autre liquide et ne
pas laisser le fil électrique c.a. entrer en contact avec l’eau ou avec
tout autre liquide.
1. Après avoir enlevé soigneusement l’emballage, vous devez nettoyer
l’intérieur de la cafetière et de la carafe en verre. Enlever toute éti-
quette des surfaces externes.
2. Préparer 12 tasses (de 5 oz) d’eau fraîche seulement. Suivre le
MODE D’EMPLOI, mais ne pas ajouter de café moulu ni de filtre en
papier dans le porte-filtre amovible.
3. Lorsque toute l’eau se sera écoulée dans la carafe, appuyer sur le
bouton AUTO ON/OFF pour éteindre la cafetière.
4. Laisser refroidir pendant 15 minutes, jeter l’eau de la carafe et
répéter les étapes 2 et 3.
5. Après que l’eau de la deuxième carafe d’eau sera refroidie, jeter
l’eau et laver à fond le porte-filtre amovible, la carafe en verre et son
couvercle dans de l’eau savonneuse tiède. Faire sécher complète-
ment toutes les pièces.
Filtres à café
On peut se procurer les filtres à café coniques en papier dans tous les-
bons magasins d’alimentation et dans les boutiques et magasins qui
vendent des cafetières.
Nous recommandons l’utilisation de filtres coniques Melitta no 4.
Les filtres en papier en forme de panier ne sont pas recommandés, car-
leur format ne correspond pas à celui du panier-filtre amovible. Leur uti-
sation pourrait occasionner des débordements et des dégâts pendant le
fonctionnement de la cafetière.
15
Hints For Best Results
• We recommend using coffee which has been ground specifically
for automatic drip coffee makers. This type of coffee is prepared
specifically for your Coffee Maker’s brewing system and promotes
fuller extraction to provide rich, full-bodied coffee.
• Use only cone-shaped filters with this Coffee Maker. Cone-shaped
paper filters are available locally at grocery stores. Use standard, #4
filters. Do not use basket-style paper filters.
We recommend using Melitta #4 cone-shaped filters.
• A clean Coffee Maker is essential for making great tasting coffee.
Regular cleaning, as specified in the USER MAINTENANCE
INSTRUCTIONS, is highly recommended.
• Always use fresh, cold water in your Coffee Maker.
• Store coffee in a cool, dry place. Once coffee has been opened,
keep it tightly sealed in the refrigerator to maintain freshness.
• For optimum coffee, buy whole beans and grind them finely just
before brewing.
• Do not re-use coffee grounds since this will greatly impair
coffee flavor.
• Reheating coffee is not recommended. Coffee is at its peak flavor
immediately after brewing.
• If using the Fast Brew for both coffee and tea, it is recommended to
thoroughly clean the Carafe, Lid, and Removable Filter Holder in
warm soapy water. Wipe the Showerhead, located at the under-
neath side of the appliance’s lid, with a clean, damp cloth.

Bien connaître votre
cafetière 12 tasses
Le produit peut différer légèrement de l’illustration.
1. Carafe en verre et couvercle
Noir P/N 31455B
Blanc P/N 31455W
2. Tableau de commande
3. Pomme de douche
4. Réservoir d’eau
5. Porte-filtre amovible
Noir P/N 31456B
Blanc P/N 31456W
6. Cavité porte-filtre
7. Voyant lumineux
8. Plaque chauffante
9. Panier pour infuser le thé
Noir P/N 31457B
Blanc P/N 31457W
6
2
4
5
8
7
1
5
9
3
16
User Maintenance Instructions
This appliance requires little maintenance. It contains no user
serviceable parts. Do not try to repair it yourself. Any servicing that
requires disassembly must be performed by a qualified appliance repair
technician.
Cleaning Instructions
NOTE: Do not place anything other than water or the vinegar cleaning
solution specified in this manual into the Water Chamber.
1. To clean your Coffee Maker after brewing, be sure the Coffee Maker
is turned OFF, unplugged and is cool. Discard the paper filter.
2. Wipe the outside of your Coffee Maker and the Warming Plate with a
soft, damp cloth and dry. Do not use abrasive cleaners or scouring
pads.
3. Hand wash Removable Filter Holder and Tea Infusion Basket in
warm, sudsy water. DO NOT PLACE IN DISHWASHER.
4. The Glass Carafe and Lid may be washed in warm, soapy water.
DO NOT PLACE IN DISHWASHER.
WARNING: Never immerse the Coffee Maker body in water or other
liquid.
WARNING: Rinse Water Chamber with cold water periodically.
NEVER use a cloth to clean or dry the Water Chamber as the cloth
will leave a lint residue and may clog and cause damage to your
Coffee Maker.
Page is loading ...

3
AUTRES CONSIGNES DE
SÉCURITÉ IMPORTANTES
MISE EN GARDE: Cet appareil produit de la chaleur et de la vapeur
lors de son fonctionnement. Il importe donc de prendre toutes les
précautions d’usage afin de prévenir les risques de brûlures, d’in-
cendie ou d’autres dommages corporels et matériels.
1. Tous les utilisateurs devraient lire et comprendre le présent mode
d’emploi avant d’utiliser ou de nettoyer la cafetière.
2. Brancher la fiche du cordon de l’appareil dans une prise électrique
de 120 volts c.a. seulement.
3. N’utiliser toujours que de l’eau dans cet appareil, et aucun autre liq-
uide ou aliment. Ne rien mélanger ou ajouter à l’eau versée dans la
cafetière, sauf de la manière recommandée pour le nettoyage dans
les consignes d’entretien par l’utilisateur.
4. Ne JAMAIS tenter de déplacer la cafetière contenant du liquide
chaud. Laisser l’appareil refroidir complètement avant de le déplaer.
5. Tenir cet appareil à au moins 10 cm de distance du mur ou d’autres
objets pendant son fonctionnement. Ne jamais placer d’objets
audessus de la cafetière pendant son utilisation et poser l’appareil
sur une surface résistant à la chaleur.
6. Si la cafetière fait défaut pendant son utilisation, appuyer sur le bou-
ton ON/OFF pour l’éteindre, puis débrancher immédiatement. Ne
pas utiliser l’appareil endommagé ni essayer de le réparer.
7. Si l’appareil tombe dans l’eau ou dans un liquide quelconque, ou se
retrouve accidentellement submergé, le débrancher immédiatement!
Ne jamais le sortir de l’eau avant de l’avoir débranché! Ne pas réu-
tiliser l’appareil s’il est tombé dans l’eau ou a été submergé.
Communiquer avec le Service à la clientèle pour le faire examiner et
réparer.
8. Ne pas laisser cet appareil fonctionner sans surveillance.
9. NE JAMAIS chauffer la carafe dans un four à micro-ondes.
10. NE JAMAIS laisser la carafe vide sur la plaque chauffante lorsque
l’appareil est en marche, autrement celle-ci pourrait se fissurer ou
autrement s’endommager.
ATTENTION: Afin d’éviter les blessures lors de l’utilisation de la
fonction Pause et service automatique, replacer la carafe dans les
30 secondes qui suivent.
18
How To Decalcify Your Coffee Maker
1. Place a #4 cone-shaped paper filter into the Removable Filter
Holder. Make sure the Removable Filter Holder fits securely into the
unit.
2. Fill Carafe with a solution of 2 tablespoons white vinegar to one liter
of cold water. Pour the water and vinegar solution into the Water
Chamber.
3. Place the empty Carafe on the Warming Plate. Plug the Coffee
Maker into an outlet and press the AUTO ON/OFF Button to turn the
Coffee Maker ON.
4. Keep the Coffee Maker ON until the Carafe is half full. Press the
AUTO ON/OFF Button to turn the Coffee Maker OFF and let cool for
1/2 hour.
5. After 1/2 hour, pour the water and vinegar solution back into the
Coffee Maker.
6. Place the empty Carafe on the Warming Plate. Press the AUTO
ON/OFF Button to turn the the Coffee Maker ON and let all the
water and vinegar solution flow through.
7. Discard the solution and the paper filter.
8. After allowing the Coffee Maker to cool for 15 minutes, flush out all
the traces of vinegar by pouring a Carafe full of cold water into the
Water Chamber. Make sure to insert a fresh filter into the Filter
Holder before brewing and place the empty Carafe on the Warming
Plate. Press the AUTO ON/OFF Button to turn the Coffee Maker ON
and allow it to cycle through.
9. At the end of the brew cycle, press the AUTO ON/OFF Button to turn
the Coffee Maker OFF. Discard water in the Carafe. Repeat steps 8 -
9. Unplug the Coffee Maker when finished.
Page is loading ...
Page is loading ...

LIMITED ONE-YEAR WARRANTY
Warranty Coverage: This product is warranted to be free from defects in materials or
workmanship for a period of one (1) year from the original purchase date. This product
warranty is extended only to the original consumer purchaser of the product and is not
transferable. For a period of one (1) year from the date of original purchase of the prod-
uct, our Repair Center will, at its option, either (1) repair the product or (2) replace the
product with a reconditioned comparable model. These remedies are the purchaser's
exclusive remedies under this warranty.
Warranty Service: To obtain warranty service, you must call our warranty service num-
ber at 1-800-233-9054 for return instructions on how to deliver the product, in either the
original packaging or packaging affording an equal degree of protection to the Repair
Center specified below. You must enclose a copy of your sales receipt or other proof of
purchase to demonstrate eligibility for warranty coverage.
To return the appliance, ship to: To contact us, please write to, call, or email:
ATTN: Repair Center Consumer Relations Department
708 South Missouri Street PO Box 7366
Macon, MO 63552 USA Columbia, MO 65205-7366 USA
Phone: 1-800-233-9054
Email: consumer_relations@toastmaster.com
What Is Not Covered: This warranty does not cover damage resulting from misuse,
accident, commercial use, improper service or any other damage caused by anything
other than defects in material or workmanship during ordinary consumer use. This war-
ranty is invalid if the serial number has been altered or removed from the product. This
warranty is valid only in the United States and Canada.
LIMITATION ON DAMAGES: THERE SHALL BE NO LIABILITY FOR ANY INCIDEN-
TAL OR CONSEQUENTIAL DAMAGES FOR BREACH OF ANY EXPRESS OR
IMPLIED WARRANTY OR CONDITION ON THIS PRODUCT.
DURATION OF IMPLIED WARRANTIES: EXCEPT TO THE EXTENT PROHIBITED BY
APPLICABLE LAW, ALL IMPLIED WARRANTIES AND CONDITIONS, INCLUDING,
WITHOUT LIMITATION, IMPLIED WARRANTIES AND CONDITIONS OF MER-
CHANTABILITY AND FITNESS FOR A PARTICULAR PURPOSE OR USE ON THIS
PRODUCT ARE LIMITED IN DURATION TO THE DURATION OF THIS WARRANTY.
Some jurisdictions do not allow the exclusion or limitation of incidental or consequential
damages, or allow limitations on how long an implied warranty lasts, so the above limi-
tations or exclusions may not apply to you. This warranty gives you specific legal rights
and you may have other rights under the laws of your jurisdiction.
For more information on our products, visit our website: www.maxim-toastmaster.com.
©
2006 All rights reserved.
Made in China 12/06
Fast Brew
™
12 CUP COFFEE MAKER
Models MEFB6B, MEFB6W, MEFB6BCAN, MEFB6WCAN
/