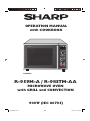
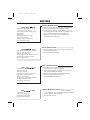
Sharp R98STM-AA Owner's manual
- Category
- Kitchen & houseware accessories
- Type
- Owner's manual
This manual is also suitable for

900W (IEC 60705)
OPERATION MANUAL
with COOKBOOK
R-959M-A / R-98STM-AA
MICROWAVE OVEN
with GRILL and CONVECTION
R-959M-A
R-959M-A.indd AR-959M-A.indd A 7/6/09 3:30:04 PM7/6/09 3:30:04 PM

OPERATION MANUAL
This operation manual contains important information which you should
read carefully before using your microwave oven.
IMPORTANT:
There may be a serious risk to health if this operation manual is not
followed or if the oven is modified so that it operates with the door open.
If you require any advice or assistance regarding your
Sharp product, please visit our website:
www.sharp.co.uk/customersupport
Customers without Internet access may telephone:
08705 274277 (9am - 5pm)
(01) 676 0648 (from Ireland)
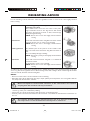
A. Information on Disposal for Users (private households)
1. In the European Union
Attention: If you want to dispose of this equipment, please do not use the ordinary dust bin!
Used electrical and electronic equipment must be treated separately and in accordance with legislation
that requires proper treatment, recovery and recycling of used electrical and electronic equipment.
Following the implementation by members states private households within the EU states may return
their used electrical and electronic equipment to designated collection facilities free of charge*.
In some countries* your local retailer may also take back your old product free of charge if you
purchase a similar new one.
*) Please contact your local authority for further details.
If your used electrical or electronic equipment has batteries or accumulators, please dispose of these
separately beforehand according to local requirements.
By disposing of this product correctly you will help ensure that the waste undergoes the necessary
treatment, recovery and recycling and thus prevent potential negative effects on the environment and
human health which could otherwise arise due to inappropriate waste handling.
2. In other Countries outside the EU
If you wish to discard this product, please contact your local authorities and ask for the correct
method of disposal.
For Switzerland: Used electrical or electronic equipment can be returned free of charge to the dealer,
even if you don’t purchase a new product. Further collection facilities are listed on the homepage of
www.swico.ch or www.sens.ch.
B. Information on Disposal for Business Users.
1. In the European Union
If the product is used for business purposes and you want to discard it:
Please contact your SHARP dealer who will inform you about the take-back of the product. You might
be charged for the costs arising from take-back and recycling. Small products (and small amounts)
might be taken back by your local collection facilities.
For Spain: Please contact the established collection system or your local authority for take-back of
your used products.
2. In other Countries outside the EU
If you wish to discard of this product, please contact your local authorities and ask for the correct
method of disposal.
Attention: Your
product is marked
with this symbol.
It means that
used electrical
and electronic
products should
not be mixed with
general household
waste. There is a
separate collection
system for these
products.
R-959M-A.indd BR-959M-A.indd B 7/6/09 3:30:04 PM7/6/09 3:30:04 PM

1
YOUR OVEN AND ACCESSORIES . . . . . . . . . . . . . . . . . . . . . . . . . . . . . . . . . . . . . . . . . . . . . . . . . . . . . 2
C
ONTROL PANEL: . . . . . . . . . . . . . . . . . . . . . . . . . . . . . . . . . . . . . . . . . . . . . . . . . . . . . . . . . . . . . . . . .3
S
AFETY:
Important Safety Instructions . . . . . . . . . . . . . . . . . . . . . . . . . . . . . . . . . . . . . . . . . . . . . . . . . . . . 4
Installation . . . . . . . . . . . . . . . . . . . . . . . . . . . . . . . . . . . . . . . . . . . . . . . . . . . . . . . . . . . . . . . . . . . . 4 - 5
O
PERATION:
Heating Category . . . . . . . . . . . . . . . . . . . . . . . . . . . . . . . . . . . . . . . . . . . . . . . . . . . . . . . . . . . . . . 6
How Your Oven Works. . . . . . . . . . . . . . . . . . . . . . . . . . . . . . . . . . . . . . . . . . . . . . . . . . . . . . . . . . 7
Before Operation . . . . . . . . . . . . . . . . . . . . . . . . . . . . . . . . . . . . . . . . . . . . . . . . . . . . . . . . . . . . . . 8
Microwave Power Levels. . . . . . . . . . . . . . . . . . . . . . . . . . . . . . . . . . . . . . . . . . . . . . . . . . . . . . . . . 9
How to Operate Your Oven . . . . . . . . . . . . . . . . . . . . . . . . . . . . . . . . . . . . . . . . . . . . . . . . . . . . . . 10 - 11
Heating without Food . . . . . . . . . . . . . . . . . . . . . . . . . . . . . . . . . . . . . . . . . . . . . . . . . . . . . . . . . . . 12
Grill Cooking. . . . . . . . . . . . . . . . . . . . . . . . . . . . . . . . . . . . . . . . . . . . . . . . . . . . . . . . . . . . . . . . . . 13
Preheating the Oven . . . . . . . . . . . . . . . . . . . . . . . . . . . . . . . . . . . . . . . . . . . . . . . . . . . . . . . . . . . . 14
Convection Cooking . . . . . . . . . . . . . . . . . . . . . . . . . . . . . . . . . . . . . . . . . . . . . . . . . . . . . . . . . . . . 15
Dual Cooking . . . . . . . . . . . . . . . . . . . . . . . . . . . . . . . . . . . . . . . . . . . . . . . . . . . . . . . . . . . . . . . . . 16 - 17
Express Cook/Express Defrost. . . . . . . . . . . . . . . . . . . . . . . . . . . . . . . . . . . . . . . . . . . . . . . . . . . . 18 - 20
Auto Cook . . . . . . . . . . . . . . . . . . . . . . . . . . . . . . . . . . . . . . . . . . . . . . . . . . . . . . . . . . . . . . . . . . . 21 - 23
C
ONVENIENT FUNCTIONS
Sequence Cooking. . . . . . . . . . . . . . . . . . . . . . . . . . . . . . . . . . . . . . . . . . . . . . . . . . . . . . . . . . . . . . 24
Auto Minute . . . . . . . . . . . . . . . . . . . . . . . . . . . . . . . . . . . . . . . . . . . . . . . . . . . . . . . . . . . . . . . . . . 24
Less and More . . . . . . . . . . . . . . . . . . . . . . . . . . . . . . . . . . . . . . . . . . . . . . . . . . . . . . . . . . . . . . . . . 25
To Use With Manual Cooking. . . . . . . . . . . . . . . . . . . . . . . . . . . . . . . . . . . . . . . . . . . . . . . . . . . . . 26
Kitchen Timer . . . . . . . . . . . . . . . . . . . . . . . . . . . . . . . . . . . . . . . . . . . . . . . . . . . . . . . . . . . . . . . . . 27
C
OOKING ADVICE:
Microwave Cooking Advice. . . . . . . . . . . . . . . . . . . . . . . . . . . . . . . . . . . . . . . . . . . . . . . . . . . . . . . 28 - 29
Suitable Cookware . . . . . . . . . . . . . . . . . . . . . . . . . . . . . . . . . . . . . . . . . . . . . . . . . . . . . . . . . . . . . 30
Defrosting Advice . . . . . . . . . . . . . . . . . . . . . . . . . . . . . . . . . . . . . . . . . . . . . . . . . . . . . . . . . . . . . . 31
Reheating Advice . . . . . . . . . . . . . . . . . . . . . . . . . . . . . . . . . . . . . . . . . . . . . . . . . . . . . . . . . . . . . . . 32
A
FTERCARE:
Cleaning and Maintenance . . . . . . . . . . . . . . . . . . . . . . . . . . . . . . . . . . . . . . . . . . . . . . . . . . . . . . . 33
Troubleshooting. . . . . . . . . . . . . . . . . . . . . . . . . . . . . . . . . . . . . . . . . . . . . . . . . . . . . . . . . . . . . . . . 34 - 35
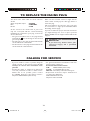
To Replace the Mains Plug. . . . . . . . . . . . . . . . . . . . . . . . . . . . . . . . . . . . . . . . . . . . . . . . . . . . . . . . 36
Calling for Service . . . . . . . . . . . . . . . . . . . . . . . . . . . . . . . . . . . . . . . . . . . . . . . . . . . . . . . . . . . . . . 36
C
OOKBOOK . . . . . . . . . . . . . . . . . . . . . . . . . . . . . . . . . . . . . . . . . . . . . . . . . . . . . . . . . . . . . . . . . . . . . . 37 - 95
G
UARANTEE. . . . . . . . . . . . . . . . . . . . . . . . . . . . . . . . . . . . . . . . . . . . . . . . . . . . . . . . . . . . . . . . . . . . . . 96
S
PECIFICATIONS. . . . . . . . . . . . . . . . . . . . . . . . . . . . . . . . . . . . . . . . . . . . . . . . . . . . . . . . . . . . . . . . . . . 97
CONTENTS
R-959M-A.indd 1R-959M-A.indd 1 7/6/09 3:30:05 PM7/6/09 3:30:05 PM

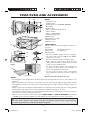
2
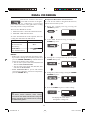
NOTES:
• The waveguide cover is fragile. Care should be taken when cleaning inside the oven to ensure that it is not
damaged.
• After cooking fatty foods without a cover, always clean the cavity and especially the grill heating element
thoroughly, these must be dry and free from grease. Built-up grease may overheat and begin to smoke or
catch fire.
• Always operate the oven with the turntable fitted correctly. This promotes thorough, even cooking. A badly
fitted turntable may rattle, may not rotate properly and could cause damage to the oven.
• The turntable rotates clockwise or anti-clockwise. The rotary direction may change each time you start the
oven. This does not affect cooking performance.
• When you order accessories, please quote both the PART NAME and MODEL NUMBER to your dealer
or SHARP approved service facility. The model number is located at the bottom of the control panel.
WARNING:
The door, outer cabinet, oven cavity, accessories and dishes will become very hot during
operation. To prevent burns, always use thick oven gloves.
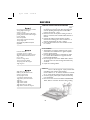
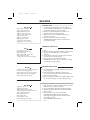
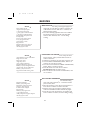
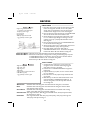
ACCESSORIES:
Check to make sure the following accessories are
provided:
14. Turntable 15. Turntable support
16. Low rack 17. High rack
18. Shelves (x2)
• Place the turntable support into the coupling in
the centre of the oven floor, TOP side up (TOP is
engraved on one side).
• Place the turntable onto the turntable support.
• When using the shelves, place them onto the
shelf runners as shown in Fig. A. Ensure the shelf
locater is on the right hand side.
• To avoid turntable damage, ensure dishes or
containers are lifted clear of the turntable rim
when removing them from the oven.
• For use of the accessories, refer to the grilling,
dual cooking and convection sections on pages 12
to 17.
Never touch the grill when it is hot.
OVEN:
1. Control panel
2. Shelf runners
3. Waveguide cover (DO NOT REMOVE)
4. Coupling
5. Oven cavity
6. Door seals and sealing surfaces
7. Door latches
8. Door opening handle
9. Grill heating element
10. Oven lamp
11. Ventilation openings
12. Outer cabinet
13. Power cord
11
13
12
14
15
8
356
7 4
9 10
1
2
Shelf locater
Fig. A
16
17
18
YOUR OVEN AND ACCESSORIES
R-959M-A.indd 2R-959M-A.indd 2 7/6/09 3:30:05 PM7/6/09 3:30:05 PM

3
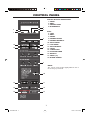
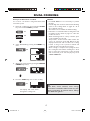
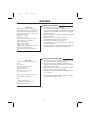
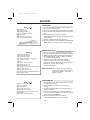
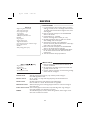
DIGITAL DISPLAY INDICATORS:
1. COOK
2. GRILL
3. CONVECTION
4. MICROWAVE
KEYS:
5. TIME
6. GRILL
7. COMBI.
8. EXPRESS COOK
9. EXPRESS DEFROST
10. AUTO COOK
11. LESS/MORE
12. AUTO MINUTE
13. START
14. STOP/CLEAR
15. KITCHEN TIMER
16. WEIGHT
17. CONV. (ºC)
18. MICRO. POWER
5
4
14
1
2
3
6
7
8
9
10
13
11
12
15
16
17
18
NOTE:
The control panel's design slightly different due to
the model you purchased.
CONTROL PANEL
R-959M-A.indd 3R-959M-A.indd 3 7/6/09 3:30:05 PM7/6/09 3:30:05 PM

4
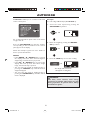
Oven Use:
• The oven is for domestic food use only.
• Never operate when empty, except as directed in
the ‘Heating without food’ section on page 12.
• Do not leave or store anything inside the oven
when not in use.
• Never attempt to use the oven with the door
open. It is important not to force or tamper with
the door safety latches.
• Never operate the oven with any object caught in
the door.
• Do not insert fingers or objects in the holes of
the door latches or air-vent openings as this may
damage the oven and cause an electric shock.
• If water or food drops inside the air vent openings
switch the oven off immediately, unplug it and call
a SHARP approved service facility. (See page 36).
• Never move the oven while it is operating.
• The door, outer cabinet, oven cavity, turntable,
dishes, accessories and especially the grill
will become very hot during operation. Care
should be taken to avoid touching these areas.
To prevent burns, always use thick oven gloves.
Before cleaning make sure they are not hot.
Pacemaker: If you have a heart pacemaker, consult
your doctor or the pacemaker manufacturer prior
to oven use.
FIRE: If smoke is observed, switch off and
unplug the appliance and keep the door
closed in order to stifle any flames.
PLEASE READ CAREFULLY AND KEEP FOR FUTURE REFERENCE
When the appliance is operated in the
GRILL, CONVECTION, DUAL, EXPRESS
COOK and AUTO COOK modes, children
should only use the oven under adult supervision
due to the temperature generated.
Accessible parts may become hot during
use. Young children should be kept away.
This appliance is not intended for use by
persons (including children) with reduced
physical, sensory or mental capabilities, or
lack of experience and knowledge, unless
they have been given supervision or
instruction concerning use of the appliance
by a person responsible for their safety.
Children should be supervised to ensure
that they do not play with the appliance.
WARNING: Liquids and other foods must
not be heated in sealed containers since
they are liable to explode. Microwave
heating of beverages can result in delayed
eruptive boiling, therefore care has to be
taken when handling the container. Stir the
liquid prior to and during heating/ reheating,
let liquid stand for at least 20 seconds in the
oven after cooking.
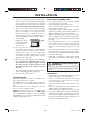
INSTALLATION
WARNING:
Inspect the Oven:
• Check the oven carefully for damage
before and regularly after installation.
• Make sure the door closes properly, that
it is not misaligned or warped.
• Check the hinges and door safety latches
are not broken or loose.
• Ensure the door seal and sealing surfaces
are not damaged. If the door or door seals
IMPORTANT:
If any damage is apparent, do not operate
the oven in any way, until it has been
repaired by a SHARP trained engineer.
WARNING: Only allow children to use the
oven without supervision when adequate
instructions have been given so that the child
is able to use the oven in a safe way and
understands the hazards of improper use.
are damaged, the oven must not be
operated until it has been repaired by a
competent person.
• Inspect the oven interior and door for
dents.
IMPORTANT SAFETY INSTRUCTIONS
R-959M-A.indd 4R-959M-A.indd 4 7/6/09 3:30:05 PM7/6/09 3:30:05 PM

5
1. Remove all packing materials including the
feature sticker (if applicable). The waveguide
cover prevents food and grease from entering
the waveguide area where it could cause damage.
DO NOT REMOVE THE WAVEGUIDE COVER.
2. The oven door will become hot during cooking.
Place or mount the oven so that the bottom
of the oven is 85cm or more above the floor.
Ensure the surface or mounting position is
strong enough to take the oven weight, plus the
heaviest item likely to be cooked in the oven.
3. The minimum
height of free space
necessary above the
top surface of the
oven is 13cm.
4. Do not place the
oven where heat, moisture or high humidity
are generated, (for example, near or above a
conventional oven) or near combustible
materials (for example, curtains). Do not block
or obstruct air vent openings. Do not place
objects on top of the oven.
5. Make sure the power supply cord is undamaged
(See “ELECTRICAL CONNECTION” below).
Do not allow the power supply cord to
run over any hot or sharp surfaces, such
as the hot air vent area at the top rear of
the oven.
6. The socket must be readily accessible so that it
can be easily unplugged in an emergency.
7. Do not use the oven outdoors.
BUILDING-IN-KIT.
This oven is designed for counter top or built-in use.
Do not place the oven in a cabinet.
An installation frame is available which enables the
microwave oven to be integrated within a kitchen
unit.
The microwave oven is not designed to be built
above or near a conventional oven.
SHARP recommend the use of the build in kit
EBR-9910 (for R-959M-A) or EBR-99ST
(for R-98STM-AA), available from your SHARP
dealer. Only the use of this frame will guarantee the
quality and safety of the oven.
ELECTRICAL CONNECTION.
• Do not allow water to come into contact with
the power supply cord or plug.
• Insert the plug properly into the socket.
• Do not connect other appliances to the same
socket using an adaptor plug.
• If the power supply cord is damaged, it must be
replaced by a Sharp approved service facility or a
similarly qualified person to avoid a hazard.
• When removing the plug from the socket always
grip the plug, never the cord as this may damage
the power supply cord and the connections inside
the plug.
• If the plug fitted to your oven is a rewireable
type and in the event of the socket outlet in
your home not being compatible with the plug
supplied, remove the plug properly (do not cut
off).
• If the plug fitted to your oven is a non-rewirable
type and in the event of the socket outlet in your
home not being compatible with the plug supplied,
cut-off the mains plug.
• Refit with a suitable type, observing the wiring
code given in ‘To replace the mains plug’ on page
36.
13cm
IMPORTANT!
• The fuse from the cut-off plug should be removed
and the plug disposed of in a safe manner.
• Under no circumstances should the cut-off plug
be inserted into a socket outlet as a serious
electric shock may occur.
• The plug must not be used without the fuse cover
fitted.
• If you have any doubt about your microwave oven
obtain the help of a qualified electrician.
• When replacing the plug please ensure that you
use a BSI or ASTA approved plug to BS1363, this
should be fitted with a brown coloured 13 amp
fuse approved by BSI or ASTA to BS1362. If you
have any doubt about electrical connection seek
the help of a qualified electrician.
WARNING: THIS APPLIANCE MUST
BE EARTHED
To wire an appropriate plug, follow the wiring
code given in ‘To replace the mains plug’ on page
36.
INSTALLATION
R-959M-A.indd 5R-959M-A.indd 5 8/4/09 2:11:17 PM8/4/09 2:11:17 PM

6
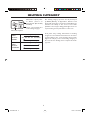
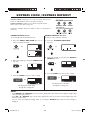
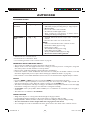
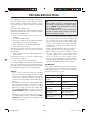
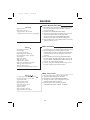
The heating category (a letter A to E) developed
by MAFF (Ministry of Agriculture, Fisheries and
Food) with microwave oven and food manufacturers
indicates the ability of the oven to heat small
quantities of food (up to 500g [1lb 2oz]). It does not
represent the general performance of the oven.
Microwave output power
in Watts (based on
international (IEC 60705)
standard).
Letter representing the
oven heating category.
Microwave Symbol.
600 700 800 900 1000 Watts
OVEN
OUTPUT
POWER
Less heating time required
More heating time required
OVEN
OUTPUT
CATEGORY
Less heating time required
More heating time required
A B C D E
Food packs carry cooking instructions for heating
categories A to E. Follow instructions for the letter
corresponding to the oven’s heating category. The
higher the output power and heating category of
the oven the less heating time is required as shown
opposite.
HEATING CATEGORY
R-959M-A.indd 6R-959M-A.indd 6 7/6/09 3:30:06 PM7/6/09 3:30:06 PM

7
Microwaves are energy waves, similar to those used
for TV and radio signals.
Electrical energy is converted into microwave
energy, which is directed into the oven cavity via a
waveguide. To prevent food and grease entering the
wave guide it is protected by the waveguide cover.
Microwaves cannot pass through metal,
because of this the oven cavity is made of metal
and there is a fine metal mesh on the door.
During cooking the microwaves bounce off the sides
of the oven cavity at random.
Microwaves will pass through certain materials,
such as glass and plastic, to heat the food.
(See ‘Suitable Cookware’ on page 30).
Water, sugar and fat in food absorb microwaves
which cause them to vibrate. This creates heat by
friction, in the same way your hands get warm when
you rub them together.
The outer areas of the food are heated by the
microwave energy, then the heat moves to the
centre by conduction, as it does in conventional
cooking. It is important to turn, rearrange or stir
food to ensure even heating.
Once cooking is complete, the oven automatically
stops producing microwaves.
Standing time is necessary after cooking, as it enables
the heat to disperse equally throughout the food.
HOW YOUR OVEN WORKS
R-959M-A.indd 7R-959M-A.indd 7 7/6/09 3:30:06 PM7/6/09 3:30:06 PM

8
Your oven-has an energy save mode.
1. Plug in the oven. Nothing will appear on the
display at this time.
2. Open the door. The display will flash the message
shown.
3. Close the door. The display will show “ . 0”.
NOTES: If you do not operate the oven for 3
minutes or more (i.e. after closing the
door, pressing the STOP/CLEAR key,
or at the end of cooking), you will not
be able to operate the oven until you
open and close the oven door. Whilst in
Energy Save Mode the display is blank.
When new, the very first time the grill
and convection are used, smoke and
odour will be given off.
To avoid this happening when food is
being cooked, heat the oven without
food for approx. 20 minutes.
(Please refer to “Heating without food”
on page 12.)
2.
3.
BEFORE OPERATION
R-959M-A.indd 8R-959M-A.indd 8 7/6/09 3:30:06 PM7/6/09 3:30:06 PM

9
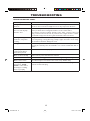
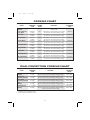
• Your oven has 6 power levels, as shown opposite.
• To change the power level for cooking, enter
the cooking time and then press the MICRO.
POWER key.
Power level:
The microwave power level is varied by the
microwave energy switching on and off.
When using power levels other than 100% you will
be able to hear the microwave energy pulsing on
and off as the food cooks or defrosts.
IMPORTANT: The microwave power level will
cook at 100% unless you press the MICRO.
POWER key to the desired setting.
Check the power level:
To check the microwave power level during
cooking, press the MICRO. POWER key.
As long as your finger is pressing the MICRO.
POWER key the power level will be displayed. The
oven continues to count down although the display
will show the power level.
MICROWAVE
POWER KEY
Power Level Press the
MICRO.
POWER key
Percentage
HIGH
x 1 100%
MEDIUM HIGH
x 2 70%
MEDIUM
x 3 50%
MEDIUM LOW
(Defrost)
x 4 30%
LOW
(Defrost)
x 5 10%
x 6 0%
MICROWAVE POWER LEVELS
R-959M-A.indd 9R-959M-A.indd 9 7/6/09 3:30:06 PM7/6/09 3:30:06 PM

10
MANUAL COOKING
• Enter the cooking time.
• Select the cooking mode; MICROWAVE,
GRILL, CONVECTION, DUAL GRILL and
DUAL CONVECTION can be selected.
• Stir or turn the food, where possible, 2 - 3 times
during cooking, if required.
• After cooking, cover the food and leave to stand,
if required.
• Refer to the cooking charts in the cookbook
section, pages 39 - 45.
Your oven enables you to cook and defrost food
using the automatic programmes, or to cook and
defrost food manually.
Automatic cooking and defrosting allows you to
cook and defrost using preset programmes where
the timings have been calculated for you, e.g
Express Cook and Express Defrost.
Manual cooking and defrosting allows you to cook/
defrost foods and weights which are not included in
the automatic programmes.
The following are examples of manual cooking and
defrosting.
For automatic cooking and defrosting refer to pages
18 - 23.
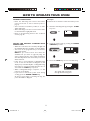
Example:
To cook for 2 minutes 30 seconds on 70%
microwave power.
1. Enter the cooking time by pressing the
1 MIN. key twice, then the 10 SEC. key three
times.
2. Input the power level by pressing the MICRO.
POWER key twice.
x2
x2
x3
Starting the oven:
Close the door and press the
START key.
Stopping the oven:
If you want to stop the oven
during cooking, press the
STOP/CLEAR key once or
open the oven door.
If you want to cancel the
cooking programme, press the
STOP/CLEAR key twice.
Opening and closing the door:
To open the oven door, pull the door opening
handle.
The display will count down
through the cooking time.
3. Press the START key once to start cooking.
x1
HOW TO OPERATE YOUR OVEN
R-959M-A.indd 10R-959M-A.indd 10 7/6/09 3:30:06 PM7/6/09 3:30:06 PM

11
NOTES FOR MANUAL COOKING AND
DEFROSTING:
• When the oven starts, the oven lamp will light and
the turntable will rotate clockwise or anti-clockwise.
• Your oven can be programmed up to 99 minutes,
90 seconds (99.90).
NOTE: If you cook food for more than the
standard time (see chart on page 34) using the
same cooking mode, the oven’s safety mechanisms
automatically activate. The microwave power level
will be reduced.
• If the door is opened during cooking/defrosting
to stir or turn over food, the cooking time on the
display stops automatically. The cooking/defrosting
time starts to count down again when the door is
closed and the START key is pressed.
• When cooking/defrosting is complete, “.0” will
reappear on the display.
• If you want to know the power level during
cooking, press the MICRO. POWER key.
As long as your finger is touching the key, the
power level will be displayed.
MANUAL DEFROSTING
• Enter the defrosting time and use microwave
power levels 10% or 30% to defrost (refer to
page 9).
• Stir or turn the food, where possible, 2 - 3 times
during defrosting.
• After defrosting, cover the food in foil and leave
to stand until thoroughly defrosted.
• Refer to the defrosting charts in the cookbook
section, page 38.
Example:
To defrost for 10 minutes on 30% microwave power.
1. Enter the defrosting time by pressing the 10 MIN.
key once.
2. Input the power level by pressing the MICRO.
POWER key 4 times.
x1
x4
The display will count down
through the defrosting time.
3. Press the START key once to start defrosting.
x1
HOW TO OPERATE YOUR OVEN
R-959M-A.indd 11R-959M-A.indd 11 7/6/09 3:30:07 PM7/6/09 3:30:07 PM

12
HEATING WITHOUT FOOD
x2
x1
x1
You may detect smoke or a burning smell when
using the grill and convection for the first time.
This is normal and not a sign that the oven is out of
order.
To avoid this problem, when first using the oven,
heat the oven without food for 20 minutes on grill
and then at convection 250ºC.
IMPORTANT: During operation, to allow smoke
or smells to disperse open a window or switch the
kitchen ventilation on. Make sure there is no food in
the oven.
WARNING:
The door, outer cabinet, oven cavity, and accessories will become very hot during operation.
Take care to avoid burns when cooling the oven down after operation.
1. Enter the required heating time by pressing the
10 MIN. key twice.
2. Select GRILL or CONVECTION once.
The display will count down
When the oven has finished the operation,
open the door to cool the oven cavity.
3. Press the START key once to start the
operation.
x1
OR
R-959M-A.indd 12R-959M-A.indd 12 7/6/09 3:30:07 PM7/6/09 3:30:07 PM

13
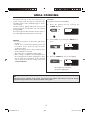
GRILL COOKING
x2
x1
x1
The grill at the top of the oven cavity has one
power setting only. The grill is assisted by the
turntable which rotates simultaneously to ensure
even browning.
Use the racks for grilling small items of food such
as bacon, gammon and teacakes, turn over halfway
through grilling.
Food can be placed either directly onto the racks, or
into a flan dish/heat-resistant plate on the racks.
NOTES:
• It is not necessary to preheat the grill before
cooking.
• Follow the recommended grilling times and
procedures in the charts on page 44 in the
cookbook section.
• When browning foods in a deep container, place
on the turntable or low rack.
• The shelves are not suitable for grill cooking.
• After cooking is complete and opening the door,
the cooling fan will continue working for a short
time to lower the temperature of the electrical
and mechanical parts. The display may show
“NOW COOLING”.
Example:
To grill for 20 minutes, using GRILL.
1. Enter the grilling time by pressing the
10 MIN. key twice.
2. Select GRILL by pressing the GRILL key
once.
The display will count down
through the grilling time.
3. Press the START key once to start grilling.
WARNING:
The door, outer cabinet, oven cavity, accessories and dishes will become very hot during
operation. To prevent burns, always use thick oven gloves.
R-959M-A.indd 13R-959M-A.indd 13 7/6/09 3:30:07 PM7/6/09 3:30:07 PM

14
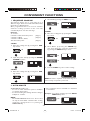
PREHEATING THE OVEN
Shelf runners
1
2
Example:
To preheat the oven to 180ºC.
1. Enter the temperature by pressing the CONV.
(ºC) key 6 times.
2. Press the START key once to start
preheating.
3. When the oven reaches 180ºC, the audible signal
will sound and the oven will display 180ºC. Place
food in the oven, enter the desired cooking time
and press the START key.
NOTES:
• When the oven is preheating, the turntable should
be in the oven.
• When the oven reaches the desired
temperature, the audible signal will sound
and the temperature will be displayed in ºC.
Do not press the STOP/CLEAR key after
opening and closing the door, as this will
cancel the Convection mode.
• The preheated temperature will be
maintained for approximately 30 minutes.
After this time, preheat will be cancelled.
• During preheating and convection cooking,
you will hear the cooling fan cycling on and off.
This is completely normal and will not affect the
cooking.
• You can check the actual temperature during
preheating by pressing the CONV. (ºC) key.
The temperature will appear on the display. This
will not affect the oven operation.
• If you prefer not to preheat the oven where
recommended in the cookbook section, allow
extra cooking time.
• Temperature measurements taken whilst the
oven is in convection mode will differ from the
displayed level. This will not affect the cooking
results as long as the operation manual and
cookbook section are followed correctly.
Your oven can be preheated to
a desired temperature prior to
convection cooking.
NOTE FOR SHELVES:
When using the shelves follow the notes below:
• The correct position for the shelves is 1 and 2, as shown in
the diagram below.
• Do not place food weighing more than 5kg on the shelves.
• When removing the food, pull the shelf until it is slightly
locked, then remove the food.
x6
x1
WARNING:
The door, outer cabinet, oven cavity, accessories and dishes will become very hot during
operation. To prevent burns, always use thick oven gloves.
R-959M-A.indd 14R-959M-A.indd 14 7/6/09 3:30:07 PM7/6/09 3:30:07 PM

15
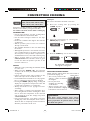
Convection cooking is ideal for cooking cakes, buns,
biscuits, scones and for proving bread at 40˚C.
To achieve the best results when cooking by
CONVECTION:
• Use the lower shelf for one layer cooking unless
food manufacturer’s instructions differ.
• Use the lower and upper shelves for two layer
cooking.
• Rotate the cookware 180 degrees after half the
cooking time.
• Where possible, place food in its container
directly onto the shelf.
• The turntable should be in the oven when using
the shelves.
• Although this product is a conventional convection
oven, consideration has to be given to the smaller
size and power of the product in comparison to a
standard kitchen oven, so the final result may vary.
• When cooking chilled or frozen foods on
CONVECTION mode, allowance must be given
to heat loss after the preheat cycle due to the
insertion of the food.
NOTES:
• When the oven is preheating, the turntable should
be in the oven.
• When using the CONV. (ºC) key, all metal
cookware can be used. (See ‘Suitable Cookware’
on page 30).
• Follow convection times and procedures in the
charts and recipes in the cookbook section.
• Food manufacturers instructions are only a guide-
line, so cooking times may need to be adjusted.
• Pressing the CONV. (ºC) key during cooking will
display the programmed temperature. This will
not affect the programme or cooking time.
• Always check the food is piping hot before
consuming.
• After cooking is complete and opening the door,
the cooling fan will continue working for a short
time to lower the temperature of the electrical
and mechanical parts. The display may show
“NOW COOLING”.
• Heat generated by the oven during convection
cooking may cause the backplate of the oven to
discolour. This is completely normal and will not
affect the performance of the oven.
The temperatures available in ºC are:
250ºC, 230ºC, 220ºC, 200ºC, 190ºC,
180ºC, 160ºC, 130ºC, 100ºC, 40ºC.
WARNING:
The door, outer cabinet, oven cavity,
accessories and dishes will become very hot
during operation. To prevent burns, always
use thick oven gloves.
Example:
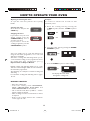
To cook for 20 minutes at 200ºC convection.
1. Enter the cooking time by pressing the
10 MIN. key twice.
2. Input the temperature by pressing the
CONV. (ºC) key 4 times.
The display will count down
through the cooking time.
3. Press the START key once to start cooking.
NOTE FOR USING SHELVES:
When using the shelves follow the notes below to
prevent them slipping out:
• The correct position for the
shelves is 1 and 2, as shown in
the diagram.
• Do not place food
weighing more than 5kg
on the shelves.
• When removing the food,
pull the shelf until it is slightly
locked, then remove the food.
Shelf runners
1
2
x2
x4
x1
CONVECTION COOKING
R-959M-A.indd 15R-959M-A.indd 15 7/6/09 3:30:08 PM7/6/09 3:30:08 PM

16
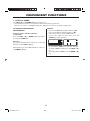
Dual Cook combines microwave
power with convection or the grill.
The combination of microwave
power with convection or the grill reduces cooking
time and provides a crisp, brown finish.
There are two Dual Cook modes:
1. Dual Convection - Convection with microwave.
2. Dual Grill - Grill with microwave.
To select the Dual Cook mode required, enter the
cooking time and follow the table below.
Dual Cook Mode Press COMBI. key
DUAL CONVECTION
(Convection and
Microwave*)
Once
DUAL GRILL
(Top and Microwave*)
Tw i c e
NOTES:
• Dual Cook is preset with 30% microwave power.
If you wish to change the microwave power level,
press the MICRO. POWER key until the desired
power level is shown on the display.
* You can select power levels 10%, 30%, 50% and
70% for DUAL CONVECTION.
* You can select power levels 10%, 30%, 50%, 70%
and 100% for DUAL GRILL.
• DUAL CONVECTION is preset with 250ºC
convection. To adjust the convection temperature,
press the CONV. ºC key.
Example for Microwave and Convection:
To cook for 20 minutes using Dual Convection,
230ºC, 10% microwave power.
1. Enter the cooking time by pressing the
10 MIN. key twice
2. Select Dual Convection by pressing the
COMBI. key once.
The display will count down
through the cooking time.
5. Press the START key once to start cooking.
4. Change the power level by pressing the MICRO.
POWER key once.
WARNING:
The door, outer cabinet, oven cavity,
accessories and dishes will become very hot
during operation. To prevent burns, always
use thick oven gloves.
x2
x1
x1
x1
x1
DUAL COOKING
3. Change the temperature by pressing the
CONV. ºC key once.
R-959M-A.indd 16R-959M-A.indd 16 7/6/09 3:30:08 PM7/6/09 3:30:08 PM

17
DUAL COOKING
NOTES:
• For DUAL GRILL it is not necessary to preheat
the grill.
• Use the high rack and low rack for Dual Cooking
(refer to the cooking charts on pages 37 - 95 in
the cookbook section.)
• The shelves are not suitable for Dual Cooking.
• Follow the recommended dual cooking times and
procedures in the charts on pages 41 - 44 in the
cookbook section.
• When browning foods in a deep container, place
on the turntable or low rack.
• Temperature measurements taken whilst the
oven is in convection mode will differ from the
displayed level. This will not affect the cooking
results as long as the operation manual and
cookbook section are followed correctly.
• After cooking is complete and opening the door,
the cooling fan will continue working for a short
time to lower the temperature of the electrical
and mechanical parts. The display may show
“NOW COOLING”.
Example for Microwave and Grill:
To cook for 15 minutes using Dual Grill, 50%
microwave power.
1. Enter the cooking time by pressing the 10 MIN.
key once and the 1 MIN. key 5 times.
2. Select Dual Grill by pressing the COMBI. key
twice.
The display will count down
through the cooking time.
4. Press the START key once to start cooking.
3. Change the power level by pressing the MICRO.
POWER key 4 times.
x1
x2
x5
x4
x1
WARNING:
The door, outer cabinet, oven cavity,
accessories and dishes will become very hot
during operation. To prevent burns, always
use thick oven gloves.
R-959M-A.indd 17R-959M-A.indd 17 7/6/09 3:30:08 PM7/6/09 3:30:08 PM

18
EXPRESS COOK enables you to cook 3 popular menus from
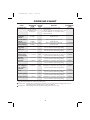
frozen or chilled. Please refer to the chart on page 19.
EXPRESS DEFROST enables you to defrost 3 popular menus.
Please refer to the chart on page 20.
Follow the examples below for details on how to operate these
functions.
NOTES:
• If the DOWN ( ▼ ) WEIGHT key is pressed the display will count down from the highest weight range,
each time the key is pressed.
• If the UP ( ▲ ) WEIGHT key is pressed the display will count up from the lowest weight range, each
time the key is pressed.
• You can enter the weight by holding down or pressing the WEIGHT keys until the desired weight is
displayed.
EXPRESS COOK Example:
To cook 0.6kg of Roast Beef from frozen.
2. Enter the weight by pressing the WEIGHT UP
key once.
EXPRESS DEFROST Example:
To defrost 1.2kg of Chicken portions.
1. Press the ROAST BEEF/LAMB key once to
select cooking from frozen.
x1
x1
The display will count down
through the cooking time.
3. Press the START key once to start cooking.
2. Enter the weight by pressing the WEIGHT
DOWN key once.
1. Press the CHICKEN PORTIONS
key once.
The display will count down
through the cooking time.
3. Press the START key once to start cooking.
x1
x1
x1
x1
EXPRESS COOK / EXPRESS DEFROST
R-959M-A.indd 18R-959M-A.indd 18 7/6/09 3:30:09 PM7/6/09 3:30:09 PM
Page is loading ...
Page is loading ...
Page is loading ...
Page is loading ...
Page is loading ...
Page is loading ...
Page is loading ...
Page is loading ...
Page is loading ...
Page is loading ...
Page is loading ...
Page is loading ...
Page is loading ...
Page is loading ...
Page is loading ...
Page is loading ...
Page is loading ...
Page is loading ...
Page is loading ...
Page is loading ...
Page is loading ...
Page is loading ...
Page is loading ...
Page is loading ...
Page is loading ...
Page is loading ...
Page is loading ...
Page is loading ...
Page is loading ...
Page is loading ...
Page is loading ...
Page is loading ...
Page is loading ...
Page is loading ...
Page is loading ...
Page is loading ...
Page is loading ...
Page is loading ...
Page is loading ...
Page is loading ...
Page is loading ...
Page is loading ...
Page is loading ...
Page is loading ...
Page is loading ...
Page is loading ...
Page is loading ...
Page is loading ...
Page is loading ...
Page is loading ...
Page is loading ...
Page is loading ...
Page is loading ...
Page is loading ...
Page is loading ...
Page is loading ...
Page is loading ...
Page is loading ...
Page is loading ...
Page is loading ...
Page is loading ...
Page is loading ...
Page is loading ...
Page is loading ...
Page is loading ...
Page is loading ...
Page is loading ...
Page is loading ...
Page is loading ...
Page is loading ...
Page is loading ...
Page is loading ...
Page is loading ...
Page is loading ...
Page is loading ...
Page is loading ...
Page is loading ...
Page is loading ...
Page is loading ...
Page is loading ...
-
 1
1
-
 2
2
-
 3
3
-
 4
4
-
 5
5
-
 6
6
-
 7
7
-
 8
8
-
 9
9
-
 10
10
-
 11
11
-
 12
12
-
 13
13
-
 14
14
-
 15
15
-
 16
16
-
 17
17
-
 18
18
-
 19
19
-
 20
20
-
 21
21
-
 22
22
-
 23
23
-
 24
24
-
 25
25
-
 26
26
-
 27
27
-
 28
28
-
 29
29
-
 30
30
-
 31
31
-
 32
32
-
 33
33
-
 34
34
-
 35
35
-
 36
36
-
 37
37
-
 38
38
-
 39
39
-
 40
40
-
 41
41
-
 42
42
-
 43
43
-
 44
44
-
 45
45
-
 46
46
-
 47
47
-
 48
48
-
 49
49
-
 50
50
-
 51
51
-
 52
52
-
 53
53
-
 54
54
-
 55
55
-
 56
56
-
 57
57
-
 58
58
-
 59
59
-
 60
60
-
 61
61
-
 62
62
-
 63
63
-
 64
64
-
 65
65
-
 66
66
-
 67
67
-
 68
68
-
 69
69
-
 70
70
-
 71
71
-
 72
72
-
 73
73
-
 74
74
-
 75
75
-
 76
76
-
 77
77
-
 78
78
-
 79
79
-
 80
80
-
 81
81
-
 82
82
-
 83
83
-
 84
84
-
 85
85
-
 86
86
-
 87
87
-
 88
88
-
 89
89
-
 90
90
-
 91
91
-
 92
92
-
 93
93
-
 94
94
-
 95
95
-
 96
96
-
 97
97
-
 98
98
-
 99
99
-
 100
100


Sharp R98STM-AA Owner's manual
- Category
- Kitchen & houseware accessories
- Type
- Owner's manual
- This manual is also suitable for
Ask a question and I''ll find the answer in the document
Finding information in a document is now easier with AI
Related papers
Other documents
-
De'Longhi Delonghi P80D0El-DK 20L 800W Solo ET Microwave User manual
-
Hyundai H-MW1625 User manual
-
Magic Chef MCSGC12B User manual
-
-
 Decosonic Convection Oven User manual
-
Electrolux EB4GL90CN Recipe book
-
-
Tesco MM1715R Solo Microwave 17L User guide
-
 Russell Hobbs 21060 User manual
-
Viking VMOC206BK Convection Cookbook (1 MB)

