Page is loading ...

Log Book
one2clean
It is essential that you observe the
points described in these instruc-
tions. Failure to do so will invali-
date all warranty claims. For all
additional items ordered from
GRAF, separate installation in-
structions will be provided in the
transport packaging.
It is essential that you check the
components for possible damage
before installation.
You will receive separate instruc-
tions for assembling the system.
Contents
1. General Notes 2
2. Function of the Wastewater Treatment System 3
3. Start-up of the Control System 4
4. Operation of the Control System 5
5. Inspection and Maintenance 11
6. Fault Messages and Troubleshooting 13
7. Operating Notes 15
8. EC Declaration of Conformity 17
9. Declaration of Performance 18
10. Technical Data of the Control System 19

1. General Notes
2 / 19
1. General Notes
Important tips for safe & long-lasting operation of the one2clean:
• The SBR system is designed for the treatment of all household sewage. The introduction of other
wastewater, such as the wastewater from restaurants and/or business establishments, etc. is permit-
ted if these were already known at the time of design of the system and were taken into account.
• Biocides, materials with a toxic effect or materials that are not biologically compatible must not enter
the system, as these impede bacteria important for wastewater treatment and lead to biological pro-
cess problems (detailed notes follow on the next pages).
It is imperative that you follow the operating and maintenance instructions for compliance with the
regulatory requirements for cleaning. These instructions can be found on the following pages.
Furthermore, we ask that you carefully read and observe the following notes:
• The location of the control system for indoor installation must be a dry, well-ventilated room (base-
ment or garage).
• If an outdoor control cabinet is used, this should be placed in as shaded place as possible to avoid
overheating.
• At no time must the cabinet is be covered, in particular its air vents, and that it is freely accessible for
maintenance.
• There must be a permanent power supply to the one2clean. Ensure that the control cabinet is ade-
quately fused (16 A) and the power supply is fitted with isolator switch for repair & maintenance. Ad-
ditional electrical components & consumers should not be using the same fuse as they can could
power failure and interfere with one2clean operation.

2. Function of the Wastewater Treatment System
3 / 19
2. Function of the Wastewater Treatment System
The one2clean small wastewater treatment system is fully biological and works according to the retention
process with long-term aeration (sequencing batch reactor). The system is essentially made up of an aer-
obic stage. This stage is split into a rest area and an activation area. The chambers are connected to one
another in the bottom section. During this process, therefore, all domestic sewage is immediately exposed
to aerobic wastewater treatment. The entire system is aerated by compressed air being blown in and the
sludge activated as a result of this biologically cleans the wastewater.
The coarse and floating solids contained in the wastewater are initially retained in the rest area by means
of a baffle. The wastewater then passes through an overflow opening in the lower part of the container
from the rest area into the activation area.
As the rest area is also aerated, the solids which remain behind are also degraded aerobically over time.
Wastewater treatment is performed in the one2clean without pre-treatment, so that no anaerobic digestion
processes can occur.
Operation of the treatment system is carried out via a microprocessor control system which controls the
air compressor and air distribution.
The SBR process is a sequence of different steps that occur at set times in a sequence and takes place
at least once a day.
Step 1: Aeration
The wastewater is subjected directly to aerobic treatment for a fixed amount of time. On
the one hand the microorganisms (activated sludge) are supplied with the oxygen nec-
essary for degradation; on the other hand mixing is achieved as a result of pressure
aeration. The air diffuser of the system is supplied with ambient air by a compressor.
The aeration is intermittent, so as to allow targeted wastewater treatment. Thus, differ-
ent environmental conditions can be achieved.
Step 2: Settling
There is no aeration in the second phase. The activated sludge and the remaining set-
tleable solids can now settle by gravity. A clear water zone is created at the top and a
layer of mud forms at the bottom. Any floating sludge which might develop is located
above the clear water zone.
Step 3: Clear Water Removal
The biologically treated wastewater (clear water) is extracted from the SBR stage. This
is done by pumping compressed air according to the mammoth pump principle (air lift
pump). The air lift is designed in such a way that no floating sludge which might develop
is drained on the clear water layer. A minimum water level in the system is maintained
without additional components.
After execution of the third Step, the cleaning process begins again with step 1.
Two cycles are performed per day. The individual adaptation of switching times is possible on the part of
the maintenance company.

3. Start-up of the Control System
4 / 19
3. Start-up of the Control System
After the system is connected to the power supply, a short system test is run, during which time the LED
light is red. The LED then becomes green when the start-up phase is completed.
During the system test, the notification “SYSTEM TEST ... OK”, the program version, and serial number of
the control system appear for a short time. Following this, the current operating status of the system is
displayed. After the system test is complete, the date and the current time should be checked and adjust-
ed if necessary (see Section 4.2.3).
After checking the date/time, a functional check of the system components must be carried out. This
check can only be carried out if the necessary air hoses are connected. The check should be carried out
via the menu point “manual mode” in the control system, which is intended for this purpose. The individual
parts of the system are tested for functionality.
After a successful check, the system is reset to automatic mode.
CAUTION: The clear water siphon only functions when the containers are filled.
If the date and time are not set correctly, operating faults will be stored with the incorrect time information.

4. Operation of the Control System
5 / 19
4. Operation of the Control System
The operation of the system is carried out via a microprocessor in the control unit. The microprocessor
allows for the set-up of operating parameters, the display of operating conditions and the query of system
parameters as well as the programming of working times through a specialist company.
Adjustments are made by scrolling through numerical values using the two arrow keys . The set-
tings are then confirmed by pressing the button.
The individual dialogues can be terminated ahead of time by pressing or will be terminated automati-
cally after 2 minutes.
The control system is broken down into the following display pages:
1. Basic level: Status of the cycle sequence with the elapsing remaining time, as well as the display of
error messages.
2. Operator level: The operator can access the operator level by pressing the button and enter oper-
ator-specific settings.
3. Service level: A password-protected service level can be accessed from the operator level using an
additional code. This level is reserved for trained personnel. Here adjustments or changes can be
made and diagnostic data is retrieved.
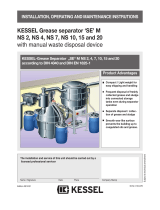
Figure 1: view of the operating unit
4.1 Control Programme
The control system switches the outputs for air compressors and stepper motors on a timer.
The timing is determined by the set sequence tables. A complete cleaning cycle is started for each start
time in accordance with the selected sequence table.
By setting up holiday times in the operator level, the complete sequence of cleaning cycles can be sup-
pressed for the set period of time. Only one holiday cycle with greatly reduced activity takes place at this
time. During this time, no treated wastewater will be removed, as there should be no supply.

4. Operation of the Control System
6 / 19
4.1.1 Display of Operating Status
The operating status is indicated by the LEDs (green = operational / red = fault) and as text on the screen.
In normal operating mode (aeration mode), the display appears as follows:
In automatic mode, the liquid crystal display shows the current work phase and the remaining time left in
this phase.
If a fault occurs, the red LED is turned on. A message indicating which component is faulty appears in the
liquid crystal display (e.g. Fault Compressor 0.0A).
4.1.2 The following work phases are displayed
Display
Process performed
Denitrification
Y3 valve (plug X1.1) is actuated intermittently; the activated sludge is briefly
mixed with the wastewater. This is followed by long pauses (response times).
Ventilation
Y3 valve (plug X1.1) is actuated; the system is aerated in intervals over a long
period of time.
Sedimentation phase
No valves are actuated, the activated sludge settles in the system.
Activity phase
Y4 valve (plug X1.2) is actuated; the clear water is pumped into the drain.
Cycle pause/
holiday mode
Y3 valve (plug X1.1) is actuated; the system is aerated in intervals (considerably
less than in the aeration phase).
Rest: XXX:XXmin
Display of remaining time.
Symbol
Key assignment
Function
Enter key
Selection of operating mode, confirmation of entries
Scroll
Display of operating modes and queries Programming of
the system by entering figures
Acknowledgement
Acknowledgement of entries without saving
Acknowledgement of fault messages
Aeration
Rest: 120:10min

4. Operation of the Control System
7 / 19
4.2 Operating the Control System
You can start different queries from the automatic mode.
You can access the first operating level by pressing . You can now call up the individual queries using
the arrow keys and then pressing :
Display
Meaning
Operating mode
Remaining time
Remaining time in current work phase
Operating hours
Display of the operating hours of the valve and compressor
Manual operation
Manual control of the valve
Date
Time
Current time, day and date. Can be set using
Holiday mode
Holiday mode set-up (max. 90 days)
Faults
Operational faults which occur are stored here and can be read. It is possible to
switch between the error message and the corresponding date using and
Settings
The current settings can be viewed using the arrow keys
Service menu
For qualified personnel
4.2.1 Operating Hours Query
Press the button. On the screen will appear:
By pressing again, the operating hours for the valves and the compressor can be displayed in se-
quence using the arrow keys .
Pressing once will take you back to the display “display operating hours”. You can access the “manual
mode” menu by pressing .
Note: If you do not press any buttons for a period of 10 minutes, normal operation will begin automatical-
ly.
Operating hours
meter reading

4. Operation of the Control System
8 / 19
4.2.2 Manual Control of the Valve using “Manual Operation”
During checks, each valve should run for at least 5 seconds, as the monitoring the current consumption of
the valves takes some time before any faults are detected.
In automatic mode, first press then the arrow key until the following is displayed on the screen:
By pressing on the button again, you will receive the following message:
Pressing allows you to turn the selected programme on and off.
The other programs can be selected using the arrow keys .
Pressing once will take you back to the display “manual mode”.
4.2.3 Set Date/Time
Press and then the arrow keys until the following is displayed on the screen (example):
By pressing , the time and date can then be set using the arrow keys .
To confirm the correction, you must press each time.
Pressing once will take you to the next display in holiday mode.
A correctly set system clock and date display is absolutely mandatory in order to record the hours of opera-
tion and so that any faults can be traced. There is no automatic change from summer to winter time.
NOTE: If you do not press any buttons for a period of 10 minutes, normal operation will begin automatically.
19-12-2007 Mon
20:15:56
Aeration OFF
Manual operation

4. Operation of the Control System
9 / 19
4.2.4 Setting-up Holiday Mode
NOTE: Holiday mode results in the reduced operation of the wastewater treatment system. It should only
be applied when no wastewater is introduced into the wastewater treatment system during the selected
time period. Wastewater that passes into the system during the holiday mode period will not be cleaned.
Holiday mode is switched on and off automatically for the data you have entered.
Press , then press the arrow buttons until the following appears on the screen:
Press again to release the input of holiday dates:
Start of holiday:
The start of holiday mode is entered in the format YYYY-MM-DD by pressing . To switch between
the different settings, the button must be pressed in each case.
End of holiday:
As with for the start of the holiday, the end of holiday mode is entered in the year, month and day format
YYYY-MM-DD by pressing .
Press the button to save the input data for holiday mode and to exit this function.
Pressing returns you to the automatic mode display.
NOTE: If you do not press any buttons for a period of 2 minutes, normal operation will begin automatically
without the date that you have just entered being saved.
Start: YYYY-MM-DD
End: YYYY-MM-DD
Vacation oper.

4. Operation of the Control System
10 / 19
4.2.5 Old Faults
The control system stores all past fault messages and the operation of the control system via the “manual
mode” function. Past fault messages with date and time can be read under the menu item “Old faults”. The
individual messages can be accessed using the arrow keys. You can exit the menu item by pressing .
Faults are indicated as encoding, in order of their appearance, starting with number 0 (latest signal).
Coding
Meaning
1
Power failure (system is currentless)
2
Net is back (system regains power)
3
Compressor has over-current
4
Compressor current supply too low
5
Manual operation
The faults number 2 (net is back) and number 5 (manual operation) are no faults. They will be registered for
a better temporal localization of possibly occurring faults or rather monitoring of manual activities on the
control system.
4.2.6 Display Settings
This menu item allows the current control system settings to be seen. It is not possible to change these
settings. This menu item is used to analyse the settings without making changes. The individual settings
can be called up using the arrow keys . You can exit the menu item by pressing .
4.2.7 Service Menu
Operating parameters can be changed in the service menu. Access is protected with a code. This second
maintenance level is reserved exclusively for qualified specialist personnel only!
Any access to the control system settings by unauthorised persons will cause the warranty to ex-
pire!

5. Inspection and Maintenance
11 / 19
5. Inspection and Maintenance
5.1 Obligations of the Operator
The system must always be turned on. The operator is obliged to ensure the fault-free operation of the
system. Almost all operational faults lead to a deterioration of the system’s cleaning performance. These
should therefore be detected at an early stage and eliminated immediately by you or a qualified service
technician.
5.1.1 Daily checks
The system should be checked daily for correct operation. The system is operating correctly when the
operating control is lit up green and no warning signal can be heard.
5.1.2 Monthly checks
• Visual inspection for any sludge output, turbidity or discoloration in the flow
• Check inflows and outflows for blockages (visual inspection)
• Read the operating hours counter on the air compressor (total operating hours), the ventilation (Y3
valve) and the clear water run-off (Y4 valve) and record in the operating log
5.2 Maintenance by a Specialist Company
Maintenance is carried out by a specialist company (experts) at least twice a year (approximately every 6
months). The time intervals and tasks specified by the local water authority in the consent permit under
water laws also apply. For this purpose, the system owner must complete a maintenance contract with a
qualified specialist.
The following tasks should be carried out in relation to maintenance:
• Inspection of the log book with determination of the regular operation (target-actual comparison),
• Check the air filter of the air compressor,
• Maintenance of the air compressor according to the manufacturer's instructions,
• Functional check of the air compressor and stepper motors,
• Carry out general cleaning work, e.g. removal of deposits,
• Check for adequate ventilation,
• Examination of activation tank:
– Oxygen concentration (O2/l > 2 mg), adjust the operating time of the compressor if necessary,
– Sludge volume ( < 900 ml/l),
If the sludge volume is greater than 900 ml/l, the sludge must be removed.
Maintenance tasks carried out, any damage detected or repairs made as well as other instances should
be summarised by the maintenance company in a maintenance report.

5. Inspection and Maintenance
12 / 19
5.3 Determination of Sludge Removal
In order to determine the need for sludge removal in the wastewater treatment system, a settling test
should be carried out at maintenance intervals. For this settling test, the SV30 is measured. The SV30 is
the sludge volume occupied by 1000 ml of activated sludge after a settling period of 30 minutes. It is a
measure of the amount of sludge present in the wastewater treatment system.
Measurement of the SV30 is carried out in a 1000 ml graduated cylinder.
The following points must be observed during this measurement:
1. Turn ventilation on - if not active - and allow to mix for a short time
2. Submerge the scoop into the tank and remove sludge sample
3. Fill the graduated cylinder with the sludge sample up to the 1000 ml mark
4. Let the cylinder containing the sample stand in a place free from vibrations for 30 minutes
5. Read the sludge level and carry out sludge removal if this is > 900 ml/l
6. After emptying the tank have to be filled up with fresh water again
5.4 Sludge Removal
Removing sludge from the wastewater treatment system should be carried out according to the following
points:
1. Remove the cover
2. Remove the deposits on the water surface and on all visible surfaces (baffle, sample container,
siphon)
3. Wash down the visible surfaces
4. Insert the suction hose into the wastewater treatment tank until it reaches the floor
(CAUTION: air admittance valves on the ground must not be damaged!)
5. Aspirate until about 30 cm of wastewater and sludge remain in the wastewater treatment system
Fill the graduated
cylinder with the
sludge sample up
to the 1000 ml
mark
30 minutes
Read the sludge
level an carry out
sludge removal if
this is > 900 ml/l

6. Fault Messages and Troubleshooting
13 / 19
6. Fault Messages and Troubleshooting
Technical problems of system operation (failure of a unit) are visually displayed.
6.1 System Behaviour after switching off the Power Supply
If the system is disconnected from the mains (e.g. power failure), the control program and the counted
operating hours are retained due to the memory of the control system. The red LED will light up. When the
system is supplied with power again, it will self-start.
NOTE: If the system is disconnected from the mains for more than 24 hours, cleaning of the existing
wastewater is not or is only possible to a very limited extent.
6.2 Fault Message in the Display
Faults are shown as text or as numbered codes on the liquid crystal display. The operating control lamp
then lights up red.
The numbered fault codes are explained below:
1. Power failure (system is de-energised)
2. Power returned (system is supplied with power again)
3. Compressor has overcurrent
4. Compressor power supply too low
5. Manual operation
The displays no. 2 (power returned) and no. 5 (manual mode) are not faults in the proper sense. These
are only registered as fault messages for better time limitations of any faults that occur and for monitoring
manual activities on the control system.
Table 1: Fault Causes and Troubleshooting
Display
Possible cause
Remedy
Mains failure
No display, no light
Power failure
System turned off
There is no voltage
at the control cabinet.
Check the power supply to the system and to
the control system
Turn system back on
Check supply to the control cabinet
Wait for resumption of power supply
No display, light is green
Turn system off and back on again after 10
seconds
Mains returned
Power available
again
Set the clock
Internal clock/date
not set
Set date and time via menu item
Compressor **overcurrent**
Short-circuit
Check supply to the control cabinet
Compressor **current too low**
Compressor does not
work / is not receiv-
ing power
Check the compressor in manual mode
Manual operation
System was activat-
ed manually in man-
ual mode

6. Fault Messages and Troubleshooting
14 / 19
6.3 Unusual Water Levels - Fixing a Fault
Observation
Possible cause
Remedy
The water level in the
activation tank is
unusually high
System is running in holiday mode
System runs continually in cycle
pause
Control system settings are incorrect
The drain siphon is clogged
The air hose to the drain siphon is
leaking
System has been flooded from exter-
nal water source and not allowing wa-
ter to drain from the system
Control system is defective
End holiday mode
Have the control system settings
checked by the maintenance
technician
Allow tank to be pumped out and
clean siphons
Seal hose connections
Wait out flooding
Get in touch with maintenance
company
The system smells,
the treated water is
cloudy or discoloured
Too little air is entering the system
Single-sided ventilation due to defec-
tive air admittance valves
Have service company increase
ventilation time
Check the ventilation, get in
touch with maintenance compa-
ny
Ventilation is one-
sided or large air
bubbles appear at
points
Membrane unit is defective
Seal leaky air admittance valves
Get in touch with maintenance
company
Get in touch with maintenance
company

7. Operating Notes
15 / 19
7. Operating Notes
Essentially, the system should only be supplied with materials that correspond to domestic wastewater in
their characteristics.
Biocides, materials with a toxic effect or materials that are not biologically compatible or degradable must
not enter the system, as these lead to biological process problems. The following, in particular, should not
be introduced into the system:
Rainwater from roofs and courtyards,
Extraneous water (e.g. drain water)
Residues from livestock in solid or liquid form,
Industrial or agricultural wastewater, as far as it is not comparable to domestic wastewater,
Chemicals, pharmaceuticals , mineral oils, solvents,
Cooling water,
Coarse materials in the form of food scraps, plastics and hygiene products, face wipes, coffee fil-
ter papers, bottle caps and other household items,
Milk and dairy products
Drain water from swimming pools,
Large amounts of blood.
In the case of large amounts of fats or vegetable oils, it is recommended that the fatty wastewater is pre-
treated in one of the grease traps upstream of the wastewater treatment system (Caution: No faeces may
be introduced into the grease trap!).

7. Operating Notes
16 / 19
The following is a list of individual substances which must not be disposed of via the wastewater treat-
ment system:
Solid or liquid substances
that do not belong in the
sink or in the toilet:
What it does:
Where it should go:
Ash
Does not decompose
Dustbin
Chemicals
Contaminates wastewater
District collection point
Disinfectants
Kills bacteria
Do not use
Paints
Contaminates wastewater
District collection point
Frying fat
Accumulates in pipes and leads to blockages
Dustbin
Adhesive plasters
Clogs pipes
Dustbin
Cigarette ends
Accumulates in the system
Dustbin
Condoms
Causes blockages
Dustbin
Corks
Accumulates in the system
Dustbin
Medication
Contaminates wastewater
Pharmacy
Engine oil
Contaminates wastewater
District collection point
Oily waste
Contaminates wastewater
District collection point
Plant protection products
Contaminates wastewater
District collection point
Paintbrush cleaner
Contaminates wastewater
District collection point
Cleaning agents, except those
which are chlorine-free (envi-
ronmentally friendly)
Contaminates wastewater, corrodes pipes and
seals
District collection point
Razorblades
Causes risk of injury for workers in sewers and
wastewater treatment systems
Dustbin
Drain cleaner
Corrodes pipes and seals, contaminates
wastewater
District collection point
Pesticides
Contaminates wastewater
District collection point
Panty liners/Sanitary towels
Leads to blockages, non-degradable plastic film
spoil water
Dustbin
Cooking oil
Leads to deposits and pipe blockages
District collection point
Food leftovers
Lead to blockages, attracts rats
Dustbin
Wallpaper paste
Leads to blockages
District collection point
Textiles (e.g. nylon tights,
cloths, handkerchiefs, etc.)
Clogs pipelines, can cripple a pumping station
Charity shop
Thinner
Contaminates wastewater
District collection point
Bird sand, cat litter
Leads to deposits and pipe blockages
Dustbin
Cotton buds/Face wipes
Clogs the system
Dustbin
Toilet blocks
Contaminates wastewater
Do not use
Nappies
Clogs pipes
Dustbin
Cement water
Creates deposits, becomes concrete
Send to a specialist company

8. EC Declaration of Conformity
17 / 19
8. EC Declaration of Conformity
Manufacturer: Otto Graf GmbH
Carl-Zeiss-Straße 2-6
D-79331 Teningen
hereby declares that the product one2clean small sewage treatment system complies with the following
Directives:
2006/42/EC Directive of the European Parliament and of the Council, dated 17 May 2006, on
machinery, and amending Directive 95/16/EC.
2006/95/EC “Directive of the Council relating to electrical equipment designed for use within cer-
tain voltage limits”
The following harmonised standards have been applied:
EN 60204-1 Electrical equipment of machines Part 1: General requirements
EN ISO 13849-1 Safety of machines - Safety-related parts of control systems - Part 1: General princi-
ples for design
This EC declaration of conformity becomes invalid if the product is modified without consent.
Teningen, 22.02.14
Arne Schröder
(Product Management Team Leader)

9. Declaration of Performance
18 / 19
9. Declaration of Performance

10. Technical Data of the Control System
19 / 19
Otto Graf GmbH – Carl-Zeiss-Str. 2-6 – D-79331 Teningen – Tel.: 0049/(0)7641/589-0 – Fax: 0049/(0)7641/589-50
GRAF SARL – 45, Route d´Ernolsheim – F-67120 Dachstein Gare – Tel.: 0033/388497310 – Fax: 0033/388493280
GRAF Iberica – C/Marquès Caldes de Montbui, 114 baixos – ES-17003 Girona – Tel.: +34/972 913 767 – Fax: +34/972 913 766
GRAF UK Ltd – Thorpe Way Industrial Estate, Banbury – Oxfordshire OX16 4TA – Phone: +44 (0) 16 22 68 65 50
06-2014
10. Technical Data of the Control System
- Programmable logic microcontroller
- T3,15A fuse (internal)
- Wide-range 100-240 VAC/50-60 Hz power supply
- Real-time clock with 5 min/a deviation, battery back-up
- Logbook, non-volatile
- Cable break monitoring for compressors by measuring output currents
- Operating/error message display with LED (green/red)
- Operating temperature range: 0°C to +55°C
- Permissible temperature range outside of operation: -20°C to +85°C
- relative humidity: 10% to 95%, no condensation
- Degree of protection IP54, front side (with properly glued front foil)
- 4-key control panel
- Display: 2 lines of 16 characters with backlighting (blue)
- Outputs:
o 230 VAC 50Hz compressor (standard),
o 2x 24 VDC step motors/solenoid valves for compressed air flow
/