Page is loading ...

October 2011 Page 1 © Copyright AccuSport International, Inc.
User Guide
KNOW THE GAME.

October 2011 Page 2 © Copyright AccuSport International, Inc.
GETTING STARTED
Congratulations on your AccuSport VectorX Launch Monitor purchase. You have
chosen to do business with the leader in launch monitor technology. To validate
the AccuSport warranty, receive notification of software updates and gain access
to technical support, please register your product by filling out the enclosed
warranty card, or by going to www.accusport.com to complete the online
registration.
To ensure trouble-free, reliable operation, read this user guide before setting up
and using your VectorX. Failure to follow the information provided in this user
guide can void your warranty.
Please visit the AccuSport web site at www.accusport.com for advanced topics
and breaking news about AccuSport products.
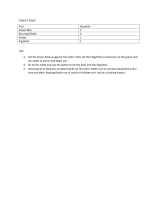
VectorX Launch Monitor Components
*The VSeries software modules are an optional add-on to the VectorX
monitor and require additional accessories. Contact Customer Support
for purchase information.

October 2011 Page 3 © Copyright AccuSport International, Inc.
Safety Instructions
• Follow all warnings and instructions marked on the product.
• Do not drop the VectorX or subject it to mechanical shocks.
• When taking a swing, do not hit the VectorX.
• Do not open the VectorX unit. It contains high voltages and delicate components.
Opening the VectorX could result in personal injury or harm to the unit, and will
void the warranty. Do not allow moisture to enter the VectorX. Use only approved
accessories. To prevent harm to the VectorX or the computer system, use only the
supplied cables and power adapters.
• Do not place items on the display screen when packing or storing the VectorX.
This could cause extensive damage to the screen.
• VectorX contains an onboard computer that is susceptible to computer viruses.
Use caution when connecting to another computer or plugging in a USB drive/key.
Care and Handling
• When necessary clean the VectorX lens using any photographic or eyeglass
cleaning kit. Paper towels or tissue are not recommended.
• The outside of the VectorX case can be cleaned using a damp cloth. Turn off and
disconnect the VectorX before cleaning. Do not allow liquid to enter the case.
• Clean the display screen using a standard LCD cleaning kit. Paper towels or tissue
are not recommended.

October 2011 Page 4 © Copyright AccuSport International, Inc.
Charging the Battery
If you are using a fully charged battery, no AC power source is needed. If the
battery is not charged, or if you will be using the VectorX for an extended time
period, you may use the optional external battery or use the AC adapter to plug
into an electrical outlet.
To charge the battery, plug the VectorX into an outlet via the AC adapter. Make
sure the VectorX unit is turned ON, and allow the unit to charge overnight or for
at least six hours.
Charging the Battery correctly is extremely Important!! If the Critically Low
Battery warning appears, connect the VectorX Immediately to external power.
Failure to do so may cause significant loss of Battery Life, which can eventually
lead to Battery Failure. If a VectorX is left unattended, and switches off due to a
low battery. session data will be lost.
When the Battery Level is low the Black and Red Warning screens (pictured
above) will display, alternately, on the VectorX LCD screen, and a beeping sound
may be heard from the VectorX. In order to clear this warning the VectorX MUST
be connected to external power.
When using the VectorX on Battery the following indicators will denote the
battery level
Indicates Full Battery Indicates Partially Full Battery
Indicates Low Battery Indicates Critically Low Battery
Indicates that VectorX is plugged into external power

October 2011 Page 5 © Copyright AccuSport International, Inc.
Starting the VectorX
To turn ON the VectorX, select the on/off switch located on the back of the
system. A white screen with the AccuSport logo will appear while the system is
initialized. Initialization will take approximately two minutes.
AccuSport VectorX Illustration

October 2011 Page 6 © Copyright AccuSport International, Inc.
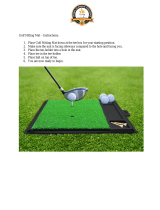
Marking the Ball
The VectorX Launch Monitor uses black marks on the golf ball to measure the
ball flight parameters. The marks must face the VectorX unit when the ball is
positioned for hitting. No other ball marks should be visible to the camera. If
making your own marks, they should be made using a black Sharpie® on a blank
face of a white ball.
Logo Method - Most golf balls on the market today provide a
marking with a straight line type orientation as pictured, or you
may also use the stripe method below.
Line method - Draw a black line at least one inch long on the
blank face of the ball. The mark must be clearly visible when it
is facing the VectorX and must be drawn perfectly straight.
There are a number of golf ball marking devices commonly used
in the industry that will work for placing the line on the ball for
use with the VectorX.
Positioning the Ball
Use the Setup Template to tee up the ball in the
correct position. If you are not using the Setup
Template, review the setup illustration on page 6, to
understand the golfer position and hitting zones. The
VectorX must be level to the hitting surface. Tee the
ball up in the Right Tee Zone for a right-handed
golfer.
For a left-handed golfer, position the VectorX facing
the hitter and tee the ball up in the Left Tee Zone.
*Note: Do NOT leave Setup Template in place
when hitting shots.
right tee
zone
left tee
zone

October 2011 Page 7 © Copyright AccuSport International, Inc.
Positioning the VectorX
Diagram shows positioning for right handed golfers.
Note: A computer is required to link VectorX to the optional add-on VSeries
software. VSeries software is sold separately.

October 2011 Page 8 © Copyright AccuSport International, Inc.
Welcome Screen
The Welcome screen appears after
startup. Select the arrow on the
keypad for the option you wish to
choose: (Restore and Language are
not used in normal operation)
‘About’ – This option gives detailed
information about the VectorX
software and hardware.
‘Next’ – This option advances you to
the ‘Select Activity’ screen.
Select Activity
Select the arrow on the keypad for
the option you wish to use:
‘Set Conditions’ – This option allows
you to ‘Switch to Meters’, ‘Set
Altitude’, ‘Set Temperature’, or go
‘Back’ to the last screen.
‘Practice’ – This option navigates to
the ‘Data’ screen without entering
student or club information. The data
screen is discussed under the fitting
section.
‘Fitting’ – This option allows users to enter information such as ‘Name’,
‘User#’, or ‘Notes’ before beginning the session. This is helpful if saving to a
USB key or to identify club changes, members or customers.
‘Run VSeries’ – Connects the VectorX to the optional VSeries software modules
if purchased.

October 2011 Page 9 © Copyright AccuSport International, Inc.
Set Local Conditions
Select the arrow on the keypad for
the option you wish to use. All
settings made on this screen will
remain the same until changed even
if the VectorX is switched OFF.
‘Switch to Meters’ – This option
changes to Meters or Yards.
‘Set Altitude’ – This options allows
you to change altitude settings based
on your current location.
‘Set Temperature’ – This option
allows you to change temperature settings based on current temperature.
‘Back’ – This option takes you back to the ‘Select Activity’ screen.
Set Altitude
Select the arrow on the keypad for
the option you wish to use.
‘>5000ft’
‘3000ft – 5000ft’
‘1000ft – 3000ft’
<1000ft – The VectorX defaults to
this setting.
‘Back’

October 2011 Page 10 © Copyright AccuSport International, Inc.
Set Temperature
‘>90F’
’75F – 90F’
’60F – 75F’ – The VectorX defaults
to this setting.
‘<60F’
‘Back’ – This option takes you ‘Back
to the ‘Set Conditions’ screen.
Fitting
To enter a ‘Name’, ‘User#’, or
‘Notes’, select the arrow next to that
option.
Move the arrow keys to the
letter you wish to choose
and press the circle to
select, continue until all
characters are entered and then
select arrow for ‘Next’ to continue to
the ‘Enter Club’.

October 2011 Page 11 © Copyright AccuSport International, Inc.
To ‘Enter Club’
information, move the
arrow keys to the
character you wish to
enter and press the circle to select.
Continue until all characters are
entered and then select arrow for
‘Next’ to continue.
This takes you to the Data screen.
Data
Carry, Offline and Total Distance
appear across the top of the screen.
The direction Offline will be
represented by an “R” for Right or an
“L” for Left.
Total Distance includes carry and
roll.
VectorX measures ball speed, launch
angle, back spin, side spin and side angle. Club speed and descent angle are
calculated.
White numbers show data from the current shot. Gold numbers show the
average of all shots for the item you are currently hitting.
‘Image’, ‘Profile’, and ‘Impact’ views can be accessed from the ‘Data’ screen.

October 2011 Page 12 © Copyright AccuSport International, Inc.
Launch Data:
Ball Speed: Measures in miles per hour (MPH) or kilometers per hour (KPH)
Club Speed: Calculates within 1 to 2 miles per hour (MPH) or kilometers per hour
(KPH)
Launch Angle: Displayed in degrees.
Descent Angle: Calculated angle of the golf ball in relation to the ground as it
descends from the apex of its flight.
Back Spin: Displayed in RPMs.
Side Spin: The label beside the number indicates draw/hook, fade/slice, or center.
Displayed in RPMs.
Side Angle: The label beside the number indicates push, pull or center. Displayed in
degrees.
Image
The ‘Image’ view displays the image
of the ball from the camera. The
VectorX Launch Monitor uses a black
line on the golf ball to measure the
ball flight parameters; the line is
indicated in red and blue by the
software to validate how the shot was
measured.
If the software misreads the black line
or you determine the shot is not a
good representation of the session,
the shot can be deleted by selecting
the arrow on the keypad next to the
‘Delete’ option.
Select ‘Options’ for additional settings related to the current session.
‘Data’, ‘Profile’, and ‘Impact’ views can be accessed from the ‘Image’ screen.

October 2011 Page 13 © Copyright AccuSport International, Inc.
Profile
‘Profile’ shows a top down and
side view of the ball flight using
AccuSport’s best-in-the-industry
flight model.
‘Image’, ‘Data’, and ‘Impact’
views can be accessed from the
‘Profile’ screen.
Impact
The ‘Impact’ view displays the attack
angle, face angle, and club path for
the selected shot.
‘Image’, ‘Profile’, and ‘Data’ views
can be accessed from the ‘Impact’
screen.

October 2011 Page 14 © Copyright AccuSport International, Inc.
Options
The ‘Options’ screen gives you the
choice to enter information for the
‘Next Club’ or to advance to
‘Finishing Options’ for the current
session.
Select the arrow on the keypad for
the option you wish to use:
Finishing Options
‘Finishing Options’ allow you to
‘Add Finishing Notes’, ‘Clear All
Data’, ‘Proceed to New Session’,
‘Save to USB’, or go ‘Back’ to the
Options screen.
‘Add Finishing Notes’ - enter
information regarding the session.
‘Clear All Data’ – Immediately
deletes all shots stored since either
beginning a new session or turning on
the VectorX.
‘New Session – Proceeds to a new session to enter student and club
information.
‘Save to USB’ – Insert flash drive into the USB port on the side of the VectorX
and select Save to USB to save an excel file of the sessions since the system has
been turned on. Inserting flash drive once the VectorX has reached the
Welcome screen and prior to shot capture is recommended.

October 2011 Page 15 © Copyright AccuSport International, Inc.
Run VSeries
The ‘Run VSeries’ option connects the software to the VSeries interface
modules if purchased as an add-on to the VectorX. The status will display
“Connected’ if available or ‘Not Connected’ if unavailable.
About VectorX
The ‘About’ option can be selected from the ‘Welcome’ screen or can be
accessed from most screens by selecting the circle on the keypad as shown
below.
This screen gives detailed information about the VectorX software and hardware
of the VectorX.

October 2011 Page 16 © Copyright AccuSport International, Inc.
General Questions
Whom should I contact with questions about the AccuSport warranty?
AccuSport Customer Support is available by phone or email:
Phone: 336-759-3300 x2
Toll-free: 866-759-3302 x2
Please have your serial number available.
HOURS: Monday – Friday 8:00 am to 5:00 pm EST
Free customer support during regular business hours while under
warranty.
Weekend support available Saturday (10:00 am to 5:00 pm) and Sunday (1:00
to 5:00 pm). There is a per incident fee.
Visit our website www.accusport.com for additional user tips.
How does VectorX connect to my computer if the VSeries software
modules have been purchased?
VectorX connects to your computer via Ethernet cable. For capturing swing video
a FireWire IEEE 1394 port is also required on your computer.
How does VectorX work?
VectorX is triggered by the sound of the club hitting the golf ball. The camera
takes two pictures of the golf ball within milliseconds of each other and advanced
image analysis software determines the size, rotation, vertical path and distance
between the two images. The software utilizes this information to accurately
measure ball speed, launch angle, back spin, side spin and push/pull, and to
calculate club head speed and angle of descent.
Can I use irons with VectorX?
Yes. In addition to drivers, irons can be used with the VectorX with minimal
adjustment. Keep in mind that the VectorX needs to be positioned at the same
level as the hitting surface to ensure the ball is not hit under the camera lens.
We recommend changing the hitting position to the iron location on the setup
template.

October 2011 Page 17 © Copyright AccuSport International, Inc.
Will VectorX work for a left handed player?
Yes. For a left-handed golfer, position the VectorX facing the hitter and tee the
ball up in the Left Tee Zone.
Does AccuSport provide product training?
The VectorX Launch Monitor is the first all-inclusive launch monitor with on-board
processor. Training packages are available at an extra cost. For details, contact
Customer Support.
Do I need to register my VectorX?
Yes. Registering your VectorX will activate your warranty. In addition, it will
assure that your contact information is entered into our system so that you can
receive software announcements and technical support for the warranty period.
You can register your VectorX at www.accusport.com or by contacting Customer
Support.
How accurate is club speed?
VectorX club speed is accurate to within 2 mph. This calculation is derived from
ball speed, launch angle, back spin, side spin and push/pull, all of which are
measured parameters.
Using VectorX
How important is ball placement?
Ball placement is crucial. If the ball is not placed in the correct hitting area or is
not at the stated 10-14 inches, from the launch monitor, the ball capture or
launch data will be affected. The Setup Template indicates where the ball should
be placed for hitting.
Does it matter what kind of golf balls I use?
We recommend using a white ball with as few markings as possible, so that the
software can clearly read the line on the ball. Be sure the ball is properly
marked. Range balls or limited flight balls will affect measured launch data.

October 2011 Page 18 © Copyright AccuSport International, Inc.
Troubleshooting
I am getting launch data for drivers, but the system is not capturing
irons.
1. Make sure that VectorX is on the same level as the mat and that the ball is
not being hit below the camera.
2. If the ball image is cut off at the side of the screen, use the setup template
to verify that you are teeing up the ball correctly.
I am getting strange or incorrect readings.
This may be due to lighting conditions or low battery.
1. Make sure the ball is marked properly by selecting the Image view, and
that the software is reading the correct mark, not some other spot on the
ball.
2. If the battery is low, charge it or use an alternate power source.
I cannot see the stripe on the ball.
Make sure when placing the ball in front of VectorX that the black line is facing
the VectorX.

October 2011 Page 19 © Copyright AccuSport International, Inc.
Error Messages
Analysis Terminated - This message indicates that the image of the ball has
not been correctly captured. Use the setup template to verify that you are
teeing up the ball correctly and that it is 10-14 inches from the unit.
No Planes – The software is unable to distinguish the black line on the golf ball.
Make sure the line is clear and facing the unit when placed on the tee.
Beyond Hitting Range – The ball is teed up too far away from VectorX. Tee
the ball up within the recommended 10-14 inches (shown on Setup Template)
Ball Clipped Top/Bottom/Right/Left Edge – A portion of the golf ball is cut
off an edge of the image. Use the Setup Template to position the ball correctly
for Drivers, Irons, and Wedges.
/