Page is loading ...

LTL Home Products, Inc. • 125 Route 61 • Schuylkill Haven, PA 17972
800-360-1585
www.ltlhomeproducts.com
info@ltlhomeproducts.com
LTL Home Products, Inc. - 125 Route 61 - Schuylkill Haven - PA – 17972
Congratulations on your high quality purchase! Pinecroft™ Shutters by LTL Home Products, Inc., are sure to add a
beautiful, distinctive touch to your home. The following guidelines are designed to help you finish and install
your new shutters with professional looking results.
As with any quality all-wood product, these exterior shutters should be properly finished .
1 - Prime the entire shutter (all exposed surfaces) with a high quality oil-base primer, applied according to paint
label instructions.
2 - Allow to dry as specified.
3 - After priming, if the wood seems ‘‘fuzzy’’ or ‘‘rough’’, sand with medium to fine sandpaper or steel wool.
4 - To give added protection against water infiltration, apply good quality caulk or spackling putty to the top
edge of the shutter.
5 - Apply finish coat/coats of a quality exterior paint.
1 - Apply exterior stain according to instructions on stain label.
2 - Sand if necessary (see #4 above).
3 - Apply adequate coats of exterior sealer.
- Medium Screwdriver
- Drill
- Safety Glasses
- Paint Brushes, Sanding Paper
- Primer/Paint or Stain/Sealer
- Non-corrosive screws
- Spacers (i.e. galvanized washers)
- Masonry anchor (optional)

LTL Home Products, Inc. • 125 Route 61 • Schuylkill Haven, PA 17972
800-360-1585
www.ltlhomeproducts.com
info@ltlhomeproducts.com
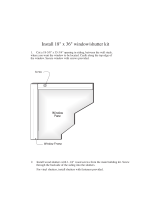
1 - Place shutter next to window at desired location.
2 - Clearly mark screw hole location with a pencil. Non-corrosive screws should be
marked 4’’ to 6’’ from the top and bottom of shutter, and within 1’’ above where the
siding makes contact with the shutter. This allows for maximum screw penetration.
3 - The remaining screw holes should be located an equal distance from each other in the same fashion as
above.
On the 81’’ shutter, two additional screw holes should be marked at shutter’s midpoint for added stability.
Make sure these holes are also within 1’’ above where the siding makes contact with the shutter.
1 - Drill holes centered on shutter side rails at marked locations. Drilling should be done on bench or ground.
DO NOT drill holes into house siding.
1 - Place shutter next to window at desired location.
2 - Place non-corrosive screws through previously drilled shutter holes and tap to start them. Tighten screws
only until the head touches the surface of the shutter. DO NOT force down tightly or puncture through siding.
Spacers should be used to keep shutter from direct contact with the mounting surface. This helps to
retard moisture accumulation between the shutter and mounting surface.
- locate screw holes so they enter
mortar joints. Drill holes to accept a suitable masonry anchor and attach shutter.
LTL Home Products, Inc. - 125 Route 61 - Schuylkill Haven - PA - 1797
/