Black & Decker 90541667 Owner's manual

Category
Lawnmowers
Type
Owner's manual

This manual is also suitable for

19
inch (483mm) Cordless Mulching Rear Bag Mower
I STRUCTION MANUAL
Catalog
Date Code:
Number
1
--L ........
Thank you for choosing Black & Decker!
Go to www.BlackandDecker.com/NewOwner to register your new product.
PLEASE READ BEFORE RETURNING THiS PRODUCT FOR ANY REASON:
IfyouhaveaquestionorexperienceaproblemwithyourBlack&Deckerpurchase,goto HTTP:/iWWW.BLACKANDDECKER.COM/JNSTANTANSWERS
for instantanswers24hoursaday.
Ifyoucan'tfindtheanswerordonothaveaccesstotheintemet,call1-800-544-6986from8a.m.to5 p.m.ESTMon.--Fri.tospeakwithanagent.
Pleasehavethecatalognumberavailablewhenyoucall.
KEY iNFORMATiON YOU SHOULD KNOW:
o Do not operate mower unless handle is locked into position.
o For best cutting results, keep blade sharpened and balanced.
o Inspect and thoroughly clean your mower after each use (a deck with caked grass will degrade performance).
o Make sure mowing area is clear of other persons or pets prior to starting and during operation.
VEA EL ESPANOL EN LA CONTRAPORTADA.
INSTRUCTIVO DE pPERACION, CENTROS DE SERVICIO Y POLIZA DE GARANTJA.
ADVERTENCJA: LEASE ESTE INSTRUCTIVO ANTES DE USAR EL PRODUCTO.
SAFETY GUiDELiNES - DEFiNiTIONS
It is important for you to read and understand this manual.
The information it contains relates to protecting YOUR
SAFETY and PREVENTING PROBLEMS. The symbols below are
used to help you recognize this information.
/_ DANGER: Indicates an imminently hazardous situation which, if not
avoided, will result in death or serious injury.
Z_WARNING: Indicates a potentially hazardous situation which, if
not avoided, could result in death or serious injury.
Z_ CAUTION: Indicates a potentially hazardous situation which, if not
avoided, may result in minor or moderate injury.
NOTICE: Used without the safety alert symbol indicates a potentially
hazardous situation which, if not avoided, may result in property
damage.
The following are explanations of important safety hazard
pictorials on the mower.
1. User must read and understand the instruction manual.
2. To avoid the risk of serious injury do not mow up and
down slopes. Always mow across slopes.
3. o avoid the risk of injury to bystanders keep all persons
and pets at asafe distance from the mower while
operating.
Rotating blades can cause serious injury. Keep hands
and feet clear of mower deck and discharge opening at
all times. Always be sure blade has stopped (wait for the
blade to stop rotating (approx. 3 seconds) after releasing
bail handle and removing the safety key) before
removing and replacing grass catcher, cleaning,
servicing, transporting or Giftingthe mower.
5. bjects struck by mower blade can cause serious injury.
Stay behind the handle when the motor is running.
Always ensure persons and pets are clear of the
discharge from the mower while operating. Always
inspect mowing area before mowing and remove objects
that could be thrown by blade. Release bail handle to
turn mower off and wait for the blade to stop rotating
(approx. 3 seconds) before crossing walk, roads, patios
and gravel drives.
/_ WARNING: IMPORTANT SAFETY WARNINGS AND
iNSTRUCTiONS
/_ WARNING: When using electric gardening appliances, basic
safety precautions should always be followed to reduce risk of
fire,electric shock, and personal injury, including the following.
READ ALL INSTRUCTIONS
TO REDUCE RiSK OF INJURY:
Before any use, be sure everyone using this toot reads and
understands all safety instructions and other information contained
in this manual.
Save these instructions and review frequently prior to use and in
instructing others.
z_ DANGER: IMPORTANT SAFE PRACTICES FOR
WALK-BEHIND MOWERS
This mower is capable of amputating hands and feet and
throwing objects. Failure to observe the following safety instructions
could result in serious injury or death.
GENERAL OPERATION
1. Read, understand, and follow all instructions on the mower and in
the instruction manual before starting.
2. Do not put hands or feet near or under the mower. Keep clear of
the discharge opening at all times.
3. Only allow responsible adults, who are familiar with the
instructions, to operate this mower.
4. Clear the area where the mower is to be used of objects such as
rocks, sticks, wire, toys, bones, etc., which could be thrown by the
blade. Objects struck by the blade can cause severe injury to
persons. Stay behind the handle when the motor is running.
5. Be sure the area surrounding the mower is clear of bystanders
before operating. All bystanders and pets should be kept at a safe
distance. Stop the mower if anyone enters the area surrounding
the mower.
6. Do not operate mower barefooted or while wearing sandals.
Always wear substantial footwear.
7. Do not pull mower backward unless absolutely necessary. Always
look down and behind before and while moving backward.
8. Never direct discharged material toward anyone. Avoid discharging
material against a wall or obstruction. Material may ricochet back
toward the operator. Release bail handle to turn mower off and stop
the blade when crossing gravel surfaces.
9. Do not operate mower without the entire grass catcher, discharge
guard, rear guard, or other safety protective devices in place and
working. Periodically check all guards and safety protective devices
to ensure they are in good working order and wilt operate properly
and perform their intended function. Replace a damaged guard or
other safety device before further use.
10. Never leave a running mower unattended.
11. Always release the bail handle to stop the motor and wait until the
blade comes to a complete stop and remove the safety key before
cleaning the mower, removing the grass catcher, unclogging the
discharge guard, when leaving the mower, or before making any
adjustments, repairs or inspections.
12. Operate mower only in daylight or good artificial light when objects
in the path of the blade are clearly visible from the operating area
of the mower.
13. Do not operate mower while under the influence of alcohol or
drugs, or when you are tired or ill. Always stay alert, watch what
you are doing, and use common sense.
14. Avoid dangerous environments. Never operate mower in damp or
wet grass, never use mower in the rain. Always be sure of your
footing; walk; never run.
15. Disengage the drive system, if so equipped, before starting the motor.
16. If the mower should start to vibrate abnormally, release the bait
handle, wait for the blade to stop and remove the safety key, then
check for the cause immediately. Vibration is generally a warning of
trouble.
17. Always wear proper eye and respiratory protection when operating
the mower.
18. The use of any accessory or attachment not recommended for use
with this mower could be hazardous. Only use accessories
approved by Black & Decker.
19. Never overreach while operating the mower. Always be sure to keep
proper footing and balance at all times while operating the mower.
SLOPE OPERATION
Slopes are a major factor related to slip and fall accidents, which can
result in severe injury. Operation on all slopes requires extra caution. If
you feel uneasy on a slope, do not mow it.
1. Mow across the face of slopes; never up and down. Exercise
extreme caution when changing direction on slopes.
2. Watch for holes, ruts, bumps, rocks, or other hidden objects.
Uneven terrain could cause a slip and fall accident. Tall grass can
hide obstacles.
3. Do not mow on wet grass or excessively steep slopes. Poor footing
could cause a slip and fall accident.
4. Do not mow near drop-offs, ditches, or embankments. You could
lose your footing or balance.
CHILDREN
Tragic accidents can occur if the operator is not alert to the presence
of children. Children are often attracted to the mower and the mowing
activity. Never assume that children wilt remain where you last saw
them.
1. Keep children out of the mowing area and under the watchful care
of a responsible adult other than the operator.
2. Be alert and turn mower off if a child enters the area.
3. Never allow children to operate the mower.
4. Use extra care when approaching blind corners, shrubs, trees, or
other objects that may block your view of a child.
GENERAL SERVICE
1. Never operate mower in a closed area.
2. Keep all nuts and bolts tight to be sure the equipment is in safe
working condition.
3. Nevertamperwithsafetydevices•Checktheirproperoperation
regularly.
4. Keepmowerfreeofgrass,leaves,orotherdebrisbuild-up.Allow
mowertocoolbeforestoring.
5. Ifyoustrikeaforeignobject,releasebailhandletoturnmoweroff,
waitforthebladetostopandremovethesafetykeyandthen
inspectthemower.Repair,anydamage,beforestartingand
operatingthemower.
6. Nevermakeanyadjustmentsorrepairswiththemotorrunningor
whilethesafetykeyisinthemower.
7. Alwaysremovesafetykeybeforeadjusting,cleaning,repairing,
inspecting,transporting,storingorleavingthemower.
8. Checkgrasscatchercomponentsandthedischargeguard
frequentlyandwhennecessaryreplacewithBlack&Decker
recommendedpartsonly.
9. Mowerbladesaresharp.Wrapthebladeorweargloves,anduse
extracautionwhenservicingthem.
10.Maintainorreplacesafetyandinstructionlabels,asnecessary•
ZLWARNING: GENERAL SAFETY WARNINGS AND
INSTRUCTIONS FOR ALL TOOLS
THiS TOOL CAN BE DANGEROUS. Follow all warnings and Safety
Instructions in this manual. The operator is responsible for following
warnings and instructions in this manual and on unit. Restrict use of
this mower to persons who read, understand and follow warnings and
instructions in this manual and on unit.
STORE IDLE MOWER INDOORS. Always store with safety key
removed. Mowers should be stored indoors in dry, secured area - out
of reach of children.
DON'T FORCE MOWER. It wilt do the job better and with less
likelihood of a risk of injury at the rate for which it was designed.
USE RIGHT APPLIANCE. Do not use the mower for any job except
that for which it is intended.
DRESS PROPERLY. Do not wear loose clothing or jewelry. They can
be caught in moving parts. Rubber gloves, long pants and substantial,
non-skid footwear are recommended when working outdoors.
USE SAFETY GLASSES AND OTHER SAFETY EQUIPMENT. Use
safety goggles or safety glasses with side shields, complying with
applicable safety standards and, when needed, aface shield. Also use
face or dust mask if operation is dusty. This applies to all persons in the
work area. Also use a hard hat, hearing protection, gloves, safety
shoes and dust collection systems when specified or required. Safety
glasses or the like are available at extra cost at your local dealer or
Black & Decker Service Center.
DON'T ABUSE CORD. Never carry charger by cord or yank it to
disconnect from receptacle. Keep cord away from heat, oil, and sharp
edges.
MAINTAIN MOWER WITH CARE. Keep cutting edge clean and sharp
for best performance and to reduce the risk of injury. Follow instructions
for lubricating and changing accessories. Inspect mower cord
periodically and if damaged, have it repaired by authorized service
facility. Keep handles dry, clean, and free from oil and grease.
AVOID UNINTENTIONAL STARTING. Don't carry mower with safety
key inserted in switch housing. Be sure bail handle is not engaged while
inserting safety key.
BEFORE USING, always visually inspect to see that the blade, blade
fasteners and cutter assembly are not worn or damaged. Replace
worn or damaged blades and fasteners in sets to preserve balance.
Inspect the mower cord - ensure it is in good condition. Cord insulation
must be intact with no cracks or deterioration.
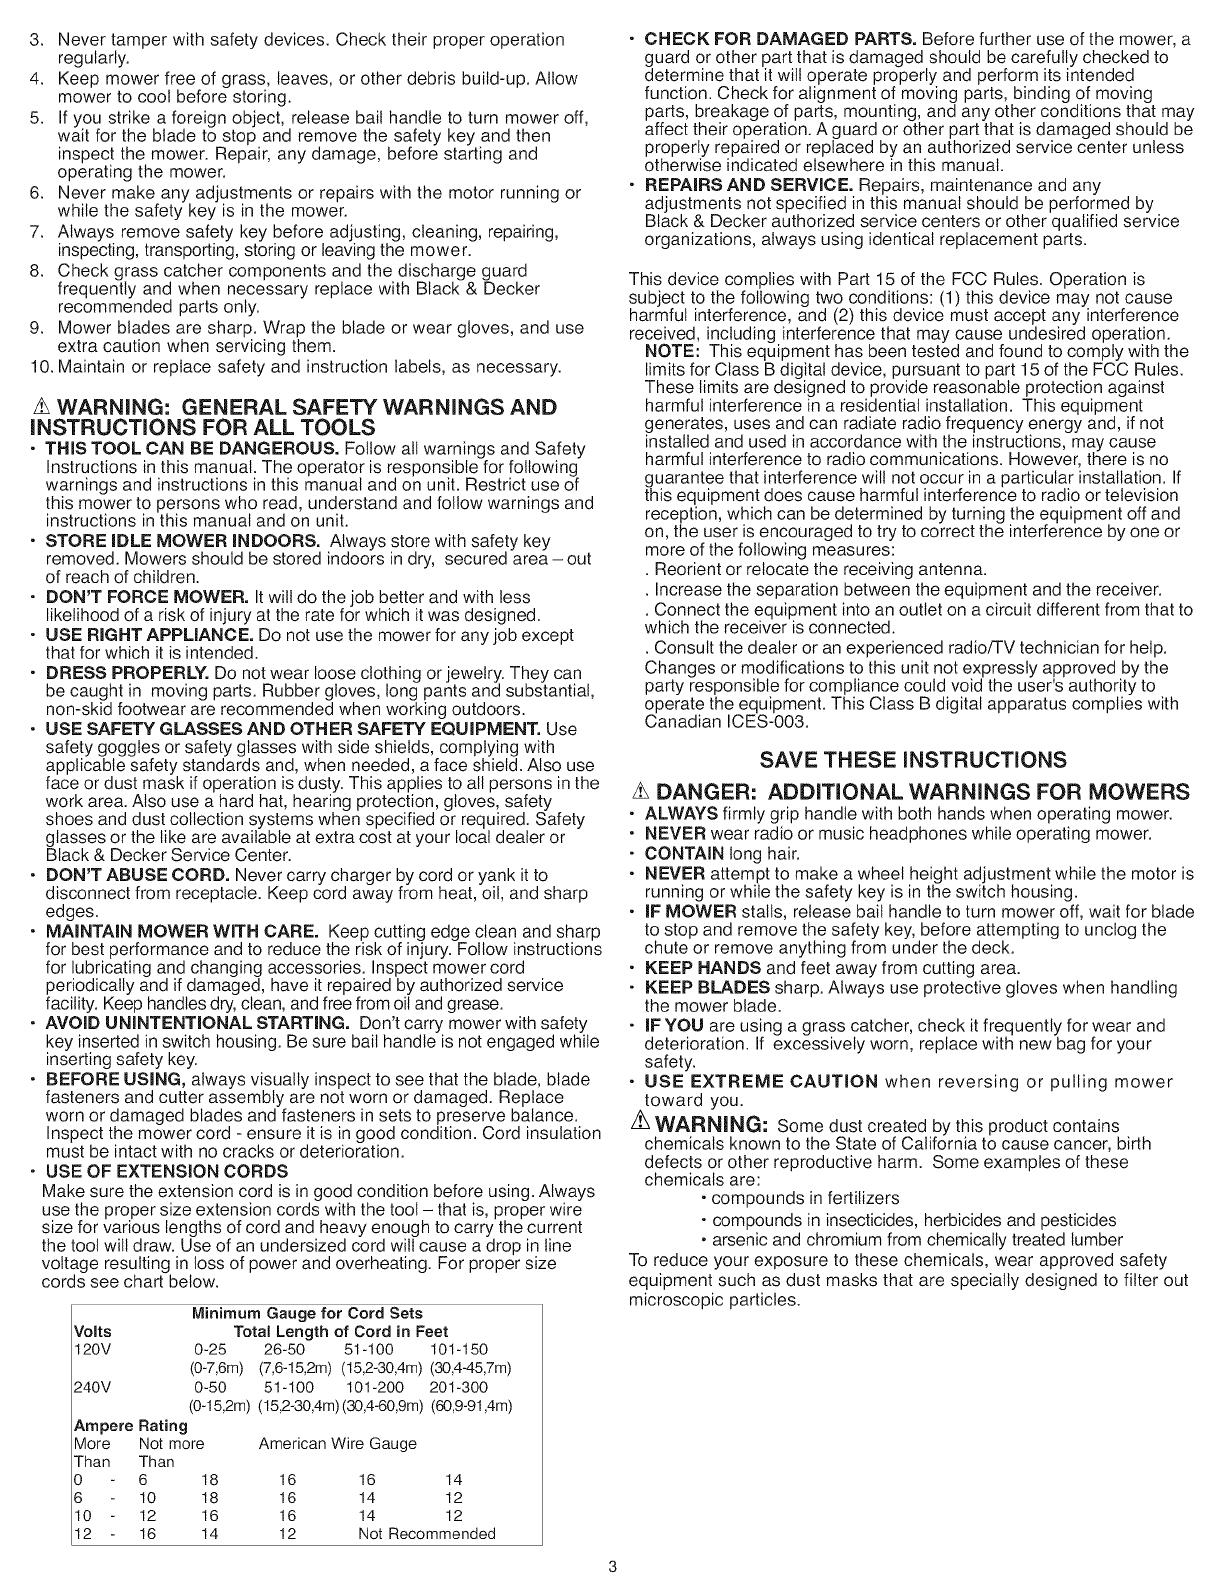
USE OF EXTENSION CORDS
Make sure the extension cord is in good condition before using. Always
use the proper size extension cords with the toot - that is, proper wire
size for various lengths of cord and heavy enough to carry the current
the tool will draw. Use of an undersized cord will cause a drop in line
voltage resulting in loss of power and overheating. For proper size
cords see chart below.
Volts
120V 0-25
(0-7,6m)
240V 0-50
(0-15,2m)
Ampere Rating
More Not more
Than Than
0 6 18
6 10 18
10 12 16
12 16 14
Minimum Gauge for Cord Sets
Total Length of Cord in Feet
26-50 51-100 101-150
(7,6-15,2m) (15,2-30,4m) (30,445,7m)
51-100 101-200 201-300
(15,2-30,4m) (30,4-60,9m)(60,9-91,4m)
American Wire Gauge
16 16 14
16 14 12
16 14 12
12 Not Recommended
CHECK FOR DAMAGED PARTS. Before further use of the mower, a
guard or other part that is damaged should be carefully checked to
determine that it will operate properly and perform its intended
function. Check for alignment of moving parts, binding of moving
parts, breakage of parts, mounting, and any other conditions that may
affect their operation. A guard or other part that is damaged should be
properly repaired or replaced by an authorized service center unless
otherwise indicated elsewhere in this manual.
REPAIRS AND SERVICE. Repairs, maintenance and any
adjustments not specified in this manual should be performed by
Black & Decker authorized service centers or other qualified service
organizations, always using identical replacement parts.
This device complies with Part 15 of the FCC Rules. Operation is
subject to the following two conditions: (1) this device may not cause
harmful interference, and (2) this device must accept any interference
received, including interference that may cause undesired operation.
NOTE: This equipment has been tested and found to comply with the
limits for Class Bdigital device, pursuant to part 15 of the FCC Rules•
These limits are designed to provide reasonable protection against
harmful interference in a residential installation. This equipment
generates, uses and can radiate radio frequency energy and, if not
installed and used in accordance with the instructions, may cause
harmful interference to radio communications. However, there is no
guarantee that interference will not occur in a particular installation. If
this equipment does cause harmful interference to radio or television
reception, which can be determined by turning the equipment off and
on, the user is encouraged to try to correct the interference by one or
more of the following measures:
• Reorient or relocate the receiving antenna.
• Increase the separation between the equipment and the receiver.
. Connect the equipment into an outlet on a circuit different from that to
which the receiver is connected.
• Consult the dealer or an experienced radio/TV technician for help.
Changes or modifications to this unit not expressly approved by the
party responsible for compliance could void the user's authority to
operate the equipment. This Class B digital apparatus complies with
Canadian ICES-003.
SAVE THESE INSTRUCTIONS
zL DANGER: ADDITIONAL WARNINGS FOR MOWERS
ALWAYS firmly grip handle with both hands when operating mower.
NEVER wear radio or music headphones while operating mower.
CONTAIN long hair.
NEVER attempt to make a wheel height adjustment while the motor is
running or while the safety key is in the switch housing.
IF MOWER stalls, release bail handle to turn mower off, wait for blade
to stop and remove the safety key, before attempting to unclog the
chute or remove anything from under the deck.
KEEP HANDS and feet away from cutting area.
KEEP BLADES sharp. Always use protective gloves when handling
the mower blade.
iF YOU are using a grass catcher, check it frequently for wear and
deterioration. If excessively worn, replace with new bag for your
safety.
USE EXTREME CAUTION when reversing or pulling mower
toward you.
ik WARNING: Some dust created by this product contains
chemicals known to the State of California to cause cancer, birth
defects or other reproductive harm. Some examples of these
chemicals are:
• compounds in fertilizers
compounds in insecticides, herbicides and pesticides
oarsenic and chromium from chemically treated lumber
To reduce your exposure to these chemicals, wear approved safety
equipment such as dust masks that are specially designed to filter out
microscopic particles.
PREPARATION
PLEASE REFER TO DIAGRAMS (A, B, C...) AND ITEM NUMBERS
(1, 2, 3...) AS NOTED THROUGHOUT MANUAL. FOR EXAMPLE,
A=I REFERS TO ITEM 1 IN FIGURE A.
UNPACKING
Your mower has been completely assembled at the factory except for
the grass bag. Your Black & Decker cordless mower is shipped with
the battery system fully assembled and ready for use.
To remove mower from carton:
1. Remove the grass bag frame and cardboard fillers.
2. Remove the mower from the carton and place all four wheels on the
ground or floor.
3. Check the carton thoroughly and make sure there are no loose parts.
To unfold handle:
Raise the handle section A-1 into place and secure by tightening
the two lower knobs A-2. Be careful not to pinch power cord.
/k DANGER: Sharp moving blade. For your ownsafety
DO NOT use this mower without either the grass catcher, mulch insert,
or optional discharge chute in operating position, as serious injury
could result.
ASSEMBLING THE GRASS CATCHER (FIGURE
C2LC3._
1. Before starting to assemble the grass bag to the frame, check that
the grass bag and frame are similar to figure C1.
2. Slide the grass bag onto the frame as shown in figure C2.
3. Assemble the top clips to the frame as shown in figure C3, then
assemble the two side clips and the bottom clip last.
4. Completely assembled grass catcher is shown in figure C4.
HANDLE ADJUSTMENT
Your mower has a variable height handle adjustment feature. To adjust
the handle position to suit your height preference, use the following
procedure:
1. Remove both hex nuts B-1 on the middle part of the handlebars
using a 1/2 inch wrench. Remove the carriage bolts B-2.
2. Slide the upper handle into one of the 3 adjustment positions B-3,
aligning the holes in the upper and lower handles.
3. Insert the carriage bolts and install the hex nuts, tightening securely.
WHEEL HEIGHT ADJUSTMENT (1=3/4 iN. (44ram)
TO 3-1/2 IN. (89mm)
1. Before making any adjustments, release bail handle to turn mower
off, wait for blade to stop, and remove safety key.
2. Your mower features the Black & Decker one touch wheel height
adjustment system. This system will adjust all four wheels at the
same time.
3. To raise or lower the cutting height, place the palm of your hand on
the palm rest E-1 and with your fingers, squeeze upward on the
finger grip E-2 and hold.
4. While holding the finger grip up you can raise or lower the cutting
height. The mower has seven blade height adjustment positions.
Refer to the scale F-1 and pointer F-2 at the front of the mower. The
pointer will indicate the height setting for cutting your lawn. This
setting can be a reference for the next time you want to cut your
lawn at the same height.
When you have the mower at the height you would like, hold it in
place with your left hand on the lower right handle bar and release
the finger grip with your right hand to lock the height adjust.
Note: To ensure that the deck is securely locked in one of the seven
positions, press down on the palm rest after releasing the finger grip.
BATTERY
/_ CAUTION: USE ONLY BLACK & DECKER APPROVED
REPLACEMENT BATTERIES =CONTACT YOUR LOCAL SERVICE
CENTER OR 1-800=544=6986.
The battery in your cordless mower is a 24-vott sealed lead acid
system. There is no liquid contained within the battery and the mower
can therefore be stored in any position without fear of leakage.
For optimal performance the battery should be kept on constant
charge when not in use.
The battery prefers to be charged in a cool, dry place.
The battery does not need to be fully discharged before recharging.
2 to 3 initial charging cycles may be required after purchase to
achieve maximum run time capacity.
The battery can be safely stored down to -40°C (-40°F).
The battery is maintenance free.
CHARGER SAFETY RULES
1. Plug charger directly into an electrical outlet. DO NOT ABUSE THE
CORD. Never carry charger by cord. Do not disconnect the charger
from the outlet or mower by pulling it by the cord.
2. Z_WARNING: To reduce the risk of fire, electrical shock, or
personal injury do not attempt to use this charger with any other
product. Likewise, do not attempt to charge the mower with any
other charger.
3. Do not service mower with charger or safety key installed.
4. Do not operate a damaged charger. Replace damaged cords or
charger immediately at an authorized Black & Decker service
center.
5. Always charge the mower in a dry area protected from the weather.
Do not expose the mower or charger to rain. Do not charge in wet
locations. Do not charge mower when temperature is above 40°C
(104°F) or below 5°C (41°F).
6. Keep the mower and charger away from water, heat sources, (such
as radiators, heaters, stoves, etc.) flames, or chemicals. Be careful
not to damage the charger cord, by keeping cord away from sharp
edges.
WARNING: FIRE HAZARD
ALWAYS DISCONNECT THE CHARGER FROM THE POWER
SUPPLY (WALL OUTLET) BEFORE REMOVING THE CHARGER
CONNECTOR. UNDER CERTAIN CONDiTiONS, WITH THE
CHARGER PLUGGED IN TO THE POWER SUPPLY, THE
EXPOSED CONNECTOR CAN BE SHORTED BY FOREIGN
MATERIAL AND MAY CAUSE A FIRE. FOREIGN MATERIALS OF A
CONDUCTIVE NATURE, SUCH AS, BUT NOT LiMiTED TO, STEEL
WOOL, ALUMINUM FOIL, OR ANY BUILD-UP OF METALLIC
PARTICLES, SHOULD BE KEPT FROM THE CONNECTOR.
ALWAYS UNPLUG CHARGER BEFORE ATTEMPTING TO CLEAN.
CHARGING PROCEDURE
The charger for your mower is a specially designed 2-step charger.
Step 1:The recharge cycle is indicated by the illuminated red light (D-l).
Step 2: The maintenance cycle is indicated by the illuminated green
light (D-2).
This cycle will maintain your mower in a fully charged condition.
1. Remove safety key D-6.
2. Plug the charger connector D-3 into the receptacle D-8 on the
mower making sure that the bevel on the charger plugjs
aligned with the bevel on the receptacle in the unit. See inset
in Figure D. The charger connector can only be plugged into the
mower receptacle one way.
3. Insert the 120 volt plug D-4 of the charger D-5 into the walt
receptacle.
4. The red light on the charger should come on indicating you have
power and the battery is being charged. Check the charger for the
red light, if it is not on check the charger plug for proper alignment
(step 2). The red light should extinguish and the green light will
come on when charging is complete (takes approximately 12 hours
to charge a fully discharged mower).
5. It is recommended to leave the mower on constant charge for
optimum performance during the mowing season.
6. The charger supplied with this product is intended to be plugged in
such that it is correctly orientated in a vertical or floor mount
position.
OPERATION
PLEASE REFER TO DIAGRAMS (A, B, C...) AND ITEM NUMBERS
(1, 2, 3...) AS NOTED THROUGHOUT MANUAL. FOR EXAMPLE,
A=I REFERS TO ITEM 1 IN FIGURE A.
KNOW YOUR MOWER
READ THIS INSTRUCTION MANUAL AND SAFETY RULES
BEFORE OPERATING YOUR MOWER. See diagram G to familiarize
yourself with the location of various controls and adjustments
referenced below. Save this manual for future reference.
G-1 : Safety key/charging port
G-2: Bale Handle (Switch lever)
G-3: Handle adjustment knobs
G-4: Handle storage knobs
G-5: Grass bag
G-6: Cut height adjustment release
G-7: Cut height indicator
SAFETY KEY
DANGER : SHARP MOVING BLADE.
In order to prevent accidental start-up or unauthorized use of your
Cordless Mower, a removable Safety Key D-6 has been incorporated
into the design of your mower. The mower will be completely disabled
when the Safety Key has been removed from the mower. With the
Safety Key removed, you will have access to the charger receptacle D-8.
NOTE: THE SAFETY KEY HAS A HOLE IN THE CENTER TO
ALLOW FOR STORAGE ON A NAIL, OUT OF THE REACH OF
CHILDREN. DO NOT TETHER SAFETY KEY TO MOWER.
DANGER: ROTATING BLADES CAN CAUSE SERIOUS
INJURY. TO PREVENT SERIOUS INJURY, REMOVE SAFETY KEY
WHEN UNATTENDED, OR WHEN CHARGING, CLEANING,
SERVICING, TRANSPORTING, LIFTING, OR STORING MOWER.
TO TURN MOWER ON
Insert Safety Key D-6 into the switch housing, until it is fully seated
inside housing.
The mower is now operational and can be started by activating the
switch lever.
/_ DANGER: SHARP MOVING BLADE. NEVER ATTEMPT TO
OVERRIDE THE OPERATION OF THiS SWITCH AND SAFETY KEY
SYSTEM AS SERIOUS INJURY COULD RESULT.
ON-OFF SWITCH (BAIL HANDLE) - FIGURE H
Your mower is equipped with a special on-off switch system. To
operate the system, first push button on side of switch housing, then
pull _ the bate handle (switch lever) to the handlebar (H).To turn the
mower off, just release the bale handle.
Once the bate handle has returned to the original position it wilt acti-
vate the "Automatic Braking Mechanism". The motor is electrically
braked and the mower blade wilt stop rotating in 3 seconds or less.
MEETS CPSC SAFETY REQUIREMENTS
Black and Decker Mowers conform to the safety standards of the
American National Standards Institute, and the U.S. Consumer Product
Safety Commission. The Blade turns when the motor is running.
SAFETY SHIELD AND REAR DOOR
This safety shield I-1 is designed to minimize the throwing of stones or
other objects by the mower blade backward from under the mower
deck. The shield, along with the rear door I-2, minimizes the possibility
of accidental foot contact with the blade. DO NOT operate mower
without the safety shield and rear door in place.
Z_ DANGER: Sharp moving blade. For your own safety DO NOT
use this mower without either the grass catcher or mulch insert in
operating position as serious injury could result.
/_ DANGER: Sharp moving blade. Do not operate the mower if the
rear door is not closed under spring tension as serious injury could
result. Take your mower to the nearest service center for repair.
REMOVING MULCH iNSERT
To remove the mulch insert I-3 so that you can bag the grass or
discharge with the optional discharge chute, follow the steps listed
below:
1. Release bail handle to turn mower off, wait until the blade stops
and remove safety key D-6.
2. Raise the rear discharge door I-2 and hold it up.
3. Locate your hand in the handle pocket I-4 as shown, and lift and
pull out the mulch insert I-3 completely.
4. The rear discharge door is spring loaded. When you release it the
door will return to the closed position.
iNSTALLING MULCH iNSERT
1. Repeat steps 1 and 2 for removing mulch insert.
2. Slide the mulch insert I-3 into the discharge opening until it is firmly
in contact with the deck.
3. Release rear door and ensure it is properly closed.
INSTALLING GRASS CATCHER
1. Release bait handle to turn mower off, wait until the blade stops
and remove safety key D-6.
2. Reaching down between the mower handles, raise the rear
discharge door J-1 to a vertical position and hold the door up.
Ensure that the mulch insert I-3 has been removed.
3. Pick up the grass catcher J-2 by the handle J-3 and place the
grass catcher between the mower handles as shown.
4. Position the grass catcher hanger hooks J-4 on the mower as
shown in Figure K. Release the rear discharge door.
Z_DANGER: Sharp moving blade. Never operate the mower
unless the hanger hooks on the grass catcher are seated properly on
the mower and the rear discharge door rests firmly against the top of
the grass catcher as serious injury could result.
MOWING TiPS
NOTE: ALWAYS iNSPECT AREA WHERE MOWER IS TO BE USED
AND REMOVE ALL STONES, STICKS, WIRE, BONES AND OTHER
DEBRIS WHICH MIGHT BE THROWN BY THE ROTATING BLADE.
1. Mow across the face of slopes, never up-and-down. Exercise
extreme caution when changing direction on slopes. Do not mow
excessively steep slopes. Always maintain good footing.
2. Release bait handle to turn mower "OFF" when crossing any
gravel area (stones can be thrown by the blade).
3.
Set mower at highest cutting height when mowing in rough ground
or in tall weeds. Removing too much grass at one time can cause
circuit breaker to trip, which stops mower. Refer to troubleshooting
guide.
4.
If a grass catcher is used during the fast growing season, the grass
may tend to clog up at the discharge opening. Release bail handle
to turn mower off and remove the safety key. Remove the catcher
and shake the grass down to the back end of the bag. Also clean
out any grass or debris which may be packed around the discharge
opening. Replace the grass catcher.
5.
If mower should start to vibrate abnormally, release bait handle to
turn mower off and remove safety key. Check immediately for
cause. Vibration is a warning of trouble. Do not operate mower until
a service check has been made. Refer to troubleshooting guide in
manual.
6. ALWAYS RELEASE BAIL HANDLE TO TURN MOWER OFF AND
REMOVE SAFETY KEY WHEN LEAVING IT UNATTENDED
EVEN FOR A SHORT PERIOD OF TIME.
THE FOLLOWING SUGGESTIONS WILL HELP YOU TO OBTAIN
OPTIMUM RUN TIME FROM YOUR CORDLESS MOWER:
1. Slow down in areas where the grass is especially long or thick.
2. When mutching, avoid cutting more than 1-1/2 inches off the length
at any one time.
3. Avoid mowing when the grass is wet from rain or dew-soaked.
4. Cut your lawn frequently, especially during high growth periods.
NOTE: IT IS RECOMMENDED THAT YOUR MOWER BE
RECHARGED AFTER USE. FREQUENT CHARGING WILL NOT
HARM YOUR BATTERY, AND WILL ENSURE THAT THE BATTERY
IS FULLY CHARGED AND READY FOR ITS NEXT USE.
MULCHING MOWING TiPS
Your mower was shipped from Black & Decker with the mulch insert
installed.
While mulching, your new mower is designed to cut the grass clippings
into small pieces and distribute them back into the lawn. Under normal
conditions, the mulched grass wilt biodegrade quickly to provide
nutrients to the lawn.
Please review the following recommendations for optimum mulching
performance.
1. Avoid mowing when the grass is wet from rain or dew. Wet grass
may form clumps which interfere with the mulching action and
reduce run-time. The best time to mow grass is in the late afternoon
when the grass is dry and the newly cut area will not be exposed to
direct sunlight.
2. For best mulching performance, set the cutting height to remove
about one third of the grass blade length, ideally no more than
1-1/2 in. at one time. If the lawn is overgrown, it may be necessary
to increase the cut height to reduce the pushing effort and prevent
overloading the motor. For extremely heavy mulching, it is advisable
to first cut at a high cut height setting, and then re-cut to the final
cut height. Otherwise, make narrower cuts and mow slowly.
3. For best performance, keep the mower housing free of built-up
grass. From time to time release bait handle to turn mower off and
wait for the blade to come to a complete stop. Then remove the
safety key and turn mower on its side. Using an object such as a
stick, wipe out any accumulation of grass in the blade area. Be
careful of the sharp edges of the blade. Clean often in wet, spring
grass, and always after every use.
4. Certain types of grass or grass conditions may require that an area
be mulched a second time to fully disperse the grass throughout the
lawn. If cutting a second time, it is advisable to cut perpendicular
(across) the first cut pattern. DO NOT CHANGE CUT PATTERN IN
ANY WAY THAT WOULD CAUSE MOWING DOWN A HILL.
5. Change your cutting pattern from week to week. This wilt help
prevent matting of the lawn.
MAINTENANCE
IMPORTANT: To assure product SAFETY and RELIABILITY, repairs,
maintenance and adjustment (including brush inspection and
replacement) should be performed by BLACK & DECKER Service
Centers or other qualified service organizations, always using
Black & Decker replacement parts. When servicing use ONLY
IDENTICAL REPLACEMENT PARTS.
PLEASE REFER TO DIAGRAMS (A, B, C...) AND ITEM NUMBERS
(1, 2, 3...) AS NOTED THROUGHOUT MANUAL. FOR EXAMPLE,
A=I REFERS TO ITEM 1 IN FIGURE A.
REMOVING AND iNSTALLiNG BLADE
1. RELEASE BAIL HANDLE TO TURN MOWER OFF, WAIT FOR THE
BLADE TO STOP, AND REMOVE SAFETY KEY.
2. Cut a piece of 2x4 wood N-1 (about 2 feet long) to keep blade from
turning while removing flange nut.
3. Turn the mower on its side. Wear gloves and proper eye protection.
Be careful of sharp edges of blade. Position wood and remove flange
nut N-3 with 3/4 in. (19mm) wrench N-2 as shown in Figure N.
4.
5.
Remove square metal blade spacer O-2, square plastic blade
insulator 0-3, and blade 0-4 as shown in figure O. Examine blade
insulator for damage and replace if necessary.
When replacing sharpened or new blade on shoulder of fan 0-5,
make sure the "GRASS SIDE" on the blade will be facing the
ground when the mower is returned to its normal upright position.
After installing blade 0-4, place blade insulator 0-3 on blade such
that the raised lips on one side engage the edges of the blade.
Then install the blade spacer 0-2 so that it sits inside the raised lips
on the other side of the blade insulator. Be sure to align the flats in
the hole of the blade spacer with the flats of the shaft, rotating the
blade and blade insulator together as necessary. Position piece of
wood P-1 to keep blade from turning as shown in figure P. Install
flange nut with the flange against the blade spacer and securely
tighten.
BLADE SHARPENING
KEEP BLADE SHARP FOR BEST MOWER PERFORMANCE. A
DULL BLADE DOES NOT CUT GRASS CLEANLY OR MULCH
PROPERLY.
WEAR PROPER EYE PROTECTION WHILE REMOVING,
SHARPENING, AND INSTALLING BLADE. ENSURE THAT SAFETY
KEY IS REMOVED.
Sharpening the blade twice during a mowing season is usually
sufficient under normal circumstances. Sand causes the blade to dull
quickly. If your lawn has sandy soil, more frequent sharpening may be
required.
REPLACE BENT OR DAMAGED BLADE IMMEDIATELY.
WHEN SHARPENING THE BLADE:
1. Make sure blade remains balanced.
2. Sharpen blade at the original cutting angle.
3. Sharpen cutting edges on both ends of blade, removing equal
amounts of material from both ends.
TO SHARPEN BLADE IN A VISE:
1. Be sure the bail handle is released, the blade has stopped and the
safety key removed before removing the blade.
2. Remove blade from mower. See instructions for removing and
installing blade.
3. Secure blade L-1 in a vise L-2.
4. Wear proper eye protection and gloves and be careful not to cut
yourself.
5. Carefully file the cutting edges of the blade with a fine tooth file L-3
or sharpening stone, maintaining the original cutting edge.
6. Check balance of blade. See instructions for blade balancing.
7. Replace blade on mower and tighten securely.
BLADE BALANCING
Check balance of blade by placing center hole in blade M-1 over a nail
or round shank screwdriver M-2, clamped horizontally in a vise M-3. If
either end of the blade rotates downward, file that end. Blade is
properly balanced when neither end drops.
LUBRICATION
No lubrication is necessary. Do not oil the wheels. They have plastic
bearing surfaces which require no lubrication.
CLEANING
RELEASE BAIL HANDLE TO TURN MOWER OFF, LET THE BLADE
COME TO A STOP AND THEN REMOVE SAFETY KEY. USE ONLY
MILD SOAP AND A DAMP CLOTH TO CLEAN THE MOWER. CLEAN
OUT ANY CLIPPINGS WHICH MAY HAVE ACCUMULATED ON THE
UNDERSIDE OF THE DECK. AFTER SEVERAL USES, CHECK ALL
EXPOSED FASTENERS FOR TIGHTNESS.
PREVENTING CORROSION
Fertilizers and other garden chemicals contain agents which greatly
accelerate the corrosion of metals. If you mow in areas where
fertilizers or chemicals have been used, the mower should be cleaned
immediately afterward as follows: (1) Release bail handle to turn
mower off and remove safety key. (2) Wipe all exposed parts with a
damp cloth.
/_ CAUTION: DO NOT POUR OR SPRAY WATER ON THE
MOWER IN AN ATTEMPT TO CLEAN IT.
Do not store the tool on or adjacent to fertilizers or chemicals. Such
storage can cause rapid corrosion.
TRANSPORTING AND STORAGE
Z_DANGER: Rotating blade can cause serious injury. Release bail
handle to turn mower off and remove the safety key before lifting,
transporting or storing the mower. Store in a dry place.
OFF=SEASON STORAGE
1. In warmer climates to ensure optimal performance, it is
recommended that the battery be maintained on constant charge.
2. The mower may be stored with the charger disconnected if all of
the following conditions are met.
-the mower is fully charged before storing.
-the average temperature of the storage location is below
10°C (50°F)
-Storage duration is less than 6 months.
BATTERY SERVICE AND INSTALLATION
Accessories
Recommended accessories for use with your mower are available from
your local dealer or authorized service center. Ifyou need assistance
regarding accessories, please call: 1-800=544-6986
Z_WARNING: The use of any accessory not recommended for use
with this toot could be hazardous.
p/n 242354-01 MULCH INSERT
p/n 242867-00 SIDE DISCHARGE CHUTE
p/n 242501-05 REPLACEMENT GRASSBAG
MB-1200 REPLACEMENT BLADE
HERE ARE SOME HELPFUL HINTS TO GET THE MOST FROM
YOUR BLACK & DECKER CORDLESS MOWER...AND KEEP YOUR
LAWN LOOKING BEAUTIFUL
2.
Lawns should first be mowed in the spring when the grass is
about 2 1/2 to 3 inches high. Mowing too early restricts the grass
root systems which renew themselves every spring. New grass
should be clipped when it is about 2 1/2 inches high.
3.
Do not remove too much grass blade surface at one time...never
more than 1/3 of the leaf height during each cutting. Cutting too
close "shocks" sensitive grass blades, resulting in a shallow root
system and thus making it more difficult for your lawn to reach
water in the soil.
When service or repair is required, it is recommended that you take
your mower to an authorized Black & Decker Service Center.
When servicing or replacing batteries, please note:
At the end of normal service life, both batteries should be replaced
at the same time. Mixing fresh and discharged batteries
could increase internal cell pressure and cause battery rupture.
When inserting batteries into this product, the proper polarity or 4.
direction must be observed. Reverse insertion of the batteries
can result in leakage or explosion. _---,_
THE RBRC TM SEAL (Battery Recycling)
The RBRC TM (Rechargeable Battery Recycling 5.
Corporation) Seal on the lead acid battery (or battery pack) indicates
that the costs to recycle the battery (or battery pack) at the end of its
useful life have already been paid by Black & Decker. In some areas,
it is illegal to place spent lead acid batteries in the trash or municipal
solid waste stream and the RBRC program provides an
environmentally conscious alternative.
RBRC in cooperation with Black & Decker and other battery users,
has established programs in the United States and Canada to
facilitate the collection of spent lead acid batteries. Help protect our 6.
environment and conserve natural resources by returning the lead
acid battery to an authorized Black & Decker service center or to your
local retailer for recycling. You may also contact your local recycling
center for information on where to drop off the spent battery, or call
1=800=544=6986
Lawn care experts say that excessively close cutting is
responsible for much of the difficulty experienced on many lawns.
The depth and strength of the roots of grass are almost exactly
proportional to its growth. Grasses of mature lawns often are
seriously injured when mowed shorter than 1 1/2 inches, and a
height of 1 1/2 to 2 inches is preferred on large lawns.
Mow your lawn when it is dry to avoid clumping of wet grass. If
you have a choice, late afternoon is the ideal time for mowing, not
only because the grass is dry, but also because the sensitive new
cut area of the grass will not be exposed to intense sunlight.
Keep the mowing blade sharp for a nice clean cut. This improves
the mower's performance and enhances the took of your lawn. A
dull blade shatters and bruises the tips of the grass. This impairs
the healthy growth of your lawn and increases susceptibility to turf
diseases. If the grass tips are bruised it causes a brownish colour
and gives your lawn an unhealthy appearance. A dull blade may
also pull up young seedlings.
Try to mow your lawn at the same (consistent) cutting height.
While there are times when you should vary the cutting height with
the changing seasons, a consistent cutting height produces a
healthier, lovelier lawn with generally fewer weeds. Mow more
frequently during periods of fast growth. Frequent cutting ensures
that the lower, less attractive portion of the grass will not show.
7.
If your lawn has grown too long, (a vacation, for example, may
interrupt your cutting schedule) mow at a cutting height one or two
positions higher than normal. A second pass at "normal" cutting
height a few days later will put your lawn back on schedule.
Changing the cutting height is a simple matter with
Black & Decker's One Touch Wheel Height Adjustment, which
simultaneously adjusts all four wheels at once.
8.
During the spring and fall, (or after an interruption to the cutting
schedule) the grass wilt be longer and thicker. If the motor
continually slows down while cutting, try setting the wheels for a
higher cutting height. Excessive motor loading can result in
uneven cutting, quicker discharge of the battery, and can cause
the circuit breaker to trip, which stops the motor.
g.
Three good ideas to enhance your lawn's appearance: Vary the
mowing direction frequently; mow horizontally on hillsides; (this is
also a good safety practice) and do not forget to overlap the
mowing path on each pass.
10. Always mow grass so that clippings are discharged onto cut lawn.
This will keep your lawn looking fresh by avoiding "Cut Grass"
build-up which will eventually brown and appear ugly. This method
also preserves your battery charge, ensuring you get the most
from your Black & Decker Cordless Power Mower.
11.
During the spring and fall seasons when the grass is longer and
thicker, you can use your mower without it being fully recharged.
(i.e. green charge indication light is on). This will enable you to
perform short cutting tasks, but we don't recommend this be done
frequently. The battery and mower perform much better if charged
fully.
SAVE THESE INSTRUCTIONS FOR
FUTURE USE
Service Information
All Black & Decker Service Centers are staffed with trained personnel to
provide customers with efficient and reliable power toot service.
Whether you need technical advice, repair, or genuine factory
replacement parts, contact the Black & Decker location nearest you. To
find your local service location, refer to the yellow page directory under
"Tools--Electric" or call: 1-800-544-6986 or visit
www.blackanddecker.com
WARRANTIES
Full Two-Year Home Use Warranty
Black & Decker (U.S.) Inc. warrants this product for two years against
any defects in material or workmanship. The defective product will be
replaced or repaired at no charge in either of two ways.
The first, which wilt result in exchanges only, is to return the product to
the retailer from whom it was purchased (provided that the store is a
participating retailer). Returns should be made within the time period of
the retailer's policy for exchanges (usually 30 to 90 days after the sale).
Proof of purchase may be required. Please check with the retailer for
their specific return policy regarding returns that are beyond the time
set for exchanges.
The second option is to take or send the product (prepaid) to a Black &
Decker owned or authorized Service Center for repair or replacement at
our option. Proof of purchase may be required.Black & Decker owned
and authorized Service Centers are listed under
"Toots-Electric" in the yellow pages of the phone directory.
This warranty does not apply to accessories. This warranty gives you
specific legal rights and you may have other rights which vary from
state to state or province to province. Should you have any questions,
contact the manager of your nearest Black & Decker Service Center.
This product is not intended for commercial use.
FREE WARNING LABEL REPLACEMENT: If your warning labels
become illegible or are missing, call 1-800-544-6986 for a free
replacement.
Deck Warranty
Lifetime Warranty for DECK only against any defects in material or
workmanship.
This product is not intended for commercial use.
TROUBLE SHOOTING GUIDE
1.
2.
3.
4.
8.
PROBLEM
Mower doesn't run when bale handle
is activated.
Motor stops while mowing.
Mower runs but cutting performance is unsatisfactory,
or does not cut entire lawn.
Mower is too hard to push.
Mower is abnormally noisy and vibrates.
A.
B.
C.
A.
B.
C.
U.
A.
B.
C.
A.
A.
B.
SOLUTION
Check to make sure safety key has been installed and is fully seated and
that button on switch housing is being completely depressed.
Release bait handle to turn mower off. Remove safety key, turn mower over
and check that blade is free to turn.
Has battery been fully charged? Plug in charger and wait for green light to
come on.
Release bail handle to turn mower off. Remove safety key. Turn mower over
and check that blade is free to turn.
Raise cutting height of wheels to highest position and start mower.
Has battery been fully charged? Plug in charger and wait for green light to
come on.
Circuit breaker may have tripped. It resets automatically. Re-set time could
be as long as 1 minute. Slow down or raise cut height.
Has battery been fully charged? Plug in charger and wait for green light to
come on."
Release bail handle to turn mower off. Remove safety key. Turn mower over
and check:
*Blade for sharpness
*Deck and discharge chute for clogging.
Wheel height adjustment may be set too low for grass condition. Raise
cutting height.
Raise cutting height to reduce deck drag on grass. Check each wheel for
free rotation.
Release bail handle to turn mower off. Remove safety key. Turn mower on
side and check blade to ensure it has not been bent or damaged. If blade is
damaged, replace with a Black & Decker replacement blade. If the under-
side of the deck is damaged return mower to a Black & Decker Authorized
service center.
If there is no visible damage to the blade and the mower still vibrates:
Release bait handle to turn mower off, remove safety key and remove
blade. Rotate blade 180 degrees and retighten. If mower still vibrates,
return the mower to an authorized Black & Decker service center.
NOTE
Should the red light remain on after charging the battery for 24 hours on initial charge, the mower can still be used. The battery may need to be
"conditioned" requiring a few battery charge and discharge cycles before the green indicator light comes on.
THiS IS ONLY A GUIDE INTENDED TO ENABLE YOU TO PERFORM VISUAL CHECKS AND SIMPLE TESTS. SHOULD NONE OF THE
SOLUTIONS PROVIDE SATISFACTION OR iMPROVE PERFORMANCE CALL 1-800=544-6986 (1=800=54-HOW-TO) TO SPEAK TO A
CONSUMER SERVICE REPRESENTATIVE OR TAKE THiS MOWER TO THE CLOSEST AUTHORIZED BLACK & DECKER SERVICE
CENTER FOR SERVICING.
Imported by
Black & Decker (U.S.) Inc.,
701 E. Joppa Rd.
Towson, MD 21286 U.S.A.
See 'Tools=
Electric'
- Yellow Pages -
for Service &
Sales
\
\
O
GRAS.SBAG
SAC A HERBE
BOLSA
PARA
PASTO
FRAME
CADRE
BASTIDOR
CLiP
PINCE
PINZA
10
1 / 1

Black & Decker 90541667 Owner's manual

Category
Lawnmowers
Type
Owner's manual
This manual is also suitable for

Ask a question and I''ll find the answer in the document

Finding information in a document is now easier with AI

Ask the document