Page is loading ...

eSpring Water Purifier
OWNER’S MANUAL
This product may be covered by one or more of the following U.S. patents:
5,529,689; 5,573,666; 5,738,780; 6,368,504; 6,436,299; 6,514,420; 6,673,250; 6,806,649;
6,825,620; 6,831,417; 6,917,163; 6,984,320; 7,153,178; 7,170,200; 7,180,248; 7,568,955
1035793_eng.indd 1 6/10/14 4:42 PM

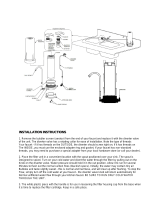
Retaining Ring
Top Shroud
Electronic
Module
Power Adapter
Base
Cartridge
Bracket
CONTENTS
INTRODUCTION
INSTALLATION AND MAINTENANCE
IMPORTANT SAFEGUARDS ....................................................................... 1
IMPORTANT NOTES ................................................................................. 1
ABOVE COUNTER DIVERTER INSTALLATION (10-0188) ............................... 2
BELOW COUNTER INSTALLATION PREPARATION FOR THE FAUCET OR
DISPENSING DEVICE ............................................................................ 3
BELOW COUNTER eSpring
®
FAUCET INSTALLATION (10-0189) .................... 4
BELOW COUNTER NON-eSpring FAUCET INSTALLATION (11-0720) .............. 5
ELECTRONIC MODULE DISPLAY ................................................................ 6
READING THE DISPLAY DURING TREATED WATER FLOW ............................ 6
TROUBLESHOOTING ................................................................................ 7
CARTRIDGE REPLACEMENT (10-0186) ....... ............................................. 9
COMPLETING THE INSTALLATION ............................................................ 10
ACCESSORIES AND REPLACEMENT PARTS .............................................. 11
SPECIFICATIONS .................................................................................... 13
CUSTOMER SERVICE ............................................................................. 13
LIMITED WARRANTY ............................................................................ 13
SATISFACTION GUARANTEE.................................................................... 14
INTRODUCTION
Congratulations on your purchase of the eSpring
®
Water Purifier. You have
made a wise investment for you and your family and have taken an important
step in improving the quality of your drinking water.
Inside the box you will find the basic Water Purifier with parts shown and the
manual with registration card. The faucet kit components will vary depending
upon the type of installation. Refer to specific installation sections:
• Above Counter Diverter Installation (10-0188)
• Below Counter eSpring Faucet Installation (10-0189)
• Below Counter NON-eSpring faucet or dispensing device Installation (11-0720)
Refer to the exploded view of the Water Purifier to the right for assistance with
part names.
INSTALLATION AND
MAINTENANCE
Before beginning installation, please review the owner’s manual thoroughly to
ensure proper performance of your eSpring Water Purifier.
NOTE: You will need an electrical outlet to plug in the power adapter. If you need
to install a new outlet, it must be installed by a licensed or certified electrician
according to Federal, Provincial, State, Municipal and local laws. This outlet
must be powered continuously for the Water Purifier to function properly. In
case of a power outage see p. 10.
To maximize Water Purifier performance and maintain quality drinking water,
the Cartridge should be replaced once a year or as soon as you have filtered
1,320 U.S. gallons (5,000 L) of water - whichever comes first. The Electronic
Module monitors the amount of water filtered and keeps track of how long the
Cartridge has been in service. When a year has passed or as soon as the Car-
tridge has treated 1,320 U.S. gallons (5,000 L) of water the Electronic Module
send out an alert to replace the Cartridge.
The Water Purifier is designed to have continuous power supplied to monitor
Cartridge performance properly.
Information can be accessed via the internet at www.espring.com or contact Customer Service:
In the United States, call 1-800-253-6500 M-F 8 AM – 12 AM and Sat. 8:30 AM – 5 PM.
In Canada, call 1-800-265-5470 weekdays M-F 8 AM – 12 AM and Sat. 8:30 AM – 5 PM.
PLEASE READ AND SAVE THESE INSTRUCTIONS
System Tested and Certified by NSF International and WQA against NSF/
ANSI Standard 42, 53, 55. Tested and certified by NSF International
against CSA B483.1. See Performance Date Sheet for permissible claims.
1035793_eng.indd 2 6/10/14 4:42 PM

1
IMPORTANT SAFEGUARDS
WHEN USING AN ELECTRIC APPLIANCE, BASIC SAFETY
PRECAUTIONS SHOULD ALWAYS BE FOLLOWED TO REDUCE
THE RISK OF FIRE, ELECTRIC SHOCK, AND/OR INJURY TO
PERSONS INCLUDING THE FOLLOWING:
1. READ ALL INSTRUCTIONS BEFORE USE. If you still have questions
concerning the installation or operation of your eSpring
®
Water Purifier,
contact Customer Service toll-free, p.13.
2. All wiring connections must comply with local electrical codes. Improper
electrical connection can result in a risk of electric shock. Check with
a qualified electrician if you are in doubt as to whether the product is
properly installed.
3. To protect against electric shock, do not place cord, power adapter, base
housing or Electronic Module in water or other liquids.
4. Supervision is required when any appliance is used by or near children.
5. To disconnect appliance from electrical power, remove power adapter from
electrical outlet.
6. Remove power adapter from electrical outlet before cleaning or performing
routine maintenance (i.e. replacing the cartridge).
7.
Do not operate any appliance with a damaged electrical cord or power adapter
or after the appliance malfunctions or has been damaged in any manner.
8. Use only factory authorized replacement parts. Any defect or diminished
performance caused by the use of any unauthorized System parts or
accessories is not covered under the Limited Warranty, pp. 13-14.
9. Do not use outdoors.
10. The device is to be supplied through a residual current device outlet having a
rated residual operation current not exceeding 30 mA. The outlet should not be
located directly above a sink, or in an area where it could be affected by water.
11. Do not let power cord hang over the edge of table or counter, or touch hot
surfaces.
12. For residential and light commercial use only. Do not use this appliance for
other than the intended use.
13.
WARNING: THE APPLIANCE MUST BE DRY BEFORE APPLYING ELECTRICAL
POWER AND BE DRY AND FREE OF LEAKS DURING OPERATION.
14. WARNING: TO REDUCE THE RISK OF FIRE OR ELECTRIC SHOCK, DO NOT
ATTEMPT TO OPEN THE ELECTRONIC MODULE. NO USER SERVICABLE
PARTS ARE INSIDE THE ELECTRONIC MODULE.
15. DANGER: Improper connection of the power adapter can result in a risk
of electric shock. Do not modify the power adapter. If it will not fit into the
outlet, have a proper outlet installed by a qualified electrician.
16. CAUTION: Regularly inspect product and plumbing fittings for water leaks,
as water leaks can cause property damage.
17. Anytime Electronic Module display has a red cup or red phone, there is no
UV treatment. Contact Customer Service, p. 13.
18. The eSpring Water Purifier must use the designated pressure regulator
and flow controller for line pressure installations.
19. The System has been certified for the reduction of radon from drinking
water at a loading rate of 15.2 liters (four gallons) per day. The
certification is not for other potential radon sources including air. The
system should not be used on drinking water containing radon levels in
excess of 4000 pCi/L.
Do not use with water that is microbiologically unsafe or of unknown quality
without adequate disinfection before or after the system.
If your immune system is weakened or compromised and for medical
reasons, you need water of exceptional purity, consult your healthcare
provider before using.
IMPORTANT NOTES
The eSpring Water Purifier is designed for use only with cold, bacteriologically
suitable (potable) water.
1.
System tested and certified by NSF International and WQA against NSF/
ANSI Standards 42, 53, and 55 as verified and substantiated by test data.
See Performance Data Sheet for individual contaminants and reductions
performance.
2.
This Class B system conforms to NSF/ANSI 55 and contains an ultraviolet lamp
that requires replacement at intervals in accordance with the manufacturer’s
instructions. The device is designed for the supplemental bactericidal treat-
ment of disinfected public drinking water or other drinking water that has
been tested and deemed acceptable for human consumption by the state and
local health agency having jurisdiction. The system is only designed to reduce
normally occurring non-pathogenic or nuisance microorganisms. Class B
systems are not intended for treatment of contaminated water.
3. Installation of the Water Purifier must comply with Federal, Provincial,
State, Municipal and local laws and regulations.
4. During normal operation, if the Water Purifier has not been used for several
hours (e.g., overnight), run water through it for 60 seconds prior to use.
5. DO NOT use with warm or hot water, as this may damage the Water Purifier.
6. DO NOT install under full line pressure. Must be installed with the following:
• Above Counter Diverter
• Below Counter eSpring Faucet
• Below Counter NON-eSpring faucet or dispensing device must be
installed with Pressure Regulator Kit (CXV3645).
7. Except for lead and a few other compounds, the eSpring Water Purifier
is NOT designed to remove soluble inorganic substances such as iron,
calcium, magnesium, nitrates, arsenic or fluorides.
8. Plumber’s thread sealing compounds should NOT be used with the Water
Purifier.
9. USE ONLY silicone or food grade lubricants with the Water Purifier O-rings.
When cleaning, use a mild liquid dishwashing detergent and water.
10. The Electronic Module p. 6 will let you know when it is time to replace the
Cartridge.
11. THE CARTRIDGE (MODEL NO. 10-0186) MUST BE REPLACED AT LEAST
ONCE A YEAR. In areas of very poor water quality, you may see a drop in
the flow rate, indicating that Cartridge replacement may be needed more
frequently. Even if water flow rate is not affected, the Cartridge must be
replaced as soon as a year has passed or when it has filtered 1320 U.S.
gallons (5000 L) of water, whichever comes first.
12. The UV lamp in the Cartridge contains mercury. Please
dispose of according to local, state or federal laws.
REMEMBER: OPERATIONAL, MAINTENANCE AND REPLACEMENT REQUIREMENTS
ARE ESSENTIAL FOR THIS PRODUCT TO PERFORM AS REPRESENTED. IT IS
IMPORTANT THAT ONLY THOSE REPLACEMENT ELEMENTS THAT ARE IDENTIFIED
IN THIS MANUAL ARE USED WITH THIS PRODUCT. THE LIMITED WARRANTY
DOES NOT COVER ANY DEFECT OR DIMINISHED PERFORMANCE CAUSED BY
THE USE OF ANY PART OR ACCESSORY THAT IS NOT COMPATIBLE WITH THE
eSpring WATER PURIFIER.
Residents of Massachusetts, please adhere to the State of Massachusetts
Plumbing Codes. Use a licensed plumber for installation.
Information can be accessed via the internet at www.espring.com or contact Customer Service:
In the United States, call 1-800-253-6500 M-F 8 AM – 12 AM and Sat. 8:30 AM – 5 PM.
In Canada, call 1-800-265-5470 weekdays M-F 8 AM – 12 AM and Sat. 8:30 AM – 5 PM.
PLEASE READ AND SAVE THESE INSTRUCTIONS
1035793_eng.indd 1 6/10/14 4:42 PM

2
Fig. 3
Fig. 9
Fig. 8
Fig. 7
Fig. 6
Fig. 5Fig. 4
Fig. 2
Fig. 12
Fig. 10
Fig. 11
a
e
d
Fig. 1
b
c
f
ABOVE COUNTER DIVERTER
INSTALLATION (10-0188)
The eSpring
®
Water Purifier sits on the countertop with the Diverter and tubing
attached directly to your faucet. It does not work with pull out sprayer faucets.
The tubing should be replaced every two years.
NOTE: Attach the Diverter to a
faucet that will supply COLD,
POTABLE WATER to the Water
Purifier. DO NOT RUN HOT
WATER THROUGH THE WATER
PURIFIER.
Check to make sure you have all
the correct components before
beginning installation (Fig 1).
a. Diverter
b. Tubing
c. 3 Faucet Adapters
d. 2 Tubing Supports
e. 2 Tie Straps
f. Tubing Removal Tool
ATTACHING THE DIVERTER
1. Unscrew to remove the aerator (wire
screen) and washer from the end of
your faucet (Fig. 2).
2. There are three options for attaching the Diverter to the faucet.
a) Position the Diverter onto the faucet and hand tighten the textured
collar counterclockwise until secure (Fig. 3).
b) If that does not fit, attach the appropriate textured adapter with inter-
nal threads and washer to the end of your faucet (Fig. 4).
c) If the threads on your faucet are internal, attach the appropriate
adapter with external threads to the end of your faucet (Fig. 5).
ATTACHING THE TUBING TO THE DIVERTER
1. Unscrew to remove the textured nuts (Fig. 6).
2. With the threads facing out, push the large nut onto the large tube and the
small nut onto the small tube (Fig. 7).
3. Firmly push the large tube onto the large
barb and the small tube onto the small
barb (Fig. 8).
4. Screw the nuts onto the barbs and hand
tighten (Fig. 9). Use the tie straps to
secure the tubing to the faucet.
ATTACHING TUBING TO WATER PURIFIER
AND CHECKING FOR LEAKS
**MAKE SURE THE UNIT IS NOT PLUGGED INTO AN ELECTRICAL OUTLET.
1. Position the eSpring Wa-
ter Purifier in a desired
location where the tubing
from the faucet reaches
the Water Purifier and the
Power Adapter reaches
an outlet with continuous
power (Fig. 10).
2. Remove the Top Shroud from the Water
Purifier . Remove the Electronic
Module (Fig. 11).
3. If the tubing is too long, use a sharp
knife to cut the tubes to the same
length where they are NOT BONDED
TOGETHER.
Make sure the cut is straight to form a
flat end on the tubes (Fig. 12).
1035793_eng.indd 2 6/10/14 4:42 PM

3
Fig. 13
Fig. 10
Fig. 14
Fig. 15A
Fig. 15B
Fig. 16
3
⁄4" ( )
5
⁄8" (
)
Fig. 17
BELOW COUNTER INSTALLATION
PREPARATION FOR THE FAUCET
OR DISPENSING DEVICE
This installation uses a separate, counter-
mounted eSpring
®
Faucet or any NON-
eSpring single line faucet or dispensing
device. With the eSpring Water Purifier
below the counter, these installations allow
maximum use of counter space, with no
visible tubing.
Cold water plumbing must be modified to pro-
vide a 3/8” (9.5 mm) Outer Diameter (O.D.)
x ¼” (6.4 mm) Inner Diameter (I.D.) tubing
(plastic or metal) for connection to an auxil-
iary faucet or dispensing device (Fig. 17).
NOTE: You will need an electrical outlet to plug
in the Power Adapter. If you need to install a new outlet, it must be installed by a
licensed or certified electrician according to Federal, Provincial, State, Municipal
and local laws. This outlet must be powered continuously for the Water Purifier to
function properly. In case of a power outage, see p. 8.
RECOMMENDATIONS
1. Hire a plumber if you do not feel comfortable modifying the plumbing and
installing the faucet.
2. Determine type and size tubing or piping needed between the cold water
supply line and the kitchen faucet. Take a digital picture of your cold water
supply plumbing to use as a guide in the hardware store to purchase the
appropriate parts for installation.
3. Install a tee in cold water supply and a separate shut-off valve to the tee
before connection of an Auxiliary Faucet or dispensing device. This will allow
for rinsing and cleaning of the Water Purifier during cartridge changes.
a. All fittings and valves must be approved for use in pressurized drinking
water applications.
b. Purchase plastic ferrules when connecting plastic tubes to metal
compression fittings (which come with metal ferrules for connection to
metal pipe).
4. Select a location for the faucet or dispensing device. There may already be
an extra, capped hole in your sink’s ledge for a sprayer, soap dispenser or
extra faucet that can be used for mounting the faucet. If you are removing
the connected sprayer, it will need to be sealed properly. (See local plumb-
ing store for assistance.)
a. For eSpring Faucet: If a new hole is needed, it must be between 1¼”
(32mm) and 1½” (38mm) in diameter, less than 3 15/16” (100mm)
from the sink basin and at least 1¼” (32mm) from the wall. Before
drilling, make sure there is sufficient clearance below the sink or coun-
tertop to accommodate the faucet and allow connections to be made
to the eSpring Water Purifier.
b. For NON-eSpring faucet or dispensing device: Follow manufacturer’s
use instructions.
NOTE: For solid countertops, it is recommended to use a very sharp bi-blade hole
saw and start by making a pilot hole. If you have a porcelain/ceramic sink or a tile
countertop, it is recommended to seek professional assistance for proper drilling.
WARNING: Due to the possibility of shock or electrocution, use extreme care
when operating an electric power drill or other power tools around the sink.
Avoid contact with water or moisture at all times.
Continue With Faucet Installation
• Below Counter eSpring Auxiliary Faucet, p. 4.
• Below Counter NON-eSpring Faucet or Dispensing Device, p. 5.
4. Lay each tube from the Diverter on the diagram. Use a pen to mark a line
across them at the arrows. Push tubing supports into their respective
tubes, until they are flush with the end of the tubes (Fig. 13).
5.
Insert each tube into the proper locations
on the Bracket until you meet the marks
or the marks disappear (Fig. 14).
NOTE: You will feel resistance before the tube
is fully installed.
6. The Diverter controls the flow of
water according to the position of
the pin.
a) Pin pulled out - Treated water
(Fig. 15A).
b) Pin pushed in - Untreated water
(Fig. 15B).
7. Turn on cold water faucet and pull
out the Diverter pin.
NOTE: It will take a short time for water
to saturate the Cartridge and flow from
the Diverter. Flush for a minimum of 5
U.S. gallons (20 liters) (approximately
5-15 minutes) to remove air pockets and
carbon dust. If water is not clear, see Troubleshotting, p. 8.
8. Check for any signs of leakage at the
Diverter and at all tubing connections
(Fig 16). If there is leaking or
bubbling, refer to Trouble-
shooting, p. 7.
9. Turn off the water and push
in the pin, after each use.
NOTE: During use periodically
check system for leaks.
10. Skip to COMPLETING THE INSTALLATION, p. 10.
Residents of Massachusetts, please adhere to the State of Massachusetts
Plumbing Codes. Use a licensed plumber for installation.
1035793_eng.indd 3 6/10/14 4:42 PM

4
Fig. 19
3
⁄4"
(
)
5
⁄8" ( )
Fig. 23
Fig. 22
Fig. 24
Fig. 25
Fig. 20
Fig. 18
a.
b
c
d
e
f
g
h
Fig. 21
BELOW COUNTER
eSpring
®
FAUCET
INSTALLATION
(10-0189)
REVIEW ALL INSTRUCTIONS TO BE SURE YOU HAVE
ALL PARTS AND TOOLS PRIOR TO INSTALLATION.
eSpring Auxiliary Faucet Components (Fig. 18):
a. Spout
b. Spout cap
c. Body with red, green and blue tubes
d. Rubber washer
e. Metal washer
f. Wing nut
g. Supply Connector with flow controller
h. Tubing Removal Tool
NOTE: Supply Connector must be used for all installations.
1. a)
Lay the RED and GREEN tubes on the top of the diagram, and lay the BLUE
tube on the bottom. Use a pen to mark them at the arrows (Fig. 19).
b) Use a ruler or lay the tube from the cold water supply on the top of the
diagram and mark a line at ¾” (18mm) or at the arrow (Fig. 19).
2. Press Faucet tap spout into the main body .
and Screw spout cap onto faucet body top (2) Un-
screw to remove the wing nut and metal washer while
keeping the rubber washer against the faucet body
(Fig. 20).
3. Holding the rubber washer in place against the
faucet body, lower the eSpring Faucet stem and
tubes through the hole in the sink ledge or counter
. With an assistant holding the faucet in place,
reach up from below the counter and slide the
metal washer then the wing nut onto the threaded
faucet . Position the faucet in the desired
orientation and tighten the metal washer and wing
nut to secure the faucet in place (Fig. 21).
NOTE: If the faucet remains loose, an additional
spacer may be required. Refer to Service Components
List, p. 11.
4. Remove the Top Shroud from the Water
Purifier
. Remove the Electronic
Module (Fig. 22).
5. Insert the GREEN and BLUE tubes at-
tached to the eSpring Auxiliary Faucet
into their proper locations on the
Bracket (Fig. 23).
NOTE: You will feel resistance before the
tubes are fully installed. Ensure the tube
is fully pushed in until it meets the mark
or the marks disappear as a check on
each of the tube connections in steps 5-6.
6. Connect the tube from the cold water
supply to the screen side of the Sup-
ply Connector . Arrow in balloon
shows water flow direction .
Insert the RED tube attached to the
Auxiliary Faucet into the opposite end
of the Supply Connector (Fig. 24).
NOTE: You must use the Supply Connector
(Fig. 18, part c) between the valve at the
water supply and the eSpring Faucet.
7. Open the eSpring Faucet
. Open the water supply
shut-off valve to start water
flowing through the Water
Purifier
(Fig. 25).
NOTE: It will take a short time
for water to saturate the
Cartridge and flow from the
Diverter. Flush for a minimum
of 5 U.S. gallons (20 liters)
(approximately 5-15 minutes) to
remove air pockets and carbon
dust. If water is not clear, see
Troubleshotting, p. 8.
8. Turn off the eSpring Faucet and check for any signs of leakage at all tubing
connections
(Fig. 25). If there is leaking or bubbling, refer to Trouble-
shooting, p. 7.
NOTE: Purchase 10-1398 to use in installation to a refrigerator or other
secondary device.
9. Skip to COMPLETING THE INSTALLATION, p. 10.
Residents of Massachusetts, please adhere to the State of Massachusetts
Plumbing Codes. Use a licensed plumber for installation.
1035793_eng.indd 4 6/10/14 4:42 PM

5
Fig. 25
Fig. 30
Fig. 31B
Fig. 31A
Fig. 32
Fig. 26
Fig. 27
Fig. 28
3
⁄4"
(
)
5
⁄8" ( )
a
b
*
*
*
*
c
e
d
g
f
Fig. 29
BELOW COUNTER NON-eSpring
®
FAUCET INSTALLATION (11-0720)
REVIEW ALL INSTRUCTIONS IN THE PURCHASED NON-eSpring FAUCET OR DISPENS-
ING DEVICE TO BE SURE YOU HAVE ALL PARTS AND TOOLS PRIOR TO INSTALLATION.
1. Install Auxiliary Faucet or Dispensing Device according to manufacturer’s
instructions.
2. Follow preparation steps for any faucet or dispensing device on p. 3.
3. Review bag labeled CXV3645,
which contains components
used with NON-eSpring instal-
lations (Fig. 26).
a. Supply Connector
b. Pressure Regulator
c. Inlet Tubing
d. Outlet Tubing
e. Tubing Removal Tool
f. T Connector
g. Tubing Reducer Connector
* Faucet not included
4. a)
Lay the red tube from the Pressure Regulator Assembly on the top of the
diagram, and lay the blue tube on the bottom. Use a pen to mark them at
the arrows (Fig. 27). (These ends will connect to the Water Purifier).
b) Lay the unmarked end of the blue tubing on the top of the diagram and
mark a line at ¾” (18 mm). (Fig. 27).
c) Lay the tube from the cold water supply on the top of the diagram and
mark a line at ¾” (18mm) or at arrow (Fig. 27).
5. Remove the Top Shroud from the Water
Purifier . Remove the Electronic
Module (Fig. 28).
6. Connect the tube from the cold water
supply to the screen side of the Supply
Connector on Pressure Regulator
Assembly . Arrow in balloon shows
water flow direction (Fig. 29).
NOTE: The supplied components (Fig. 29)
must be used between the valve at the water
supply and the eSpring Water Purifier.
7. Insert the RED tube from the Pres-
sure Regulator Assembly into the
large port on the Bracket. Insert the
end of the BLUE tube marked at 5/8”
(15 mm) into the small port on the
Bracket (Fig. 30).
NOTE: You will feel resistance before the
tubes are fully installed. Ensure the tube is
fully pushed in until it meets the mark or
the marks disappear, as a check on each of
the tube connections in steps 7 and 8.
8.
The other end of the BLUE tube
marked at ¾” (18mm) connects to
the NON-eSpring Faucet or dispens-
ing device by inserting BLUE tube
into the Tubing Reducer Connector.
Follow manufacturer’s installation
instructions to connect the other
end of the connector to the faucet
or dispensing device (Fig. 31A).
NOTE: For installation with refrigerator
or secondary device use the T Connector
in place of the Tubing Reducer Connector
(Fig 31B).
9. Open the NON-eSpring Faucet or dispensing device . Open the water
supply shut-off valve to start water flowing through the Water Treat-
ment System (Fig. 32).
NOTE: It will take a short time for water to saturate the Cartridge and flow from
the Diverter. Flush for a minimum of 5 U.S. gallons (20 liters) (approximately
5-15 minutes) to remove air pockets and carbon dust. If water is not clear, see
Troubleshotting, p. 8.
10. Turn off the NON-eSpring Faucet or dispensing device and check for any
signs of leakage at all tubing connections
(Fig. 32). If there is leaking
or bubbling, refer to Troubleshooting, p. 7.
11. Skip to COMPLETING THE INSTALLATION, p. 10.
Residents of Massachusetts, please adhere to the State of Massachusetts
Plumbing Codes. Use a licensed plumber for installation.
1035793_eng.indd 5 6/10/14 4:42 PM

6
READING THE DISPLAY DURING TREATED WATER FLOW
ELECTRONICS DISPLAY
The Electronics display on the eSpring
®
Water Purifier keeps track of actual water
usage (gallons/litres) and when the Cartridge was installed. When properly plugged into
an electrical outlet, the Water Purifier will display its status via the Electronic Module
LED display.
STATUS
WATER
DROPS
CUP
ICON
CARTRIDGE
ICON
LIFE
INDICATOR
BEEPER PHONE COMMENTS/ACTIONS
Normal display
Blue Blue Blue Blue Off Off Normal
Top Shroud removed
(Reseat for display)
Blue Red* Blue Blue Repeated Off
Cup icon On/Red –
Do not operate, replace Top Shroud
Cartridge not recognized
Blue Red* Off Off Repeated Off
Install Cartridge – Light On/Red
Cup icon On/Red
Lamp malfunction
Blue Red* Blue Blue Repeated Red*
Phone icon On/Red;
Need replacement Cartridge
Under 10% Cartridge life
remaining
Blue Blue Blue
Last
segment
flashing
Once at
flow start
Off Order replacement Cartridge
End of Cartridge life
Blue Red* Flashing Off
Every 2
seconds
Off Install Cartridge – Light On/Red
Water Purifier
needs servicing
Blue Off Off Off Repeated Red*
Cup icon; Phone icon
Need new Electronic Module
Call Customer Service
Water Purifier
malfunction
Flashing
Flashing/
Red*
Flashing Flashing
Constant
tone
Flashing/
Red*
Phone icon On/Red. All other segments flashing
Unplug immediately. Wait 5 minutes. Plug back in and run
treated water. If unsuccessful, call Customer Service.
Blank display
Off Off Off Off Off Off
Plug in unit or wait for power to return.
No rolling water drops
Not blue,
not moving
Off Blue Blue Off Off
No UV treatment - Normal display does not
change when treated water flows. Sensor
malfunction. Call Customer Service.
1035793_eng.indd 6 6/10/14 4:42 PM

7
CONCERN CAUSE(S) SOLUTION(S)
WATER LEAKS - DIVERTER
Water leaks at Diverter.
Tubing not pushed all the way onto barbs.
Tubing needs to be pushed completely onto barbs and nuts hand tightened,
p. 2, Fig. 9.
Nuts not tightened all the way.
Connections at faucet and/or adapter are loose.
Tighten all connections between faucet and Diverter. If leaks persist, contact
Customer Service, p. 2.
Water leaks at Diverter pin. Damaged internal seal. Contact Customer Service to order replacement Diverter, p. 12, WTI-0651.
Water flows simultaneously from treated
and untreated ports on Diverter.
Diverter pin not pushed in after each use. Follow Diverter use instructions, p. 3, Fig 14A & B.
Damaged internal seal. Contact Customer Service to order replacement seal.
WATER LEAKS – eSpring
®
AUXLILARY FAUCET
Water leakage around the connections at
supply connector with flow controller.
Tubing end is not cut evenly.
-Remove tubing at connector locations, p. 9, Fig. 32.
-Trim and install tubes, p. 2, Fig. 11; p. 3, Fig. 13.
NOTE: If tubing is too short, contact Customer Service to order additional tubing
and union connector.
Tubing damaged on surface.
Tubing not inserted far enough.
-Remove tubing, p. 9, Fig. 32.
-Mark tubing, p. 4, Fig. 18.
-Install tubing, p. 4, Fig. 21.
Water leaks at tubing connection to faucet. Damaged connection. Contact Customer Service to replace Supply Connector, p. 11, WTI-0601.
Water leaks continuously from end
of spout.
Damaged internal seal. Use web site to order replacement Faucet Kit, 10-0663.
Water leaks at spout to faucet
body connection
Spout is not inserted completely.
-Remove spout, p. 4, Fig. 19.
-Inspect O-rings.
-Reinsert spout and check for leaks, p. 4, Fig. 19.
If leaking persists, contact Customer Service.
Damaged o-ring on spout.
WATER LEAKS – OTHER
FAUCETS/DISPENSING
DEVICES
Water leakage around the tubing con-
nections at Supply Connector with flow
controller, the faucet connector, and the
Pressure Regulator.
Tubing end is not cut evenly.
-Remove tubing at connector locations, p. 9, Fig. 32.
-Trim and install tubes, p. 2, Fig. 11; p. 3, Fig. 13.
NOTE: If tubing is too short, contact Customer Service to order additional tubing
and union connector.
Tubing damaged on surface.
Tubing not inserted far enough.
-Remove tubing, p. 9, Fig. 32.
-Mark tubing, p. 5, Fig. 25.
-Install tubing, p. 5, Fig. 27.
Water leaking at threaded connection or
body of Pressure Regulator.
Damaged Pressure Regulator. Contact Customer Service to replace Pressure Regulator, p. 12, WTI-0430.
WATER LEAKS AT UNIT
Water leakage around tubing connections
on Bracket.
Tubing supports not installed (Diverter only)
-Remove tubing, p. 9, Fig. 32.
-Locate and install tubing supports, p. 3, Fig. 12.
- Contact Customer Service to order tubing supports, p. 12, WTI-0432,
if needed.
Tubing cut where it was bonded. (Diverter only)
-Remove tubing, p. 9, Fig. 32.
-Re-trim and install tubes, p. 2, Fig. 11; p. 3, Fig. 12-13.
NOTE: If tubing is too short, contact Customer Service to order additional tubing
and union connector.
Tubing is not cut evenly or thoroughly.
Tubing damaged on surface.
Tubing not inserted far enough or not seated well
in notches on back of unit.
-Remove tubing, p. 9, Fig. 32.
-Mark tubing, p. 3, Fig. 12.
-Install tubing, p. 3, Fig. 13.
Water leaking from Bracket. Retaining
Ring or Base.
Bracket not pushed down on Base completely.
-Reseat Bracket, p. 9, Fig. 33, 34, 36, 38.
-Reassemble Retaining Ring, p. 10, Fig. 39.
-Reassemble Water Purifier, p. 10, Fig. 40-47.
Retaining Ring not threaded to stop.
Debris on O-ring to Base seal. Look for debris on O-ring and remove, p. 9, Fig. 36.
Damaged O-ring. Contact Customer Service to order replacement O-Ring, p. 11, WTI-0426.
Cartridge not threaded into Bracket completely. Reinstall Cartridge into Bracket, p. 9, Fig. 37.
Defective Bracket. Contact Customer Service to order replacement Bracket, p. 11, WTI-0706.
Damaged Cartridge. Contact Customer Service to order replacement Cartridge, p. 11, 10-0186.
Water leaking at NON-eSpring faucet or
dispensing device.
Improper connection.
-Review manufacturer’s instructions.
-Contact manufacturer.
Damaged faucet/dispensing device.
TROUBLESHOOTING
READING THE DISPLAY DURING TREATED WATER FLOW
For more detailed troubleshooting information, contact contact Customer Service:
In the United States, call 1-800-253-6500 M-F 8 AM – 12 AM and Sat. 8:30 AM – 5 PM.
In Canada, call 1-800-265-5470 M-F 8 AM – 12 AM and Sat. 8:30 AM – 5 PM.
STATUS
WATER
DROPS
CUP
ICON
CARTRIDGE
ICON
LIFE
INDICATOR
BEEPER PHONE COMMENTS/ACTIONS
Normal display
Blue Blue Blue Blue Off Off Normal
Top Shroud removed
(Reseat for display)
Blue Red* Blue Blue Repeated Off
Cup icon On/Red –
Do not operate, replace Top Shroud
Cartridge not recognized
Blue Red* Off Off Repeated Off
Install Cartridge – Light On/Red
Cup icon On/Red
Lamp malfunction
Blue Red* Blue Blue Repeated Red*
Phone icon On/Red;
Need replacement Cartridge
Under 10% Cartridge life
remaining
Blue Blue Blue
Last
segment
flashing
Once at
flow start
Off Order replacement Cartridge
End of Cartridge life
Blue Red* Flashing Off
Every 2
seconds
Off Install Cartridge – Light On/Red
Water Purifier
needs servicing
Blue Off Off Off Repeated Red*
Cup icon; Phone icon
Need new Electronic Module
Call Customer Service
Water Purifier
malfunction
Flashing
Flashing/
Red*
Flashing Flashing
Constant
tone
Flashing/
Red*
Phone icon On/Red. All other segments flashing
Unplug immediately. Wait 5 minutes. Plug back in and run
treated water. If unsuccessful, call Customer Service.
Blank display
Off Off Off Off Off Off
Plug in unit or wait for power to return.
No rolling water drops
Not blue,
not moving
Off Blue Blue Off Off
No UV treatment - Normal display does not
change when treated water flows. Sensor
malfunction. Call Customer Service.
1035793_eng.indd 7 6/10/14 4:42 PM

8
TROUBLESHOOTING
CONCERN CAUSE(S) SOLUTION(S)
REDUCED WATER FLOW RATE
Water flow rate out of Diverter has
reduced.
Screen on inlet is clogged. Clean treated water screen with brush.
Screen on the treated water port is clogged. Unscrew treated water port and clean screen with brush.
Water flow rate out of eSpring
®
Faucet has
reduced or was initially low.
Cold water shut-off valve(s) not fully open. Make sure all shut-off valve(s) are completely opened.
Supply Connector improperly installed (facing the
wrong direction).
Check installation p. 4, Fig. 22.
Screen on the Supply Connector with flow con-
troller may be clogged.
-Turn off cold water supply and drain water from line by opening faucet.
- Remove tube from screen side of Supply Connector with flow controller from
cold water supply tube, p. 9, Fig. 32; p. 4, Fig. 22.
-Clean screen with a brush and re-insert tube, p. 4, Fig. 21.
If all above solutions did not help, Cartridge may
be clogged with dirt due to high particle content
in water.
Use the web site to order replacement Cartridge or contact Customer
Service, p. 11, 10-0186.
Water flow rate from other (NON-eSpring
faucet/dispensing device) has reduced.
Damaged Pressure Regulator. Contact Customer Service to replace Pressure Regulator, p. 12, WTI-0430.
SMELL, TASTE OR APPEARNACE OF TREATED WATER CHANGED
Water tastes musty.
System not used enough. Daily usage recom-
mended or at least a few times within 2 weeks.
Flush for an additional 3 minutes prior to use.
-If this does not work, disinfect Base of unit. Remove Cartridge and put 5 ml
or a teaspoon of household liquid bleach into a cup of cold water. Put solution
into Base and fill ¼ with cold water. Reinstall Cartridge and tubing (Replace-
ment instructions, pp. 9-10). Let sit for 10 minutes. Run water through
System for at least 5 minutes prior to use. If problem is not resolved, use web
site to order a replacement Cartridge, p. 11, 10-0186.
Cartridge not dried out before storing outside
System for more than 1 month.
Cartridge in System not used for more than 1
month.
Water is orange. High iron content.
Cartridge is not designed to remove iron. Use of an iron cartridge prior to the
System may extend the life of the Cartridge.
Water smells like rotten eggs. Sulfur reducing bacteria is in the water supply.
NOTE: Cartridge is not designed to remove sulfur, the following solution is
only temporary:
Disinfect Base of unit. Remove Cartridge and put 5 ml or a teaspoon of
household liquid bleach into a cup of cold water. Put solution into Base and fi ll
¼ with cold water. Reinstall Cartridge and tubing (Replacement instructions,
pp. 9-10).
Let sit for 10 minutes. Run water through System for at least 5 minutes
prior to use. If problem is not resolved, use web site to order a replacement
Cartridge, p. 11, 10-0186.
Occasional white sediment or flakes in
water (cloudy ice cubes or white film on
boiled water).
Calcium carbonate is in water supply.
Cartridge is not designed to remove calcium carbonate. The condition is
normal and no action is needed.
Water does not clear after flushing Trapped air or incomplete flush.
Repeat flush for a minimum of 5 U.S. gallons (20 liters) (approximately 5-15
minutes) 2 additional times. If still not clear, contact Customer Service to
replace Cartridge, p. 11, 10-0186.
Water does not clear. Damaged Cartridge. Contact Customer Service to replace Cartridge, p. 11, 10-0186.
For questions regarding changes in the display, please refer to the table on p. 6.
Below are some common concerns regarding display changes of the Water Purifier.
View Display while troubleshooting.
DISPLAY NOT WORKING
PROPERLY
No lights on the display.
Water Purifier is not plugged into outlet with
continuous power.
Plug Water Purifier into outlet with continuous power. Plug in a nightlight to
verify outlet has power.
Power outage. Do not use the Water Purifier until the power returns.
Electronic Module is not working properly.
Refer to Electronic Module display chart on pg. 6 or contact Customer
Service, p. 13 for assistance.
Power Adapter not fully installed.
Make sure Power Adapter is fully installed in back of Electronic Module and
plug is fully installed in outlet.
AUDITORY WARNINGS
Inconsistent or no rolling water drops
during treated water flow.
Damaged Bracket. Call Customer Service, p. 13 for replacement.
Water Purifier is beeping continuously.
Top Shroud is off or loose.
Make sure the cord strain relief is in groove on back of Water Purifier and
replace Top Shroud (Instructions on p. 12, Fig. 48-49).
Cartridge is not working properly.
Cartridge not threaded into position (p. 11, Fig. 41). If not, Contact Customer
Service, p. 13 for assistance, Cartridge may need to be replaced.
New Cartridge not fully flushed before Water
Purifier plugged in.
Unplug Water Purifier. Flush Cartridge 5 minutes. Plug back in.
Electronic Module is not working properly.
Unplug Water Purifier. Wait 5 minutes. Plug back in. Electronic Module may
need to be replaced – Use web site to order replacement, p. 11, WTI-0417.
1035793_eng.indd 8 6/10/14 4:42 PM

9
Fig. 33A
Fig. 36
Fig. 34
Fig. 35
Fig. 37
Fig. 38
Fig. 39
Fig. 33B
Fig. 41
Fig. 42
Fig. 40
CARTRIDGE REPLACEMENT
(10-0186)
Refer to the exploded view of the
eSpring
®
Water Purifier for assistance
with part names (See inside front cover).
1. Unplug the Power Adapter from
the wall outlet.
2. Turn off water to Water Purifier.
a) If using the Diverter, turn off
the kitchen faucet and place the
Water Purifier in the sink. Pull the metal pin on the Diverter to
drain water (Fig. 33A).
b) If using the Auxiliary Faucet, turn off the cold water supply using the shut-
off valve . Turn on Faucet to drain water and leave open . Place
towels around the Base of the Water Purifier (Fig. 33B).
3. Remove the Top Shroud
. Remove
the Electronic Module . Then,
remove the tubing removal tool
(Fig. 34).
4.
Draw a line with an ink pen across the
top of each tube where it meets the
rings on the Water Purifier (Fig. 35).
5. Make sure the logo on the removal tool is facing out and the tool is flat
against the Bracket. Firmly push
the tool against the rings with your
fingers and then pull the tubes out
with the opposite hand while rings
are depressed (Fig. 36).
NOTE: If you do not have the Removal
Tool, remove each tube by pressing evenly
with your fingertips on both sides of the
rings that surround the tubing. Then, pull
the tube out with the opposite hand.
6. Unscrew to remove the Retaining Ring (Fig. 37).
7. Lift the handle on the Bracket. Pull
straight up to remove the attached used
Cartridge and Bracket (Fig. 38).
8. Unscrew Cartridge from Bracket to
remove and dispose of the Cartridge in
accordance with local requirements
(Fig. 39).
NOTE: The UV lamp in the Cartridge contains
mercury. Please dispose of according to local,
state or federal laws.
9. Empty water from the Base. Then,
inspect seal and upper interior surface of
Base and remove any dirt (Fig. 40).
NOTE: DO NOT allow vegetable oil, petroleum
jelly, or other lubricants, solvents, ammonia,
alcohols, acids, or strong cleaning solutions to
come into contact with the Water Purifier. They
could cause permanent damage to the Base. Use
food grade silicone (WTI-0895) on o-rings to
lubricate if needed. When cleaning, use a mild
liquid dishwashing detergent and water.
10. Remove the protective plastic wrap from
the new eSpring Cartridge (10-0186).
11.
Firmly press Cartridge and Bracket to-
gether . Screw the Cartridge onto the
Bracket until it comes to a STOP (Fig.
41).
12. Reinsert the Bracket (with the attached
Cartridge) into the base by aligning the
notches of the Bracket with the tabs on
the Base . With the handle down,
firmly push down on the Bracket until it
contacts the Base (Fig. 42).
1035793_eng.indd 9 6/10/14 4:42 PM

10
Fig. 46
Fig. 45A
Fig. 45B
Fig. 43
Fig. 47
Fig. 48
Fig. 49
Fig. 50
Fig. 44
13. Screw on the Retaining Ring until
it hits a STOP. No exposed threads
should be visible below the Retain-
ing Ring. If threads are exposed,
the Bracket is not pushed all the
way down (Fig. 43).
NOTE: The Retaining Ring is not meant
to create a water seal, so Do Not rotate
past the STOP, as this may result in Car-
ton Water Treatment System damage.
14. Reinsert each tube into the proper
locations on the Bracket. Insert
tubes until they meet the marks or
the marks disappear (Fig. 44).
NOTE: You will feel resistance before the
tube is fully installed.
15. Turning on the cold water to the Water Purifier.
a) For the Existing
Faucet: Turn on the
cold water at the
faucet and pull
the Diverter pin
(Fig. 45A).
b) For the Auxiliary
Faucet: With the
Auxiliary Faucet
handle still in the
open position ,
open the supply
shut-off valve
(Fig. 45B).
NOTE: It will take a short time for water to saturate the Cartridge and flow from
the Diverter. Flush for a minimum of 5 U.S. gallons (20 liters) (approximately
5-15 minutes) to remove air pockets and carbon dust. If water is not clear, see
Troubleshotting, p. 8.
16. Check for any signs of leakage (Fig.
46).
Refer to Troubleshooting, p. 7.
17. Turn off the water to the Water Puri-
fier.
COMPLETING THE
INSTALLATION
1. Replace the Electronic Module .
Store the Tubing Removal Tool for
future use (Fig. 47).
2. Push cord strain relief into notch on
Base. Make sure the tubes are in the
notches on the back of the Base
(Fig. 48).
3. Place the Top Shroud onto Base .
Plug the Power Adapter into the wall
outlet (Fig. 49)
4. Wait for monitor to signal new
Cartridge with a beep. This may
take 30 seconds.
5.
Turn on water to the Water Purifier
and make sure that the display has
a blue cup with rolling water drops,
p. 6 (Fig. 50). If not, refer to
Troubleshooting, p. 8.
ACCESSORIES AND REPLACEMENT PARTS
These parts can be ordered on the web site at amway.com/shopespring
Primary Components
eSpring Faucet Parts
eSpring Faucet Spout
WTI-0937
These parts can be ordered through Customer Service: In the United States, call 1-800-253-6500 M-F 8 AM – 12 AM and Sat. 8:30 AM – 5 PM.
In Canada, call 1-800-265-5470 M-F 8 AM – 12 AM and Sat. 8:30 AM – 5 PM.
1035793_eng.indd 10 6/10/14 4:42 PM

11
ACCESSORIES AND REPLACEMENT PARTS
These parts can be ordered on the web site at amway.com/shopespring
Primary Components
eSpring Faucet Parts
Replacement Cartridge
10-0186
Top Shroud
WTI-0421
Electronic Module
WTI-0417
Power Adapter
WTI-0420
eSpring
®
Faucet Kit
10-0663
Retaining Ring
WTI-0423
Supply Connector
(Flow Controller)
WTI-0601
eSpring Faucet Spout
WTI-0937
Bracket O-Ring
WTI-0426
Elbow Set
WTI-0618
eSpring Kit Handle
WTI-0936
Base
WTI-0903
5/16” to 1/4” Connector
WTI-0874
eSpring Kit Mount
WTI-0938
Bracket
WTI-0706
1/4” Tubing - 3 ft (.91 m)
WTI-0875
Diverter Kit
10-0662
Single Line Faucet / Icemaker
Conversion Kit
10-1398
Tubing Removal Tool
WTI-0780
These parts can be ordered through Customer Service: In the United States, call 1-800-253-6500 M-F 8 AM – 12 AM and Sat. 8:30 AM – 5 PM.
In Canada, call 1-800-265-5470 M-F 8 AM – 12 AM and Sat. 8:30 AM – 5 PM.
1035793_eng.indd 11 6/10/14 4:42 PM

12
SPECIFICATIONS
eSpring
®
Water Purifier: Model No. 10-0185, 10-0188, 10-0189, 11-0720
Housing Height: 12
7
⁄8” (327mm) nominal.
Diameter: 7” (178 mm) nominal. Constructed of durable, high impact plastic
Electrical Rating:
Output Rating: 120V~, 1.8A/50-60Hz
Input Rating: 19V DC, 3.16A
Cartridge (Model No. 10-0186): Pressed carbon block with internal UV lamp
Materials: All wetted materials meet U.S. FDA requirements for use in
transmitting fluids for human consumption.
Maximum Operating Pressure: 125 psi (860 kPa)
Minimum Operating Pressure: 15 psi (103 kPa)
Maximum Operating Temperature: 86° F (30° C)
Minimum Operating Temperature: 40° F (4.4° C)
Rated Service Flow: 0.9 U.S. gallons (3.4 L) per minute at 60 psi (415 kPa) of
water pressure with a new Cartridge. (Actual flow rate will vary directly with
water pressure and the length of time the Cartridge has been in service.)
Rated Service Life: The Cartridge is designed to serve the average family’s
cooking and drinking water needs for one year or 1320 U.S. gallons (5000 L),
whichever comes first.
NOTE: Actual Cartridge life will vary with the amount of use and quality of the
water supply.
Installation: Quick and easy. The Existing Faucet installation can be accomplished
in less than ten minutes. The Faucet installation takes somewhat longer, but
can be accomplished without the services of a plumber and requires ordinary
hand tools.*
Cartridge replacement: Also quick and easy. Can be handled by the user. Does
not require returning the Water Purifier to the factory for Cartridge replacement.
Testing: System Tested and Certified by NSF International and WQA against
NSF/ANSI Standards 42, 53 and 55. See Performance Data Sheet for
permissible claims.
*If an electrical outlet is not located under sink – the Auxiliary Faucet kit will
require the installation of an electrical outlet by a licensed or certified electrician
according to Federal, Provincial, State, Municipal and local laws and regulations.
CUSTOMER SERVICE
Please read the instructions in this manual carefully. After studying the manual,
if you still have a question concerning the installation or operation of your
eSpring Water Purifier, contact Customer Service toll-free.
In the United States, call 1-800-253-6500 M-F 8 AM – 12 AM and Sat.
8:30 AM – 5 PM.
In Canada, call 1-800-265-5470 M-F 8 AM – 12 AM and Sat. 8:30 AM – 5 PM.
Information can also be accessed via the internet at wwww.espring.com
Diverter Parts
Ice Maker/NON-eSpring
®
Faucet Parts
Miscellaneous Parts
3/8” Knurled Nut
WTI-0648
Pressure Regulator
WTI-0430
1/4” x 5/16” x 1/4”
T Connector
WTI-0896
5/16” Knurled Nut
WTI-0649
3/8” x 1/4” x 5/16”
Reducer T Connector
WTI-0445
3/8” Tubing
3 ft (.91 m)
WTI-0881
3/8” x 3/8” Straight
Connector
WTI -0600
Aerator
WTI-0650
1/4” Straight Connector
WTI-0446
5/16” x 5/16” Straight
Connector
WTI -0902
5/16” Tubing
3 ft (.91 m)
WTI-0882
Diverter
WTI-0651
1/4” Plug
WTI-0447
Angle Stop Adapter Valve
(tee for cold water line)
WTI-0894
Washer for Diverter
WTI-0821
3/8” x 5/16”
Straight Connector
WTI-0448
Dow 111 Silicone
WTI-0895
ACCESSORIES AND REPLACEMENT PARTS
These parts can be ordered through Customer Service: In the United States, call 1-800-253-6500 M-F 8 AM – 12 AM and Sat. 8:30 AM – 5 PM.
In Canada, call 1-800-265-5470 M-F 8 AM – 12 AM and Sat. 8:30 AM – 5 PM.
Tubing w/Tube Supports
WTI-0433
Faucet Adapters
For Diverter
(Set of 3 Adapters)
WTI-0603
Cartridge Spout
for Diverter
WTI-0704
3/8” & 5/16”
Tube Support Set
WTI-0432
1035793_eng.indd 12 6/10/14 4:42 PM

13
SPECIFICATIONS
eSpring
®
Water Purifier: Model No. 10-0185, 10-0188, 10-0189, 11-0720
Housing Height: 12
7
⁄8” (327mm) nominal.
Diameter: 7” (178 mm) nominal. Constructed of durable, high impact plastic
Electrical Rating:
Output Rating: 120V~, 1.8A/50-60Hz
Input Rating: 19V DC, 3.16A
Cartridge (Model No. 10-0186): Pressed carbon block with internal UV lamp
Materials: All wetted materials meet U.S. FDA requirements for use in
transmitting fluids for human consumption.
Maximum Operating Pressure: 125 psi (860 kPa)
Minimum Operating Pressure: 15 psi (103 kPa)
Maximum Operating Temperature: 86° F (30° C)
Minimum Operating Temperature: 40° F (4.4° C)
Rated Service Flow: 0.9 U.S. gallons (3.4 L) per minute at 60 psi (415 kPa) of
water pressure with a new Cartridge. (Actual flow rate will vary directly with
water pressure and the length of time the Cartridge has been in service.)
Rated Service Life: The Cartridge is designed to serve the average family’s
cooking and drinking water needs for one year or 1320 U.S. gallons (5000 L),
whichever comes first.
NOTE: Actual Cartridge life will vary with the amount of use and quality of the
water supply.
Installation: Quick and easy. The Existing Faucet installation can be accomplished
in less than ten minutes. The Faucet installation takes somewhat longer, but
can be accomplished without the services of a plumber and requires ordinary
hand tools.*
Cartridge replacement: Also quick and easy. Can be handled by the user. Does
not require returning the Water Purifier to the factory for Cartridge replacement.
Testing: System Tested and Certified by NSF International and WQA against
NSF/ANSI Standards 42, 53 and 55. See Performance Data Sheet for
permissible claims.
*If an electrical outlet is not located under sink – the Auxiliary Faucet kit will
require the installation of an electrical outlet by a licensed or certified electrician
according to Federal, Provincial, State, Municipal and local laws and regulations.
CUSTOMER SERVICE
Please read the instructions in this manual carefully. After studying the manual,
if you still have a question concerning the installation or operation of your
eSpring Water Purifier, contact Customer Service toll-free.
In the United States, call 1-800-253-6500 M-F 8 AM – 12 AM and Sat.
8:30 AM – 5 PM.
In Canada, call 1-800-265-5470 M-F 8 AM – 12 AM and Sat. 8:30 AM – 5 PM.
Information can also be accessed via the internet at wwww.espring.com
1/4” x 5/16” x 1/4”
T Connector
WTI-0896
3/8” x 1/4” x 5/16”
Reducer T Connector
WTI-0445
3/8” x 3/8” Straight
Connector
WTI -0600
LIMITED WARRANTY
WHAT DOES THIS LIMITED WARRANTY COVER?
Amway Corp. and Amway Canada Corporation (“Amway”) warrants that the
eSpring
®
Water Purifier (except for the Cartridge, Auxiliary Faucet, Diverter, Tubing and Pres-
sure Regulator) will not prove defective (as defined below) under normal use for three
years from the date of purchase. An item will be considered “defective” if it is defective
in materials or workmanship and if the defect materially impairs the performance or
value of the eSpring Water Purifier to the original purchaser.
WHAT DOES THIS LIMITED WARRANTY NOT COVER?
This Limited Warranty does not cover:
(a) Any eSpring Water Purifier that has been subjected to any use that is different
than or inconsistent with the use instructions in the eSpring Water Purifier
Owners Manual.
(b) Any eSpring Water Purifier that has been subjected to any abuse, accident,
physical damage, improper installation or application, alteration, neglect, im-
proper temperature, humidity or other environmental conditions (including, but
not limited to, lightning, flood or fire).
(c) Any eSpring Water Purifier that has been damaged due to improper repair,
modification, alteration or maintenance by anyone other than an authorized
service warranty representative of Amway.
(d) Any defect or diminished performance caused by the use of any part or acces-
sory that is not compatible with the eSpring Water Purifier, OR;
(e) Any eSpring Water Purifier that was not installed with an eSpring Auxiliary Fau-
cet Kit or an eSpring Existing Faucet Kit or using a NON-eSpring faucet that was
not installed per the installation directions using the pressure regulator supplied
by Amway.
HOW WILL THE USE OF NON-AUTHORIZED PARTS AFFECT THE PERFORMANCE OF
YOUR eSpring WATER PURIFIER?
Performance claims relating to the eSpring Water Purifier were developed through
testing of the complete system as designed by the manufacturer, and as installed
and operated as recommended by the manufacturer. The use of replacement parts
or accessory attachments not recommended by the manufacturer may result in
diminished Water Purifier performance. Amway does not warrant the performance of
any NON-eSpring Water Purifier parts or accessories, and is not responsible for any
damage to the eSpring Water Purifier caused by any NON-eSpring Water Purifier
parts or accessories.
WHAT WILL AMWAY DO IF YOUR eSpring WATER PURIFIER IS DEFECTIVE?
If any eSpring Water Purifier that has not been altered or subjected to tampering,
misuse, or abuse proves to have been defective during the Limited Warranty period
then, subject to timely notification of the claimed defect, Amway will, at its option,
either repair or replace the defective item at its expense.
HOW AND WHEN MUST YOU MAKE A CLAIM UNDER THIS LIMITED WARRANTY?
For service under this Limited Warranty in the United States, please contact Amway
Corp. via telephone at 1-800-253-6500 weekdays between 8 AM and 12 AM East-
ern time BEFORE you return anything, for shipping and handling instructions. Then
return the claimed defective product to Health Tech Returns, 4607 44th Street SE
Kentwood, Michigan 49512, together with a copy of a sales receipt or other proof of
purchase and a brief description of the product defect.
For service under this Limited Warranty in Canada, please contact Amway Canada
Corporation at 1-800-265-5470 weekdays between 8 AM and 12 AM Eastern time
BEFORE, you return anything, for shipping and handling instructions. Then return the
defective product to Amway Canada Corporation, Box 7780, London Station Main,
London, Ontario N5Y 5W3, together with a copy of a sales receipt or other proof of
purchase and a brief description of the product defect.
1035793_eng.indd 13 6/10/14 4:42 PM

No warranty claim may be made unless the purchaser has notified Amway of the
claimed defect by writing or telephoning Amway within 30 days after its discovery
(but in all events no later than 30 days after the end of the applicable warranty
period). Upon receipt of an
eSpring
®
Water Purifier that is claimed to be defective,
Amway will determine, in its reasonable discretion, whether the eSpring Water
Purifier is defective. By accepting a returned eSpring Water Purifier for inspection,
Amway does not concede that the returned system is defective. Amway will bear
the expense of shipping, both ways, with respect to the repair or replacement of any
defective eSpring Water Purifier within the warranty period. If, in Amway’s opinion,
the eSpring Water Purifier is not defective, it will be returned to the purchaser.
OTHER IMPORTANT LIMITATIONS
If Amway fails to repair or replace any defective item within a reasonable time, its
liability under this Limited Warranty will in all events be limited to the purchase price
of the defective eSpring Water Purifier. Except as provided under Federal, State or
Provincial laws, no person is authorized to or may modify or expand the warranty
provided herein, waive any of the conditions and limitations of this Limited Warranty,
or make any different or additional warranties with respect to the eSpring Water
Purifier. Any statements to the contrary shall be of no effect unless made in writing
and signed by an authorized officer of Amway.
Except as provided under Federal, State or Provincial laws, this Limited Warranty
sets forth the purchaser’s sole and exclusive remedies for any defect in the eSpring
Water Purifier, and THE WARRANTIES STATED HEREIN ARE IN LIEU OF ALL OTHER
WARRANTIES, EXPRESS, IMPLIED, STATUTORY OR OTHERWISE, EXCEPT FOR
THE IMPLIED WARRANTY OR CONDITION OF MERCHANTABILITY, THE IMPLIED
WARRANTY OR CONDITION OF FITNESS FOR A PARTICULAR PURPOSE, AND ANY
OTHER NON-DISCLAIMABLE WARRANTIES IMPOSED BY FEDERAL, STATE OR
PROVINCIAL LAW. NO SUCH NON-DISCLAIMABLE WARRANTY, INCLUDING BUT
NOT LIMITED TO THE WARRANTY OR CONDITION OF MERCHANTABILITY AND THE
WARRANTY OR CONDITION OF FITNESS FOR A PARTICULAR PURPOSE, SHALL
BE FOR TERMS EXTENDING BEYOND THE DURATION OF THE EXPRESS LIMITED
WARRANTY DESCRIBED ABOVE. Notwithstanding the foregoing, some states or
provinces do not allow limitations on how long an implied warranty lasts, so the
above limitation may not apply to you.
This Limited Warranty gives you specific legal rights, and you may also have other
rights which vary from state to state or province to province. The laws of some
jurisdictions do not permit the exclusion or limitation of certain rights or remedies
provided by such laws. As this Limited Warranty is subject to such laws, some of
the limitations or restrictions contained in this Limited Warranty may not apply to
you. The provisions of this Limited Warranty are in addition to and not a modification
of or subtraction from the statutory warranties contained in state or provincial laws.
AMWAY SHALL HAVE NO LIABILITY TO THE ORIGINAL PURCHASER OR ANY OTHER
PERSON FOR CONSEQUENTIAL, INCIDENTAL, SPECIAL, EXEMPLARY, INDIRECT, OR
PUNITIVE DAMAGES ARISING FROM ANY DEFECT AND BASED UPON BREACH OF
WARRANTY, BREACH OF CONTRACT, NEGLIGENCE, STRICT TORT OR ANY OTHER
LEGAL THEORY. IN PARTICULAR, AND WITHOUT LIMITATION, AMWAY SHALL NOT
BE LIABLE FOR PERSONAL INJURY OR DEATH, PROPERTY DAMAGE, LOST PROFITS,
OR OTHER ECONOMIC INJURY, NOR UPON ANY CLAIM BASED ON ALLEGED
NEGLIGENT DESIGN OR MANUFACTURE OF ANY GOODS, OR THE OMISSION OF
ANY WARNING WITH RESPECT THERETO. Some states or provinces do not allow the
exclusion or limitation of incidental or consequential damages, so the above limitation
may not apply to you.
This Limited Warranty is applicable in the United States and Canada.
SATISFACTION GUARANTEE
We stand behind the quality of our products and guarantee your satisfaction.
If for any reason you are not completely satisfied with your purchase, you may return
it within 120 days of purchase for an exchange or refund of the product price and
applicable tax.
®
/trademark licensed by Alticor Inc., © 2010, Alticor
Dist. by/par Amway Corp., Ada, MI 49355 USA/É.-U.
1035793
1035793_eng.indd 14 6/10/14 4:42 PM
/