ShelterLogic 97053 Operating instructions
- Category
- Cookers
- Type
- Operating instructions
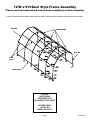
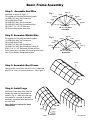
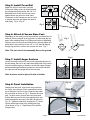
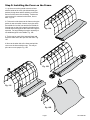
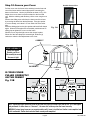
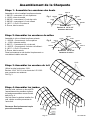
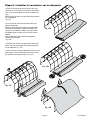
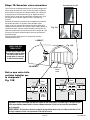
ShelterLogic 97053 is a 12' x 20' x 9' Barn Style Shelter that is designed to provide storage and protection from sun, rain, snow, and other elements. It is made of a durable galvanized steel frame and a polyethylene fabric cover that is UV-resistant and water-repellent. The shelter is easy to assemble and can be anchored to the ground using the included auger anchors. It is also equipped with a zippered door for easy access.
Here are some of the capabilities of the ShelterLogic 97053:
- Storage: The shelter can be used to store a variety of items, such as vehicles, equipment, tools, and supplies.


-
 1
1
-
 2
2
-
 3
3
-
 4
4
-
 5
5
-
 6
6
-
 7
7
-
 8
8
-
 9
9
-
 10
10
-
 11
11
-
 12
12
-
 13
13
-
 14
14
-
 15
15
-
 16
16


ShelterLogic 97053 Operating instructions
- Category
- Cookers
- Type
- Operating instructions
ShelterLogic 97053 is a 12' x 20' x 9' Barn Style Shelter that is designed to provide storage and protection from sun, rain, snow, and other elements. It is made of a durable galvanized steel frame and a polyethylene fabric cover that is UV-resistant and water-repellent. The shelter is easy to assemble and can be anchored to the ground using the included auger anchors. It is also equipped with a zippered door for easy access.
Here are some of the capabilities of the ShelterLogic 97053:
- Storage: The shelter can be used to store a variety of items, such as vehicles, equipment, tools, and supplies.
Ask a question and I''ll find the answer in the document
Finding information in a document is now easier with AI
in other languages
- français: ShelterLogic 97053 Mode d'emploi
Related papers
-
ShelterLogic 90253.0 User manual
-
 ShelterLogic 76804.0 User manual
-
ShelterLogic 70652 User manual
-
 ShelterLogic 97053 User manual
-
 ShelterLogic 62780 User manual
-
 ShelterLogic 95333 User manual
-
 ShelterLogic 51351 User manual
-
 ShelterLogic 62693 User manual
-
 ShelterLogic 51451.0 Operating instructions
-


Other documents
-
 Colonial Elegance RDSHK-37 User manual
-
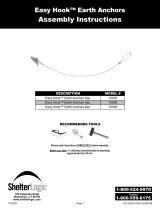 Rowlinson 4 Piece Easy Hook Earth Anchor Kit Assembly Instructions
-
 E-Z UP 159457 Operating instructions
-
Sojag 135-8163957 Installation guide
-
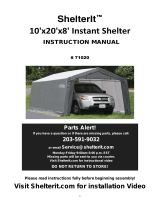
 ShelterIT 71220 User manual
-
Unbranded 0287700270 Operating instructions
-
 ShelterIT 71020 User manual
-
 ShelterIT 71010 User manual
-
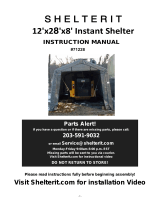 ShelterIT 71228 User manual
-
Kmart 42919438 User manual


