4-155-113-11(1)
Operating Instructions
Mode d’emploi
Manual de instrucciones
MPK-WEB
© 2009 Sony Corporation Printed in Japan
Drip-proof packing
Garniture pare-gouttes
3
1 2
1
2
1
2
O-ring and drip-proof packing serviceable life
O-ring
e serviceable life of the O-ring varies with frequency of use of this unit and
conditions. Generally, it is about one year.
Drip-proof packing
Replace the drip-proof packing with a new one if you nd scratches or cracks on it.
Aer replacing, check that no water leaks in.
Grease
Use the grease in the blue tube (supplied). Using the grease in the yellow tube or
other manufacturer’s grease will damage the O-ring, and cause water leaks.
O-ring, drip-proof packing and grease
You can obtain the O-ring, drip-proof packing and grease at the nearest Sony dealer.
O-ring (model No. 3-080-065-0 )
Drip-proof packing (model No. 3-080-066-0 )
Grease (model No. 3-071-370-0 )
Maintenance
Aer recording in a location with a sea breeze, wash this unit thoroughly in fresh
water with the buckles fastened to remove salt and sand, then wipe with a so dry
cloth. It is recommended that you submerge this unit in fresh water for about 30
minutes. If it is le with salt on it, metal portions may be damaged or rust may
form and cause water leakage.
If sun oil is on this unit, be sure to wash it o thoroughly using lukewarm water.
Wipe the inside of this unit with a so dry cloth. Do not wash it with water.
Be sure to perform the above maintenance each time you use this unit. Do not use
any type of solvent such as alcohol, benzine or thinner for cleaning, as this might
damage the surface nish of this unit.
When storing this unit
Attach the spacer supplied with this unit to prevent wear of the O-ring. (See
illustration )
Prevent dust from collecting on the O-ring.
Lightly coat the O-ring with grease and insert it into the seating groove, then store
this unit in a cool, well-ventilated location. Do not fasten the buckle.
Avoid storing this unit in a cold, very hot or humid place, or together with
naphthalene or camphor, as these conditions might damage this unit.
Preparation
Replacing the attachment
e following procedures are explained using DSC-WX1/W230.
Do not use excessive force when replacing the attachment.
* If you are using the DSC-WX1, the following steps are not required because
the attachment C for the DSC-WX1 is already attached to this unit at
purchase.
Always use the correct attachment for your camera. Using the wrong attachment
may damage the camera or allow water to leak into this unit.
1 Open this unit. (-1)
Press the top and bottom OPEN buttons together and release the buckle in
the direction of the arrow to open this unit body.
Notes
Take care not to lose the spacer as you will need it to store this unit.
2 Replace the attachments.
Detach the DSC-WX1 front attachment C and rear attachment C-1
(-2)
Grasp the front attachment C by the parts marked in the illustration and li
it straight out.
Press lightly with your nger inside wall of the rear attachment C-1 and li it
straight out.
Use the front attachment and rear attachment that are made for your
camera (-2).
e illustration shows the DSC-W230 front attachment B and rear attachment
B-1.
Firmly press the points marked in the illustration.
Aer replacing the attachment, press this unit buttons several times to check
their operation.
* Aer you remove the attachment from this unit and store it, it should not be
straightened before you store it. It can be damaged if stored while it is deformed.
Preparing the O-ring and drip-proof packing
1 Remove the O-ring.
2 C
oat the O-ring with grease.
Clean o any sand or dirt on the O-ring, in the seating groove, or on this unit’s
body where it touches the O-ring. Coat the O-ring with a light, even layer of
grease.
3 Attach the O-ring to this unit.
4 C
heck the drip-proof packing for any sand or dirt.
Notes
Do not remove or apply grease to the drip-proof packing.
is unit’s body may be scratched or water may leak if the cover is closed with
sand or dirt on the O-ring or drip-proof packing.
Be sure to read the separate O-ring Maintenance Manual.
Important details regarding handling of the O-ring are described in this
manual.
Preparing the digital still camera
Install the camera in this unit in a room with low-humidity or a similar
environment. Opening or closing this unit in hot or humid locations may
result in fogging of the front glass.
Refer to the operating instructions supplied with the camera.
1 Remove the strap from the camera.
2 I
nsert the battery pack and “Memory Stick Duo” media.
Be sure to use a fully charged battery pack.
Be sure that “Memory Stick Duo” media has enough space to record images.
3 Press the ON/OFF (Power) button to turn on the camera.
4 S
elect REC Mode. (-4)
To record digital images, select (Scene Selection) by the Mode dial.
To record movies, select (Movie Mode) by the Mode dial.
5 Select Mode in REC Mode.
To record digital images under water, select (Underwater) on the LCD
screen.
To record movies under water, press the MENU button to display the mode
selection screen and select (Underwater) on the LCD screen. (DSC-WX1/
W290/W275/W270 only)
6 Set the AF Illuminator to [O].
e AF Illuminator cannot be used with this unit.
7 Check the lens and LCD screen for any dirt.
Notes
To set the [Burst/Bracket] mode on the DSC-WX1, press (Burst/Bracket)
button before installing the camera in this unit. You cannot change the [Burst/
Bracket] setting by pressing (Burst/Bracket) button aer installing the camera
in this unit.
Underwater movie recording is available in DSC-WX1/W290/W275/W270 only.
DSC-W230/W220/W215/W210 do not have that function.
Installing the digital still camera in the marine pack
Always be sure to turn o the power when installing or removing the
camera. The lens may be damaged if the power is on.
1 Press the ON/OFF (Power) button to turn o the camera.
2 I
nstall the camera in this unit. (-2)
Check that the camera is placed correctly.
3 Close this unit’s body and fasten the buckle. (-3)
Secure this unit body, and fasten the buckles until the top and bottom latches
catch.
Notes
When closing this unit’s body, make sure that there is no debris, sand, hair or any
other foreign matter on the O-ring or in the seating groove. Water leakage may
result if any foreign matter is caught in these places.
Buckle position when closing this unit’s body
Good example (-3)
Bad example (-3)
If you close the buckle as shown in -3, the buckle will be caught,
making it impossible to lock this unit.
Attaching the accessories
Attaching the hand strap
We recommend attaching the hand strap (supplied) before using this unit. (-)
Attaching the diuser
We recommend attaching the diuser when you record using ash.
Align the diuser with the front protector and press it rmly as illustrated. (-)
Attaching and detaching the LCD hood
How to attach (-)
1 Attach the supplied strap of the LCD hood to this unit.
2 A
lign the LCD hood with the attachment guide and press it
rmly as illustrated.
How to detach (-)
Spread the LCD hood and detach it from the guide.
Notes
Be careful not to pinch the hand strap or the accessory strap when you close this
unit body. A water leak may develop if they are caught in the body.
Using the Marine Pack
Recording
1 Turn on the power. (-1)
2
Press the shutter lever/shutter button to record images. (-2)
Using/Setting various functions
You can use the various functions of the camera installed in this unit.
For DSC-WX1 users
e DSC-WX1 focuses automatically without switching to Macro mode.
Selecting the mode
Select the REC Mode using the Mode dial on this unit.
To record still images all REC Mode except for (Movie Mode)
To record movies (Movie Mode)
* While you are recording movies, audio cannot be recorded correctly.
When you set REC mode to (Scene Selection) or (Movie Mode), you
can select submode in that mode.
For DSC- WX1 users
Press the MENU button on this unit and select the desired mode with (Smile)
or (Flash) button.
For DSC-W290/W275/W270/W230/W220/W215/W210 users
Press the MENU button on this unit and select the desired mode with
(Macro) or (Flash) button.
* We recommend that you use (Underwater) in the scene selection mode for
underwater still image recording, or (Underwater) in the movie recording
mode for underwater movie recording (DSC-WX1/W290/W275/W270 only).
Notes
Underwater movie recording is available in DSC-WX1/W290/W275/W270 only.
DSC-W230/W220/W215/W210 do not have that function.
Selecting the underwater white balance
Adjusts the color tone in (Underwater) mode under (Scene Selection) or in
(Underwater) mode under (Movie Mode).
(Auto)
e camera automatically adjusts color tones underwater so
they appear natural.
(Underwater 1)
Adjusts for underwater conditions where blue is strong.
(Underwater 2)
Adjusts for underwater conditions where green is strong.
(Flash) Adjusts for use of ash underwater.
(One Push)*
Adjusts the white balance depending on the light source.
(One Push Set)*
Memorizes the basic white color which will be used in [One
Push] mode.
* Only available with the DSC-WX1.
Notes
For DSC-WX1 users
(Flash) in [Underwater White Balance] is not available.
When ash is [On] the underwater white balance can only be adjusted to
[Auto], [One Push], or [One Push Set].
For DSC-W290/W275/W270 users
(Flash) in [Underwater White Balance] is not available.
[Underwater White Balance] is not available when the ash is set to [Flash
On].
For DSC-W230/W220/W215/W210 users
If you use the ash while the underwater white balance is set to other than
(Flash), [Underwater White Balance] is automatically set to (Auto).
* For setting details, refer to the operating instructions supplied with the camera.
Using the zoom (W/T) button (See illustration )
Press on the W side for wide-angle. (Subject appears farther away.)
Press on the T side for telephoto. (Subject appears closer.)
Notes on recording
If you do not record any images for a certain time, the camera turns o
automatically to prevent the battery pack from running out. To use the camera
again, turn on the power again. For details, refer to the operating instructions
supplied with the camera.
If you use the ash when this unit is attached, the shooting distance may shorten
depending on the situation.
If you use the ash underwater, the ash light may be reected by particles in the
water and appear in the image as circles of light.
Reected glare may occur depending on the shooting condition. If this happens,
change the condition.
You cannot operate the following buttons with this unit.
(Burst/Bracket) button on the DSC-WX1
You can use [Burst/Bracket] if you set the desired mode before installing
the camera in this unit. You cannot change the [Burst/Bracket] setting aer
installing the camera in this unit.
(Smile) button on the DSC-W290/W275/W270
Playing back
You can play back images on the LCD screen using the operation button. You
cannot hear the sound.
1 Turn on the power. (-1)
2 P
ress (Playback) button. (-2)
3 S
elect the desired image. (-3)
-3 To previous image
-3 To next image
For details, refer to the operating instructions supplied with the camera.
Removing the digital still camera
1 Turn o the power. (-1)
Be sure to turn o the power whenever installing or removing the
camera. The lens may be damaged if the power is on.
2 Press the top and bottom OPEN buttons together and release the
buckle in the direction of the arrow to open this unit body. (-2)
3 Remo
ve the camera from this unit.
When the camera has been used for a long time, the camera heats up. Turn o
the power and leave for a while to cool down before removing the camera from
this unit.
Be careful not to drop the camera when removing it.
4 Cancel (Underwater) or (Underwater).
5 Set the AF Illuminator to [Auto].
Notes
Before opening this unit, rinse it with tap water or fresh water and then wipe the
water o with a so cloth. When opening it, be careful not to let any water from
your body, hair or wetsuit cus drip onto the camera.
Before making a dive
Before recording images underwater, rst take this unit to a depth of about 1 m
(3.3 feet) and check that it operates properly and that there are no leaks, then
commence your dive.
Install the camera in this unit before diving, and avoid opening and closing this
unit while on board boats or at the seashore as much as possible. When installing
the camera, do it in a place that has as low a humidity as possible.
Before using this unit, make sure that no debris has been caught between the front
and back halves of this unit’s body.
Before using this unit, always check the number of recordable images and
remaining battery life.
Times that are suited for recording
e most suitable time for recording images is between 10:00 AM and 2:00 PM,
when the sun is directly overhead.
Troubleshooting
Symptom Cause/Corrective Actions
ere are drops of water
inside this unit.
ere are scratches or cracks on the O-ring.
Replace the O-ring with a new one.
e O-ring is not set correctly.
Place the O-ring evenly in the groove.
e buckle is not fastened.
Fasten the buckle until it clicks.
e recording function
does not work.
e battery pack has run out.
Charge the battery pack fully.
e “Memory Stick Duo” media is full.
Insert another “Memory Stick Duo” media or
erase unneeded data from the “Memory Stick
Duo” media.
e write-protect tab on the “Memory Stick Duo”
media is set to LOCK.
Set the tab to the recording position or insert a
new “Memory Stick Duo” media.
e camera heats up.
Leave the camera in the cool place for a while to
cool down.
e playback image is not
displayed in the color you
expected. (When recording
underwater)
e camera may not be set to
(Underwater) or (Underwater).
Check that the camera is set to
(Underwater) or (Underwater).
e underwater white balance may not be set
correctly.
Check the underwater white balance setting of the
camera.
Specications
Material
Plastic (PC, ABS), glass
Water-resistance
O-ring, buckle
Pressure-resistance
To a depth of up to 40 m (132 feet) underwater
Switches that can be externally operated
ON/OFF (Power), Shutter, Zoom (W/T), Mode, Control, MENU, Delete, HOME
(DSC-W230/W220/W215/W210 only), Playback
Dimensions
Approx. 148 × 112 × 89 mm (5 7/8 × 4 1/2 × 3 5/8 in.) (w/h/d)
(excluding the projecting parts)
Mass
Approx. 480 g (1 lb 1 oz.) (marine pack only)
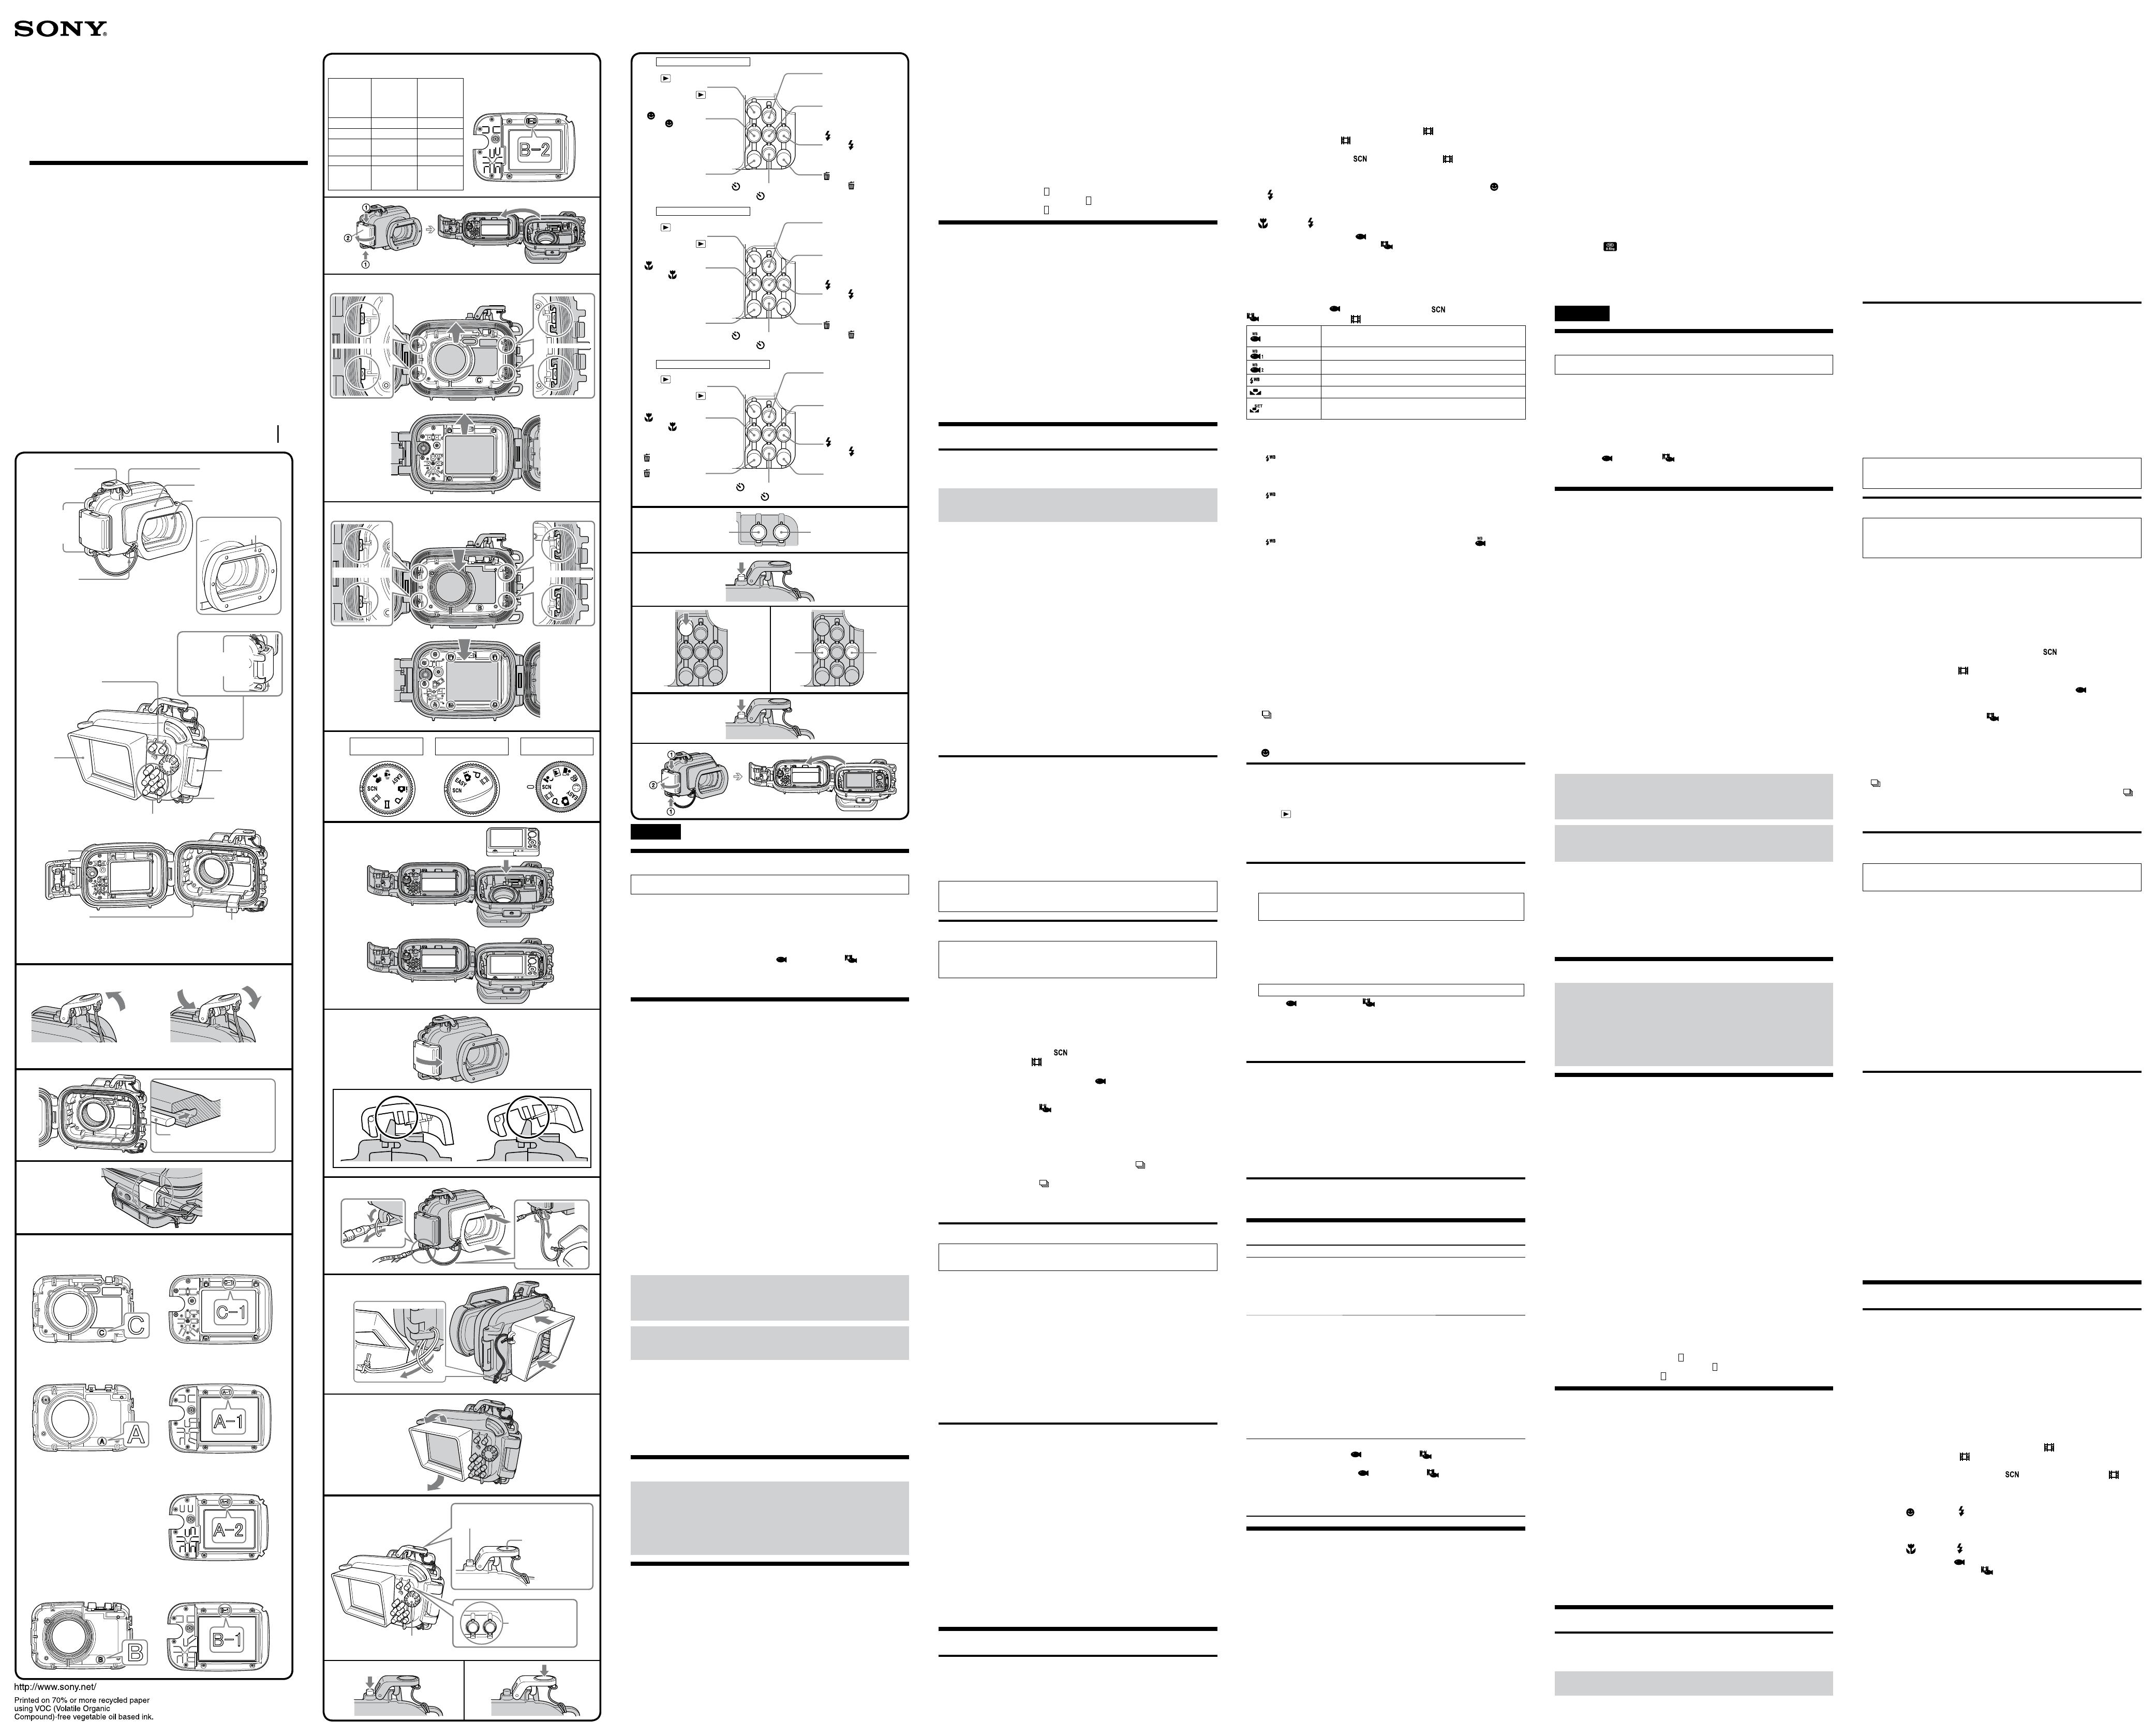
Spacer (remove to use this unit)
Entretoise (la retirer avant d’utiliser ce boîtier)
Drip-proof packing
Garniture pare-gouttes
O-ring
Joint torique
2
Shutter lever
(Shutter button)
Manette du déclencheur
(Déclencheur)
Front protector
Protection avant
Tripod receptacle
When using a tripod, use a tripod with 5.5 mm
or shorter screws. is unit cannot be rmly
fastened on a tripod with long screws. Doing so
might damage this unit.
Filetage pour pied photo
Si vous utilisez un pied photo, sa vis ne doit pas
dépasser 5,5 mm. Ce boîtier ne pourra pas être
xé stablement si la vis du pied photo est plus
longue. De plus le boîtier peut être endommagé.
ON/OFF button
Touche ON/OFF
Hook for hand
strap
Crochet pour la
dragonne
Front glass
Vitre avant
Diuser
Diuseur
Buckle
Boucle
OPEN button
Touche OPEN
LCD hood
Pare-soleil de
l’écran LCD
Zoom (W/T) buttons
Touches de zoom (W/T)
Mode dial
Sélecteur de
mode
Operation buttons
Touches d’exploitation
Front attachment A (1)
(For DSC-W290/W275/W270)
Fixation avant A (1)
(Pour les DSC-W290/W275/W270)
3
Detaching the shutter lever
Retrait de la manette du déclencheur
e shutter lever is removable.
La manette du déclencheur peut être retirée.
Attaching the shutter lever
Fixation de la manette du déclencheur
1
2-
Rear attachment A-1 (1)
(For DSC-W290)
Fixation arrière A-1 (1)
(Pour le DSC-W290)
Front attachment B (1)
(For DSC-W230/W220/W215/W210)
Fixation avant B (1)
(Pour les DSC-W230/W220/W215/W210)
Rear attachment B-1 (1)
(For DSC-W230)
Fixation arrière B-1 (1)
(Pour le DSC-W230)
4
Waterproof Case
Marine pack
Boîtier étanche
Caisson étanche
button
Touche
(Flash) button
Touche
(Flash)
MENU button
Touche MENU
(Macro) button
Touche
(Macro)
(Self-timer) button
Touche
(Retardateur)
(Playback)
button
Touche
(Lecture)
DISP (Display) button
Touche DISP (Achage)
(Delete) button
Touche
(Suppression)
English
Main Feature
Useable at a depth of up to 40 m (132 feet) underwater.
Marine Pack MPK-WEB (referred to below as “this unit”) is exclusively for use
with the Sony Digital Still Camera (referred to below as “camera”) DSC-WX1/
W290/W275/W270/W230/W220/W215/W210. (Not all cameras are available in
all countries or regions.)
is unit is waterproof so the camera can be used in the rain, snow, at the beach,
or underwater.
Using this unit with the camera setting to
(Underwater) or (Underwater)
will enable you to record beautiful underwater images. (Underwater movie
recording is available in DSC-WX1/W290/W275/W270 only. DSC-W230/W220/
W215/W210 do not have that function.)
Precautions
When using this unit while diving, be sure to pay attention to the surrounding
situation. Lack of attention may cause an accident while diving.
In case a water leakage is occurred, be sure to pay attention to the surrounding
situation and surface following the safety rules for diving.
Do not subject the front glass to strong shock, as it may crack.
Avoid opening this unit at the beach or on the water. Preparation such as
installing the camera and changing the “Memory Stick Duo” media should be
done in a place with low humidity and no salty air.
Do not throw this unit into the water.
Avoid using this unit in places with strong waves.
Avoid using this unit under the following situations:
in a very hot or humid place.
in water hotter than 40˚C (104˚F).
at temperatures lower than 0˚C (32˚F).
In these situations moisture condensation or water leakage may occur and damage
this unit.
Use this unit for no longer than 30 minutes at a time in temperatures above 35˚C
(95˚F).
Do not leave this unit under direct sunlight in a very hot and humid place for a
long period of time. If you cannot avoid leaving this unit under direct sunlight, be
sure to cover this unit with a towel or other protection.
e camera heats up if it is used inside this unit for a long time. Before removing
the camera from this unit, leave this unit in the shade or other cool place for a
while to cool down.
When the camera overheats, it may automatically turn o or recording may
malfunction. To use the camera again, leave it in the cool place for a while to cool
down.
A loose or nipped O-ring, sand or dirt on the O-ring may cause water leaks
under water.
Be sure to check the O-ring before use.
For details, read the O-ring Maintenance Manual.
If sun oil is on this unit, be sure to wash it o thoroughly using lukewarm
water. If this unit is le with sun oil on its body, the surface of this unit may
become discolored or damaged (such as cracks on the surface).
Water leakage
If water happens to leak in, stop exposing this unit to water immediately.
If the camera gets wet, take it to the nearest Sony dealer immediately. Repair costs
must be borne by the customer.
Anti-fogging eect
Although the front glass of this unit has been treated for anti-fogging, be sure
to install the camera in this unit in a room with low-humidity room or a similar
environment.
Before use
Before using the camera underwater, rst take this unit to a depth of about
1 m (3.3 feet) and check that the camera is operating properly and that this
unit is not leaking, then commence your dive.
In the unlikely event that a malfunction of this unit causes damage due to
water leakage, Sony does not guarantee against damages to the equipment
contained in it (camera, battery pack, etc.) and the recorded contents, nor
expenses entailed in the photography.
O-ring and Drip-proof packing
O-ring
is unit uses an O-ring to maintain its water resistance. For details, refer to the
separate O-ring Maintenance Manual.
Improper handling of the O-ring can result in water leakage.
Drip-proof packing
Do not remove or apply grease to the drip-proof packing. If the packing rises up or
is nipped, this may result in water leaks.
If the drip-proof packing comes o, ret it carefully so that it is not twisted.
(See illustration )
Rear attachment A-2 (1)
(For DSC-W275/W270)
Fixation arrière A-2 (1)
(Pour les DSC-W275/W270)
Rear attachment B-2 (1)
(For DSC-W220/W215/W210)
Fixation arrière B-2 (1)
(Pour les DSC-W220/W215/W210)
DSC-W290/W275/
W270
DSC-W230/W220/
W215/W210
DSC-W290/W275/W270
DSC-W230/W220/W215/W210
MENU button/
(Delete) button
Touche MENU/
(Suppression)
(Macro) button
Touche
(Macro)
(Playback)
button
Touche
(Lecture)
(Self-timer) button
Touche
(Retardateur)
HOME button
Touche HOME
(Flash) button
Touche
(Flash)
button
Touche
DISP (Display) button
Touche DISP (Achage)
Digital still
camera/
Appareil
photo
numérique
Front
attachment/
Fixation
avant
Rear
attachment/
Fixation
arrière
DSC-WX1 C C-1
DSC-W290 A A-1
DSC-W275/
W270
A A-2
DSC-W230 B B-1
DSC-W220/
W215/
W210
B B-2
Front attachment C (1)
(For DSC-WX1)
Fixation avant C (1)
(Pour les DSC-WX1)
Rear attachment C-1 (1)
(For DSC-WX1)
Fixation arriere C-1 (1)
(Pour le DSC-WX1)
DSC-WX1
button
Touche
(Flash) button
Touche
(Flash)
MENU button
Touche MENU
(Smile) button
Touche
(Sourire)
(Self-timer) button
Touche
(Retardateur)
(Playback)
button
Touche
(Lecture)
DISP (Display) button
Touche DISP (Achage)
(Delete) button
Touche
(Suppression)
DSC-WX1
Mode dial
Sélecteur de mode
Shutter lever
(Shutter button)
Manette du
déclencheur
(Déclencheur)
ON/OFF button
Touche ON/OFF
Zoom button
Touche de zoom
Included items
Waterproof case (1)
Hand strap (1)
LCD hood (1)
Diuser (1)
Front attachment C (1)*
Rear attachment C-1 (1)*
*Attached to the waterproof case at purchase.
Front attachment A (1)
Rear attachment A-1 (1)
Rear attachment A-2 (1)
Front attachment B (1)
Rear attachment B-1 (1)
Rear attachment B-2 (1)
Grease (1)
O-ring (1)
Spacer (1)
Set of printed documentation
Optional accessories
O-ring kit ACC-MP105
(Check for on the package at the time of purchase.)
is unit allows the attachment of SEA&SEA SUNPAK CO., Ltd. underwater
accessories. For details of those accessories, refer to the following website.
http://www.seaandsea.co.jp/products/accessory/mpk/index.html
Design and specications are subject to change without notice.
Français
Caractéristiques principales
Utilisable sous l’eau jusqu’à une profondeur de 40 mètres (132 pieds).
Le caisson étanche MPK-WEB (appelé ci-dessous « ce boîtier ») est destiné
à être utilisé exclusivement avec les appareils photo numériques Sony (appelés
ci-dessous « l’appareil photo ») DSC-WX1/ W290/W275/W270/W230/W220/
W215/W210. (Tous ces appareils photos numériques ne sont pas disponibles dans
tous les pays ou toutes les régions.)
Ce boîtier étanche permet d’utiliser l’appareil photo sous la pluie ou la neige, sur la
plage ou sous l’eau.
Vous pourrez faire des prises de vue magniques sous l’eau si vous utilisez ce
boîtier avec
(Sous l’eau) or (Sous l’eau). (Vous pouvez lmer sous l’eau
seulement avec les DSC-WX1/W290/W275/W270. Les DSC-W230/W220/W215/
W210 ne possèdent pas cette fonction.)
Précautions
Si vous utilisez ce boîtier pendant la plongée, faites attention à votre
environnement. Un manque d’attention peut causer un accident pendant la
plongée.
Si de l’eau devait pénétrer dans ce boîtier, faites attention à votre environnement et
remontez à la surface en respectant les règles de sécurité propres à la plongée.
Ne soumettez pas la vitre avant à des chocs trop forts, car elle pourrait se briser.
Evitez d’ouvrir ce boîtier sur la plage ou sur l’eau. Les préparatifs, tels que la mise
en place de l’appareil photo et le remplacement du « Memory Stick Duo » doivent
être eectués à l’abri de l’humidité et de l’air salin.
Ne pas jeter ce boîtier dans l’eau.
Evitez d’utiliser ce boîtier aux endroits exposés à de fortes vagues.
Evitez d’utiliser ce boîtier dans les situations suivantes :
à un endroit très chaud ou humide ;
dans une eau à plus de 40˚C (104 ˚F) ;
à des températures inférieures à 0˚C (32 ˚F).
Dans de telles situations, ce boîtier peut être endommagé par la condensation
d’humidité ou les inltrations d’eau.
Ne pas utiliser ce boîtier pendant plus de 30 minutes à une température
supérieure à 35˚C (95 ˚F).
Ne pas laisser ce boîtier en plein soleil à un endroit très chaud et humide pendant
longtemps. Si ce boîtier doit rester longtemps exposé au soleil, veillez à le
recouvrir d’une serviette ou d’un tissu quelconque.
L’appareil photo devient chaud s’il est utilisé pendant un certain temps avec ce
boîtier. Avant de retirer l’appareil photo de ce boîtier, laissez ce boîtier un moment
à l’ombre ou à un endroit frais pour qu’il refroidisse.
Lorsque l’appareil photo est trop chaud, il peut s’éteindre ou l’enregistrement peut
ne pas s’eectuer normalement. Laissez l’appareil photo un moment à un endroit
frais avant de le réutiliser.
Une inltration d’eau dans ce boîtier peut être due à un joint torique détendu
ou coupé, à des grains de sable ou à de la poussière sur le joint torique.
Veillez à bien vérier le joint torique avant d’utiliser ce boîtier.
Pour de plus amples informations, reportez-vous à la notice du joint torique.
Si de l’huile solaire devait tomber sur ce boîtier, prenez soin de l’enlever avec de
l’eau tiède. Si vous laissez ce boîtier avec des taches d’huile au soleil, sa surface
risque de se décolorer ou d’être endommagée (elle peut se craqueler).
Inltration d’eau
Si de l’eau devait pénétrer dans ce boîtier, retirez-le immédiatement de l’eau.
Si l’appareil photo devait être mouillé, portez-le immédiatement au revendeur Sony
le plus proche. Les frais de réparation seront à la charge du client.
Eet anti-buée
Bien que la vitre avant de ce boîtier ait été traitée pour prévenir la formation de
buée, veillez à installer l’appareil photo dans ce boîtier dans une pièce non humide
ou à un endroit similaire.
Avis
Avant d’utiliser l’appareil photo sous l’eau et avant la plongée, mettez ce
boîtier dans l’eau à une profondeur de 1 m (3,3 pieds) et assurez-vous d’une
part que l’appareil photo fonctionne correctement et d’autre part que ce
boîtier est bien étanche.
Si une défectuosité du boîtier devait provoquer des dégâts à la suite d’une
inltration d’eau, Sony ne garantira pas les dégâts causés à l’appareil qu’il
contient (appareil photo numérique, batterie, etc.) ni le contenu de la prise
de vue ou les frais liés à la prise de vue.
Joint torique et garniture pare-gouttes
Joint torique
L’étanchéité de ce boîtier est garantie par un joint torique. Pour de plus amples
informations, reportez-vous à la notice séparée du joint torique.
Une inltration d’eau peut être due à une mauvaise manipulation du joint torique.
Garniture pare-gouttes
N’enlevez pas et n’appliquez pas de graisse sur la garniture pare-gouttes. Si la
garniture ressort ou est abîmée, de l’eau risque de pénétrer dans le boîtier.
Si la garniture pare-gouttes se détache, remettez-la délicatement dans la rainure sans
la tordre. (Voir l’illustration )
Durée de vie du joint torique et de la garniture pare-gouttes
Joint torique
La durée de vie du joint torique varie selon la fréquence et les conditions
d’utilisation de ce boîtier. Le joint torique dure environ un an.
Garniture pare-gouttes
Remplacez la garniture pare-gouttes par une neuve si elle est rayée ou craquelée.
Une fois le remplacement eectué, assurez-vous que le boîtier est étanche.
Graisse
Utilisez la graisse du tube bleu (fourni). L’emploi de la graisse du tube jaune ou
de la graisse d’une autre marque peut endommager le joint torique et causer des
inltrations d’eau.
Joint torique, garniture pare-gouttes et graisse
Vous pouvez vous procurer un joint torique, une garniture pare-gouttes et de la
graisse auprès du revendeur Sony le plus proche.
Joint torique (référence : 3-080-065-0 )
Garniture pare-gouttes (référence : 3-080-066-0 )
Graisse (référence : 3-071-370-0 )
Entretien
Après une prise de vue à un endroit exposé à la brise marine, lavez soigneusement
ce boîtier à l’eau douce, en laissant la boucle bien fermée, pour enlever le sel et
le sable, puis essuyez-le avec un chion doux et sec. Il est conseillé de laisser ce
boîtier dans de l’eau douce pendant 30 minutes environ. Si le caisson n’est pas bien
nettoyé, le sel restant peut attaquer les deux parties métalliques et causer de la
corrosion, et par la suite une inltration d’eau.
Si de l’huile solaire devait tomber sur ce boîtier, prenez soin de l’enlever avec de
l’eau tiède.
Essuyez l’intérieur de ce boîtier avec un chion doux et sec. Ne le lavez pas à l’eau.
Eectuez toutes les opérations mentionnées ci-dessus chaque fois que vous utilisez
ce boîtier. N’utilisez pas de solvant, comme de l’alcool, de la benzine ou du diluant
pour le nettoyage, car ces substances peuvent attaquer la nition de ce boîtier.
Avant de ranger ce boîtier
Fixez l’entretoise fournie avec ce boîtier pour que le joint torique ne s’use pas.
(Voir l’illustration )
Eviter d’exposer le joint torique à la poussière.
Recouvrez légèrement le joint torique de graisse et insérez-le dans la rainure, puis
rangez ce boîtier à un endroit frais et bien aéré. Ne fermez pas la boucle.
Evitez de ranger ce boîtier à un endroit froid, très chaud ou humide, ou à
proximité de naphtaline ou de camphre. Cela pourrait l’endommager.
Préparatifs
Remplacement de la xation
Les opérations suivantes concernent les DSC-WX1/W230.
Ne forcez pas lorsque vous remplacez la xation.
* Si vous utilisez le DSC-WX1, les points suivants sont inutiles parce que la
xation C pour le DSC-WX1 a été rattachée à ce boîtier en usine.
Utilisez toujours la xation adaptée à votre appareil photo. Si vous ne le faites pas,
l’appareil photo risque d’être endommagé ou de l’eau risque de s’inltrer dans ce
boîtier.
1 Ouvrez ce boîtier. (-1)
Appuyez en même temps sur les touches OPEN du haut et du bas et ouvrez la
boucle dans le sens de la èche pour ouvrir les deux parties du boîtier.
Remarques
Faites attention de ne pas perdre l’entretoise car vous devrez la remettre dans ce
boîtier avant de le ranger.
2 Remplacez les xations.
Détachez la xation avant C et la xation arrière C-1 du DSC-WX1
(-2)
Saisissez la xation avant C aux endroits indiqués par sur l’illustration et
tirez-la tout droit.
Appuyez légèrement avec le doigt à l’intérieur de la xation arrière C-1 et
tirez-la tout droit.
Utilisez la xation avant et la xation arrière prévues pour votre
appareil photo (-2).
Les illustrations montrent la xation avant B et la xation arrière B-1 du DSC-
W230.
Appuyez fermement aux endroits indiqués par sur l’illustration.
Après avoir remplacé la xation, appuyez plusieurs fois sur les touches de ce
boîtier pour vous assurer qu’elles fonctionnent.
* Ne redressez pas la xation de ce boîtier après l’avoir retirée et avant de la ranger.
Elle peut être endommagée si elle est déformée lorsque vous la rangez.
Préparation du joint torique et de la garniture pare-
gouttes
1 Retirez le joint torique.
2 M
ettez de la graisse sur le joint torique.
Enlevez le sable ou la saleté présente sur le joint torique, dans la rainure du
joint ou sur les deux parties du boîtier touchant le joint torique. Revêtez
uniformément le joint torique d’une ne couche de graisse.
3 Insérez le joint torique dans ce boîtier.
4 A
ssurez-vous qu’il n’y a pas de sable ou saleté sur la garniture pare-
gouttes.
Remarques
N’enlevez pas et n’appliquez pas de graisse sur la garniture pare-gouttes.
Les deux parties de ce boîtier peuvent être rayées ou de l’eau peut s’inltrer s’il y
a du sable ou de la saleté sur le joint torique ou la garniture pare-gouttes lorsque
vous fermez le couvercle.
Veillez à lire la notice séparée du joint torique.
Vous trouverez dans cette notice des détails importants sur le joint
torique.
Préparation de l’appareil photo numérique
Mettez l’appareil photo dans ce boîtier dans une pièce non humide ou
dans un lieu similaire.
La vitre avant se couvrira de buée si vous ouvrez ou fermez ce boîtier
dans un lieu chaud ou humide.
Reportez-vous au mode d’emploi fourni avec l’appareil photo.
1 Détachez la dragonne de l’appareil photo.
2 I
nsérez la batterie et un « Memory Stick Duo ».
La batterie doit être pleine.
Le « Memory Stick Duo » doit disposer de susamment d’espace pour les photos
ou le lm que vous voulez prendre.
3 Appuyez sur la touche ON/OFF (Alimentation) pour mettre l’appareil
photo sous tension.
4 S
électionnez le mode REC. (-4)
Pour prendre des photos numériques, sélectionnez (Sélection scène) avec le
sélecteur de mode.
Pour lmer, sélectionnez (Mode lm) avec le sélecteur de mode.
5 Sélectionnez le mode REC.
Pour prendre des photos numériques sous l’eau, sélectionnez (Sous l’eau) sur
l’écran LCD.
Pour lmer sous l’eau, appuyez sur la touche MENU pour acher la page de
sélection de mode et sélectionnez (Sous l’eau) sur l’écran LCD. (DSC-WX1/
W290/W275/W270 seulement)
6 Réglez l’illuminateur AF sur [Désact].
L’illuminateur AF ne peut pas être utilisé avec ce boîtier.
7 Vériez si l’objectif et l’écran LCD sont propres.
Remarques
Pour choisir le mode [Rafale/Bracketing] sur le DSC-WX1, appuyez sur la touche
(Rafale/Bracketing) avant d’installer l’appareil photo dans ce boîtier. Vous ne
pouvez pas changer le réglage [Rafale/Bracketing] en appuyant sur la touche
(Rafale/Bracketing) après avoir installé l’appareil photo dans ce boîtier.
Vous pouvez lmer sous l’eau seulement avec les DSC-WX1/W290/W275/W270.
Les DSC-W230/W220/W215/W210 ne possèdent pas cette fonction.
Mise en place de l’appareil photo dans le caisson
étanche
Veillez à mettre l’appareil photo hors tension avant de l’installer ou de le
sortir du boîtier. Sinon l’objectif pourrait être endommagé.
1 Appuyez sur la touche ON/OFF (Alimentation) pour mettre l’appareil
photo hors tension.
2 I
nstallez l’appareil photo dans ce boîtier. (-2)
Assurez-vous que l’appareil photo est bien en place.
3 Fermez les deux parties de ce boîtier et verrouillez la boucle. (-3)
Les taquets du haut et du bas de la boucle doivent être encliquetés pour que ce
boîtier soit bien fermé.
Remarques
Lorsque vous fermez les deux parties de ce boîtier, assurez-vous qu’il n’y a pas de
saleté, sable, cheveux ou d’autres matières sur le joint torique ou dans sa rainure.
Si des matières étrangères sont prises à ces endroits, de l’eau peut pénétrer dans
ce boîtier.
Position de la boucle lors de la fermeture des deux parties de ce
boîtier
Bon (-3)
Mauvais (-3)
Si vous fermez la boucle comme indiqué dans -3, elle se coincera et ce boîtier
ne pourra pas être verrouillé.
Fixation des accessoires
Fixation de la dragonne
Il est conseillé de xer la dragonne (fournie) avant d’utiliser ce boîtier. (-)
Fixation du diuseur
Il est conseillé de xer le diuseur si vous utilisez le ash pour la prise de vue.
Alignez le diuseur sur le protecteur avant et appuyez fermement dessus de la façon
illustrée. (-)
Fixation et retrait du pare-soleil de l’écran LCD
Fixation (-)
1 Fixez la lanière fournie du pare-soleil de l’écran LCD à ce boîtier.
2 A
lignez le pare-soleil de l’écran LCD avec le guide et appuyez
fermement de la façon illustrée.
Retrait (-)
Ecartez le pare-soleil de l’écran LCD et détachez-le du guide.
Remarques
Attention de ne pas coincer la dragonne ou la lanière de l’accessoire lorsque vous
fermez les deux parties de ce boîtier. Sinon le boîtier risque de laisser l’eau s’inltrer.
Utilisation du caisson étanche
Enregistrement
1 Mettez l’appareil photo sous tension. (-1)
2 A
ppuyez sur la manette du déclencheur/le déclencheur pour
prendre des photos. (-2)
Utilisation et réglage des diverses fonctions
Vous pouvez utiliser les diverses fonctions de l’appareil photo quand il est dans ce
boîtier.
Pour les utilisateurs du DSC-WX1
Le DSC-WX1 fait automatiquement la mise au point sans passer au mode Macro.
Sélection du mode
Sélectionnez le mode REC avec le sélecteur de mode de ce boîtier.
Pour prendre des photos Tous les modes REC sauf (Mode lm)
Pour lmer (Mode lm)
* Lorsque vous lmez, le son ne peut pas s’enregistrer correctement.
Lorsque vous réglez le mode REC sur (Sélection scène) ou sur
(Mode Film), vous avez le choix entre diérents modes secondaires.
Pour les utilisateurs du DSC-WX1
Appuyez sur la touche MENU de ce boîtier et sélectionnez le mode souhaité avec
la touche (Sourire) ou (Flash).
Pour les utilisateurs des DSC-W290/W275/W270/W230/W220/W215/
W210
Appuyez sur la touche MENU de ce boîtier et sélectionnez le mode souhaité avec
la touche (Macro) ou (Flash).
* Il est conseillé d’utiliser (Sous l’eau) dans le mode de sélection de scène pour
prendre de photos sous l’eau ou (Sous l’eau) dans le mode d’enregistrement
de lm pour lmer sous l’eau (DSC-WX1/W290/W275/W270 seulement).
Remarques
Vous pouvez lmer sous l’eau seulement avec les DSC-WX1/W290/W275/W270.
Les DSC-W230/W220/W215/W210 ne possèdent pas cette fonction.
(Suite à la page arrière)


