Page is loading ...

B
BLACK PANTONE185
BLACK PANTONE185
2 3
4 5 6
1
8 9
10 11 12
7
23
1413
А
1
3
2
8
16
18
11
6
17
7
20
5
4
12
13
23
15
21 221914
10
11
20
9

1
VC 1221 • Original instructions
EN
Contents
Introduction ........................................................................................................................................................................ 1
Technical specications .................................................................................................................................................... 3
Safety instructions for vacuum cleaners ......................................................................................................................... 3
Know your product ............................................................................................................................................................ 5
Operation instructions ....................................................................................................................................................... 5
Maintenance ...................................................................................................................................................................... 7
Warranty ............................................................................................................................................................................. 7
Introduction
Your new SPARKY electric appliance will more than satisfy your expectations. It has been manufactured under stringent
SPARKY Quality Standards to meet superior performance criteria. You will nd your new electric appliance easy and safe to
operate, and, with proper care, it will give you many years of dependable service.
WARNING:
Carefully read through these entire Original instructions before using your new SPARKY electric appliance.
Take special care to heed the warnings. Your SPARKY electric appliance has many features that will make
your job faster and easier. Safety, performance, and dependability have been given top priority in the develop-
ment of this appliance, making it easy to maintain and operate.
Do not dispose of electrical products together with household waste!
Waste electrical products should not be disposed of with household waste. Please recycle where facilities
exist. Check with your local authority or retailer for recycling advice.
ENVIRONMENTAL PROTECTION
The machine, accessories and packaging should be sorted for environmental-friendly recycling. The plastic
components are labelled for categorised recycling.
pages-VC1221-2017.indd 1 28.7.2017 г. 12:18:11

2
VC 1221
EN
DESCRIPTION OF SYMBOLS
The rating plate on your electric appliance may show symbols. These represent important information about the product
or instructions on its use.
Double insulated for additional protection
Wet vacuum cleaner
Conforms to the requirements of Russian standards
Conforms to the requirements of Customs Union regulations.
Conforms to the requirements of Ukrainian standards
Read the instruction manual
YYYY-Www
Production period, where the variable symbols are:
YYYY - year of manufacture, ww - calendar week number
VC VACUUM CLEANER
pages-VC1221-2017.indd 2 28.7.2017 г. 12:18:12

3
Original instructions
EN
Technical specications
Model VC 1221
▪ Power input 1250 W
▪ Maximum suction power 1500 W
▪ Tank capacity 20 l
▪ Tank material plastic
▪ Dust bag capacity 20 l
▪ Maximum suction force 18 kPa
▪ Maximum air flow 55 l/s
▪ Air flow according to EN 60312 27 l/s
▪ Wet vacuuming Yes
▪ Air control handle No
▪ Hose diameter Ø36 mm
▪ Hose length 1,5 m
▪ Cable length 4 m
▪ Operating radius 6 m
▪ Weight (EPTA procedure 01/2014) 4,5 kg
▪ Protection class IP X4
▪ Safety class
/ II
▪ Noise emission (measured values determined according to EN 60704-1)
A-weighted sound pressure level L
pA
75,6 dB(A)
A-weighted sound power level L
wA
88,7 dB(A)
Wear hearing protection!
Safety instructions for vacuum cleaners
▪ This appliance is not intended for use by children and persons with physical,
sensory or mental limitations or a lack of experience or knowledge.
▪ This appliance can be used by children aged from 8 years and above and
persons with reduced physical, sensory or mental capabilities or lack of ex-
periance and knowledge if they have been given supervision or instruction
concerning use of the appliance in a safe way and understand the hazards
involved. Children shall not play with the appliance. Cleaning and user mainte-
nance shall not made by children without supervision.
WARNING: This appliance complies with the
compulsory safety regulations for electric equipment.
To reduce the risk of injury, user must read instruc-
tion manual. Read all instructions. Failure to follow all
instructions listed below may result in personal injury
and/or property damage and as a result, the guarantee
will become void.
Save these instructions for future reference!
WARNING: Make sure the power supply volt-
age corresponds to the value indicated on the name
plate with technical data of the appliance.
▪ If in doubt, do not plug in the appliance.
▪ A power source with a voltage greater than that speci-
fied for the appliance can result in serious injury to the
user, as well as damage to the appliance.
▪ Using a power source with a voltage less than the
nameplate rating is harmful to the motor.
pages-VC1221-2017.indd 3 28.7.2017 г. 12:18:12

4
VC 1221
EN
▪ The appliance is designed to vacuum up materials
that are not hazardous to your health and that are not
flammable.
▪ This appliance is suitable for use in the household or
workshop.
▪ Do not use the appliance outdoors (unless it has been
specifically designed for use outdoors).
▪ Do not subject the appliance to heat, direct sunshine
or high moisture (e.g. rain).
▪ Never immerse the appliance in liquids and be aware
of sharp edges that may damage it.
▪ Never use the appliance with wet or damp hands. Un-
plug it immediately if the appliance becomes wet or
damp when it is running. Do not immerse the appli-
ance in water.
▪ When operating the vacuum cleaner in damp environ-
ment, use a residual current device (RCD). Using a
residual current device (RCD) reduces the risk of an
electric shock.
▪ The appliance must be used only for its prescribed
purpose. Any use other than those mentioned in this
Manual will be considered a case of misuse. The user
and not the manufacturer shall be liable for any dam-
age or injury resulting from such cases of misuse.
▪ Never hold the connectors in front of your face (es-
pecially your eyes, ears, etc.) Never direct the nozzle
towards persons or animals.
▪ Make sure that the correct dust bag has been inserted
securely in its holder before using the appliance. The
wrong dust bag or incorrectly installed dust bags can
cause damage to the appliance and cause the guar-
antee to become void.
▪ Do not vacuum up ashes, hot coals or the like, large
fragments of glass and sharp objects.
▪ Do not vacuum up any toner dust, which is used in
printers and copiers for example, because it is elec-
trically conductive. In addition, it is possible that it will
not be completely filtered out by the filter system of the
wet/dry vacuum cleaner and can be released into the
air via the exhaust fan.
▪ Never vacuum flammable or poisonous liquids like
petrol, oil, acids, or other volatile substances.
▪ Do not vacuum up liquids that are hotter than 60ºC or
any poisonous or flammable dusts.
▪ Never vacuum asbestos or asbestos dust.
▪ Never lay the appliance on its side. Pay particular at-
tention to a horizontal position and adequate stability
on stairs.
WARNING: Always switch off and unplug the
appliance after use, prior to cleaning, changing the l-
ters or accessories, carrying or storing. Do not use the
cable to pull the plug out of the socket. Dismount all
accessories from the appliance prior to storing.
▪ Keep the vacuum cleaner away from heat sources
▪ Never leave the appliance switched on unattended. If
you leave the work area, switch the appliance off or
unplug it from the receptacle (don‘t pull the cord, but
use the plug).
▪ Never use the appliance when you are under the influ-
ence of medication, alcohol or drugs, if you are cur-
rently under medical care, or if you are tired.
▪ Make sure that the cable can’t cause bystanders to
stumble and do not give children access to the ap-
pliance.
▪ Check regularly the perfect working condition of the
electric appliance and the supply cable. Do not oper-
ate faulty electric appliances.
▪ In case the supply cable is damaged, the replacement
has to be done in an authorised SPARKY service
centre.
▪ Do not attempt to repair the appliance yourself.
The repair of these electric appliances can be per-
formed only by qualified technicians in the authorised
SPARKY service centres using original spare parts.
Incorrect repair may cause considerable danger for
the operator.
▪ Only use original SPARKY spare parts and accesso-
ries. The use of non approved parts or accessories
may be a possible source of danger and will cause the
guarantee to become void.
▪ Check the float often.
▪ If you notice liquid leaking from your appliance, switch
it off immediately and unplug it.
▪ Do not put the appliance in water. Make sure that wa-
ter is not spilled on the appliance.
▪ When disposing of the wastewater, make sure that
you observe any legal regulations.
▪ Only store the appliance in a safe and dry location out-
side the reach of children.
▪ Always keep the appliance clean. Don’t use any sol-
vents or cleaners that contain solvents for cleaning.
Please pay particular attention to the following “Special
Safety Information”
SPECIAL SAFETY INFORMATION
▪ Never vacuum up hot ashes, pointed or sharp objects.
▪ Never use the appliance in damp premises.
▪ When using the appliance, make sure that no hair,
clothing, or members are drawn in.
▪ Keep the vacuum cleaner away from heat sources
such as radiant heaters, ovens, etc.
▪ In order to operate this electric appliance properly you
must observe the safety regulations, the assembly
directions and the operating instructions specified in
this Manual. All users must be acquainted with this
manual and informed on the potential risks during op-
erating the electric appliance.
▪ This appliance is not intended for use by persons (in-
cluding children) with reduced physical, sensory or
mental capabilities, or lack of experience and knowl-
edge, unless they have been given supervision or in-
struction concerning use of the appliance by a person
responsible for their safety.
▪ Children should be supervised to ensure that they do
not play with the appliance.
▪ The manufacturer shall not be liable for any changes
made to the tool nor for any damage resulting from
such changes.
▪ Electric appliances must not be used outdoors in rainy
weather, or in moist environment (after rain) or in close
vicinity with easily flammable liquids and gases. The
working place should be well lit.
pages-VC1221-2017.indd 4 28.7.2017 г. 12:18:12

5
Original instructions
EN
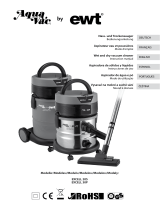
Know your product
1. Handle
2. ON/OFF switch
3. Upper section
4. Filter basket
5. Float
6. Clamps
7. Tank
8. Hose connection
9. 2 castors
10. Hose set
11. Plastic tube
12. Blow connection
13. Floor nozzle
14. Dust bag
15. Crevice nozzle
16. Castor pedestals
17. Clasp seat
18. Accessory holder
19. Foam lter
20. 2 big wheels
21. PET cartridge lter
22. Dry lter
23. Cable hook
UNPACKING
Due to modern mass production techniques, it is unlikely
that your electric appliance is faulty or that a part is miss-
ing. If you nd anything wrong, do not operate the ap-
pliance until the parts have been replaced or the fault
has been rectied. Failure to do so could result in serious
personal injury.
Carefully unpack the contents of the box.
1. Hold the two clamps (6) fastening the upper section
(3) in its position and fold them upwards (Fig.1).
2. Loosen the clamps, remove the upper section
(Fig.2) and take out the contents from the tank.
Please check the parts using the list shown above to
make sure they are complete and that there has been no
damage in transport.
ASSEMBLY
▪ Hold the two clamps fastening the upper section in its
position and fold them upwards (Fig.1).
▪ Loosen the clamps and lift the upper section outwars
(Fig.2).
▪ Turn the tank upside down on a stable leveled clean
surface.
▪ Fasten the pedestals (16) of the castors (9) to the tank
with screws. (Fig. 3)
▪ Insert the castors (9) into their pedestals (16) by press-
ing. (Fig. 4)
▪ Fasten the assembled to their pedestals big rear
wheels (20) to the tank with screws. The wheels are
marked (with L and R) for mounting to the left (L) and
to the right (R).
▪ Place the tank back in normal position.
▪ Insert a filter appropriate for the work to be done.
▪ Place the upper section back on the tank.
▪ Align the upper section with the clamps.
▪ Attach the clamps to the upper section and press
them downwards until an audible “click” is heard.
▪ Insert the larger end of the hose (10) into the tank front
inlet (8) (Fig.5). The hose connector tooth shall align
with the groove in the tank front inlet. Rotate the hose
connector in the direction marked with an arrow.
▪ Select an appropriate nozzle and/or hose and attach
them to the hose (10) (Fig.6).
▪ After you have completed vacuuming and cleaning
the appliance, store the accessories in the corre-
sponding holders (18) (Fig.7).
Operation instructions
These electric appliances are supplied from single-
phase alternating current mains only. The vacuum clean-
ers must be connected to grounded sockets. These elec-
tric appliances are radio suppressed in compliance with
EMC Directive.
PRIOR TO INITIAL OPERATION
▪ Make sure power supply voltage corresponds to the
value indicated on the name plate with technical data
of the appliance.
▪ If the supply cord is damaged it must be replaced with
a special cord or assembly available from the manu-
facturer or its service agent to avoid a safety hazard.
▪ It is absolutely necessary for you to read, understand,
and observe the section entitled “Safety instructions
for vacuum cleaners”.
DRY VACUUM CLEANING
WARNING: Never vacuum up hazardous ma-
terials.
WARNING: Wet cleaning with mounted lter
elements for dry cleaning is absolutely forbidden.
The following lter elements are used for dry cleaning:
а) The dry lter (22) and the dust bag (14) can be used
separately or together. When they are used together the
ltering effectiveness is increased.
b) The cartridge lter (21) and the dust bag (14) can be
used separately or together. When they are used sepa-
rately the cartridge lter efciency is much higher than
the dust bag efciency.
Filter efciency:
Cartridge lter - high
Dry lter - medium
Dust bag - low
▪ Make sure that the appliance is not plugged into the
power supply.
▪ Ensure that the tank (7) is clean and dry.
Dry lter
Place the dry lter (22) onto the lter basket (4). (Fig. 8)
Cartridge lter
Place the cartridge lter onto the lter basket (4) (Fig.9)
pages-VC1221-2017.indd 5 28.7.2017 г. 12:18:12

6
VC 1221
EN
and screw the locking cap to close the lter basket. Af-
ter prolonged use the cartridge lter must be cleaned by
tapping and brushing it.
When vacuuming concrete or similar materials generat-
ing ne dust, the cartridge lter must be brushed and
dusted off more often. This is an important prerequisite
for the reliable operation and long life of your vacuum
cleaner. If you notice that the suction force decreases or
in case you ascertain that the cartridge lter is damaged,
you must replace it immediately with a new one.
Dust bag
▪ Slide the dust bag flange over the hose connection
(Fig.10) on the inner side of the tank. Press it until it
snaps firmly into place (Fig.11) taking care not to dam-
age the dust bag.
The use of improper dust bag voids the guarantee.
Check the dust bag (14) regularly and change it when it is
2/3 full. The bag is designed in such way that only air, and
no dust, can pass through the paper. Therefore a used
dust bag may not be reused.
Do not use the dust bag for vacuuming up objects with
sharp edges or wet objects.
▪ Place the upper section on the tank once again and
close the clamps.
▪ Place the large end of the hose on the front air intake
stub on the tank.
▪ Select the desired nozzle (13,15) or tube (11) and con-
nect it to the hose (10).
▪ Make sure that the ON/OFF switch (2) of the appliance
is in “OFF” position „O“ before you insert the power
plug into the socket.
▪ Insert the power plug into the socket.
▪ Switch the motor on (ON/OFF switch in position “I”).
▪ When you have finished vacuuming, switch the motor
off by putting the ON/OFF switch (2) in „OFF“ posi-
tion „O“.
▪ Unplug the vacuum cleaner.
WET VACUUM CLEANING
WARNING: Never vacuum up hazardous ma-
terials.
▪ Make sure that the appliance is unplugged.
▪ Check to make sure that the tank (7) is free of dust
and dirt.
▪ The appliance is shipped from the factory with a car-
tridge filter. Remove the cartridge filter (21), which is
not appropriate for wet vacuum cleaning.
▪ Remove the dust bag (14) and the dry filter (22) in case
you have used them prior to wet vacuum cleaning.
▪ Place the foam filter (19) (Fig.12) on the filter basket.
▪ Place the upper section on the tank and close the
clamps.
▪ Place the large end of the hose on the front air intake
stub on the tank.
▪ Select the necessary nozzle (13,15) or tube (11) and
place it on the hose (10).
▪ Make sure that the ON/OFF switch (2) of the appliance
is in “OFF” position ″O″ before you plug the appliance.
▪ Insert the plug into the socket.
▪ Switch the motor on by placing the ON/OFF switch (3)
in position “I”.
▪ When you have finished wet vacuuming, switch the
motor off by putting the ON/OFF switch (2) into the
„OFF“ position „O“.
▪ Unplug the vacuum cleaner.
▪ After use, empty and dry the tank (7).
Tip: If you want to vacuum up a large quantity of liquid
from a sink or a tank, please don’t put the entire suc-
tion nozzle in the liquid; rather leave a little space so that
some air can also be drawn in along with the liquid.
The appliance is equipped with a oat switch (5) (Fig.13)
that will stop the vacuuming when the tank is full. You will
notice that suction has stopped by the motor now run-
ning faster. At this event, switch the appliance off and
unplug it.
Be aware that the full tank can be very heavy.
After wet vacuuming, switch off the appliance and un-
plug it. Empty the container and clean/dry it inside and
outside prior to storage.
IMPORTANT! After wet vacuuming, please proceed as
described in the section entitled „Dry vacuum cleaning”
before you attempt to dry vacuum again.
BLOWING FUNCTION
Remove the upper hook (23) for winding up the cable.
Insert the larger end of the hose into the orice in the up-
per rear part of the vacuum cleaner. The hose connector
tooth shall align with the groove in the blow connector.
(Fig.14)
WARNING: Never turn the air ow towards
people, animals or objects as the outcoming air may
be hot.
ACCESSORIES
MODEL
VC 1221
Hose set •
2-part plastic tube •
Dust bag •
Dry lter •
Foam lter •
Cellulose pleated lter •
Floor nozzle •
Crevice nozzle •
Wheels and castors
2 wheels +
2 castors
Castor pedestals 2
WARNING: Use only original SPARKY ac-
cessories. The use of non original spare parts or
accessories presents potential danger and voids the
guarantee.
pages-VC1221-2017.indd 6 28.7.2017 г. 12:18:12

7
Original instructions
EN
Maintenance
▪ Make sure that the appliance is not plugged into the
power mains.
▪ Take out the suction hose (10) from the tank.
▪ Release the clamps (Fig.1) and remove the upper sec-
tion from the tank (Fig.2).
▪ Clean up any dirt or debris from the tank and hose.
▪ Clean the foam filter (19) by washing it with a mild de-
tergent.
▪ Check the hose and connections and inspect the
power cord for any damage.
▪ When the foam foam filter (19) is removed, check
the float (5). To do this, take the upper section by the
handle and turn it carefully so that the filter basket is
facing upwards. The float should move freely up and
down (Fig.13).
TROUBLESHOOTING
Problem Probable cause Corrective action
The appliance doesn’t work.
No power. Check the power supply.
Functional fault in the power cord,
switch, or motor.
Test, repair or replace the dam-
aged part.
Tank is full of liquid. Empty the tank.
Dust is escaping from the motor
cover.
The dust bag/pleated lter is miss-
ing or damaged.
Insert or replace the dust bag/
pleated lter.
Low suction power and high motor
speed / vibrations
The pleated lter is clogged. Replace the pleated lter.
The nozzle, hose or tank is
clogged.
Inspect the nozzle, hose or tank.
Notes
Carefully read the entire original instructions before us-
ing this product.
The manufacturer reserves the right to change specica-
tions without notice.
Specications may differ from country to country.
WARNING: Never use alcohol, petrol or other
cleaning agent. Never use caustic agents to clean
plastic parts.
WARNING: Water must never come into con-
tact with the electric appliance.
IMPORTANT! To assure product safety and reliability,
repairs, maintenance and adjustment should be per-
formed by authorised SPARKY service centres or other
qualied service organisations, always using genuine
replacement parts.
Warranty
The guarantee period for SPARKY electric appliances is
determined in the guarantee card.
Faults due to normal wear, overloading or improper han-
dling will be excluded from the guarantee.
Faults due to defective materials implemented as well as
defects in workmanship will be corrected free of charge
through replacement or repair.
The complaints for defective SPARKY electric applianc-
es will be recognized if the appliance is sent back to the
dealer or is presented to the authorised warranty service
centre undismantled, in its initial condition.
pages-VC1221-2017.indd 7 28.7.2017 г. 12:18:13
/