Pioneer PDP-S64 Operating instructions

Category
Loudspeakers
Type
Operating instructions
English
2
Thank you for buying this Pioneer product.
Please read through these operating instructions before
using your speaker system so you will know how to make
the most of its performance. After you have finished reading
the instructions, put them away in a safe place for future
reference.
CAUTION
About compatibility
This product is designed exclusively for use with the Pioneer
flat screen TV. For more information on compatibility, please
consult with your nearest Pioneer authorized dealer or
service center.
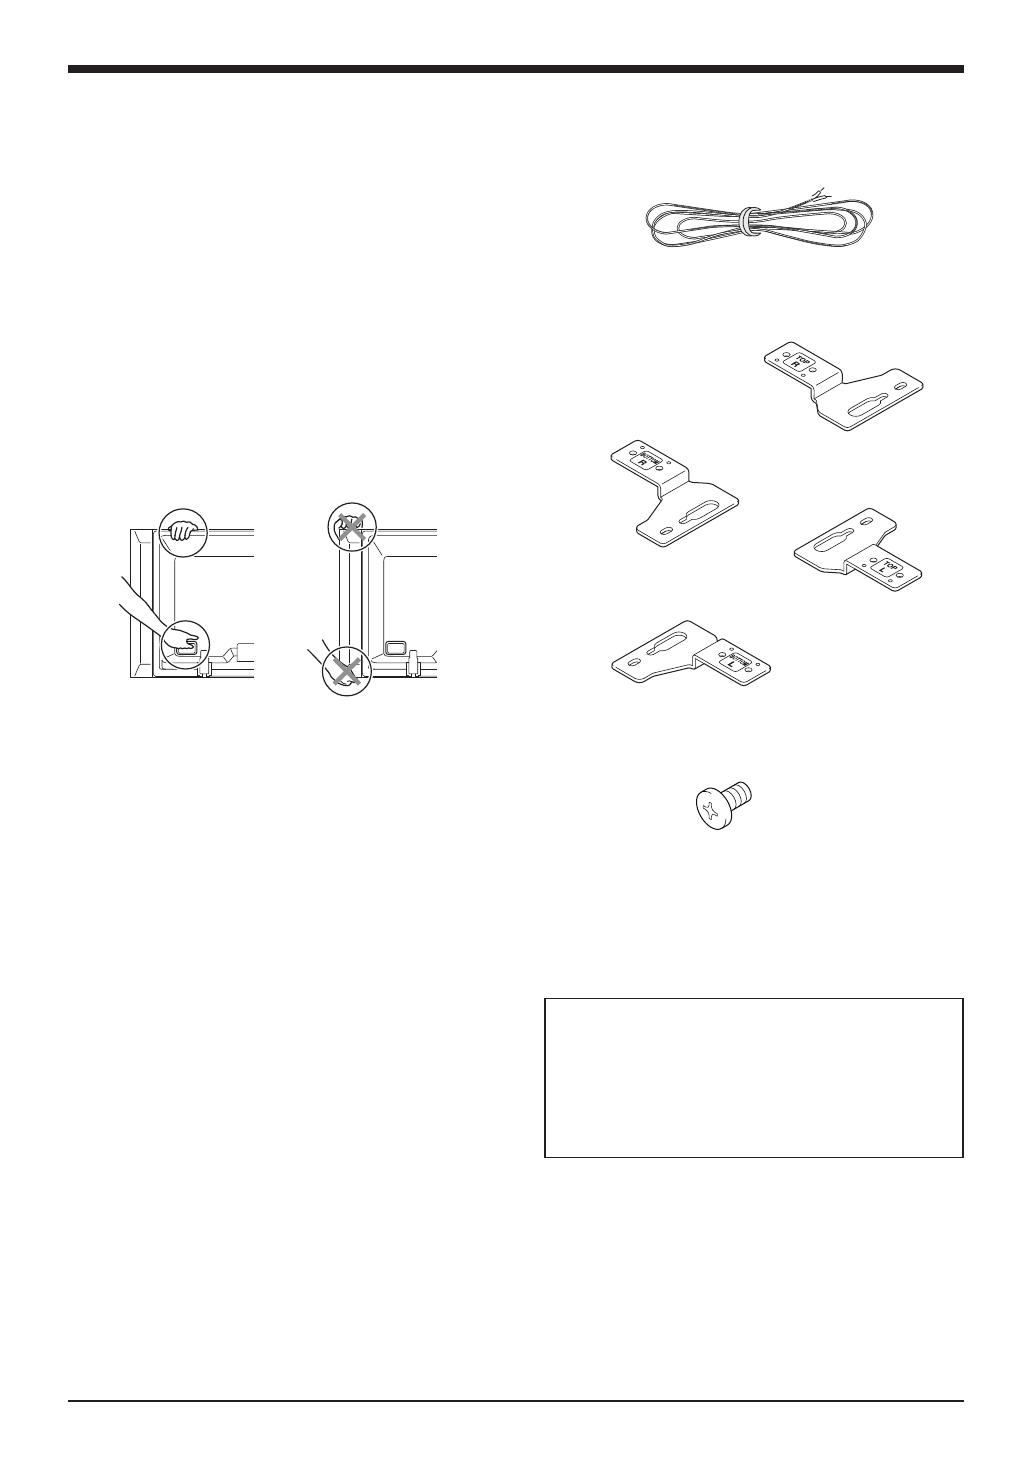
About installation and setting
Do not move the flat screen TV by holding these speakers
or speaker brackets. This could result in injury or damage
to the brackets. When moving the TV, hold by the top and
handles.
When installing the speaker, do not use any screws other
than those supplied, otherwise the speaker may come off
from the main unit and fall over.
When installing the speaker, tighten the screws firmly.
Please handle the speaker with sufficient care, as the
grille net and the cabinet can become damaged or broken
when they are subjected to strong external impacts.
Placing a CRT computer screen or CRT monitor near to
the speaker may result in interference or color distortion.
If this happens, distance the monitor from the speaker.
About the input
In order to prevent damage to the speaker system
resulting from input overload, please observe the
following precautions:
Do not connect these speakers to anything other than the
specified flat screen TV. Doing so may result in damage
or fire.
Be sure to turn the connected devices off and remove
the power cord from the wall outlet beforehand when
changing the connection or installation method.
When using a tone control function to greatly emphasize
treble sounds, do not use excessive amplifier volume.
CHECKING THE ACCESSORIES
Speaker Cables × 2
Speaker Brackets




Speaker Mounting Screws
(M5 × 10 mm : Black) × 16
Operating Instructions
Installation
Consult your dealer if you encounter any difficulties
with this installation.
Pioneer is not liable for any damage resulting from
improper installation, improper use, modification, or
natural disasters.
3
English
English
INSTALLATION ON THE FLAT SCREEN TV































When using the table top stand:
NOTE:
Before attaching the speaker, please attach the KRP-TS01 series table top stand (or another Pioneer flat screen TV stand) to the flat
screen TV.
1. Attaching the Speaker Brackets to the Speakers.
There are top and bottom speaker brackets for both the left and the right speaker. Attach the appropriate brackets to the top
and the bottom on the back of the speakers using the supplied screws.
(It shows the attachment of the bracket on the right side. It is attached on the left side by the same procedure.)














English
4
2. Screw an supplied screw into the
speaker mounting hole (lower of the
t
wo) at the top, rear of the flat screen
TV.
Do not tighten it all the way yet. Leave it loose, with
about 5 mm left to tighten.








3. Hang the speaker bracket on the
screw you installed at the top by
passing the wide part over it and
lowering into the slot; screw in the
lower screw temporarily.
After passing the wide part of the hole of the speaker
bracket (top) over the screw, lower the speaker onto it.









4. Adjust the position of the speaker
and then tighten the upper and lower
screws firmly.
5. Tighten the two screws, at the top
and bottom for each speaker (total of
four screws), thus fixing the speakers
to the flat screen TV.
6. Pass the supplied speaker cable
between the speaker and the flat
screen TV (below the speaker bracket)
from below.
7.
Connect the speaker cables to the
speaker (see next page).
8.
Insert the cable in the groove on the
speaker.





9. Connect the other end of the speaker
cables to the rear ofat screen TV (see
next page).
5
English
English
NOTE:
Press the lever and insert the end of
the cable.
When you release the lever, it clamps
onto the speaker cable.
Caution
Be sure to turn the connected devices off and remove
the power cord from the wall outlet beforehand when
changing the connection or installation method.
If you insert the speaker cable too far so
that the insulation is touching the speaker
terminal, you may not get any sound. Please
insert it with showing the copper wire.
Check if the end of the speaker cables are
securely connected to the terminals by
slightly tugging on the cable af
ter making
connections. Loose connections may result
in sound dropouts or noise.
If there is a short in the
and
cables caused by an
exposed lead wire, excessive load may be applied to
the flat screen TV, resulting in interrupted operation or
malfunction.
Incorrect connections of the speaker cable to the right
or left of the flat screen TV terminals with respect to the
polarity may result in insufficient stereo sound effects,
delivering poor bass sounds or unstable sound image.
Bundle the cable without pulling.






 


 








 






English
6
10.
Bundling the cables.
Follow the steps below to attach a cable clamp.
1 ) Thread the clamp band through the holder and
bundle the cable(s) in the cable clamp.
2 )
Push and hold the levers then insert the hook into
an appropriate hole on the rear of the flat screen TV.
3 ) Pull up the clamp band to lock.
4 ) Confirm that the cable clamp is seated firmly in the
panel.
NOTE:
Avoid pinching or creating pressure points when routing
or bundling cables.
T
o remove the clamp band, pull and hold the latch to
release.
T
o remove the cable clamp, push and hold the levers
then pull it out from the hole.
NOTE:
The longer a clamp is in place, the better chance of
deterioration. An older clamp is mor
e easily damaged
while being removed and may not be reusable.



When using the hung on
wall unit:
NOTE:
First lay the flat screen TV on top of a soft sheet etc., then
attach the speakers.
1. Attach the speakers to the flat screen
TV (See procedures 1 to 10 on pages
3 to 6).
Connect the other cables and power cord to the flat
screen TV.
2. Place the flat screen TV on the
mounting fittings of the hung on
wall unit.
For details, refer to the operating instructions supplied
with the hung on wall unit.
Caution
Do not lift up the flat screen TV by the speakers.
A speak
ers may come off, so hold it by the bottom.
7
English
English
Published by Pioneer Corporation.
Copyright © 2008 Pioneer Corporation.
All rights reserved.








SPECIFICATIONS
Cabinet ............................................................ Bass-reflex type
Used speaker (two-way system):
Woofer (for low tones) ............... 4.8 cm × 13 cm cone type
Tweeter (for high tones) ....................2.5 cm semidome type
Impedance ...........................................................................6
F
requency Range ........................................55 Hz to 30 000 Hz
Sensitivity (1 m, 1 W) ....................................................... 80 dB
P
ermissible input :
Max. input ...................................................................... 18 W
Rated input ..................................................................... 6 W
Crossover frequency ........................................................3 kHz
External Dimensions
...............................105 (W) mm
×
876 (H) mm
×
64 (D) mm
W
eight :
Speaker (one piece) ....................................................1.75 kg
Speakers (pair) with cables, brackets and screws .... 4.1 kg
Accessor
y parts (for two speakers)
................................................................. Speaker Cables
×
2
....................................................................Speaker Brackets
TOP-Left
×
1
BOT
TOM-Left
×
1
TOP-Right
×
1
BOTTOM-Right
×
1
.................... Speaker Mounting Screws (M5
×
10 mm)
×
16
..................................................... Operating Instructions
×
1
NOTE:
Specifications and design subject to possible modification
without notice, due to impr
ovements.
CABINET MAINTENANCE
Use a polishing cloth or dry cloth to wipe off dust and dirt.
When the cabinet is very dirty, wipe with a soft cloth
moistened with water-diluted cleanser; then wipe again
with a dry cloth. Do not use furniture wax or cleaners.
They may damage the surface of the cabinet.
Never use thinner, benzine, insecticide sprays and other
chemicals on or near the cabinets, since these will
corrode the sur
faces.
When a chemical cloth is used, read the cautions for the
chemical cloth carefully.
  • Page 1 1
  • Page 2 2
  • Page 3 3
  • Page 4 4
  • Page 5 5
  • Page 6 6
  • Page 7 7
  • Page 8 8
  • Page 9 9
  • Page 10 10
  • Page 11 11
  • Page 12 12
  • Page 13 13
  • Page 14 14
  • Page 15 15
  • Page 16 16
  • Page 17 17
  • Page 18 18
  • Page 19 19
  • Page 20 20
  • Page 21 21
  • Page 22 22
  • Page 23 23
  • Page 24 24
  • Page 25 25
  • Page 26 26
  • Page 27 27
  • Page 28 28
  • Page 29 29
  • Page 30 30
  • Page 31 31
  • Page 32 32
  • Page 33 33
  • Page 34 34
  • Page 35 35
  • Page 36 36
  • Page 37 37
  • Page 38 38
  • Page 39 39
  • Page 40 40
  • Page 41 41
  • Page 42 42
  • Page 43 43
  • Page 44 44
  • Page 45 45
  • Page 46 46
  • Page 47 47
  • Page 48 48
  • Page 49 49
  • Page 50 50

Pioneer PDP-S64 Operating instructions

Category
Loudspeakers
Type
Operating instructions

Ask a question and I''ll find the answer in the document

Finding information in a document is now easier with AI