10
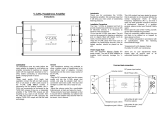
RC-1550 Stereo Control Amplifier
Recording Selector Control
7
Front panel only
Turn the front panel control
7
to select the input signal that goes to
the record outputs. When you are not recording, set the control to Off.
This minimizes the chance of interference from other components in the
system.
Having a separate Recording and Listening selector adds a significant
degree of flexibility in how you can use the RC-1550. For example
by selecting CD with the Record Selector and selecting Tuner with the
Listening Selector you can record a CD onto a tape while listening to
the tuner.
If you have a three-head recorder or a DAT recorder that allows
simultaneous read and write operation, you can monitor the recording
by setting the LISTENING control
8
to the Tape 1 or Tape 2 position.
Note: If you select TAPE 1 with the RECORDING control
7
, the
recording signal will only be available at the TAPE 2 recording
outputs. To copy a tape from one tape recorder to another, connect
the source recorder to the TAPE 1 inputs and outputs and set the
RECORDING control to Tape 1. Connect tape recorder you are
copying to to the Tape 2 inputs and outputs.
Controlling Other Components
In addition to operating many of the controls of the RC-1550, the
RR-AT94 remote control can operate basic features of some Rotel CD
players, DVD players, and AM/FM tuners.
CD Functions
DG
The
/
PLAY,
.
STOP,
,
PAUSE,
{
}
TRACK and, RANDOM
buttons, and NUMERIC buttons (0 - +10) operate many Rotel CD
players after the CD button on the remote has been pressed.
DVD Functions
DG
The
/
PLAY,
.
STOP,
,
PAUSE,
{
}
TRACK and RANDOM buttons
operate Rotel DVD players, after the AUX1 button on the remote has
been pressed.
Tuner Functions
F
The BAND, TUNING
<
>
, and additional tuning feature buttons (PTY,
TA, TP, etc.) operate Rotel tuners, after the TUNER listening button on
the remote has been pressed.
Note: By default, the RR-AT94 operates the Rotel RT-1080/RT-1082/
RT-1084 tuners. The remote can be reprogrammed to operate the
RT-940AX tuner. This programming only needs to be done once:
To program for the RT-940AX: press the POWER button and the
2 button simultaneously.
To program for the RT-1080/RT-1082/RT-1084: press the
POWER button and the 1 button simultaneously.
Troubleshooting
Most difficulties in audio systems are the result of incorrect connections,
or improper control settings. If you encounter problems, isolate the area
of the difficulty, check the control settings, determine the cause of the
fault and make the necessary changes. If you are unable to get sound
from the RC-1550, refer to the suggestions for the following conditions:
Standby Power Indicator Is Not Lit
The Standby Power Indicator should be lit whenever the RC-1550 is
plugged into the wall power outlet. If it does not light, test the power
outlet with another electrical device, such as a lamp. Be sure the
power outlet being used is not controlled by a switch that has been
turned off.
Fuse Replacement
If another electrical device works when plugged into the power outlet,
and the Standby Indicator still will not light when the RC-1550 is
plugged into the wall outlet, it indicates that the internal power fuse
may have blown. If you believe this has happened, contact your
authorized Rotel dealer to get the fuse replaced.
No Sound
Check the signal source to see if it is functioning properly. Make sure
the cables from the signal source to the RC-1550 inputs are connected
properly. Be sure the Listening Selector is set to the proper input. Check
the power amplifier for power and proper operation. Check all the
wiring between the RC-1550 and the power amplifier, and the power
amplifier and speakers.
Remote Control Code Conflicts
Rotel uses the same IR remote control codes for all its audio products.
In systems that have multiple Rotel products, the IR control codes of a
remote control that is supplied with one product may interfer with the
control codes of another product. The RR-AT94 and the RC-1550 can
be set to alternate control codes to prevent such conflicts.
To change the IR codes of the RR-AT94, press the Phono button and
the 2 button at the same time. To change the IR codes of the RC-1550,
point the RR-AT94 at the RC-1550 then press and hold the 2 button for
5 seconds. The LED in the volume control will flash to indicate the IR
code has changed.
Note: After changing the remote codes for the remote control and
the preamplifier as described above, the remote control will no
longer operate the Rotel tuners. To return the RR-AT94 IR code to the
default setting, press the Phono button and the 1 button at the same
time. To return the IR code of the RC-1550 to the default setting,
point the RR-AT94 at the RC-1550 and press and hold the 1 button
for 5 seconds. The LED in the volume control will flash to indicate the
IR code has changed.
Resetting the IR codes
Should you need to reset the IR code, press the MUTE button
A
on the
RR-AT94 remote control for more than 5 seconds while pointing it at
the RC-1550. The unit will return to default condition and the Listening
CD LED
8
will turn on to indicate the IR code is reset. Contact your
authorized Rotel dealer for further information.