
3-858-067-32(1)
About This Manual
The instructions in this manual are for the M-417, M-427,
M-427C, M-437, M-529V, M-539V and M-579V. Before
you start reading, check your model number. The M-
579V is the model used for illustration purposes. Any
differences in operation are clearly indicated in the text,
for example, “M-579V only”.
A propos de ce mode d’emploi
Les instructions de ce manuel sont destinées aux modèles
M-417, M-427, M-427C, M-437, M-529V, M-539V et M-
579V. Avant de lire ce mode d’emploi, vérifiez le numéro
de votre modèle. Le modèle M-579V est utilisé dans ce
manuel à titre de référence dans les illustrations. Toute
différence de fonctionnement est clairement spécifiée
dans le texte, par exemple “M-579V uniquement.”
Operating Instructions
Mode d‘emploi
Manual de instrucciones (en el reverso)
Manual de instruções (no verso)
M-417/427/427C/437/
529V/539V/579V
Sony Corporation ©1996 Printed in China
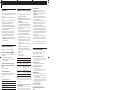
Only standard
microcassette have a
small indentation of
side A.
Seules les
microcassettes
standard comportent
une petite encoche sur
la face A.
Standard
Standard
Non-standard
Non standard
Approx. 2.5 mm
Approx. 2,5 mm
Approx. 5 mm
Approx. 5 mm
A
a
B
a
REC/BATT
r
C PAUSE
0 CUE/REVIEW )
p 6
VOR
EAR
TAPE
COUNTER
TAPE
SPEED
Microphone
Microphone
BATT
b
c
m
m
m
C
REC/BATT
C PAUSE
0 CUE/REVIEW )
p 6
VOL
EAR
TAPE
SPEED
9
BATT
D
Connecting cord RK-G64HG (not supplied)
Cordon de connexion RK-G64HG
(non fourni)
EAR
MIC
E
F
3
2
1
c
to the wall outlet
vers prise murale
DC IN 3V
AC power
adaptor
Adapteur CA
Charge adaptor
Adapteur de recharge
1
2
to the wall outlet
vers prise murale
Rechargeable
batteries NC-AA
Piles rechargeables
NC-AA
Power indicator
Témoin
d’alimentation
b
]
]
}
}
AC power adaptor (supplied with M-579V only)
or AC-E30HG AC power adaptor (not supplied)
Adaptateur CA (fourni avec M-579V
uniquement) ou adaptateur CA AC-E30HG
(non fourni)
d

English
Slide CPAUSE in the direction of
the arrow. The BATT lamp goes off.
To Press or slide
p6Stop recording
Start recording during
playback
r during playback (the unit becomes
in the recording mode)
Review the portion just
recorded
Push up 0CUE/)REVIEW
toward )REVIEW during
recording. Release the button at the
point to start playback.
Pause recording
Take out a cassette p6
Note
Select the 2.4 cm tape speed for recording, if you play back the
recorded tape with another unit. Otherwise, the sound quality may
be changed.
Notes on VOR (Voice Operated Recording) (M-529V/539V/
579V only)
• The VOR system depends on the environmental conditions. If you
cannot get the desired results, set VOR to OFF.
• When you use the system in a noisy place, the unit will stay in the
recording mode. If the sound is too soft, on the contrary, the unit
will not start recording. Set VOR to H (high) or L (low) depending
on the conditions.
To monitor the sound
Connect the earphone (not supplied) to the EAR jack. The
monitor volume cannot be adjusted by VOL.
To prevent a cassette from being accidentally
recorded over (see Fig. B-c)
Break out and remove the cassette tabs. To reuse the
cassette for recording, cover the tab hole with adhesive
tape.
Playing a Tape (see Fig. C)
1 Insert a cassette with the side to start playing facing
the lid.
2 Select the tape speed to the same speed as that used
for recording.
3 Press 9.
4 Adjust the volume.
To
Press or slide
Stop playback/stop fast
forward or rewind*
p6
Pause playback Slide CPAUSE in the direction of
the arrow. The BATT lamp goes off.
Recording (see Fig. B-a)
1 (M-529V/539V/579V only) Press the reset button of
the TAPE COUNTER.
2 Press p6 and insert a standard microcassette with
the side to start recording facing the lid (see Fig. B-
b).
3 Select the desired tape speed.
2.4 cm for optimum sound (recommended for normal
use): A 30-minute recording can be made using both
sides of the MC-30 microcassette.
1.2 cm for longer recording time: A 60-minute
recording can be made using both sides of the MC-30
microcassette.
4 (M-529V/539V/579V only) Set VOR to H, L or OFF.
If you set VOR to H or L, the unit automatically starts
recording the sound and pauses when there is no
sound (you can save tapes and batteries).
H: To record at meetings or in a quiet and/or
spacious place.
L: To record for dictation or in a noisy place.
When the sound is not loud enough, set it to OFF, or
the unit may not start recording.
5 Press r.
Recording starts.
Recording level is fixed.
Troubleshooting
Should any problem persist after you have made these
checks, consult your nearest Sony dealer.
A cassette cannot be inserted.
n The cassette is being inserted in the wrong way. (The
cassette should be inserted in the lid with the tape side
facing you.)
n 9 has been already pressed.
r cannot be pressed.
n There is no cassette in the cassette compartment.
n The cassette tab has been removed.
r or 9 cannot be pressed.
n The tape has reached the end.
n After the automatic shut-off, CPAUSE is slid in the
direction of the arrow.
The unit does not operate.
n The batteries have been inserted with incorrect polarity
n The batteries are weak. Replace both batteries with new
ones.
nCPAUSE is slid in the direction of the arrow.
n The AC power adaptor or car battery cord is connected to
the unit only and you are going to use the unit on
batteries.
No sound comes from the speaker.
n The earphone is plugged in.
n The volume is turned down completely.
The sound drops out or comes with excessive
noise.
n The volume is turned down completely.
n The batteries are weak. Replace both batteries with new
ones.
n The head is contaminated. See “Maintenance”.
Tape speed is too fast or too slow in the
playback mode.
n Improper setting of the TAPE SPEED switch. Set it to the
same speed as that used for recording.
Tape speed is faster than the normal playback
speed.
n The TAPE SPEED switch is set between the 1.2 cm and 2.4
cm positions.
Recording cannot be made.
n Connection is made incorrectly.
n The batteries are weak. Replace both batteries with new
ones.
n The head is contaminated.
n Improper setting of the VOR switch (M-529V/539V/579V
only). Set it to H or OFF.
Recording is interrupted.
n The VOR switch (M-529V/539V/579V only) is set to H or
L. When you do not use VOR, set it to OFF.
Recording cannot be erased completely.
n The head is contaminated.
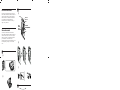
Maintenance (see Fig. F)
To clean the tape head and path
Press 9 and wipe the head 1, capstan 2 and the pinch
roller 3 with a cotton swab, moistened with alcohol
every 10 hours of use.
To clean the exterior
Use a soft cloth slightly moistened in water. Do not use
alcohol, benzine or thinner.
Specifications
Tape
y (normal position type)
Recording system
2-track 1-channel monaural
Speaker
Approx. 3.6 cm (1
7
⁄16 in.) dia.
Tape speed
2.4 cm/s (
15
⁄16 ips), 1.2 cm/s (
15
⁄32 ips)
Frequency range
300 – 4,000 Hz
Output
Earphone jack (minijack) for 8 – 300 ohms earphone
Power output (at 10% harmonic distortion)
160 mW
Battery life (recording)
See “Preparing Power Sources”.
Power requirements
• Two R6 (size AA) batteries: 3 V DC
• Sony AC-E30HG AC power adaptor (not supplied):
220/230 V AC, 50 Hz (European model)
120/220 V AC, 50/60 Hz (model for other countries) (for M-427/
427C/437/529V/539V only)
Dimensions (w/h/d)
Approx. 66.7 x 120.8 x 25 mm incl. projecting parts and controls
Mass
Approx. 160 g incl. batteries
Supplied accessories
Microcassette tape MC-30 (1) (M-427C/437, M-529V (European
model) and M-539V (European model) only)
Handstrap (1) (M-529V/539V/579V only)
AC power adaptor (1) (M-579V only)
Charge adaptor (1) (M-579V only)
Rechargeable batteries NC-AA, 1,2 V, 700 mAh, Ni-Cd (2) (M-579V
only)
Design and specifications are subject to change without notice.
Optional accessories
Microcassette MC-60, MC-30
Earphone ME-81, ME-L82
Connecting cord RK-G64HG (miniplug to miniplug with attenuator)
AC power adaptor AC-E30HG
On the unit
•Use only the y(standard microcassettes)
with this unit. Non-standard cassette cannot be used
because the “L” dimension (see Fig. E) is different.
•Do not leave the unit in a location near heat sources, or
in a place subject to direct sunlight, excessive dust or
mechanical shock.
•Should any solid object or liquid fall into the unit,
remove the batteries or disconnect the AC power
adaptor, and have the unit checked by qualified
personnel before operating it any further.
•Keep personal credit cards using magnetic coding or
spring-wound watches etc. away from the unit to
prevent possible damage from the magnet used for the
speaker.
•When you do not use the unit for long, remove the
batteries to avoid damage caused by battery leakage
and subsequent corrosion.
•If the unit has not been used for long, set it in the
playback mode and warm it up for a few minutes
before inserting a tape.
If you have any questions or problems concerning your
unit, please consult your nearest Sony dealer.
Batteries
Rechargeable batteries (supplied with
M-579V only)
Charge the rechargeable batteries only with the supplied
charge adaptor and the AC power adaptor. The
rechargeable batteries can be charged approximately 500
times.
Be sure to charge the rechargeable batteries for
approximately 8 hours before using them. The unit can
be used for recording for approximately 6.0 hours with
the fully charged rechargeable batteries.
To charge (see Fig. A-d)
The power indictor of the charge adaptor remains lit as
long as power is supplied from the wall outlet.
To use (see Fig. A-a)
Notes
• Use the supplied two rechargeable batteries only with the supplied
charge adaptor.
• If there is distortion of sound or excessive noise, or if the unit does
not operate properly, turn off the unit and recharge the two
rechargeable batteries together.
• The rechargeable batteries will discharge even when not in use. Be
sure to charge them before use.
• Recharge the two rechargeable batteries together. Otherwise, the
charging cannot be done.
• Be sure to remove the rechargeable batteries from the charge
adaptor to avoid overcharging (more than 20 hours) when
charging has been completed.
• Charging and operation should be made in temperature ranges 5°C
to 40°C (40°F to 104°F).
• The charge adaptor will become warm during charging but this is
not a sign of problem.
• Do not use or leave the charge adaptor in a location near heat
sources or in a place subject to direct sunlight or excessive
moisture.
• Unplug the AC power adaptor from the wall outlet when it is not
to be used for long.
• Do not attempt to charge dry batteries.
Recording
Sony R6P (SR)
Welcome!
Thank you for purchasing the Sony Microcassette-
Corder. Some features are:
•The BATT lamp indicates when to replace the batteries.
•The VOR (Voice Operated Recording) system (M-529V/
539V/579V only) starts and stops recording
automatically in response to the sound.
•Edit function—You can start recording directly from the
playback mode by pressing the r button to correct a
previously recorded portion.
•Tape counter (M-529V/539V/579V only)
•Automatic shut-off mechanism at the end of the tape (in
the recording/playback mode only)
•Stop-pause-release function—The pause switch is
released automatically when the p6 button is
depressed so that you don’t miss a recording chance.
Preparing Power Sources
Choose one of the following power sources.
Dry Batteries (see Fig. A-a)
Make sure that nothing is connected to the DC IN 3V
jack.
1 Open the battery compartment lid.
2 Insert two R6 (size AA) batteries with correct polarity
and close the lid.
If the battery compartment lid is accidentally
detached (see Fig. A-b)
Attach it as illustrated.
When to replace the batteries
Replace the batteries with new ones when the BATT
(battery) lamp dims and the sound is distorted.
Battery life (Approx. hours)
5.5
Sony alkaline LR6 (SG)
NC-AA (M-579V only)
6.0
19
House Current (see Fig. A-c)
Connect the AC power adaptor to DC IN 3V and to a
wall outlet. Use the AC power adaptor (supplied with M-
579V only) or the AC-E30HG AC power adaptor (not
supplied). Do not use any other AC power adaptor.
Fast forward Slide 0CUE/)REVIEW toward
0CUE during stop**
Rewind Slide 0CUE/)REVIEW toward
)REVIEW during stop.**
Search forward during
playback (CUE)
Keep 0CUE/)REVIEW pushed
down during playback and release it
at the point you want.**
Search backward during
playback (REVIEW)
Keep 0CUE/)REVIEW pushed
up during playback and release it at
the point you want.**
* If you leave the unit after the tape has been wound or rewound,
the batteries will be consumed rapidly. Be sure to depress p6.
** The tape moves faster in the rewind/REVIEW mode than in the
fast forward/CUE mode.
At the end of the tape
In the recording or playback mode, the tape stops at the
end of the tape and the locked buttons will be released
automatically (Automatic shut-off mechanism).
After fast forward or rewind, be sure to return 0CUE/
)REVIEW to the center.
Recording/Playback with the
Connected Equipment
Dubbing onto another tape recorder
(see Fig. D)
Set this unit to the playback mode and another tape
recorder to the recording mode.
Precautions
On power
•Operate the unit only on 3 V DC.
For AC operation, use the AC power adaptor
recommended for the unit. Do not use any other type.
For battery operation, use two R6 (size AA) batteries.
•The nameplate indicating operating voltage, etc., is
located on the bottom of the unit.
Polarity of the plug
Page is loading ...
Page is loading ...
Page is loading ...
Page is loading ...
-
 1
1
-
 2
2
-
 3
3
-
 4
4
-
 5
5
-
 6
6


Ask a question and I''ll find the answer in the document
Finding information in a document is now easier with AI
in other languages
- français: Sony M 579V Manuel utilisateur
- español: Sony M 579V Manual de usuario
- português: Sony M 579V Manual do usuário
Related papers
Other documents
-
Panasonic RXM50 Operating instructions
-
Aiwa TP-M445 Operating instructions
-
QFX RETRO-39 User manual
-
Sanyo M-1075C User manual
-
-
Philips AQ6345/00 User manual
-
-
-
COBY electronic CXR123 User manual
-