Page is loading ...

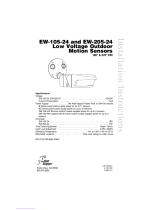
SPECIFICATIONS
Power ..............................120VAC, 60Hz
Relay Type .............................Form A, N.O.
Load Requirements
@120VAC .................................500W
isolated relay rated 5A 250VAC
Low Voltage Connections
RJ45 connection to FS sensor .....Control in, common,
+24VDC
8-Pin connector to LED strip and battery
2-wire output to LEDs.........400mA @10VDC max.
2-wire output to 9V Ni-MH battery 5-8mA @10VDC max.
Line and Load Connections..........12-18AWG terminals
Operating Temperature ..........32° to 131°F (0° to 55°C)
HN-200 Dimensions.. 7.5” x 0.75” x 1.5” (190 x 19 x 38mm)
LED Light bar
Dimensions 12.13”
long x 0.5” dia.
(30.8cm x 12.7mm)
HN-300
Fixture Mount Nightlight Controller
with LED Assembly
Installation Instructions

DESCRIPTION
The HN-300 kit contains an HN-200 controller plus a complete LED nightlight
assembly. This assembly includes a 9V Ni-MH rechargeable battery, plug-in
low voltage connector, LED light bar and a set of translucent mounting brackets
that can be positioned anywhere along the light bar to facilitate mounting on the
fixture. In addition, the mounting brackets are hinged for easy angle adjustment.
The HN-200 controller supplies power to FS series occupancy sensors, a
light fixture ballast and the LED light bar. It also supplies a trickle charge for a
9Volt battery that provides backup power to the LED light bar. The HN-200 is
designed for installation inside the lighting fixture housing.
The HN-200 has a male RJ45 plug attached to a 10” cable. Each FS series
24VDC occupancy sensor is equipped with a cable that carries power to the
sensor and lighting control signals to the HN-200. The two devices connect
using the shielded male-to-male RJ45 coupler provided with the HN-200.
Typically, the HN-200 connects to one FS sensor inside the lighting fixture,
however, each HN-200 can power up to three FS series sensors. FS-Cx ac-
cessories are required to connect multiple sensor wiring configurations.
OPERATION
The HN-200 must be used with a Legrand 740 31 momentary switch, provided
with the HN-200. The switch toggles the fixture between full lighting operation,
nightlighting using the LEDs, and no lighting at all.
When the light fixture is ON, the FS sensor controls the light. When no motion is
detected and the occupancy sensor’s delay expires, the light goes OFF and the
LED nightlight goes ON. Push the switch button twice to force OFF all lights.
During a power failure lasting more than 2 seconds, the HN-200 uses the 9V
battery to power the LEDs. To conserve battery, the LEDs appear dimmer than
during normal nightlight operation. The length of time the LEDs are lit during
a power failure depends on battery status. To protect the battery, the HN-200
turns off the LEDs when the battery discharges below a safe level.
Call 800.879.8585 or 972.578.1699 for Technical Support
Fig 1: HN-200 connections and operation monitor LED
Line voltage
input and
Switch
wiring
Low voltage RJ45
connection to FS sensor
Green LED
Low voltage connector to
LED night light and Battery wire assembly
Shielded male-to-male
RJ45 extension
connector
04800r1
ISOLA TED
RELAY
OUTPUTS
TO LOAD
COM
LOAD
Santa Clara, CA
800.879.8585
Appliance
Control
88T9
L
I
S
T
E
D
C
U
S
HN-200
Model:
Fixture Nightlight
Controller
120VAC, 60Hz
@120VAC
5A (N/O)
0479 9r1
Strip Gauge
12-18AWG
CU wire only
120VAC Input
HOT
NEUTRAL
GROUND

Visit our website for FAQs: www.wattstopper.com
Santa Clara, CA
800.879.8585
Appliance
Control
88T9
LISTED
C US
HN-200
Model:
Fixture Nightlight Controller
120VAC, 60Hz
@120VAC 5A (N/O)
04799r1
Strip Gauge
12-18AWG
CU wire only
120VAC Input
HOT
NEUTRAL
GROUND
04800r1
ISOLATED
RELAY
OUTPUTS
TO LOAD
COM
LOAD
1L2
Line (Black)
Neutral (White)
Ground (Green)
HOT to COM
LOAD
Neutral (White)
Legrand 740 31
Momentary N/C Switch
WIRING
Fig 2: HN-200 electrical supply, switch and load wiring
INSTALLATION
1. Determine an appropriate mounting location for the HN-200 inside the
light fixture. Use the holes or mounting slots at both ends of the HN-200
to secure it to the fixture.
2. Determine a suitable mounting location on the outside of the fixture for
the LED light bar. Make sure the 8-pin connectors from the LED light bar
and the HN-200 meet. Make a 3/4” opening in the enclosure. Run the wire
assembly from the LED light bar into the fixture by inserting it’s 8-pin con-
nector through a 3/4”opening. Install a grommet to protect the wires.
3. Install the LED light bar on the fixture using the mounting brackets (Fig 3).
4. Connect the 8-pin low voltage connector from the HN-200 to the 8-pin
connector for the battery and LED light bar wire assembly.
5. Connect the 9V rechargeable Ni-MH battery to the snap-on terminals on
the battery wire assembly inside the fixture.
6. Install the FS sensor and make appropriate adjustments as described in
the FS installation instructions.
7. Connect the RJ45 from the sensor to the RJ45 on the HN-200.
8. Connect wires to load, switch and electrical supply as shown in the wiring
section. High voltage wiring should use at least 16 AWG wire. Check local
building codes.
12-16 AWG
Cu Only
CAUTION
MAKE SURE POWER IS OFF BEFORE
WIRING THE SWITCH OR CONTROLLER.

Call 800.879.8585 or 972.578.1699 for Technical Support
Fig 3: HN-300 LED nightlight assembly and mounting
Santa Clara, CA
800.879.8585
Appliance
Control
88T9
LISTED
C US
HN-200
Model:
Fixture Nightlight Controller
120VAC, 60Hz
@120VAC 5A (N/O)
04799r1
Strip Gauge
12-18AWG
CU wire only
120VAC Input
HOT
NEUTRAL
GROUND
04800r1
ISOLATED
RELAY
OUTPUTS
TO LOAD
COM
LOAD
8-Pin Connector
Male-to-Male
RJ45 Connector
LED Light Bar
FS-205-HN Sensor
9VDC
Rechargeable
Battery
BALLAST
Red
Black
Exterior of
Fixture Enclosure
Knockout
with
Rubber
Grommet
Interior of
Fixture Enclosure
Adjustable Mounting Brackets
Wire Assembly
LED Night Light Bar
Interior of
Fixture Enclosure
Adjustable Mounting Brackets
HN-200
Diffuser
or Shade
Bulbs
WALL
Sensor

TROUBLESHOOTING
Lights will not turn on:
• SensorLEDdoesnotflash:
- Is green HN-200 LED on?
If yes, check RJ45 connections between sensor and HN-200.
If no, check circuit breaker and wiring to wall switch and HN-200.
- Check all wire connections.
• LEDdoesflash:
- Press the wall switch to toggle between OFF, nightlight, and full opera-
tion.
- Check all wire connections and verify the load wire is tightly secured.
• Istheswitchwiredcorrectly?
• Ifthesensorhasalightlevelfeature,setittomaximum(eventhe
brightest ambient light will not hold off the light fixture) and then retest
to see if the lights turn on.
• Iflightsstilldonotturnon,call800.879.8585fortechnicalsupport.
Lights will not turn off:
The time delay on the FS sensor can be set from 30 seconds to 30 minutes
(60 minutes for the FS-205-HN). Ensure that the time delay is set to the
desired delay and that there is no movement within the sensor’s view for that
time period.
• Toquicklytesttheunitforproperoperation,turnthetimedelaytomini-
mum and move out of the sensor’s view. Lights should turn off after 30
seconds.
• Iflightsstilldonotturnoff,call800.879.8585fortechnicalsupport.
LED nightlight will not turn on:
• Cyclethewallswitchbypushingthebuttontochangebetweenthemain
fixture light source and the LED nightlight.
• CheckconnectionsbetweenLEDlightbarandHN-200controller.
Call 800.879.8585 or 972.578.1699 for Technical Support

Catalog # Description
HN-300 Fixturenightlightpackageincludes:oneHN-200controller
(120VAC, 60Hz), one male-to-male RJ45 connector, one
Legrand 740 31 wall switch and cover plate, one LED light bar,
one low voltage LED and battery wire assembly, one 9VDC
rechargeable battery (sensor sold separately)
FS-105 Ceiling tile mount, low voltage PIR occupancy sensor
with adjustable time delay and light level, 6’ cable
FS-205 Fixture mount, low voltage PIR occupancy sensor
with adjustable time delay and light level, 6’ cable
FS-205-HN Fixture mount, low voltage PIR occupancy sensor
with adjustable time delay (up to 60 minutes) and light level,
1’ cable.
FS-305 Fixture or ceiling tile mount, low voltage PIR occupancy sensor,
adjustable time delay, 6’ cable
FS-405 Fixture mount, low voltage PIR occupancy sensor w/20’
diameter coverage, adjustable time delay and light level,
6’ cable
FS-505 Fixture mount, low voltage ultrasonic occupancy sensor,
2’ cable
FS-505C Same as FS-505, with directional cones
ORDERING INFORMATION
All sensors and HN-200 are White.
2800 De La Cruz Boulevard, Santa Clara, CA 95050
TechnicalSupport:800.879.8585•972.578.1699
www.wattstopper.com
06666r1 03/2006
WARRANTY INFORMATION
Watt Stopper/Legrand warranties its products to be free of defects in materi-
als and workmanship for a period of five (5) years. There are no obligations
or liabilities on the part of Watt Stopper/Legrand for consequential damages
arising out of, or in connection with, the use or performance of this product or
other indirect damages with respect to loss of property, revenue or profit, or
cost of removal, installation or reinstallation.
/