
WIGGLE
DYNAMIC WAVESHAPING SYNTHESIZER
v1.1.1
Operation Manual
www.2ndSenseAudio.com

2
Table of Contents
1.OVERVIEW 5
1.1 Sections 5
1.2 Special Controls 7
2. SYNTH PAGE 8
2.1 The Sound Generators (OPs) 8
2.1.1 WAVE (Wavetable) 8
2.1.2 TUNE (Tuning) 9
2.1.3 PD (Phase Distortion) 9
2.1.4 AMP (Amplitude Envelope) 9
2.1.5 Wavetable Display and Control Points 10
2.1.6 MOVE 10
2.1.7 Pan and Filter Selector 10
2.1.8 Wave Type Mixing 11
2.1.9 Reset All OP’s Parameters 11
2.2 FM Matrix & OP Mix 12
2.3 Filters & Effects 13
2.3.1 Filters 13
2.3.2 Equalizer 13
2.3.3 Distortion 13
2.3.4 Chorus 13
2.3.5 Phaser 14
2.3.6 Delay 14

3
2.3.7 Reverb 14
2.4 Master Control 15
2.4.1 Unison Control 15
2.4.2 Velocity Curves 15
2.4.3 Pitch Bend 15
2.4.4 Random 15
2.4.5 Panic 16
2.4.6 Poly/Mono 16
2.4.7 Master 16
2.5 Morph Pad 16
2.5.1 Snapshots 17
2.5.2 Morphing 17
2.5.3 Remove From Morph Pad 17
2.5.4 Motion 17
2.5.5 Direction 18
2.5.6 Transition 18
2.5.7 Sync & Interval 18
2.5.8 Retriggering (Retrig) 18
2.6 Modulations 19
2.6.1 Mod 1 - 8 20
2.6.2 Macro 21
2.6.3 Key-Switch Mod 21
2.6.4 Velocity Mod 21
3. PRESET BROWSER 22

4
4. UTILITY 23
4.1 Quality 23
4.2 Master Tune 23
4.3 Record Audio 23
4.4 Tutorial 23
4.5 Left Handed 23
5. SEQUENCER PAGE 24
5.1 Sequencer Global Control 24
5.2 Step Activation and Connection 24
5.3 Sequencer Control Tabs 24
5.3.1 Length 24
5.3.2 Velocity 25
5.3.3 Octave 25
5.3.4 Semitone 25
5.3.5 Nudge 25
5.3.6 Stretch 26
5.3.7 Slice 26
5.3.8 Custom 26
5.4 Sequencer Modulator 28
6. STAND ALONE HOST 29

5
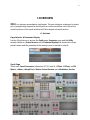
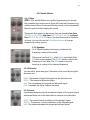
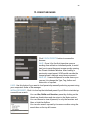
1.OVERVIEW
WIGGLE is a dynamic waveshaping synthesizer. The user interface is designed to assist
you in programming expressive sounds with an intuitive workflow. Let’s look at the
overall structure of the synth and then we’ll dive deeper into each section.
1.1 Sections
Page Selector & Parameter Display
Use the 3 big buttons to access the Synth page, Sequencer page and the Utility
window. Below is a Preset Browser and a Parameter Display that shows the current
preset’s name and the parameter if the mouse cursor is placed on a knob.
Synth Page
There are 4 Sound Generators (labeled as OP1,2,3 and 4), 2 Filters, 6 Effects, an FM
Matrix , a Mixer, a Morph Pad, a Master Control Section and a Modulation Section.

6
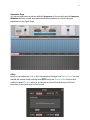
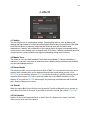
Sequencer Page
You can arrange musical pattern with the Sequencer on the top and use the Sequencer
Modulator below to create step-based modulation patterns to control the synth
parameters in the Synth Page.
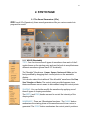
Utility
Here you can adjust the Quality (the Oversampling Settings) and Master Tune. You can
sample the internal audio coming from WIGGLE using the Record Audio function and
enable On-board Tutorial, which is an interactive tutorial that shows you the basic
functions of the synth upon its first launch.

7
1.2 Special Controls
Modulatable Knobs - These knobs can be controlled by modulators
from the Modulation Section and the Sequencer Modulators on the
Sequencer Page.
Disabled Knobs - Sometimes a knob can be “greyed out”, that means it’s not
controllable under the current settings. For example, the Glide knob only
works in Monophonic Mode and the Left, Right delay time knobs only work
when they are not Synced.
Reset Knob to Default Value
Opt+Click (Mac) or Alt+Click (Windows) on a knob to reset the knob to its default
position. You can also use Right-click and choose “To Default Value”.
Drag-and-Drop Tabs
Modulation Tabs - These tabs can be drag-and-drop to the
Modulatable Knobs.
Media Tabs - DRAD MIDI tab of the Sequencer and DRAG tab of the
Record Audio function can be drag-and-drop to your DAW’s timeline
as MIDI or Audio clips.
Combo Boxes
Different values or controls messages can be selected from these boxes.
MIDI Learn
All knobs can be MIDI Learned - Right click and select MIDI Learn.
A MIDI CC message can only be used to control one knob at a time.

8
2. SYNTH PAGE
2.1 The Sound Generators (OPs)
WIGGLE has 4 OPs (Operators), these sound generators offer you various controls to
program the sound.
2.1.1 WAVE (Wavetable)
TYPE - You can choose from 8 types of waveforms from each of the 2
combo boxes as the starting point and use the knob to morph between
different waveforms (please see 2.1.7 for details)
The “Movable” Waveforms - Linear, Square, Cosine and Cubic can be
freely modified by dragging the 4 control points on the wavetable
display.
You can also select the traditional “Non-Movable” waveforms like Sine,
Saw, Triangle and Noise. The control points would disappear since
these waveforms are not meant to be modified using the control points.
SHAPING - You can further modify the waveform by applying one of
these 8 types of shaping waveforms.
The DEPTH and FREQ knobs are used to control the intensity of the
shaping effect.
RANDOMIZE - There are 2 Randomize functions - The PHASE button
randomizes the starting phase of the waveform each time a voice is
generated. The POINT button randomizes the control points’ positions.

9
2.1.2 TUNE (Tuning)
There are 5 controls that you can use to change the pitch of the OP.
OCT - Tuning by Octaves.
SEMI - Tuning by Semitones.
CENT - Tuning by cents in a semitone up or down range.
CONT - Continuous, tuning by cents in a 2 octaves up or down range.
HARM - Tuning by Harmonic Sequence, up to the 10th harmonic.
2.1.3 PD (Phase Distortion)
The Phase Distortion can dynamically change the harmonic content
of the OP’s sound by applying a modulator waveform to modulator
the OP’s current waveform.
You can choose the 1/4 Cosine, Sine or Customize as the modulator
waveform.
The DEPTH knob changes the steepness of the modulator
waveform’s curve. When choosing the Customize option, you can
draw a waveform on the display - Single-click to add a point; double-
click to remove a point; drag the handle between 2 points to change
the curve; click and drag a point to change its position; right click on
the empty space of the display and choose “Reset” to set the
waveform to default.
2.1.4 AMP (Amplitude Envelope)
You can adjust the Amplitude Envelope here.
A (Attack) - It’s the time taken for the amplitude to rise up to its peak
from zero when a voice is generated.
H (Hold) - It’s the time for the amplitude to hold after the attack
stage, before it decays.
D (Decay) - It’s the time for the amplitude to decay before it reaches
the sustain stage.
S (Sustain) - It’s the amplitude level when the envelope reaches the
sustain stage, until the voice is released.
R (Release) - It’s the time for the amplitude to decay from sustain
level to zero when a voice is released.

10
2.1.5 Wavetable Display and Control Points
You can click and drag these 4 control points on the wavetable display to manipulate
the OP’s waveform. It’s the most intuitive way to adjust the timbre of the OP.
2.1.6 MOVE
This is the signature feature of WIGGLE. There are 4 built-in LFOs (Low Frequency
Oscillator, basically a control signal) that can control the movement of the 4 control
points.
Turn on the MOVE switch or move any of the SPEED or RANGE knobs will put the LFO
to work.
Click on the number 1 to 4 or click on a control point on the wavetable display to select
the LFO you want to adjust.
The horizontal and vertical speed and range can be individually adjusted on each LFO.
The speed can be synced to your DAW’s tempo setting. When the SYNC button is on,
you can select the sync value from the combo box; when not synced, the speed is set
in seconds.
2.1.7 Pan and Filter Selector
There’s a panning control to pan the OP’s output in the stereo field.
Below that is the selector for the OP’s output to go to any of the 2 Filters
(F1, F2) or Bypass (OFF).

11
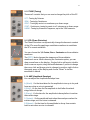
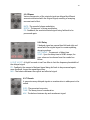
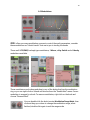
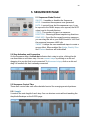
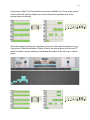
2.1.8 Wave Type Mixing
This is a newly added feature for version
1.0.3. Now, for each OP, you can select 2
types of waveforms and adjust the mix
between them using the control knob.
If the Source (left) Wave Type is a Movable
waveform and the Destination (right) Wave
Type is Non-Movable waveform, the Control
Points would fade out when the knob is
turned to the right, as shown on the pictures
on the left; and vise versa.
The MOVE function is enabled if either of the Source or Destination Wave Type is
Movable. If both Wave Types are Non-Movable, the MOVE switch and all of its control
knobs would be disabled as shown below.
2.1.9 Reset All OP’s Parameters
If you don’t like the current settings of an OP,
now you can reset all its parameters to the
default state by right-click on an empty area of
the OP and select “Reset All in OP”.

12
2.2 FM Matrix & OP Mix
In WIGGLE, the 4 OPs can be layered together to create rich sounds. Even better, they can
modulate each other to create more complex and expressive sounds using Frequency
Modulation (FM) Synthesis. The FM Matrix and OP Mix section helps you achieve that.
In FM Synthesis, the timbre of a waveform (let’s call it FM Carrier) is changed by
modulating its frequency with a modulator frequency (let’s call it FM Modulator) that is
also in the audio range, resulting a more complex waveform.
The knobs on the FM Matrix are color-coded. On each knob, the color of the left side
represents the OP that works as the FM Modulator; the color of the right side
represents the OP that works as the FM Carrier. For instance, the knobs on the upper
row each means that OP1 modulates itself, OP2 modulates OP1, OP3 modulates OP1,
OP4 modulates OP1. The FM knobs control the modulation amount.
The OP Mix knobs control the mix of the OPs in the final output. The Solo (S) buttons
are useful when you want to listen and adjust the sound of a specific OP.
Tips:
The FM Modulator’s pitch and amplitude envelope have significant influence on the
resulting sound. Experiment with different TUNE and AMP settings to explore the
possibilities.
An OP can be used purely as an FM Modulator to alter the timbre of other OPs. It’s own
audio output does not need to be present at the final out put.

13
2.3 Filters & Effects
2.3.1 Filters
WIGGLE’s OPs and FM Matrix are capable of generating rich sounds.
But sometime you might want to shave off some high frequencies, or
add the classic flavor of resonant filtering sound; so we’ve prepared 2
filters for you to further shaping the sound.
There are 9 filter types can be chosen, they are standard Low Pass
(LP-SVF, LP-12, LP-24), High Pass (HP-SVF, HP-12, HP-24) and Band
Pass (BP-SVF, BP-12, BP-24) filters. The two filters work in Parallel or
in Series. You can click on the Filter Mode Buttons to change
between the routing options.
2.3.2 Equalizer
It’s a 3-Band Equalizer that helps you balance the
frequency content of the sound.
There are a Low-Shelf (LO), a Bell (MID) and a High-Shelf
(HI) filter in the equalizer. The 3 FREQ knobs controls the
frequency of each filter. The GAIN knob control the
boosting or cutting of the selected frequency.
2.3.3 Distortion
You can add a “guitar amp type” distortion to the sound by using this
distortion unit.
GAIN - The amount of signal being fed into the distortion unit.
DRIVE - The amount of distortion effect.
MIX - The mix between the original and distorted signal.
CAB - It enables the Guitar Cabinet Simulator.
2.3.4 Chorus
It generates delayed and pitch-modulated copies of the original signal
and spread them out in the stereo field to create a choir-like effect.
RATE - The speed of pitch-modulation of the delayed signal.
DEPTH - The amount of pitch-modulation of the delayed signal.
MIX - The balance between the original and delayed signal.

14
2.3.5 Phaser
Various frequencies of the original signal are delayed by different
amounts and mixed with the original signal, resulting a sweeping
resonant swirl effect.
RATE - The speed of phase modulation.
DEPTH - The amount of phase modulation.
FB - Feedback, the amount effected signal being fed back to be
processed again.
2.3.6 Delay
2 delayed signal are panned hard left and right and
mixed with the original signal to create repeating,
decaying echoes.
LEFT, RIGHT - The amount of delay time.
SYNC - Sync the delay time to DAW’s tempo, the
sync value can be chosen from the combo box
below.
LO CUT, HI CUT - A High-Pass and a Low-Pass filter to limit the frequency bandwidth of
the delayed signal.
FB - Feedback, the amount of delayed signal being fed back to be processed again;
more feedback, longer the repeating echoes.
MIX - The balance between the original and effected signal.
2.3.7 Reverb
It generates many delayed signals as reverberation to add space to the
sound.
SIZE - The perceived room size.
TIME - The decay time of reverberation.
MIX - The balance between dry and reverberant signal.

15
2.4 Master Control
2.4.1 Unison Control
UNISON - It’s similar to the chorus effect, every note triggered will also trigger multiple
copies (unisons) of the same note stacking on each other. The knob controls the
numbers of the unisons.
DETUNE - It tunes the pitch of the unisons in various amount, from subtle chorus
effect to extremely dissonant effect.
WIDTH - It pans the unisons in the stereo field in various amount to widen the sound.
Tips: Enabling RANDOMIZE PHASE on an OP while using the WIDTH control can
enhance the stereo image of a sound but it also soften the transient (attack portion) of
the sound.
2.4.2 Velocity Curves
There are 4 velocity curves available if you want to control the amplitude by how hard
you play the MIDI keyboard.
FIXED - Select this curve if you wish the amplitude stays the same no matter how you
play the keyboard.
NORMAL - This is the standard, linear curve.
LIGHT - Select this curve if you play the keyboard lightly, but wish for the amplitude to
respond as though you were playing the keyboard a little harder.
HEAVY - Select this curve if you play the keyboard heavily, but wish for the amplitude
to respond as though you were playing the keyboard a little lighter.
2.4.3 Pitch Bend
The up and down range can be adjusted up to 2 octaves.
2.4.4 Random
Click and choose “Random Preset” to create a brand new randomized preset or choose
“Random Current Modulator” to create a randomized modulation envelope.

16
2.4.5 Panic
It simply sends an “All Notes Off MIDI” message to the synth just in case you need to
kill any hanging notes while the synth malfunctions.
2.4.6 Poly/Mono
POLY - In Polyphonic Mode, the synth can produce multiple notes at once.
MONO - In Monophonic Mode, the synth produces only one note at a time.
The combo box lets you choose the number of polyphony; in Poly Mode, the polyphony
can be chose from 2 to 24. And the combo box is disabled if Mono Mode is chosen.
LEGATO - It only works in Mono Mode, if you play the notes in a slurred fashion
(making smooth transition from note to note with no intervening gaps), the attack and
decay phases of the Amplitude Envelope would sound only once for an entire legato
sequence of notes, until the final note is released, thus creating a smooth phrase.
GLIDE - It only works in Mono Mode, on some synths it’s also called “Portamento”, it
adds a pitch sliding effect from one note to another. The higher the value, the longer it
takes the pitch of a note to glide to another.
2.4.7 Master
It changes the level of the final output, as a master volume knob. When the Unison
number is high, the output can be easily clipped. So watch out the output meter of your
DAW and use the Master knob to adjust the volume appropriately.
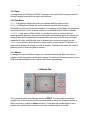
2.5 Morph Pad
This is another major sound design feature of Wiggle. You can create 4 variations
(snapshots) of the sound and morph between them by using the computer mouse, a
MIDI controller or its built-in Motion function. It can generate a wide range of sonic
results, from subtle timbre variations to drastic transformation of sounds.

17
2.5.1 Snapshots
To take snapshots of the current sound, simply click on the SNAPSHOT (1,2,3,4)
buttons at the corners of the Morph Pad. The Control Points of the OP’s wavetable and
most of the knobs’ positions can be recorded by the snapshots. There’s a list of knobs
that cannot be recorded - the OP’s filter selector, the ones on Master Control and the
ones on the bottom row of the Modulation section (ATT, REL, LENGTH, GRID and
OFFSET).
You can erase the information saved in all the snapshots, by right-clicking on the
morph pad and choose “Reset All Snapshots”. The red snapshots buttons would turn
grey and the sound would remain in its current state.
2.5.2 Morphing
Once you’ve taken the snapshots, you can experiment with the morphing by moving
the Morph Point. If you prefer to control the morph point with a MIDI controller, like an
XY Pad, just use the MANUAL CONTROL to select the corresponding MIDI CC number
for your controller. You can also use the LEARN function to assign the MIDI CC.
2.5.3 Remove From Morph Pad
Knobs - If you don’t want certain knobs to work with the morph pad, right-click on the
knob and choose “Remove From Morph Pad”. The knobs would stay in their current
positions and will not be affected by the morph pad anymore unless you take a new
snapshot again.
OP’s Control Points - To remove morphing of the OP’s Control Points, right-click on the
waveform display and choose “Remove Control Points from Morph Pad”. If you want
the Control Points to be added to the morph pad again, right-click on the Waveform
Display and choose “Add Control Points to Morph Pad”.
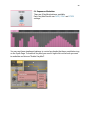
2.5.4 Motion
If you want the morphing to occur automatically, then turn on the MOTION button. The
morph point would temporarily disappear, now you can draw a moving path for the
morph point - Click to add a point; double-click to remove a point; once a point is set,
you can click and drag it to a new position; if you want to erase the current path and
start drawing again, click on the empty space on the morph pad and choose “Reset”.
When the path is drawn, you can experiment with the movement using the DIRECTION
and TRANSITION functions.

18
2.5.5 Direction
FORWARD - The morph point moves from start point to the end point and repeats.
BACKWARD - The morph point moves from the end point to the start point and repeats.
PALINDROME - The morph point moves from the start point to the end point and then
back to the start point and repeat.
CIRCULAR 1 - It closes the morph path and the morph point moves clockwise.
CIRCULAR 2 - It choses the morph pad and the morph point moves counter-clockwise.
2.5.6 Transition
LINEAR - The morph point moves in a linear speed.
EASE IN - The morph point moves slower at beginning and speeds up.
EASE OUT - The morph point moves faster at beginning and slows down.
EASE IN & OUT - The morph point moves slower at beginning, speed up and then slows
down in the end.
BOUNCE - The morph point bounces between two points on its path as it moves to the
next point.
IMMEDIATE - The morph point immediately jumps from one point to another on its
path.
STUTTER 1, 2, 3, 4 - The move points moves in a stuttered fashion. The way it stutters
varies in these 4 modes.
2.5.7 Sync & Interval
In default, the SYNC button is on and the Motion is synced to your DAW’s tempo, the
sync value shows how long it takes the morph point to move from one point to another
on its path, it can be chosen from the combo box. If you’d like the Motion to run freely,
just turn off the sync button and use the INTERVAL knob above to adjust the speed,
higher the interval, slower the speed.
2.5.8 Retriggering (Retrig)
When the RETRIG buttons is on, the morphing starts from the first point every time a
note is generated (but if you play the notes in legato, the retriggering will not take
effects).
When it’s off, the morphing carries on from where it stopped last time when a new note
is generated. When the HOLD button is on, the morphing always continues on its path
regardless of the note input.

19
2.6 Modulations
WIGGLE offers you many modulation sources to control the synth parameters, consider
these modulators as “robotic hands” that assist you in turning the knobs.
There are 8 LFO/ENV(Envelope) type modulators, 2 Macro, a Key-Switch and a Velocity
modulators available.
These modulators can be drag-and-drop to any of the knobs that has the modulation
ring, or you can right-click on a knob and choose from the “Enable Mod” menu. Once a
modulator is mapped to a knob. To remove modulation, right-click on the knob and
choose “Remove Mod”.
You can double-click the knob to enter Modulation Range Mode, then
click and drag up or down to change the modulation range, when
finished, double-click again to exit the range mode.

20
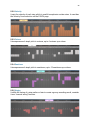
2.6.1 Mod 1 - 8
To edit the envelops of LFO/ENV Modulators, click on the display to add points; double
click to remove points; drag the handle between two points to change the steepness of
the curve; to reset the envelope, right-click on the display and choose “Reset”; to
randomize the envelope, right-click on the display and choose “Random”.
To switch between LFO or Envelope modes, click on the LFO/ENV button. In LFO mode,
the start point and end point’s positions are matched. In ENV mode, the end point
becomes the Release Point, and the point before becomes the Sustain Point.
The ENV mode also has a looping function, select
a point, right-click and choose “Set Loop Start” and
repeat the same to “Set Loop End”, then the
looping portion of the modulation curve will turn
yellow. To disable the loop, right-click on any point
within the loop and choose “Remove Loop”.
RETRIG- It only works in LFO mode, it controls if
the modulator starts from the start point every
time a note is generated.
SYNC/FREE - It controls if the modulator follows
the DAW’s tempo or run freely.
LENGTH - It controls the modulation length. When
in SYNC Mode, its value is locked to the beats;
when in FREE Mode, its value is set in seconds.
GRID - It sets the number of the guiding lines showing on the modulation display that
help you draw the modulation envelope in time.
SNAP - When its on, you can snap a point to a grid by dragging it close to it; When its
off, the points won’t snap to any grids.
OFFSET - It only works in ENV mode, it moves the starting point of the modulator
further to the right as the value gets higher. It can be modulated by any of the
Modulators to create interesting effects, adding randomness to the modulation.
Page is loading ...
Page is loading ...
Page is loading ...
Page is loading ...
Page is loading ...
Page is loading ...
Page is loading ...
Page is loading ...
Page is loading ...
-
 1
1
-
 2
2
-
 3
3
-
 4
4
-
 5
5
-
 6
6
-
 7
7
-
 8
8
-
 9
9
-
 10
10
-
 11
11
-
 12
12
-
 13
13
-
 14
14
-
 15
15
-
 16
16
-
 17
17
-
 18
18
-
 19
19
-
 20
20
-
 21
21
-
 22
22
-
 23
23
-
 24
24
-
 25
25
-
 26
26
-
 27
27
-
 28
28
-
 29
29


Ask a question and I''ll find the answer in the document
Finding information in a document is now easier with AI
Other documents
-
Native Instruments LO-FI GLOW Owner's manual
-
Arturia JUPITER-8V 2.0 User manual
-
-
 Native Instruments SKANNER XT Owner's manual
-
Native Instruments FM8 Owner's manual
-
Roland SYSTEM-8 Owner's manual
-
Behringer NEUTRON User manual
-
Novation AFX Station User guide
-
Massive Audio Massive User guide
-
Korg KORG iWAVESTATION Owner's manual
