Page is loading ...

Lowes.com
Serial Number
1
Questions, problems, missing parts? Before returning to your retailer, call our customer
service department at 1-800-233-3823, 9 a.m. - 4:30 p.m., EST, Monday - Friday.
Purchase Date
ATTACH YOUR RECEIPT HERE
LOCKING
HARDWOOD FLOORING
MODEL #ESS321, ESS543LG, ESS340, ESSM540, ESS541
ESSM541, ESS542, ESSH541, ESS544LG, ESS545LG
Français p. 18
Español p. 35
ITEM #0370555, 0772286, 0772288, 0772290, 0772291
,
0772292, 0772293, 0772296, 0772306, 0772309
Lowes.com
AB15923

2
Lowes.com
TABLE OF CONTENTS
Package Contents .............................................................................................................. 2
Safety Information .............................................................................................................. 3
Preparation .......................................................................................................................... 3
Before You Begin ................................................................................................................ 5
Floating Installation Instructions ......................................................................................... 6
Glue-Down Installation Instructions ................................................................................... 10
Completing the Installation ................................................................................................ 15
Installing Under a Door Jamb ............................................................................................ 15
Care and Maintenance ..................................................................................................... 16
Warranty ........................................................................................................................... 16
PACKAGE CONTENTS
PART DESCRIPTION QUANTITY
A Wood Plank 22 sq. ft.
Note: Planks vary in length.

3
Lowes.com
Please read and understand this entire manual before attempting to assemble, operate or install
the product.
WARNING
• Sawing, sanding and machining wood products can produce dust. Airborne wood dust can cause
respiratory, eye and skin irritation. The International Agency for Research on Cancer (IARC) has
classied wood dust as a nasal carcinogen in humans.
• If power tools are used, they should be equipped with a dust collector. If high dust levels are
encountered, use an appropriate NIOSH-designated dust mask. Avoid dust contact with eyes and
skin.
• In case of irritation, ush eyes or skin with water for at least 15 minutes.
CAUTION
• Locking hardwood ooring can be installed using a oating oor installation. A 1/2 in. expansion
zone must be maintained at all vertical obstructions including doorways and transition strips. The
ooring cannot be t tight against any vertical surface such as stairways, walls or pipes. DO NOT
attach or pinch the ooring to the suboor at any point in the installation when using a oating
installation, including gluing, nailing or by any other methods. DO NOT restrict horizontal motion of
the oor by wedging planks under other surfaces, such as door jambs, base moulding or existing
transition strips.
KEEP THESE INSTRUCTIONS FOR FUTURE REFERENCE.
• Install only at room temperature above 60˚F and 35-55% humidity conditions.
• In rooms with under-oor (radiant) heating, the surface temperature of the suboor may not, under
any circumstances, exceed 85˚F. Increasing heat should be done in 5-degree increments. Ascertain
the suboor is properly engineered or controlled for the ooring being installed. Suboors designed
for materials with higher resistance to heat transfer, such as carpet, WILL damage the ooring.
Installations that include multiple oor covering products on a single heating circuit must be adjusted
for the ooring product with the highest heat transfer or lowest temperature requirement.
PREPARATION
SAFETY INFORMATION
Before beginning installation of product, make sure all parts are present. Compare parts with package
content list. If any part is missing or damaged, DO NOT attempt to install the product.
Estimated Installation Time: 45 minutes (Note: Time may vary depending on room size and layout,
amount of preparation needed, and skill level)
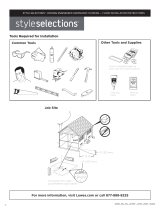
Tools Required for Installation (not included): Broom, pencil, safety glasses, matching ller,
moisture meter (wood, concrete or both), transition and wall mouldings as needed, hand saw, table
saw, circular saw or band saw, tape measure, Carpenter’s square, hammer or rubber mallet, vinyl/
plastic tapping block, pull-bar, utility knife, dust mask, wood glue, painter’s tape and hardwood
ooring cleaner. For glue-down installations add adhesive and adhesive remover, 1/4 in. x 1/2 in. x
3/16 in. V-notch trowel, and hardwood ooring moisture retardant system on concrete (if needed).
Use with urethane adhesive only.

4
Lowes.com
PREPARATION
Storage and Handling
• Handle and unload with care. Store in a dry place, being sure to provide at least a 4 in. air space
under cartons that are stored upon “on-grade” concrete oors. Flooring shall not be delivered until
the building has been enclosed with windows, doors are in place, and cement work, plastering and
all other “wet” work is completed and dry. Concrete should be at least 60 days old. Although it is
not necessary to acclimate engineered ooring it is best to store it in the environment in which it
is expected to perform prior to installation. DO NOT open cartons of locking hardwood ooring in
advance of installation. Air conditioning/heating systems should be in place and in operation at least
14 days prior, during and after installation of the ooring.
Suboor Conditions
Floating oors may be installed over any suboor that is structurally sound, at, clean and dry on all
grade levels. All substrates must meet or exceed all applicable building codes and be:
• Clean–Suboor must be free of wax, paint, oil, sealers, adhesives and other debris.
• Flat–Within 3/16 in. in 10 ft. and/or 1/8 in. in 6 ft. Sand high areas or joints. Fill low areas with a
latex additive cementitious leveling compound (not included) of 3,000-PSI minimum compressive
strength. Follow the instructions of the leveling compound manufacturer. Leveling compounds must
be tested for moisture to ensure they are within the specied requirements for proper installation.
• Dry–Check and document moisture content of the suboor using the appropriate moisture test.
Moisture content of wood suboors must not exceed 13% on a wood moisture meter, or read more
than a 4% difference from the moisture level of the product being installed.
• Structurally Sound–Nail or screw any loose areas that squeak. Wood panels should exhibit an
adequate nailing pattern. A typical pattern is 6 in. along bearing edges and 12 in. along intermediate
supports. Flatten edge swell as necessary. Replace any water-damaged, swollen or delaminated
subooring or underlayments.
Note: Avoid suboors with excessive vertical movement. Optimum performance of hardwood oor
covering products occurs when there is little horizontal or vertical movement of the suboor. If the
suboor has excessive vertical movement (deection) before the installation of the ooring it is likely it
will do so after installation of the ooring is complete. Spacing and spans, as well as their engineering
methods, are the responsibility of the builder, engineer, architect or consumer, who is better able to
evaluate the expected result based on site related performance.

5
Lowes.com
• When possible, preselect and set aside planks that blend best with all horizontally mounted
mouldings (reducer/stair nose etc.) This will assure a uniform nal appearance. Install these planks
adjoining the mouldings.
• Floor should be installed from several cartons at the same time to ensure good color and shade
mixture.
• Be attentive to staggering the ends of the planks at least 4 in. – 6 in. when possible, in adjacent
rows. This will help ensure a more favorable overall appearance of the oor.
Doorway and Wall Preparation
• Undercut door casings and jambs. Remove any existing base, shoe mould or doorway thresholds.
These items can be replaced after installation. When undercutting door casings the installer should
conrm there is the recommended expansion space. The oor must have 1/16 in. clearance under
the door casing to be able to oat freely without vertical restriction.
Refer to INSTALLING UNDER A DOOR JAMB on page 15
for more information.
Plan Your Layout
• Decide the direction of the oor installation in the room.
• Planks installed parallel to windows accent the oor the
best.
• Floors should be installed perpendicular to the oor joists.
• Stiffen suboors as necessary to prevent vertical
movement.
Note: If the room exceeds a maximum width of 30 ft. or
a maximum length of 30 ft., additional expansion space
is required. T-mouldings may be used at doorways or
intersections to increase the expansion space.
Expansion Space Requirements
Room Width Room Length Expansion Space Required
30 ft. 30 ft. 1/2 in.
40 ft. 40 ft. 3/4 in.
50 ft. 50 ft. 1 in.
60 ft. 60 ft. 1-1/4 in.
BEFORE YOU BEGIN
1/16 in.

6
Lowes.com
FLOATING INSTALLATION INSTRUCTIONS
Underlayment
1. Install the underlayment (not included) in the same
direction that the hardwood ooring is to be installed.
Most oating oor underlayment already has double-
sided tape for ease of taping the precut overlapping
seams. If a non-adhesive underlayment is used,
tape all seams with the tape included with the
underlayment.
Note: Extend the underlayment a few inches up the
wall. Trim excess prior to installing trim or mouldings.
2
Wood
Wedge
Expansion
Space
Expansion
Space
2. Use wood wedges (not included) to create an
expansion gap between the walls and installed
planks. See chart on page 5 for the correct
width of the expansion space.
3
Tongue
3. Begin installation of the rst row using the
longest planks available. Starting from the left
with the tongue facing the wall, carefully place
the rst plank against the wedges in place.
Note: Often walls are not structurally square.
Planks in rst row may need to be scribed and
cut to contour with the wall (the rst row). It is
important that planks follow wall. Mark plank
with a scribing tool (follow the shape of wall) then
cut it lengthwise to follow the line.
1

7
Lowes.com
4. Overlap the end joint of second plank onto
the board previously installed. Continue
placing succeeding planks to complete row.
Cut the last plank to correct size (allow for
expansion space) and install.
Note: Ensure that this rst row is straight using the
wood wedges to maintain proper expansion space
from the wall.
FLOATING INSTALLATION INSTRUCTIONS
5. For rst plank of second row, place by angling up
slightly, pushing forward and interlocking the side
tongue. Slide plank to the left to align the edges
of the end joint. Carefully push plank down until
tongue and groove lock together on the side. A
slight tap with a tapping block (not included) may
be necessary to complete the interlock.
Note: Begin the second row with the cut piece from
rst row. If the cut piece is shorter than 8 in., DO NOT
use. Instead, begin with a new plank that exceeds
8 in. in length and allows 6 in. spacing between the
end joints.
2
2
1
4
5
4

8
Lowes.com
FLOATING INSTALLATION INSTRUCTIONS
7. Repeat steps 5-6 to install remaining planks in
remaining rows.
Note: Whenever practical, use cut pieces from
previous rows as a starter plank to reduce waste.
Maintain 6 in. spacing between end joints after the
rst four rows for best appearance.
6. Install the second plank of the second row by
rst interlocking the end followed by the side.
Slightly angle the edge to properly engage the
tongue and groove then push down. A slight
tap with a tapping block may be necessary to
complete the interlock.
3
2
1
6
7
8 in. minimum
end joint stagger
8 in. minimum
end joint stagger

9
Lowes.com
FLOATING INSTALLATION INSTRUCTIONS
9. When installing last row of planks, use a pull bar
(not included) to draw the last row to t tightly
into previous row.
8
a.
Measure the distance between the oor face
edge (exclude the tongue) to the wall. Subtract
the expansion space from this measurement for
expansion gap. Draw a line on the planks. Cut the
planks
using an electric circular saw with nish saw
blades (not included)
along the marked line.
Note: The blade should cut into the face of the board
to prevent splinters. Care must be taken to prevent
scratching the face of planks.
1
Expansion
Space
8a
2
1
9
1
Expansion
Space
8b
8b. Place the row of planks to be t on top of the last row
of installed planks. Use a piece of plank as a scribe to
trace the contour of the wall.
Then, remove and cut the
planks
using an electric circular saw with nish saw
blades (not included)
along the marked line.
Note: The blade should cut into the face of the board to
prevent splinters. Care must be taken to prevent scratching
the face of planks.
Most often, the width of the entire length of the last row
will need to be cut (ripped) so it is narrow enough to t the
remaining space. To nd the correct measurement use
either:

10
Lowes.com
GLUE-DOWN INSTALLATION INSTRUCTIONS
Maximum adhesive working times: Urethane adhesive (not included) - 60 minutes. When not in
use, keep the adhesive container tightly closed to prevent thickening. Thickening will cause difculty
in spreading the adhesive.
• Open times and curing times of ALL adhesives vary dependent upon suboor porosity, air
movement, humidity and room temperature. Urethane adhesive has a shortened working time in
high humidity environments, whereas the polymeric resin adhesives will be lengthened. In areas
of low humidity, open time will be longer with urethane adhesives. Adjust the amount of adhesive
spread on the suboor accordingly. The adhesive should not be applied if suboor or room
temperature is below 60°F.
• Hold trowel (not included) at a minimum 45° angle rmly against the suboor to obtain a
40-60 sq. ft. per gallon spread rate. The trowel will leave ridges of adhesive and very little adhesive
between the ridges. This will allow you to still see the chalk lines between the ridges and provide the
recommended spread rate.
• For additional application instructions, follow the recommendations on the adhesive container.
• Proper ventilation within the room must be provided. An electric fan is helpful.
• Rolling is not required, but if desired, DO NOT do so until the adhesive has cured for two hours.
•
During the installation, occasionally remove a piece of ooring from the suboor and inspect the
back for proper adhesive transfer. Adequate adhesive transfer is necessary to ensure sufcient
holding strength.
• If the adhesive skins over and fails to transfer, remove and spread new adhesive to achieve proper
bonding.
Note: Clean adhesive from the surface of the oor frequently. DO NOT use painter’s tape before
adhesive is removed from the surface. Use clean towels, changed frequently, to prevent haze and
adhesive residue.
• To eliminate minor shifting or gapping of product during installation, use painter’s tape to hold the
planks together. After installation is complete, remove all of the painter’s tape from the surface of the
newly installed ooring. DO NOT let the tape remain on the ooring longer than 24 hours. Avoid the
use of masking or duct tape, which leaves an adhesive residue and may damage the nish.
• If necessary, use weights to atten planks with bows until adhesive cures in order to prevent hollow
spots. Planks that cannot be attened should be cut in length to reduce the bow, or not used.
• Be sure not to spread adhesive too far ahead of your work area.
• Avoid heavy foot trafc on the oor for at least 24 hours. Lift the furniture or xtures back into place
after 24 hours.

11
Lowes.com
GLUE-DOWN INSTALLATION INSTRUCTIONS
1
Starting wall
Expansion
space
60 min. of adhesive60 min. of adhesive
Expansion
space
Expansion
space
1. Measure out from the wall the appropriate
expansion space (see chart on page 5). Start
the installation along an exterior wall as it's
more likely to be straight and square with the
room. Mark an area that can be covered in 60
minutes (see adhesive information on page 10).
Note: Use clean white towels to clean as you go
along with mineral spirits. Adhesive that has cured
on the surface of the ooring can be difcult to
remove.
2. Using the recommended trowel (not included),
spread a sufcient amount of adhesive in marked
area.
Note: Use wedges (or 1/4 in. scrap) along the wall
to help hold planks in place while allowing for the
required expansion space
Note: If necessary, nail a sacricial row with 1 in.
nails on the dry side of your line to help hold the rst
row in place.
2
Glue area
Wood
Wedge
3. Place the rst plank with the tongue side facing
the wall, ensuring there is 100% contact between
the plank and adhesive by pressing down rmly on
plank. For random and alternate width products,
use the widest plank for the rst row.
Note: Often walls are not structurally square. Planks
in rst row may need to be scribed and cut to contour
with the wall (the rst row). It is important that
planks follow wall. Mark plank with a scribing tool
(follow the shape of wall) then cut it lengthwise to
follow the line.
Note: The rst row must be aligned and seated in the
adhesive, as all additional rows will be pushed back to
this original row. If necessary, remove tongue on rst
row to allow for expansion space.
3
Tongue

12
Lowes.com
GLUE-DOWN INSTALLATION INSTRUCTIONS
5. For rst plank of second row, angle plank up
slightly, push forward to interlock the side
tongue, then slide plank to the left to align the
edges of the end joint. Carefully push plank
down until tongue and groove lock together.
A slight tap with a tapping block (not included)
may be necessary to complete the interlock.
Note: Begin the second row with the cut piece
from the rst row. If the cut piece is shorter than
8 in., begin with a new plank that exceeds 8 in. in
length and allows 6 in. spacing between the end
joints.
4. Overlap the end joint of second plank onto the
board previously installed. Continue placing
succeeding planks to complete row.
Note: The last plank of the rst row may have to be
cut to size.
4
2
2
1
4
5

13
Lowes.com
GLUE-DOWN INSTALLATION INSTRUCTIONS
6. Install the second plank of the second row by rst
interlocking the end followed by the side. Slightly
angle the edge to properly engage the tongue and
groove then push down. A slight tap with a tapping
block may be necessary to complete the interlock.
7. Repeat steps 1-2 then 5-6 to install remaining
planks in remaining rows.
Note: Whenever practical, use cut pieces from
previous rows as a starter plank to reduce waste.
Maintain 8 in. spacing between end joints after the
rst four rows for best appearance.
3
2
1
6
7
8 in. minimum
end joint stagger
8 in. minimum
end joint stagger

14
Lowes.com
GLUE-DOWN INSTALLATION INSTRUCTIONS
9. When installing last row of planks, use a pull bar
(not included) to draw the last row to t tightly
into previous row.
2
1
9
1
8a
Expansion
Space
1
Expansion
Space
8b
8
a.
Measure the distance between the oor face
edge (exclude the tongue) to the wall. Subtract
the expansion space from this measurement for
expansion gap. Draw a line on the planks. Cut the
planks
using an electric circular saw with nish saw
blades (not included)
along the marked line.
Note: The blade should cut into the face of the board
to prevent splinters. Care must be taken to prevent
scratching the face of planks.
8b. Place the row of planks to be t on top of the last row
of installed planks. Use a piece of plank as a scribe to
trace the contour of the wall.
Then, remove and cut the
planks
using an electric circular saw with nish saw
blades (not included)
along the marked line.
Note: The blade should cut into the face of the board to
prevent splinters. Care must be taken to prevent scratching
the face of planks.
Most often, the width of the entire length of the last row
will need to be cut (ripped) so it is narrow enough to t the
remaining space. To nd the correct measurement use
either:

15
Lowes.com
• Remove all wedges and tape if used.
• Clean oor with the recommended hardwood ooring cleaner.
• Trim all underlayment and install, or re-install, all base and/or quarter round mouldings. Nail
mouldings into the wall, not the oor.
• Inspect the oor, lling all minor gaps with the appropriate blended ller.
• If the oor is to be covered, use a breathable material such as cardboard. DO NOT cover with
plastic.
• To prevent surface damage, avoid rolling heavy furniture and appliances on the oor. Use plywood,
hardboard or appliance lifts if necessary. Use protective casters/caster cups or felt pads on the legs
of furniture to prevent damage to the ooring.
COMPLETING THE INSTALLATION
INSTALLING UNDER A DOOR JAMB
Ledge
Glue
Installations of locking engineered oors under
mouldings, such as a door jamb, may require the top
lip of the groove on the end be reduced in size.
Using a small plane or knife plane (not included),
shave off the ledge off the groove of the plank.
After the groove edge has been trimmed, place the
plank into place and tighten with a pull bar to test for t.
Make certain the proper expansion space is maintained
and the ooring is not pinched. If t is incorrect, trim as
necessary.
Remove plank, then place a bead of recommended
wood glue (not included) on the bottom lip of the
groove. Reinsert the tongue into the groove and
tighten the plank with a pull bar. Hold the plank in place
with painter’s tape (not included) until the glue is dry.
CAUTION: Do not use masking tape or duct tape, as
the oor's nish may be damaged.
Note: Hold the plank in place with painter’s tape until
the glue is dry. DO NOT use masking tape or duct
tape, as the nish may be damaged.

16
Lowes.com
• NEVER CLEAN OR WET MOP WITH WATER. Water may permanently damage the oor.
• Clean oor with the recommended hardwood ooring cleaner.
• To prevent surface damage, avoid rolling heavy furniture and appliances on the oor. Use plywood,
hardboard or appliance lifts if necessary. Use protective casters/caster cups or felt pads on the legs
of furniture to prevent damage to the ooring.
• Recognizing that hardwood oor dimensions will be slightly affected by varying levels of humidity
within your building, care should be taken to control humidity levels within the 35-55% range.
To protect your investment and to assure the oors provide lasting satisfaction, refer to the
recommendations below:
• Heating Season (Dry): A humidier is recommended to prevent excessive shrinkage in
hardwood oors due to low humidity levels. Wood stoves and electric heat tend to create very
dry conditions.
• Non-Heating Season (Humid, Wet): Proper humidity levels can be maintained by use of
an air conditioner, dehumidier, or by turning on your heating system periodically during the
summer months. Avoid excessive exposure to water from tracking during periods of inclement
weather.
• DO NOT obstruct in any way the expansion joint around the perimeter of the oor.
CARE AND MAINTENANCE
WARRANTY
The manufacturer guarantees to the original purchaser that the covered products, in their original
manufactured condition, will be free from defects in grading, lamination and assembly for as long
as you (the original purchaser) own the oor. In addition, for 25 years from the date of purchase,
the nish on the covered product will not wear through, and that the nish will not separate from the
wood ooring under normal household use when maintained in accordance with the recommended
maintenance guidelines. Mechanical, chemical or other modication of the nish, such as sanding or
abrading, voids this warranty.
To be covered under the warranty you need to retain your sales slip and make sure the ooring is
properly installed in accordance with the installation instructions provided with the ooring. You must
also properly care for the oor using the instructions within this manual. It is recommended you use
only the specially formulated oor care products to preserve your ooring. Use of oor care or sundry
products (i.e. adhesives) other than those specially formulated and recommend for use with our
ooring products may damage your oor and void this warranty.
If any of the covered events listed in this guide occurs within 25 years from the date of purchase, the
manufacturer will recoat, renish, ll or furnish comparable ooring (of our manufacture and of similar
color, pattern, and quality), for either the repair of the defective area or the replacement of the oor, at
our option. In the unlikely event the manufacturer is unable to correct the problem after a reasonable
number of attempts, the manufacturer will refund the portion of the purchase price for the section of
failed ooring. This warranty does not include the removal or replacement of cabinets, xtures, retail
markups, installation or labor provided by others or supplemental costs, including but not limited to,
relocation during the repair process such as hotel, meals or moving and storage of furniture.

17
Lowes.com
WARRANTY
What Is Not Covered By These Warranties?
• The limited warranty does not cover conditions caused by improper use or maintenance.
• Splits, cracks, grain raising, checking, edge fracturing, splintering or chipping that occurs during or
after the oor has been installed and as a result of abuse, misuse, improper maintenance or care,
exposure to excessive moisture or improper environmental conditions (i.e., low or high humidity).
• Wood ooring installed in full bathrooms with a shower or tub.
• Damage caused by re, ooding, and other natural disasters and Acts of God.
• Changes in color due to aging, excessive moisture, exposure to sunlight or ultraviolet rays (which
may cause oxidation of nish/stain).
• Color, shade or texture variations between samples, printed color photography or replacement
ooring and the actual material.
• Color variations between ooring and/or samples and other ooring or wood products, which you
wish to match (e.g., cabinets, stair railings, trim, etc.).
• Deciencies related to suboor/oor joist assemblies, suboor preparation materials, and
fasteners including, but not limited to, uneven suboor surfaces, oor deection or voids in the
suboor.
• Noises including, but not limited to, squeaks, popping, etc.
• A product deformity that is not measureable or that is visible only under certain light or from a
certain angle is not considered a defect and is therefore not covered by these warranties. Visible
defects should be evaluated by their visibility from a standing position in normal lighting.
• Natural wood characteristics such as variations in grain, color, mineral streaks, knots, normal
differences between color of samples and the color of installed oors, and color variations from
plank to plank.
• Natural expansion and contraction resulting in separation between planks or damage caused by
low or excessive humidity.
• Floors that are installed in other than owner-occupied or tenant-occupied residences.
• Commercial installations of residential products.
• Construction or installation-related damage.
• Floors damaged by suboor moisture or water damage, including without limitation, due to broken
or leaking water pipes, ooding, wet-mopping spills or weather conditions.
• Installation defects, including installations made: (i) in violation of applicable state or local housing
or building codes, or (ii) contrary to written instructions furnished with the product.
Printed in U.S.A.
Style Selections
®
is a registered trademark
of LF, LLC. All Rights Reserved.

LA-297830 -1215
Lowes.com
/