LIMITED ONE-YEAR WARRANTY
Warranty Coverage: This product is warranted to be free from defects in materials or
workmanship for a period of one (1) year from the original purchase date. This product
warranty is extended only to the original consumer purchaser of the product and is not
transferable. For a period of one (1) year from the date of original purchase of the
product, our Repair Center will, at its option, either (1) repair the product or (2) replace
the product with a reconditioned comparable model. These remedies are the
purchaser’s exclusive remedies under this warranty.
Warranty Service: To obtain warranty service, you must call our warranty service
number at 1-800-233-9054 for return instructions on how to deliver the product, in either
the original packaging or packaging affording an equal degree of protection to the
Repair Center specified below. You must enclose a copy of your sales receipt or other
proof of purchase to demonstrate eligibility for warranty coverage.
To return the appliance, ship to: To contact us, please write to, call, or email:
ATTN: Repair Center Consumer Relations Department
708 South Missouri Street PO Box 7366
Macon, MO 63552 USA Columbia, MO 65205-7366 USA
Phone: 1-800-233-9054
Email: consumer_relations@toastmaster.com
What Is Not Covered: This warranty does not cover damage resulting from misuse,
accident, commercial use, improper service or any other damage caused by anything
other than defects in material or workmanship during ordinary consumer use. This
warranty is invalid if the serial number has been altered or removed from the product.
This warranty is valid only in the United States and Canada.
LIMITATION ON DAMAGES: THERE SHALL BE NO LIABILITY FOR ANY
INCIDENTAL OR CONSEQUENTIAL DAMAGES FOR BREACH OF ANY EXPRESS
OR IMPLIED WARRANTY OR CONDITION ON THIS PRODUCT.
DURATION OF IMPLIED WARRANTIES: EXCEPT TO THE EXTENT PROHIBITED
BY APPLICABLE LAW, ALL IMPLIED WARRANTIES AND CONDITIONS, INCLUDING,
WITHOUT LIMITATION, IMPLIED WARRANTIES AND CONDITIONS OF
MERCHANTABILITY AND FITNESS FOR A PARTICULAR PURPOSE OR USE ON
THIS PRODUCT ARE LIMITED IN DURATION TO THE DURATION OF THIS
WARRANTY.
Some jurisdictions do not allow the exclusion or limitation of incidental or consequential
damages, or allow limitations on how long an implied warranty lasts, so the above
limitations or exclusions may not apply to you. This warranty gives you specific legal
rights and you may have other rights under the laws of your jurisdiction.
For more information on our products, visit our website: www.esalton.com.
'2006 All rights reserved.
Made in China 8/06
SMART MILL & BREW
™
10-Cup Coffee Maker
Region Specific Weather Information
Model ME1MSB
with MSN
®
Direct
Melitta_ME1MSB_IB_7-12-06 12/7/06 2:44 PM Page 1

Trouble
Shooting
Symptom Possible Solutions
I have pressed the The ON/OFF Button will
ON/OFF Button but STOP the Mill/Brew process.
the Coffee Maker Unplug the Coffee Maker
will not turn OFF to turn the unit OFF.
Display graphics are Press the MENU Button
unclear on the Display to RESET the unit. If Display is
unclear, unplug unit and let sit for
5 minutes. When the unit is
plugged in, the Coffee Maker will
scan to acquire the signal.
Depending on the signal strength
in your area, “Acquiring Signal”
may remain on the LCD Display
for up to 1 hour. Please be patient.
Screen appears This is normal. When the Coffee
to flicker Maker is scanning for the FM
signal, some flickering may be
noticeable. Please be patient.
Screen is flashing A real time Weather Alert or Amber
Alert has been issued. Press the
COFFEE/WEATHER Button
and the information will scroll on the
bottom of your screen. If you need
to know further details about the
Alert in your area, please tune into a
local media source (i.e. TV, radio,
or internet).
29
Melitta_ME1MSB_IB_7-12-06 12/7/06 2:44 PM Page 3

Welcome
Important
Safeguards
Quick Start
Controls
& Features
Brewing
Instructions
Weather
Mode
User
Maintenance
Definition
of Terms
Trouble
Shooting
Trouble
Shooting
28
Symptom Possible Solutions
Coffee is too weak
or too strong See Coffee Brew Chart below.
There is water on the Do not overfill the Water Reservoir.
countertop behind the Do not exceed 10 (5-oz.) cups
Coffee Maker of water.
Remove the animated Press MENU Button and change
sleeping cat from the Sleep Mode to OFF.
LCD Display
Coffee Brew Chart
Weaker Stronger
Grind Coarser Finer
Coffee Beans Use less Add more
Water Add more Use less
*Do not use less than 4 (5-oz.) cups of water.
*Do not exceed 10 (5-oz.) cups of water and 8 scoops
of whole bean coffee. (1 scoop = 1 tablespoon)
NOTE: This chart is to be used as a general guide.
Adjust coffee, water and grind to suit your
individual taste.
Thank you for your purchase of the Smart Mill & Brew™ 10-Cup
Coffee Maker featuring MSN
®
Direct region specific weather
information -- Melitta’s
®
perfect way to begin and plan your day.
1
Welcome
For easy access to information in this Owner’s Manual, follow the
sectioned tabs on the pages listed below.
Welcome . . . . . . . . . . . . . . . . . . . . . . . . . . . . . . . . 1
Important Safeguards . . . . . . . . . . . . . . . . . . . . . . . 2 - 4
Quick Start . . . . . . . . . . . . . . . . . . . . . . . . . . . . . . . 5 - 6
Controls & Features . . . . . . . . . . . . . . . . . . . . . . . . 7 - 12
Brewing Instructions . . . . . . . . . . . . . . . . . . . . . . . . 13 - 18
Weather Mode . . . . . . . . . . . . . . . . . . . . . . . . . . . . 19 - 22
User Maintenance . . . . . . . . . . . . . . . . . . . . . . . . . . 23 - 24
Definition of Terms . . . . . . . . . . . . . . . . . . . . . . . . . 25 - 26
Trouble Shooting . . . . . . . . . . . . . . . . . . . . . . . . . . . 27 - 29
Melitta_ME1MSB_IB_7-12-06 12/7/06 2:44 PM Page 5

Trouble
Shooting
Important
Safeguards
27
Trouble Shooting
Symptom Possible Solutions
Visit the msn website at:
www.msndirect.com/coverage
to make sure there is FM signal
coverage in your area or
please call 1-800-459-8060 for
further assistance.
Unit will not brew coffee The Coffee Mill Assembly must
be placed properly in the Brew
Chamber and the Coffee Maker
Lid must be closed securely.
Power Failure Unplug the Coffee Maker until
power is re-established.
Overlapping FM Coverage The Coffee Maker will auto-
matically select data from the FM
tower signal that is strongest.
In the event of a local Weather or
Amber Alert, consult a trusted TV,
radio or internet station.
Temperatures are in ºC Press MENU Button and change
METRIC FORMAT to ºF.
Visibility miles are in km Press MENU Button and change
METRIC FORMAT to miles.
NO SIGNAL
PLEASE
CALL
1-800-459-
8060
The Coffee Maker will not operate
without the Lid being closed
properly. Replace the Coffee Mill
Lid and operation will resume.
2
IMPORTANT SAFEGUARDS
When using electrical appliances, basic safety precautions
should always be followed, including the following:
1. Read all instructions.
2. Do not touch hot surfaces. Use handles or knobs.
3. To protect against electric shock, do not place cord, plugs,
or appliance in water or other liquid.
4. Close supervision is necessary when any appliance is used
by or near children.
5. Unplug from outlet when not in use and before cleaning.
Allow to cool before putting on or taking off parts, and
before cleaning the appliance.
6. Do not operate any appliance with a damaged cord or
plug or after the appliance malfunctions, or has been
damaged in any manner. Contact Consumer Service for
examination, repair or adjustment.
7. The use of an accessory not evaluated for use with this
appliance may cause injuries.
8. Do not use outdoors.
9. Do not let cord hang over edge of table or counter, or touch
hot surfaces.
10. Do not place on or near a hot gas or electric burner, or in a
heated oven.
11. To disconnect, remove plug from wall outlet.
12. Do not use appliance for other than intended use.
13. Be certain Lids are securely in place before operating
appliance.
14. Scalding may occur if the Lids are removed during the
brewing cycle.
15. The Carafe is designed for use with this appliance. It must
never be used on a range top.
16. Do not set a hot Carafe on a wet or cold surface.
17. Do not use a cracked Carafe or a Carafe having a loose or
weakened handle.
18. Do not clean Carafe with cleansers, steel wool pads, or
other abrasive material.
19. Check Filter Basket for presence of foreign objects
before using.
SAVE THESE INSTRUCTIONS
For Household Use Only
Melitta_ME1MSB_IB_7-12-06 12/7/06 2:44 PM Page 7

Important
Safeguards
Definition
of Terms
26
Visibility
The distance at which a given standard object can be seen and
identified with the unaided eye.
Probability of Precipitation (PoP)
PoP Percent Expressions of Uncertainty
10% slight chance or none
20% slight chance
30-40-50% chance
60-70% likely
80-90-100% (none used)
Winds
If the Sustained Wind Speed is 20-30 mph, the term “Windy” may
be applied. The numbers may vary in other parts of the country due
to such variables as terrain and elevation.
What is an AMBER Alert?
The AMBER Alert Plan is a voluntary partnership between law-
enforcement agencies and broadcasters to activate an urgent
bulletin in the most serious child-abduction cases.
Broadcasters use the Emergency Alert System (EAS), formerly called
the Emergency Broadcast System, to air a description of the
missing child and suspected abductor.
This is the same concept used during severe weather emergencies.
The goal of the AMBER Alert is to instantly galvanize the entire
community to assist in the search for and safe return of the child.
Alert information is put together for public distribution. This
information can include descriptions and pictures of the missing
child, the suspected abductor, a suspected vehicle, and any other
information available and valuable to identifying the child and
suspect.
Please consult: http://codeamber.org for further information on
Amber Alerts in and around your area.
*Terms and information provided by the National Weather Service.
3
ADDITIONAL IMPORTANT
SAFEGUARDS
WARNING: This appliance generates heat and escaping
steam during use. Proper precautions must be taken
to prevent the risk of burns, fires, or other injury to
persons or damage to property.
1. All users of this appliance must read and understand this
Owner’s Manual before operating or cleaning this appliance.
2. The cord to this appliance should be plugged into a
120V AC electrical outlet only.
3. Use water only in this appliance! Do not put any other liquids
or food products in this appliance. Do not mix or add anything
to the water placed in this appliance, except as instructed in
the User Maintenance Instructions to clean the appliance.
4. DO NOT attempt to move an appliance containing hot liquids.
Allow appliance to cool completely before moving.
5. Keep appliance at least 4 inches away from walls or other
objects during operation. Do not place any objects on top of
appliance while it is operating. Place the appliance on a
surface that is resistant to heat.
6. If this appliance begins to malfunction during use, immediately
unplug the cord. Do not use or attempt to repair the
malfunctioning appliance.
7. If this appliance falls or accidentally becomes immersed in
water or any other liquid, unplug it immediately. Do not reach
into water! Do not use this appliance after it has fallen
into or has become immersed in water. Contact
Consumer Service for examination and repair.
8. Do not leave this appliance unattended during use.
9. The appliance must be left to cool down sufficiently before
adding more water to avoid spattering.
10. Always use fresh, cool water in your appliance. Warm water or
other liquids, except as listed in the Care and Cleaning
section, may cause damage to the appliance.
11. DO NOT put Carafe into a microwave.
CAUTION: To prevent injury when utilizing Pause & Pour
(drip-stop) feature, replace Carafe within 20 seconds of
removing during brewing process.
12. Make sure that the Filter Basket and Filter Basket Lid are
securely assembled into the appliance before use.
13. Only coffee beans and coffee grounds should be placed into
the Filter Basket.
Melitta_ME1MSB_IB_7-12-06 12/7/06 2:44 PM Page 9

Definition
of Terms
Important
Safeguards
25
Definition of Terms
*
BE PREPARED FOR HAZARDOUS WEATHER
WATCH = Be alert!
WARNING = Take action!
Understanding Weather Alerts
Weather Advisory
An advisory is for less serious conditions that cause significant
inconvenience and, if caution is not exercised, could lead to situations
that may threaten life and/or property.
Weather Watch
A watch is used when the risk of a hazardous weather event has
increased significantly, but its occurrence, locations, and/or timing is
still uncertain. It is intended to provide advance notice of possible
inclement weather.
Weather Warning
A warning is used for conditions posing an immediate threat to
life or property. Depending on the type of warning, you should take
immediate, appropriate action.
Ultraviolet Index
This index provides important information to help you plan your
outdoor activities in ways that prevent overexposure to the sun's rays.
It was designed by the National Weather Service (NWS) and the
Environmental Protection Agency (EPA).
Category UV Time Actions to Take
Index to Burn**
Minimal 0 - 2 60 min. Apply SPF sunscreen.
Low 3 - 4 45 min. Apply SPF sunscreen, wear a hat.
Moderate 5 - 6 30 min. Apply SPF 15, wear a hat.
High 7 - 9 15 - 24 min. Apply SPF 15 to 30, wear a hat
& sunglasses.
Limit midday exposure.
Very High 10+ 10 min. Apply SPF 30; wear a hat,
sunglasses, and protective
clothing; limit midday exposure.
**PLEASE NOTE: All skin types are different. This chart is to be used as
a guide only. Please use caution whenever you are unprotected from
the sun’s rays.
4
ADDITIONAL IMPORTANT
SAFEGUARDS (Continued)
CAUTION: BLADES ARE SHARP. DO NOT ATTEMPT TO
DISASSEMBLE COFFEE MILL ASSEMBLY.
WARNING: To avoid serious injury, never place fingers
or objects at the bottom of the Filter Basket.
WARNING: To avoid scalding and burns, do not open
the Filter Basket Lid until all liquid has emptied into
the Carafe. Always allow the Coffee Maker to cool
for 15 minutes before brewing another Carafe of
coffee. Use caution; coffee grounds are hot after
brewing.
Polarized Plug
This appliance has a polarized plug (one blade is wider than the
other). To reduce the risk of electric shock, this plug is intended
to fit into a polarized outlet only one way. If the plug does not
fit fully in the outlet, reverse the plug. If it still does not fit, contact a
qualified electrician. Do not attempt to modify the plug in any way.
Short Cord Instructions
A short power-supply cord is provided to reduce the risk resulting from
becoming entangled in or tripping over a longer cord.
Do not use an extension cord with this product.
Plasticizer Warning
CAUTION: To prevent Plasticizers from migrating to the finish of the
counter top or table top or other furniture, place NON-PLASTIC
coasters or place mats between the appliance and the finish of the
counter top or table top.
Failure to do so may cause the finish to darken. Permanent blemishes
may occur or stains can appear.
Electric Power
If the electrical circuit is overloaded with other appliances, your
appliance may not operate properly. It should be operated on a
separate electrical circuit from other appliances.
WARNING
TO REDUCE THE RISK OF FIRE OR ELECTRIC SHOCK, DO NOT
REMOVE THE BOTTOM COVER. NO USER-SERVICEABLE
PARTS INSIDE. REPAIR SHOULD BE DONE BY AUTHORIZED
SERVICE PERSONNEL ONLY.
Melitta_ME1MSB_IB_7-12-06 12/7/06 2:44 PM Page 11

Quick Start: Plug & Play
MSN
®
Direct constantly streams both time and region-specific weather
information to more than 120 cities in North America.
NO set-up, NO subscription, NO internet connection is
necessary to receive the most up-to-the-minute time and weather
information. All data is updated constantly, 24/7 via a regional
FM signal.
1. Carefully unpack your Coffee Maker. Remove any labels from the
outside surfaces.
2. Plug the Smart Mill & Brew™ Coffee Maker into a 120V AC
electrical outlet.
3.
The “Welcome” screen will appear, followed by “Scanning for Signal.”
Depending on the signal strength in your area, “Acquiring Signal”
may remain on the LCD Display for up to 1 hour. Please be patient.
4. While the unit is scanning for the signal, you may begin to
brew a Carafe of freshly ground coffee. Simply press the
COFFEE/WEATHER Button and the “Mill & Brew Idle”
screen will appear.
HELPFUL HINT: Use the COFFEE/WEATHER Button to
toggle between Coffee Mode and Weather Mode.
5. If this is the initial use of the Coffee Maker, please consult the section
entitled “Before Using Your Smart Mill & Brew™ For The First Time”
and follow the steps outlined on pages 14 and 15 to make sure the
unit is properly cleaned and ready for brewing.
6. After cleaning, simply add your favorite whole bean coffee and water,
select the grind setting for coffee beans, then grind and brew fresh
coffee immediately. Ground coffee may also be used. Please consult
the “Brewing Coffee: Immediate Start” section described on pages
15 to 17 for detailed procedures.
Quick Start
User
Maintenance
24
7. Press the ON/OFF Button to turn the Coffee Maker ON again.
Allow the vinegar/water solution to cycle through the Coffee
Maker. When the brew cycle is finished, press the ON/OFF
Button to turn the Coffee Maker OFF and discard the
vinegar/water solution.
8. To rinse: Allow the Coffee Maker to cool for 15 minutes. Fill the
Carafe with cold fresh water. Pour the water into the Water
Reservoir. Replace the Carafe onto the Warming Plate and press
the ON/OFF Button. When the brew cycle is complete discard
the water. Repeat with another Carafe of fresh water. Discard the
rinse water.
9. Wash and dry all removable parts. Wipe the exterior of the
Coffee Maker with a damp cloth.
5
WARNING: Changes or modifications to this equipment
not expressly approved by the party responsible for
compliance could void the user's authority to operate
the equipment.
This device complies with Part 15 of the FCC Rules. Operation
is subject to the following two conditions:
(1) this device may not cause harmful interference, and
(2) this device must accept any interference received, including
interference that may cause undesired operation.
NOTE: This equipment has been tested and found to comply
with the limits for a Class B digital device, pursuant to Part 15
of the FCC Rules. These limits are designed to provide
reasonable protection against harmful interference in a
residential installation.
This equipment generates, uses and can radiate radio
frequency energy and, if not installed and used in accordance
with the instructions, may cause harmful interference to radio
communications. However, there is no guarantee that
interference will not occur in a particular installation. If this
equipment does cause harmful interference to radio or
television reception, which can be determined by turning the
equipment off and on, the user is encouraged to try to correct
the interference by one or more of the following measures:
• Reorient or relocate the receiving antenna.
• Increase the separation between the equipment and receiver.
• Connect the equipment into an outlet on a circuit different
from that to which the receiver is needed.
• Consult the dealer or an experienced radio/TV technician
for help.
Melitta_ME1MSB_IB_7-12-06 12/7/06 2:44 PM Page 13

User
Maintenance
Quick Start
23
User Maintenance
Instructions
This appliance requires little maintenance. It contains no user serviceable
parts. Do not try to repair it yourself. Any servicing requiring disassembly
must be performed by a qualified appliance repair technician.
Care and Cleaning
Coffee is naturally oily. A build up of coffee oils on the Coffee Maker will
adversely affect the taste of new pots of coffee. For best results, completely
clean and dry all removable parts after every use.
When cleaning your Coffee Maker, please observe the following precautions:
•Make sure the Coffee Maker is OFF. Unplug and allow the Coffee Maker
to cool completely before cleaning.
• NEVER IMMERSE THE CORD, PLUG OR COFFEE MAKER IN
WATER OR OTHER LIQUID.
•Do not use metal cleaning pads or abrasive cleaners.
Daily
Wash all removable parts in warm, soapy water. Rinse thoroughly and dry. If
necessary, use a small brush, such as a toothbrush, to clean the Carafe Lid,
the bottom of the Filter Basket and around the Pause & Pour Switch.
Monthly
Mineral deposits from tap water can clog the Coffee Maker or reduce its
efficiency and adversely affect the taste of the coffee. For best coffee
brewing results, the Coffee Maker should be cleaned once a month with a
solution of vinegar and water. To remove mineral deposits from the
Coffee Maker, follow the descaling instructions described below:
1. Pour 1/2 cup of vinegar into the carafe. Add cold water up to
the Water Reservoir’s 4-cup mark. Pour the vinegar/water
mixture into the Water Reservoir.
2. Insert the Filter Basket. DO NOT USE COFFEE!
3. Make sure the Grind Level is set to “0” to turn the Blades OFF.
Consult the “Selecting the Grind Level” section of this Owner’s Manual
for detailed instructions.
4. Press the ON/OFF Button to begin the brew cycle.
5. When the brew cycle is finished, press the ON/OFF Button to turn the
Coffee Maker OFF. Carefully remove the Carafe and place on a heat
resistant surface.
6. Wait 15 minutes. Pour the same vinegar/water solution back into the
Water Reservoir. Replace the Carafe onto the Warming Plate.
HELPFUL HINT: The unit’s Clock automatically synchron-
izes to an atomic clock and the correct date, day and
time will appear on the top of each Display.
7. If the screen begins to flash while your Coffee Maker is in
operation, a real time Weather Alert or Amber Alert has been
issued. Press the COFFEE/WEATHER Button and the
information will scroll on the bottom of your screen. If you need
to know further details about the Alert in your area, please tune
into a local media source (i.e. TV, radio, or internet).
8. If the following screen appears, please visit the msn website
at: www
.msndirect.com/coverage to make sure there is FM
signal coverage in your area. While we do not anticipate
problems, if your Coffee Maker is still experiencing difficulty in
obtaining a signal, please call 1-800-459-8060 for further
assistance to help you resolve any issues.
9. If you do not wish to see the sleeping cat, please consult the
instructions for Menu/Setup on page 9 to turn Sleep Mode
to OFF.
6
NO SIGNAL
PLEASE
CALL
1-800-459-
8060
Melitta_ME1MSB_IB_7-12-06 12/7/06 2:44 PM Page 15

Weather Warnings & Alerts
When the Coffee Maker is in the Weather mode, real time information
at the bottom portion of the screen is updated continuously, and will
scroll through the information described in the chart below.
NOTE: Press the COFFEE/WEATHER Button to display
pertinent Coffee information on the bottom pane. Please
refer to the diagram on page 13 of this Owner’s Manual for a
detailed description of coffee information displayed.
NOTE: If the screen begins to flash while your Coffee Maker is in
operation, a real time Weather Alert or Amber Alert has been
issued. Press the COFFEE/WEATHER Button and the
information will scroll on the bottom of your screen. If you need
to know further details about the Alert in your area, please tune
into a local media source (i.e. TV, radio, or internet).
HELPFUL HINT: Please refer to the “Definition of Terms”
section on pages 25 and 26 of this Owner’s Manual for
the National Weather Service’s detailed descriptions of
Weather Warnings and Alerts.
Severe Weather
Visibility (in miles or km)
Sunrise
Sunset
UV Levels
HELPFUL HINT: Please refer to the “Weather Terms /
Ultraviolet Index” section on page 25 of this Owner’s
Manual for a detailed description of the UV Index and
proper actions to take based on UV information.
Weather
Mode
Controls
& Features
22
• by UV Index Number
• low, moderate, high
Coffee Maker Controls
Control Panel
COFFEE/WEATHER Button
Toggles between Coffee and Weather modes.
ON/OFF Button
Press to begin the grinding/brewing process; press to stop grinding or
brewing or press to turn the Warming Plate manually OFF.
NOTE: To power OFF the unit completely, unplug the
Coffee Maker.
MENU Button
Use to change default settings for backlight, date format, language,
metric/temperature format, time format, and sleep (cat) mode. Also
press to reset the Coffee Maker to original factory settings.
UP/DOWN Buttons
Use this pair of Buttons to navigate coffee brewing and weather
operations and functions.
HELPFUL HINT: When programming Future Brew Start Time,
press and hold down the UP or DOWN Button to fast
forward or fast reverse the time in 5-minute increments.
TIMER Button
Press to program Future Brew Start Time.
MILL Button
Select coffee bean grind setting: from 0 to 7.
HELPFUL HINT: When using previously ground coffee, you must
set Grind Level to “0” to turn the Grinder Blades OFF.
LCD Display
Displays current time, day, date, Coffee Maker status, Grind Level,
current weather conditions and 3-Day weather forecast.
Mill On/Off Select
Up
Menu
DownTimer
7
Melitta_ME1MSB_IB_7-12-06 12/7/06 2:44 PM Page 17

Weather
Mode
Controls
& Features
Weather Icons
Description Icon
Sunny
Partly-Sunny
Cloudy
Rain
Thunder Storm
Night Clear
Night Cloudy
Frigid
Snow
Fog
Windy
Haze
Dust
Smoke
21
METRIC FORMAT
ºF / MILE
ºC / KM
Menu/Setup
Press the MENU Button to change factory settings. Control options
include: BACKLIGHT, DATE FORMAT, LANGUAGE: English, French or
Spanish, METRIC FORMAT, TIME FORMAT, RESET all settings and SLEEP
MODE (cat animation).
Press the UP or DOWN Button to navigate between settings. When the
desired option is highlighted, press the SELECT Button to activate.
HELPFUL HINT: In the event of a power failure, it may be necessary
to use the MENU Button to reset previously changed options.
SETUP
BACKLIGHT
DATE FORMAT
LANGUAGE
METRIC FORMAT
TIME FORMAT
RESET
SETUP
BACKLIGHT
DATE FORMAT
LANGUAGE
METRIC FORMAT
TIME FORMAT
RESET
SETUP
BACKLIGHT
DATE FORMAT
LANGUAGE
METRIC FORMAT
TIME FORMAT
RESET
SETUP
BACKLIGHT
DATE FORMAT
LANGUAGE
METRIC FORMAT
TIME FORMAT
RESET
LANGUAGE
ENGLISH
FRENCH
SPANISH
BACKLIGHT
ON
OFF
AUTO OFF
8
• Controls the blue
backlit LCD Display
• ON = ON always
• OFF = No backlight
• AUTO OFF = OFF
after 10 sec. delay
• Changes the format
of the Display
• Day/Month
• Month/Day
• Choose to display
coffee and weather
information in
3 languages
• Changes temp.
information to
display in ºF or ºC
• Changes visibility
information from
miles to km
DATE FORMAT
DD / MM
MM / DD
Melitta_ME1MSB_IB_7-12-06 12/7/06 2:44 PM Page 19

Controls
& Features
Weather
Mode
3-Day Weather Forecast
Screen 4
Probability of Precipitation
3-Day Weather Forecast
Screen 3
Low Temps
3-Day Weather Forecast
Screen 2
High Temps
• Weather Icon
• Today’s High Temp.
• Today’s Low Temp.
• Current Temp.
• Probability of Precipitation
Current Forecast
Screen 1
20
Weather Information Center
When the Coffee Maker is in the Weather mode, real time information is
updated continuously, 24/7 via a regional FM signal. The 4 Weather screens
advance automatically. Press the UP Button at any time to manually advance
to the next screen or press the DOWN Button to go back to previous screen.
SETUP
BACKLIGHT
DATE FORMAT
LANGUAGE
METRIC FORMAT
TIME FORMAT
RESET
TIME FORMAT
12 HOUR
24 HOUR
SETUP
DATE FORMAT
LANGUAGE
METRIC FORMAT
TIME FORMAT
SLEEP MODE
EXIT
SETUP
DATE FORMAT
LANGUAGE
METRIC FORMAT
TIME FORMAT
RESET
SLEEP MODE
RESET
YES
NO
SETUP
BACKLIGHT
DATE FORMAT
LANGUAGE
METRIC FORMAT
TIME FORMAT
RESET
9
• Changes time display
• Resets all options
to original factory
settings
• When the unit is
idle, the sleeping
cat will appear.
Cat will appear at
the desired “sleep”
time. Select OFF if the
animated cat screens
are not desired
• Press either the
SELECT Button or
press the MENU
Button to exit the
SETUP screen
SLEEP MODE
10
20
60
OFF
Melitta_ME1MSB_IB_7-12-06 12/7/06 2:44 PM Page 21

Weather
Mode
19
Weather Only Screens
Current Conditions and Forecast
Animated
Weather Icons
3 Day
Future
Weather
Forecast
Current Forecast
High/Low
Current Temp.
Chance of
Precipitation
•
•
•
•
•
•
•
•
Time Display
Scrolling Weather
Information
Visibility
UV Index
Sunrise/Sunset
Date Display
FM Signal
Strength
AM/PM
•
Displays real-
time Weather
Warnings
& Alerts
City
3-Day Weather Forecast
HELPFUL HINTS: 4 Weather screens will advance automatically.
Press the UP Button at any time to manually advance to the next
screen or press the DOWN Button go back to previous screen.
Please consult the “Definition of Terms” and “Understanding Weather
Alerts” sections described on pages 25 and 26 for further information.
10
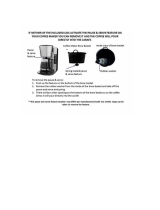
Coffee Maker Features
NOTE: Your product may vary slightly from illustration.
1. Water Reservoir Lid
Lift to pour water into the Water Reservoir.
2. Water Window
Markings indicate water needed to make corresponding cups of
brewed coffee, 10 (5-oz.) cups maximum, 4 (5-oz.) cups minimum.
3. Pause & Pour
Stops the flow of coffee from the Brew Chamber when the Carafe
is removed from the Warming Plate to allow a cup to be poured in
mid-brew, if desired. Since the extraction rate varies during the brew
cycle, we recommend allowing the brewing cycle to finish before
pouring the brewed coffee.
CAUTION: To prevent injury when utilizing Pause & Pour
(drip-stop) feature, replace Carafe within 20 seconds of
removing during brewing process.
4. Carafe Lid (P/N 31190)
Special design minimizes oxygen flow into the Carafe to help
preserve coffee flavor.
5. Carafe with Lid (P/N 31191)
10 cup capacity with a sturdy, easy-grip Handle.
6. Warming Plate with Auto Shut Off
The Warming Plate’s scratch-resistant, non-stick coating prevents
the Carafe from sticking. When brewing is complete, the Warming
Plate keeps the coffee at the ideal serving temperature and will shut
off automatically after 1 hour; the words “WARMING PLATE” will
appear in the LCD Display when the unit is in the Coffee Mode and
the Warming Plate is ON.
1.
2.
3.
4.
5.
6.
7.
8.
9.
10.
11.
12.
13.
Controls
& Features
Melitta_ME1MSB_IB_7-12-06 12/7/06 2:45 PM Page 23

Controls
& Features
Brewing
Instructions
18
Setting the Future Brew Start Time
1. The Future Brew Time is disabled from the factory. The word
“OFF” will appear on the lower left corner of the Display. To set,
press the TIMER Button.
NOTE: Once the Future Brew Time has been set, the Future
Brew Time will default to the last time chosen.
2. Future Brew Start “hours” time (next to the coffee cup in the
bottom pane) will begin to flash. Adjust the Future Brew Time
“hours” by pressing the UP or DOWN Button repeatedly. The
hands of the clock will spin. When the desired “hour” is shown,
press the SELECT Button. Next the “minutes” will begin to flash.
Press the UP or DOWN Button until the desired “minutes”
appears on the screen; then press the SELECT Button.
HELPFUL HINT: Hold down the UP or DOWN Button to fast
forward or fast reverse the time in 5-minute increments.
The AM and PM will automatically change.
3. When the desired Brew Start time appears on the Display, press
the TIMER Button to finalize.
4. The ENABLE/DISABLE screen will automatically appear on the
Display. “ENABLE” will be highlighted. Press the SELECT Button
to program the desired Future Brew Start time into memory.
IMPORTANT: If the Future Brew Time function is not needed
for the following day, press the TIMER Button to activate
the Timer function, then press TIMER Button again, and
the ENABLE/DISABLE screen appears. Press the DOWN
Button to highlight DISABLE and press the SELECT Button
to stop Coffee Maker from brewing automatically. The
word OFF will appear next to the coffee cup icon in the
lower left corner of the LCD Display.
5. Prepare the unit for future brewing. Fill Water Reservoir with the
desired amount of water; add coffee beans or ground coffee to
the Filter Basket. Please consult the “Brewing Coffee: Immediate
Start” section described on pages 15 to 17 for detailed
procedures.
11
7. Control Panel
Use the Control Panel Buttons to set up all Coffee Maker functions,
program the Mill, preset automatic Future Brew Time, and to
manually start and stop brewing.
8. LCD Display
Program the blue backlight for spectacular visibility to highlight the
Clock’s date and time of day, display animated weather functions
and Coffee Maker status.
9. Coffee Mill
Includes a Permanent Stainless Steel Filter Basket with integrated
Stainless Steel Blades.
10. Coffee Mill Lid Latch
Press in Latch to release Lid.
11. Coffee Mill Lid
Lift to open.
12. Overflow Slot
If too much water is poured into the Water Reservoir, any
excess drains through this opening.
13. Cord Storage Compartment
Store unused cord inside the hidden Cord Storage Compartment to
keep counters neat.
HELPFUL HINT: Please call 1-800-459-8060 for availability of
replacement parts.
Melitta_ME1MSB_IB_7-12-06 12/7/06 2:45 PM Page 25

Controls
& Features
Brewing
Instructions
17
NOTE: If the Grind Level is set to “0,” when the ON/OFF Button
is pressed, brewing will begin immediately.
5. A cup of steaming coffee icon and “ON” will appear in the lower
pane of the LCD Display during brewing.
6. When brewing is complete, the WARMING PLATE screen will
appear. The Warming Plate will keep your coffee at the ideal
serving temperature for 1 hour. As a safety precaution, the
Warming Plate will automatically shut off after 1 hour.
HELPFUL HINT: To stop the brewing process at any time,
press the ON/OFF Button.
For Best Results:
•To avoid overflow and water leakage from the back of the Coffee
Maker, do not fill the Water Reservoir with more than 10 (5-oz.)
cups of fresh water; do not exceed the 10-cup marking on the
Water Reservoir.
• Do not add less than 4 cups (20 ounces) of water to the
Water Reservoir.
• Do not add more than than 8 scoops of whole bean coffee to the
Filter Basket.
•To keep coffee hot, return the Carafe to the Warming Plate
after serving.
• The Coffee Mill is intended for COFFEE ONLY. Never grind any
other food products or spices in the Coffee Mill.
12
Coffee Mill Assembly
1. Filter Basket (P/N 30640)
Permanent Stainless Steel Filter
Basket makes paper coffee filters
unnecessary.
2. Maximum Fill Level
To prevent overflowing, do not place
more than 8 scoops (8 tablespoons)
of coffee beans in the Filter Basket.
3. Blades
Stainless Steel Blades.
4. Brew Chamber (P/N 31193)
Holds the Filter Basket and Blades.
Brewed coffee flows through the
Brew Chamber into the Carafe.
5. Pause & Pour Switch
During brewing, when the Carafe is placed properly on the Warming
Plate, the Pause & Pour Switch is depressed, allowing brewed coffee
to flow into the Carafe. If the Carafe is removed from the Warming
Plate, the Pause & Pour Switch is in the ‘out’ position preventing
brewed coffee from flowing from the Brew Chamber.
NOTE: To prevent overflows during the brew cycle, replace
the Carafe within 20 seconds.
6. Filter Basket Tabs
Use tabs to remove Filter Basket when hot.
7. Filter Basket Lid (P/N 30639B)
Specially designed openings distribute hot water over coffee grinds
for optimal brewing.
8. Filter Basket Lid Tabs
Use tabs to remove Filter Basket Lid when hot.
9. Safety Interlock Switch
This Switch prevents coffee brewing from beginning unless the
Coffee Mill Assembly is placed properly in the Brew Chamber and
the Coffee Mill Lid is closed securely.
CAUTION: BLADES ARE SHARP. DO NOT ATTEMPT TO
DISASSEMBLE COFFEE MILL ASSEMBLY.
1.
2.
3.
4.
5.
6.
7.
8.
9.
Melitta_ME1MSB_IB_7-12-06 12/7/06 2:45 PM Page 27

WARNING: The Filter Basket maximum capacity is 8 scoops of
whole bean coffee. DO NOT EXCEED THE 8-SCOOP MAXIMUM.
NOTE: 8 scoops = 8 tablespoons maximum.
4. Replace the Filter Basket Lid, taking care to place it securely on the
Filter Basket.
WARNING: The Coffee Maker will not operate
without the Lids being closed properly. A
Warning Screen will appear. Replace the
Coffee Mill Lid and operation will resume.
NOTE: Ground coffee may be substituted for
whole coffee beans.
We recommend using 1/2 to 1 tablespoon of ground coffee beans
for every brewed cup of coffee, which may be adjusted to suit your
individual tastes.
NOTE: When using ground coffee press the MILL Button and set
Grind Level to “0” (See the following section: “Selecting the Grind
Level” for complete procedure.)
Selecting the Grind Level
1. Press the MILL Button. The Grinder is factory preset to Grind
Level “0.”
NOTE: Once the Level has been changed, the Grind Level will
default to the last Grind Level chosen.
2. Adjust the Grind Level by pressing the UP or DOWN Button repeatedly.
“1” is the coarsest grind, “ 7” is the finest. The grind selection will flash
as it changes. When the Grind Level is set to “0,” Grinder Blades
are OFF.
3. When the desired Grind Level appears on the screen, press the
SELECT Button.
4. To begin the brewing process, press the ON/OFF Button. The Coffee
Mill will begin grinding the coffee beans. The “Grinding” screen will
appear in the coffee information center of the Display during the
grinding operation. Brewing will begin automatically.
Brewing
Instructions
16
Mill & Brew Idle
Grind Select
1. Grinding
2. Brewing
3. Warming Plate
WARNING
Enable/Disable
(Future Brew)
Coffee Information Center
The central portion of your screen displays all Coffee Maker
operations associated with brewing coffee. The following screens will
appear and provide Coffee Maker brew status information.
13
Coffee Only Screens
Coffee
Information
Center
•
•
•
•
•
•
Time Display
Brewing Status
ON/OFF /
Future Brew
Time
Grind Level
(0 to 7)
Date Display
FM Signal Strength
AM/PM
1. Press
1. Press MILL Button
2. Press UP/DOWN Button
3. Press SELECT Button
1. Press TIMER Button
2. Press UP/DOWN Button
3. Press SELECT Button
1. Press UP/DOWN Button
2. Press TIMER Button
1. Replace the Coffee
Mill Lid
1. Press the ON/OFF Button
to begin the automatic
Mill/Brew process
2. Press the ON/OFF Button
to STOP the automatic
Mill/Brew process
Program Time
(Future Brew Start)
Brewing
Instructions
Melitta_ME1MSB_IB_7-12-06 12/7/06 2:45 PM Page 29

Brewing Instructions
Before Using Your Melitta
®
Smart Mill & Brew
™
Coffee Maker for the First Time
1. Carefully unpack your Coffee Maker. Remove any labels from the
outside surfaces.
2. Clean the Carafe, Carafe Lid, Filter Basket and Filter Basket Lid in
warm, soapy water. Rinse thoroughly and dry.
3. Fill the Water Reservoir to the 10-cup mark with cold water. Place
the Carafe onto the Warming Plate.
4. Insert the Filter Basket and Filter Basket Lid into the Coffee
Maker, taking care to replace it properly. DO NOT USE COFFEE
WHEN CLEANING. USE WATER ONLY. Close the Coffee Mill Lid.
NOTE: The Coffee Mill Lid must be closed securely in order
for the brew cycle to begin.
5. Plug the Smart Mill & Brew™ Coffee Maker into a 120V AC
electrical outlet.
6. The “Welcome” screen will appear, followed by “Scanning for
Signal” and then “Acquiring Signal” which may remain on the
LCD Display for up to 1 hour depending on the signal strength in
your area. Please be patient.
7. While the unit is scanning for the signal, press the
COFFEE/WEATHER Button to advance to the coffee-only mode.
The “Mill & Brew Idle” screen advises the unit is not in operation.
Brewing
Instructions
Brewing
Instructions
8. Press the ON/OFF Button. The “Brewing”
screen will appear as water will begin to flow
through the Coffee Maker. The Brew ON
icon will appear at the bottom left of the
LCD Screen.
9. When the Carafe is full, press the ON/OFF
Button to turn the unit OFF. Discard the
water in the Carafe. Allow the unit to cool
for 15 minutes.
10. Refill the Water Reservoir and repeat steps
8 and 9 one more time.
Coffee Yield
A 5-oz. cup is the American industry standard and is used by most
coffee maker manufacturers. The Smart Mill & Brew™ Coffee Maker
brews a maximum of 10 (5-oz.) cups as indicated by the 10 coffee
cup markings on the Water Window. For best results, we do not
recommend preparing less than 4 cups (or 20 ounces) of coffee.
Brewing Coffee: Immediate Start
1. Fill the Water Reservoir to the 10-cup mark with cold, fresh
water. Place the Carafe securely onto Warming Plate.
NOTE: Take care to place the Carafe squarely beneath the
Brew Chamber. If it is even slightly off center, the Pause &
Pour feature will prevent brewed coffee from flowing into
the Carafe and the coffee may overflow.
2. Press the COFFEE/WEATHER Button twice to advance
to the coffee-only mode. The “Mill & Brew Idle” screen advises
the unit is not in operation.
3. Open the Coffee Mill Lid and remove the Filter Basket Lid. Using
the scoop provided with your Coffee Maker, measure the desired
amount of roasted whole bean coffee into the Filter Basket. We
recommend using 1 scoop for every 2 cups of brewed coffee,
which may be adjusted to suit your individual tastes.
NOTE: 1 scoop = 1 tablespoon.
15
14
Note the Grind Level
listed at the bottom right
side of the LCD Display.
The unit is preset to “0.”
The synchronized
Atomic Clock info at the
top of the screen will
appear when the FM
signal has been acquired.
Press the
COFFEE/WEATHER
Button to change to
the coffee-only mode.
Note the Brew ON
steaming coffee cup icon
at the bottom left side
of the LCD Display.
Melitta_ME1MSB_IB_7-12-06 12/7/06 2:45 PM Page 31

WARNING: The Filter Basket maximum capacity is 8 scoops of
whole bean coffee. DO NOT EXCEED THE 8-SCOOP MAXIMUM.
NOTE: 8 scoops = 8 tablespoons maximum.
4. Replace the Filter Basket Lid, taking care to place it securely on the
Filter Basket.
WARNING: The Coffee Maker will not operate
without the Lids being closed properly. A
Warning Screen will appear. Replace the
Coffee Mill Lid and operation will resume.
NOTE: Ground coffee may be substituted for
whole coffee beans.
We recommend using 1/2 to 1 tablespoon of ground coffee beans
for every brewed cup of coffee, which may be adjusted to suit your
individual tastes.
NOTE: When using ground coffee press the MILL Button and set
Grind Level to “0” (See the following section: “Selecting the Grind
Level” for complete procedure.)
Selecting the Grind Level
1. Press the MILL Button. The Grinder is factory preset to Grind
Level “0.”
NOTE: Once the Level has been changed, the Grind Level will
default to the last Grind Level chosen.
2. Adjust the Grind Level by pressing the UP or DOWN Button repeatedly.
“1” is the coarsest grind, “ 7” is the finest. The grind selection will flash
as it changes. When the Grind Level is set to “0,” Grinder Blades
are OFF.
3. When the desired Grind Level appears on the screen, press the
SELECT Button.
4. To begin the brewing process, press the ON/OFF Button. The Coffee
Mill will begin grinding the coffee beans. The “Grinding” screen will
appear in the coffee information center of the Display during the
grinding operation. Brewing will begin automatically.
Brewing
Instructions
16
Mill & Brew Idle
Grind Select
1. Grinding
2. Brewing
3. Warming Plate
WARNING
Enable/Disable
(Future Brew)
Coffee Information Center
The central portion of your screen displays all Coffee Maker
operations associated with brewing coffee. The following screens will
appear and provide Coffee Maker brew status information.
13
Coffee Only Screens
Coffee
Information
Center
•
•
•
•
•
•
Time Display
Brewing Status
ON/OFF /
Future Brew
Time
Grind Level
(0 to 7)
Date Display
FM Signal Strength
AM/PM
1. Press
1. Press MILL Button
2. Press UP/DOWN Button
3. Press SELECT Button
1. Press TIMER Button
2. Press UP/DOWN Button
3. Press SELECT Button
1. Press UP/DOWN Button
2. Press TIMER Button
1. Replace the Coffee
Mill Lid
1. Press the ON/OFF Button
to begin the automatic
Mill/Brew process
2. Press the ON/OFF Button
to STOP the automatic
Mill/Brew process
Program Time
(Future Brew Start)
Brewing
Instructions
Melitta_ME1MSB_IB_7-12-06 12/7/06 2:45 PM Page 29

Controls
& Features
Brewing
Instructions
17
NOTE: If the Grind Level is set to “0,” when the ON/OFF Button
is pressed, brewing will begin immediately.
5. A cup of steaming coffee icon and “ON” will appear in the lower
pane of the LCD Display during brewing.
6. When brewing is complete, the WARMING PLATE screen will
appear. The Warming Plate will keep your coffee at the ideal
serving temperature for 1 hour. As a safety precaution, the
Warming Plate will automatically shut off after 1 hour.
HELPFUL HINT: To stop the brewing process at any time,
press the ON/OFF Button.
For Best Results:
•To avoid overflow and water leakage from the back of the Coffee
Maker, do not fill the Water Reservoir with more than 10 (5-oz.)
cups of fresh water; do not exceed the 10-cup marking on the
Water Reservoir.
• Do not add less than 4 cups (20 ounces) of water to the
Water Reservoir.
• Do not add more than than 8 scoops of whole bean coffee to the
Filter Basket.
•To keep coffee hot, return the Carafe to the Warming Plate
after serving.
• The Coffee Mill is intended for COFFEE ONLY. Never grind any
other food products or spices in the Coffee Mill.
12
Coffee Mill Assembly
1. Filter Basket (P/N 30640)
Permanent Stainless Steel Filter
Basket makes paper coffee filters
unnecessary.
2. Maximum Fill Level
To prevent overflowing, do not place
more than 8 scoops (8 tablespoons)
of coffee beans in the Filter Basket.
3. Blades
Stainless Steel Blades.
4. Brew Chamber (P/N 31193)
Holds the Filter Basket and Blades.
Brewed coffee flows through the
Brew Chamber into the Carafe.
5. Pause & Pour Switch
During brewing, when the Carafe is placed properly on the Warming
Plate, the Pause & Pour Switch is depressed, allowing brewed coffee
to flow into the Carafe. If the Carafe is removed from the Warming
Plate, the Pause & Pour Switch is in the ‘out’ position preventing
brewed coffee from flowing from the Brew Chamber.
NOTE: To prevent overflows during the brew cycle, replace
the Carafe within 20 seconds.
6. Filter Basket Tabs
Use tabs to remove Filter Basket when hot.
7. Filter Basket Lid (P/N 30639B)
Specially designed openings distribute hot water over coffee grinds
for optimal brewing.
8. Filter Basket Lid Tabs
Use tabs to remove Filter Basket Lid when hot.
9. Safety Interlock Switch
This Switch prevents coffee brewing from beginning unless the
Coffee Mill Assembly is placed properly in the Brew Chamber and
the Coffee Mill Lid is closed securely.
CAUTION: BLADES ARE SHARP. DO NOT ATTEMPT TO
DISASSEMBLE COFFEE MILL ASSEMBLY.
1.
2.
3.
4.
5.
6.
7.
8.
9.
Melitta_ME1MSB_IB_7-12-06 12/7/06 2:45 PM Page 27

Controls
& Features
Brewing
Instructions
18
Setting the Future Brew Start Time
1. The Future Brew Time is disabled from the factory. The word
“OFF” will appear on the lower left corner of the Display. To set,
press the TIMER Button.
NOTE: Once the Future Brew Time has been set, the Future
Brew Time will default to the last time chosen.
2. Future Brew Start “hours” time (next to the coffee cup in the
bottom pane) will begin to flash. Adjust the Future Brew Time
“hours” by pressing the UP or DOWN Button repeatedly. The
hands of the clock will spin. When the desired “hour” is shown,
press the SELECT Button. Next the “minutes” will begin to flash.
Press the UP or DOWN Button until the desired “minutes”
appears on the screen; then press the SELECT Button.
HELPFUL HINT: Hold down the UP or DOWN Button to fast
forward or fast reverse the time in 5-minute increments.
The AM and PM will automatically change.
3. When the desired Brew Start time appears on the Display, press
the TIMER Button to finalize.
4. The ENABLE/DISABLE screen will automatically appear on the
Display. “ENABLE” will be highlighted. Press the SELECT Button
to program the desired Future Brew Start time into memory.
IMPORTANT: If the Future Brew Time function is not needed
for the following day, press the TIMER Button to activate
the Timer function, then press TIMER Button again, and
the ENABLE/DISABLE screen appears. Press the DOWN
Button to highlight DISABLE and press the SELECT Button
to stop Coffee Maker from brewing automatically. The
word OFF will appear next to the coffee cup icon in the
lower left corner of the LCD Display.
5. Prepare the unit for future brewing. Fill Water Reservoir with the
desired amount of water; add coffee beans or ground coffee to
the Filter Basket. Please consult the “Brewing Coffee: Immediate
Start” section described on pages 15 to 17 for detailed
procedures.
11
7. Control Panel
Use the Control Panel Buttons to set up all Coffee Maker functions,
program the Mill, preset automatic Future Brew Time, and to
manually start and stop brewing.
8. LCD Display
Program the blue backlight for spectacular visibility to highlight the
Clock’s date and time of day, display animated weather functions
and Coffee Maker status.
9. Coffee Mill
Includes a Permanent Stainless Steel Filter Basket with integrated
Stainless Steel Blades.
10. Coffee Mill Lid Latch
Press in Latch to release Lid.
11. Coffee Mill Lid
Lift to open.
12. Overflow Slot
If too much water is poured into the Water Reservoir, any
excess drains through this opening.
13. Cord Storage Compartment
Store unused cord inside the hidden Cord Storage Compartment to
keep counters neat.
HELPFUL HINT: Please call 1-800-459-8060 for availability of
replacement parts.
Melitta_ME1MSB_IB_7-12-06 12/7/06 2:45 PM Page 25
Page is loading ...
Page is loading ...
Page is loading ...
Page is loading ...
Page is loading ...
Page is loading ...
Page is loading ...
Page is loading ...
Page is loading ...
Page is loading ...
Page is loading ...
Page is loading ...
/