Page is loading ...

HI991001
Extended Range Waterproof
pH & Temperature Meter
INSTRUCTION MANUAL

Thank you for choosing a Hanna Instruments product.
Please read this instruction manual carefully before
using this meter.
This manual will provide you with the necessary
information for correct use of this meter, as well as a
precise idea of its versatility.
If you need additional technical information, do not
hesitate to e‑mail us at [email protected] or view
our worldwide contact list at www.hannainst.com.
Dear
Customer,
All rights are reserved. Reproduction in whole or in part is prohibited
without the written consent of the copyright owner, Hanna
Instruments Inc., Woonsocket, Rhode Island, 02895, USA.

3
TABLE OF CONTENTS
Preliminary examination ...........................................
General description and Intended use ........................
Main features ...........................................................
Specifications ...........................................................
Display description ...................................................
Operational guide .....................................................
Meter setup..............................................................
Battery replacement..................................................
Accessories ...............................................................
Electrode maintenance ..............................................
Certification ..............................................................
Recommendations for users .......................................
Warranty .................................................................
5
6
8
14
16
7
9
17
15
4
18
19
19

4
PRELIMINARY EXAMINATION
PRELIMINARY EXAMINATION
Remove the instrument and accessories from the packaging
and examine it carefully to make sure that no damage
has occurred during shipping. Notify your nearest Hanna
Instruments Customer Service Center if damage is observed.
Each HI991001 is delivered in a rugged carrying case and
is supplied with:
• HI12963 pH/temperature probe with titanium body,
DIN connector and 1m (3.3’) cable
• HI70004 pH 4.01 buffer (1 sachet)
• HI70007 pH 7.01 buffer (1 sachet)
• HI700601 pH and ORP electrode cleaning solution
(2 sachets)
• 100 mL beaker (1 pc.)
• 1.5V AAA alkaline batteries
• Instrument quality certificate
• Electrode quality certificate
• Instruction manual
Note: Save all packing material until you are sure that
the instrument works correctly. Any damaged or defective
item must be returned in its original packing material
with the supplied accessories.

5
GENERAL DESCRIPTION AND INTENDED USE
The HI991001 portable pH meter together with HI12963
pH electrode is designed to measure pH in manufacturing
and environmental testing protocols.
The HI991001 is a lightweight, portable pH and
temperature meter. It features a two button operation
system and is simple to use. It has a waterproof and
compact casing, large dual‑line display, and automatic pH
calibration at one or two points.
The HI12963 has rugged titanium body with built‑in
temperature sensor for temperature compensated pH and
temperature readings. It also contains an integral pH
sensor preamplifier to provide stable measurements in
electrically noisy environments.
GENERAL DESCRIPTION AND INTENDED USE

6
MAIN FEATURES
• Simultaneous pH and temperature measurements on a
large dual‑line LCD display
• Automatic pH calibration at one or two points within
two memorized buffer sets (standard or NIST)
• Selectable temperature unit (°C or °F)
• Electrode condition indicator
• mV of pH measurement for electrode check
• HI12963 dedicated pH probe with integrated
temperature sensor
• Probe quick connect system
• Battery life indication and low battery detection
• Keystroke confirmation tone
• Auto‑off function
• Waterproof casing IP67
MAIN FEATURES

7
SPECIFICATIONS
Range*
‑2.00 to 16.00 pH / ‑2.0 to 16.0 pH
±825 mV (pH‑mV)
‑5.0 to 105.0 °C/23.0 to 221.0 °F
Resolution
0.01 pH / 0.1 pH
1 mV
0.1 °C/0.1 °F
Accuracy
@ 25°C / 77°F
±0.02 pH / ±0.1 pH
±1 mV (pH‑mV)
±0.5 °C up to 60 °C; ±1.0 °C outside
±1.0 °F up to 140 °F; ±2.0 °F outside
Temperature
compensation
Automatic
‑5.0 to 105.0 °C/23.0 to 221.0 °F
pH calibration
Automatic, 1 or 2 point selectable buffer
set Standard (4.01, 7.01, 10.01) or
NIST (4.01, 6.86, 9.18)
Probe (included)
HI12963 preamplified pH and
temperature probe with titanium body,
DIN connector and 1 m (3.3’) cable
Battery type/life
1.5V AAA (3 pcs.)
approx. 1400 hours of continuous use
Auto‑off
user selectable: after 8 min, 60 min or
disabled
Environment
0 to 50 °C (32 to 122 °F)
RH max. 100%
Meter dimensions 154 x 63 x 30 mm (6.1 x 2.5 x 1.2”)
Weight
(with batteries)
196 g (6.91 oz.)
Case ingress
protection rating
IP67
* the HI12963 is limited to be used from 0 to 13 pH and from
0 to 80 °C temperature (32 to 176 °F).
SPECIFICATIONS

8
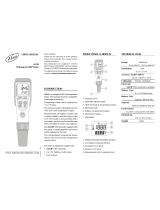
DISPLAY DESCRIPTION
DISPLAY DESCRIPTION
1 Automatic Temperature Compensation indicator
2 Stability indicator
3 Battery percentage
4 Electrode condition indicator
5 Low battery indicator
6 Measurement unit
7 Primary LCD
8 Temperature unit
9 Secondary LCD
10 Meter modes indicator
11 pH calibration buffer(s) used

9
OPERATIONAL GUIDE
OPERATIONAL GUIDE
Each meter is supplied with batteries. Before using the meter
for the first time, open the battery compartment and insert
batteries, observing the polarity (see “Battery Replacement“).
CONNECTING THE ELECTRODE
With the meter turned off, connect the HI12963 probe to the
DIN socket on the bottom of the meter by aligning the pins
and pushing in the plug firmly. Remove the protective cap
from the probe before taking any measurements.
TURNING THE METER ON
To turn the meter ON, press the
button on
the front of the meter. If it does not turn on,
make sure that the batteries are properly installed in their
place. The meter is provided with an active acoustic signal
when a key is pressed. At start‑up the meter displays all
LCD segments for a few seconds, followed by the percentage
indication of the remaining battery life, displaying “WAIT“
until electrode check is in process then the meter enters the
normal measurement mode.
Battery life
Measurement
mode
LCD check
up
→ →
→
Electrode
check
Note: The meter detects the presence and the type of the
probe at its input.
- If the probe is not connected the message “NO”
”PROBE“ appears alternatively on the secondary LCD
with “---“ blinking on the first LCD line.
- If the probe is not compatible “WRONG” ”PROBE“
message appears alternatively on the secondary LCD
with “---“ blinking on the first LCD line.
- If the readings are out of range, the nearest range
limits are displayed blinking (e.g. -2.00 pH -5.0 °C).

10
OPERATIONAL GUIDE
SELECTING MEASUREMENT RANGE
While in measurement mode, press the SET button to select
pH or pH‑mV measurement on the first LCD line.
FREEZING MEASUREMENT VALUES
While in measurement mode, press and hold the SET
button until “HOLD“ appears on the secondary LCD. The
“HOLD“ remains for 1 second and reading of pH, mV and
temperature will be frozen on the LCD with “H” blinking.
→
Press any button to resume active measurements.
ENTERING CALIBRATION MODE
Press and hold the
button until ”POWER” and tag
is replaced by “STD“ and tag. Release the button.
ENTERING SETUP MODE
Press and hold
button until “STD“ and tag is
replaced by “SETUP“ and
tag. Release the button.
TURNING THE METER OFF
While in measurement mode, press the
button.”POWER”
and
tag will appear. Release the button.
pH MEASUREMENT & CALIBRATION
Make sure the meter has been calibrated before use.
If the probe is dry, soak it in HI70300 storage solution for
30 minutes to reactivate it. If soiled, clean the electrode
by soaking in cleaning solution for 20
minutes, then rinse the tip and soak
in storage solution at least 30 minutes
before use.
Rinse the electrode off well and shake
off excess droplets. Recalibrate before using.
Submerge the probe in the sample to be tested while
stirring it gently. Wait until the
tag on the LCD
disappears.

11
The LCD displays the pH value (automatically compensated
for temperature) on the primary LCD, while the secondary
LCD displays the sample temperature. If measurements are
taken in different samples successively, rinse the probe tip
thoroughly in distilled or deionized water to eliminate cross‑
contamination.
For better accuracy, frequent calibration of the pH sensor
with the meter is recommended. In addition, the meter
must be recalibrated:
a) whenever the pH electrode is replaced.
b) after testing aggressive chemicals.
c) when high accuracy is required.
d) at least once a month.
e) after cleaning the sensor.
pH calibration
Enter calibration mode while in pH
measurement mode. Place the sensor
into the first calibration buffer. If
performing a two‑point calibration, use
pH 7.01 (pH 6.86 for NIST) buffer first. The meter will enter
the calibration mode, displaying “pH 7.01 USE”
and
tag blinking (or “pH 6.86 USE” for NIST).
Follow directions for single and two‑point calibration below:
Single-point calibration
1. Place the probe in any buffer from the selected buffer
set. The meter will automatically recognize the buffer value.
2. If the buffer is not recognized or the calibration offset
is out of the accepted range “---- WRONG“ is displayed.
3. If the buffer is recognized “REC“ is displayed then
“WAIT“ until the calibration is accepted.
If using pH 7.01 (or pH 6.86 for NIST), after acceptance
of the buffer press any key to exit. The ”SAVE” message is
displayed and the meter returns to pH measurement mode.
If using pH 4.01 or 10.01 (or pH 9.18 for NIST) buffer the
”SAVE” message is displayed and the meter returns to pH
measurement mode.
OPERATIONAL GUIDE

12
Two-point calibration
Proceed with steps 1 through 3 under single‑point
calibration using 7.01 pH (pH 6.86 for NIST) buffer first.
Then follow steps below:
The ”pH 4.01 USE” message is then displayed.
Place the probe in the second calibration buffer (pH 4.01
or 10.01, or, if using NIST, pH 4.01 or 9.18). When the
second buffer is accepted, the LCD will display “SAVE”
for 1 second and the meter will return to the normal
measurement mode.
If the buffer is not recognized or the slope is out of accepted
range ”--- WRONG” is displayed. Change the buffer, clean
the electrode or press any key to exit calibration.
For better accuracy it is always recommended to carry out
a two‑point calibration.
After the calibration procedure has been completed, the
“CAL“ is turned on together with the calibrated points.
Exiting calibration and resetting default values
After entering the calibration mode and before the first point
is accepted, it is possible to quit the procedure and return
to the last calibration data by pressing the
button. The
LCD displays “ESC“ for 1 second and the meter returns to
normal mode.
To reset the default values and clear a previous calibration,
press the SET button after entering the calibration mode
and before the first point is accepted.
The LCD displays “CLEAR“ for 1 second, the meter resets
to the default calibration and the “CAL“ with the calibrated
points on the LCD disappears.
OPERATIONAL GUIDE

13
OPERATIONAL GUIDE
ELECTRODE CONDITION
The display is provided with a probe icon (unless the
feature is disabled from setup) which indicates the electrode
status after calibration. The “condition” remains active for
12 hours (unless the batteries are removed).
The electrode condition is evaluated only if the current
calibration has two points.
5 bars: excellent condition
4 bars: very good condition
3 bars: good condition
2 bars: fair condition
1 bar: poor condition
1 bar blinking: very poor condition
With 1 bar it is recommended to clean the electrode and
recalibrate. If there is still only 1 bar or 1 bar blinking
replace the probe.
Sensor check
Setting the meter to pH‑mV range the user can check the
sensor status at any time. The offset value is the reading
in pH 7.01 buffer (@ 25 °C/77 °F). If this reading is
outside the range ±30 mV, the electrode is considered
“very poor”. The slope value of the sensor is the difference
between readings in pH 7.01 and in pH 4.01 buffers. When
the slope reaches the value of about 150 mV, the electrode
is considered “very poor“. When “poor“ or “very poor“, it
is recommended to replace it with a new one.
Note: To ensure reliable readings, the electrode must
be cleaned with cleaning solution and then hydrated in
storage solution for a minimum of 30 minutes before
calibrating the probe.

14
METER SETUP
Setup mode allows the selection of the Temperature unit,
Auto‑off, Beep confirmation tone, the type of pH buffer set,
the Resolution and Information. To enter Setup mode press
and hold
button until “STD“ and tag is replaced
by “SETUP“ and
tag. Release the button.
• “TEMP“ is displayed on the secondary
LCD with the current temperature unit
(e.g. “TEMP °C“), for °C/°F selection,
use the SET button. After the
temperature unit has been selected,
press
to confirm and to enter the “A-OFF“ selection.
• Use the SET button, to navigate
through the auto‑off choices: 8
minutes (“8”, default value), 60
minutes (“60”) or disabled (“---”).
Press
to confirm and to enter the
“BEEP“ selection.
• To switch the beep tone ON or OFF,
press the SET button; press
to
confirm and to enter the calibration
buffer selection “pH 7.01 BUFF“.
• To change the buffer set, the meter
will show the current buffer set: “pH
7.01 BUFF” (for standard buffer set:
4.01/7.01/10.01) or “pH 6.86
BUFF” (for NIST buffer set:
4.01/6.86/9.18). Change the set
with the SET button. Press
to confirm and to enter pH
resolution selection “RESOL“.
• To change the pH measurement
resolution between “0.1“ and
“0.01“ use the SET button; then
press
to confirm and to enter
electrode calibration information
“INFO“ selection.
• To switch the electrode condition
indicator on the LCD ON or OFF, press
the SET button; press
to exit setup
options. Change the set with the SET
button, then press
to confirm and
to return to normal mode.
METER SETUP

15
BATTERY REPLACEMENT
BATTERY REPLACEMENT
When the remaining battery life is less
than 10% the battery tag blinks on the
display to warn the user.
Battery Error Prevention System (BEPS)
If the battery is too weak (“0%”) the display shows “bAtt“,
“DEAD“ for a few seconds then the meter powers off.
Immediately replace the batteries with new ones.
The batteries are accessed by opening the battery cover
on the back of the instrument. Remove protective boot
if present.
Replace the three 1.5V AAA alkaline batteries located in
the battery compartment, observing the indicated polarity.
Replace the battery cover making sure that the gasket is
in place.

16
ACCESSORIES
HI12963
Combination preamplified pH/temperature
probe with titanium body, DIN connector and
1 m (3.3’) cable
HI7004L pH 4.01 buffer solution, 500 mL
HI7006L pH 6.86 buffer solution, 500 mL
HI7007L pH 7.01 buffer solution, 500 mL
HI7009L pH 9.18 buffer solution, 500 mL
HI7010L pH 10.01 buffer solution, 500 mL
HI70300L
Storage solution for pH and ORP electrodes,
500 mL
HI700601P
pH and ORP electrode cleaning solution,
20 mL sachet, 25 pcs.
HI710028 Orange silicon rubber boot
HI710142
Black carrying case for HI991XX portable
instruments
HI77400P
Calibration kit (pH 4.01 and pH 7.01,
20 mL sachets, 5 pcs. each)
Code and
serial number
on the other
side
Temperature sensor
Reference junction
pH tip
Quick connector with
Rubber protection, and
1 meter cable
ACCESSORIES

17
ELECTRODE MAINTENANCE
ELECTRODE MAINTENANCE
PREPARATION
• Remove the protective cap. Do not be alarmed if any
salt deposits are present. Rinse with water.
• Shake the electrode down as you would do with a
clinical thermometer to eliminate any air bubbles inside
the glass tip.
• If the glass tip and/or junction are dry, soak the electrode
in HI70300 storage solution for a minimum of 30 minutes.
• Rinse with water.
• Calibrate before using.
STORAGE
• To ensure a quick response, the glass bulb and the junction
should be kept moist and not allowed to dry.
• Replace protective cap with a few drops of HI70300
storage solution. Follow PREPARATION above before
taking measurements.
Note: Never store the electrode in distilled water.
PERIODIC MAINTENANCE
• Inspect the electrode for any scratches or cracks. If any
present, replace the electrode.
• Rinse off any salt deposits with water.
• Follow the STORAGE procedure above.
• If the junction becomes discolored, extract a fresh 1/8”
section and trim off the soiled part.
CLEANING PROCEDURE
• Soak in Hanna HI700601 pH and ORP electrode cleaning
solution for general use for 20 minutes. Rinse with water.
• Soak the electrode in HI70300 storage solution for a
minimum of 30 minutes. Rinse with water. Calibrate
before using.
TROUBLESHOOTING
• pH Meter: Follow the meter’s operating and calibration
procedures.
• Electrode: Evaluate your electrode performance based on
the Sensor check procedure on page 13.

18
MAN991001 12/18
CERTIFICATION
All Hanna Instruments conform to the CE European Directives.
RoHS
complian
t
Disposal of Electrical & Electronic Equipment. The
product should not be treated as household waste. Instead
hand it over to the appropriate collection point for the
recycling of electrical and electronic equipment which will
conserve natural resources.
Disposal of waste batteries. This product contains
batteries, do not dispose of them with other household
waste. Hand them over to the appropriate collection point
for recycling.
Ensuring proper product and battery disposal prevents
potential negative consequences for the environment and
human health. For more information, contact your city,
your local household waste disposal service, the place of
purchase or go to www.hannainst.com.
CERTIFICATION

HI991001 is warranted for two years against
defects in workmanship and materials when used
for its intended purpose and maintained according
to instructions. Electrodes and probes are warranted
for a period of six months. This warranty is limited
to repair or replacement free of charge. Damage
due to accidents, misuse, tampering or lack of
prescribed maintenance is not covered.
If service is required, contact your local Hanna
Instruments Office. If under warranty, report the
model number, date of purchase, serial number
(see engraved on the back of the meter) and the
nature of the problem. If the repair is not covered
by the warranty, you will be notified of the
charges incurred. If the meter is to be returned to
Hanna Instruments, first obtain a Returned Goods
Authorization number from the Technical Service
department and then send it with shipping costs
prepaid. When shipping any meter, make sure it is
properly packed for complete protection.
Warranty
Before using this product, make sure
it is entirely suitable for your specific
application and for the environment
in which it is used. Any variation
introduced by the user to the supplied
equipment may degrade the meter’s
performance. For yours and the meter’s
safety do not use or store the meter in
hazardous environments.
Recommendations
for users
Hanna Instruments reserves the right to modify the design,
construction or appearance of its products without advance notice.

Printed in ROMANIA
World
Headquarters
Hanna Instruments Inc.
Highland Industrial Park
584 Park East Drive
Woonsocket, RI 02895 USA
www.hannainst.com
MAN991001
/