
Quick Start Guide
V1.0
AGRAS
SERIES

2
©
2018 DJI All Rights Reserved.
AGRAS MG-1P SERIES Quick Start Guide
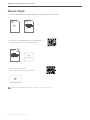
Before Flight
1. Read the Disclaimer and Safety Guidelines and Quick Start Guide carefully.
DJI Assistant 2 supports Windows 7 (or later) or OS X 10.11 (or later).
3. Watch the video tutorials.
http://www.dji.com/mg-1p/info#video
2. Download the User Manual and DJI ASSISTANT
TM
2.
http://www.dji.com/mg-1p/info#downloads
DJI
Assistant 2
User Manual
AGRAS
SERIES
AGRAS
SERIES
AGRAS
SERIES

AGRAS MG-1P SERIES Quick Start Guide
©
2018 DJI All Rights Reserved.
3
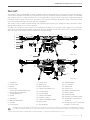
Aircraft
The AGRAS
TM
MG-1P series (MG-1P / MG-1P RTK) aircraft are equipped with a wide-angle First Person View (FPV)
camera which enables observation of the landscape in front of the aircraft, allowing operation areas to be identied
and enabling pilots to avoid obstacles. Its second generation high-precision radar with integrated obstacle
avoidance radar module and forward, backward, and downward altitude stabilization radar modules provides
improved obstacle sensing and terrain following capabilities.
The quality of the aircraft’s industrial design and materials make it dust-proof, water-proof (IP43 protection rating,
IEC standard 60529), and corrosion-resistant.
The MG-1P and MG-1P RTK utilize DJI’s dedicated A3 flight control system with eight-rotor propulsion
redundancy, ensuring safe and stable operation at all times. The MG-1P RTK has a built-in DJI
TM
Onboard D-RTK*,
which provides more accurate data for centimeter-level positioning.
1 Propellers
2 Frame Arms
3 Motors
4 ESC LEDs
(on M1-M4 and M7-M8 arms)
5 Aircraft Status Indicators
(on M5-M6 arms)
6 Hoses
7 Sprinklers
8 Manual Relief Valve
9 Nozzles
10 Link Button
11 Pump Ports
12 Radar Port
13 Micro USB Port
14 Liquid Level Meter Port
15 Landing Gear
16 Pump Cables
17 Liquid Level Meter
18 Delivery Pumps
19 Liquid Level Meter Cable
20 Spray Tank
21 Aircraft Body
22 GNSS Module
23 FPV Camera
24 Intake Vent
25 Power Port
26 Battery Compartment
27 Radar Cable
28 Radar Module
29 Remote Controller Holder
30 OCUSYNC
TM
Dual-band
Antennas
31 Onboard D-RTK
TM
Antennas
(on MG-1P RTK only)
DO NOT obstruct the GNSS module (located at the center of the aircraft), as doing so would reduce the GNSS signal strength.
The MG-1P and MG-1P RTK do not come with a battery. Please purchase the DJI approved battery pack (Model: MG-12000P).
* This should be used with a DJI Base Station (sold separately) or a DJI approved Network RTK service.
1
2
15
21
22
12 1413
23
24
25
26
27
28
Rear View
Front View
29
30
31
3
4
5
7
8
10
9
6
11
16 16191817
20

4
©
2018 DJI All Rights Reserved.
AGRAS MG-1P SERIES Quick Start Guide
Remote Controller
The remote controller uses the DJI OcuSync dual-band video downlink system, has a maximum control distance
of up to 3.11 mi (5 km)*, and is equipped with a bright, dedicated screen with the DJI MG app built-in. Operation
planning can be performed either using the remote controller only or by flying the aircraft to waypoints. The
Banked Turning feature in the DJI MG app commands the aircraft to take corners without fully stopping, making
ight operations more exible and ecient. The remote controller’s Multi-Aircraft Control mode can be used to
coordinate the operation of up to ve aircraft at the same time, enabling pilots to work very eciently. Replaceable
batteries make it easy to use the remote controller every day and removable antennas make maintenance easier.
1 Antennas
2 Display Device
3 Speaker
4 Control Sticks
5 Lanyard Attachment
6 Power Button
7 Status LED
8 USB-C Port
9 3.5 mm Audio Jack
10 Battery Level LEDs
11 microSD Card Slot
12 RTH Status LED
13 RTH Button
14 Spray Rate Dial
15 Spray Button
16 Pause Switch
17 Sleep/Wake Button
18 Button A (customizable)
19 Button B (customizable)
20 Aircraft Control Switch Dial
21 Button C1 (customizable)
22 Button C2 (customizable)
23 Battery Compartment Cover
24 Battery Compartment Cover Lock
25 Dongle Compartment Cover
The gure below shows the function that each control stick movement performs, using Mode 2 as an example. In
Mode 2 the left stick controls the aircraft’s altitude and heading while the right stick controls its forward, backward,
left, and right movements.
For more information about how to link and use the remote controller, please refer to the Agras MG-1P / MG-1P RTK User
Manual.
The stick mode can be selected in the DJI MG app.
* The remote controller is able to reach its maximum transmission distance (FCC: 3.11 mi (5 km); CE / KCC / MIC / SRRC: 1.86 mi (3
km)) in a wide open area with no electromagnetic interference, and at an altitude of about 8.2 ft (2.5 m).
1
2
3
4
6
5
7
8
9
10
16
17
18
19
20
22
21
23
24
25
15
14
11
12
13
Up
Down
Turn RightTurn Left
Forward
Backward
Right Left
Left Stick Right Stick

AGRAS MG-1P SERIES Quick Start Guide
©
2018 DJI All Rights Reserved.
5
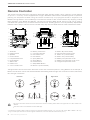
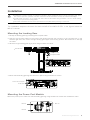
Installation
4. Mount the left landing gear leg and secure it in place using three M3×10 screws.
Mounting the Power Port Module
Mount the power port module onto the left landing gear leg using two M3×18 screws and one M3×22 screw.
Mounting the Landing Gear
1. Identify the landing gear leg containing the compass cable.
2. Take out the compass cable from the tube of the landing gear leg and connect it to the compass port on the
aircraft’s right side, then mount the right landing gear leg to the mounting position. Be careful not to damage
the cable.
3. Secure the right landing gear leg in place using four M3×10 screws.
Threadlocker of medium strength is required for installation. Apply threadlocker when mounting the landing gear, power
port module, spray tank, sprinklers, and radar module. Ensure the threadlocker is totally dry and solid before ight.
DO NOT bend the hoses in an arc tighter than their minimum bend radius during installation. This is to avoid creasing,
which may compromise the spraying eect.
Ensure that all installation and connection procedures are completed before powering on the aircraft.
Aircraft Rear
M3×18
Insert into the upper
screw hole
M3×18
M3×22
The installation steps are the same for both the MG-1P and MG-1P RTK. In the figures below the
MG-1P is shown.
Compass Port
Compass Cable

6
©
2018 DJI All Rights Reserved.
AGRAS MG-1P SERIES Quick Start Guide
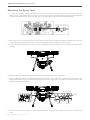
Mounting the Spray Tank
1. Connect the sprinkler kits to the spray tank: Pull the four hoses through the nuts to the outlets under the
delivery pump, then tighten the nuts using a wrench. Note that the white and black hoses should be attached
to outlets with labels of the same color. Be sure to securely tighten the nuts to avoid liquid leakage.
2. Remove the cover of the spray tank. Pull the hoses on both sides through the spaces between the two tubes
of each landing gear leg with the mouth of the tank facing toward the right side of the aircraft.
3. Lift the spray tank and pull the mouth of the tank through the space between the two tubes of the right landing
gear leg.
4. Insert the plugs on the left landing gear leg into the mounting holes on the spray tank.
5. Slide the xing bracket on the right landing gear leg to the marks on the tubes to align the screw holes on the
xing bracket with the n on the right side of the spray tank. Tighten the two M3×12 screws and insert and
tighten one M3×10 (Plus) screw.
6. Connect the two pump cables and one liquid level meter cable to their corresponding ports on the aircraft
body.
M3×12M3×12
M3×10 (Plus)
Marks

AGRAS MG-1P SERIES Quick Start Guide
©
2018 DJI All Rights Reserved.
7
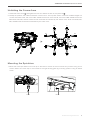
M1M2
M3
M4
M5 M6
M7
M8
Unfolding the Frame Arms
1. Unfold the frame arms
1
and tighten the two arm sleeves at each of the junctions
2
.
2. Identify the position and rotational direction of the motors. The top view shows motors M1 to M8 arranged in a
counter-clockwise order, with motors M1 and M2 at the front of the aircraft, and motors M5 and M6 at the rear.
Motors M1, M3, M5, and M7 rotate counter-clockwise as indicated by the “CCW” mark, while motors M2, M4,
M6, and M8 rotate clockwise as indicated by the “CW” mark.
Mounting the Sprinklers
1. Mount the hose clips: Mount one hose clip to the bottom of each of the four frame arm junctions using T3×10
screws. Mount one hose clip to the outside of the right landing gear leg mounting position using an M3×6
screw.
M3×6T3×10

8
©
2018 DJI All Rights Reserved.
AGRAS MG-1P SERIES Quick Start Guide
2. Mount the sprinklers with white hoses under motors M3 and M8 (with white circle marks). Mount the sprinklers
with black hoses under motors M4 and M7 (with black circle marks). Mount each of the four sprinklers using
three M3×8 (Plus) screws, then insert the hoses into the clips at the bottom of the frame arm junctions. Be
sure to mount the sprinklers to the mounting holes nearer to the inside of the aircraft, with the hoses facing the
frame arm.
3. Insert the hoses on both sides into the clips on the landing gear.
4. Mount the fender to the right landing gear leg to avoid spills when pouring liquids. Handle with care to
avoid damage to the fender.

AGRAS MG-1P SERIES Quick Start Guide
©
2018 DJI All Rights Reserved.
9
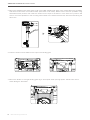
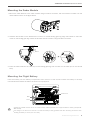
Mounting the Radar Module
1. Mount the radar bracket to the radar module using four M3×5.5 screws, with the bracket crossbar over the
radar cable as shown in the gure below.
Power Port
Stud
Belt
The MG-1P and MG-1P RTK do not come with a battery. Please purchase the DJI approved MG-1P battery pack (Model:
MG-12000P).
The voltage on the aircraft can reach 50.4 V. Read the battery’s safety guidelines and take necessary precautions when
handling the battery to ensure your own safety.
Mounting the Flight Battery
Insert the battery into the battery compartment from the front of the aircraft. Ensure the battery is securely
mounted and then fasten the belt to the stud on the spray tank.
2. Unfasten the buckles on the bracket then mount it to the left landing gear leg. Align the bracket to the lower
marks on the landing gear leg. Fasten the buckles and secure them using four M3×5.5 screws.
3. Insert the radar cable into the cable clip on the landing gear leg, then connect it to the radar port on the aircraft
body.
Marks

10
©
2018 DJI All Rights Reserved.
AGRAS MG-1P SERIES Quick Start Guide
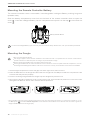
To remove the Intelligent Battery, open the cover, press and hold the battery release button, then push the battery downward.
Mounting the Dongle
Only use a DJI approved dongle.
The dongle supports various network standards. Use a SIM card that is compatible with the chosen mobile network
provider and select a mobile data plan according to the planned level of usage.
Use the dongle and the SIM card in accordance with their manuals.
The dongle and SIM card are used to enable the remote controller to access to specic networks and platforms, such as
the DJI Agriculture Management Platform. Be sure to mount them correctly, or else network access will not be available.
1. Lift the dongle compartment cover at the gap at its lower right corner, then remove it.
2. Insert the SIM card into the dongle and then insert the dongle into the USB port inside the compartment. Test
to ensure that they function properly.*
3. Cut the connecting string between the dongle cap and dongle body if there is one.
4. Re-mount the dongle compartment cover. To secure the cover, open the silicone protectors on the cover, insert
and tighten two M1.6×3 screws, then close the silicone protectors.
Battery Release Button
2
3
Mounting the Remote Controller Battery
The remote controller uses a removable, interchangeable Intelligent Battery making long-term
operation easy.
Slide the battery compartment cover lock on the back of the remote controller down to open the
cover
1
, insert the Intelligent Battery into the compartment and push it to the top
2
, then close the
cover
3
.
* Test procedure: Press the remote controller power button once, then press again and hold to turn the remote controller on. In the
DJI MG app tap and select Network Diagnostics. If the statuses of all the devices in the network chain are shown in green the
dongle and SIM card are functioning properly.

AGRAS MG-1P SERIES Quick Start Guide
©
2018 DJI All Rights Reserved.
11
Fly Safe
It is important to understand some basic ight guidelines, both for your protection and for the safety of those
around you.
1. Flying in Open Areas: Do not fly near or above people or animals, or near buildings, power lines, or other
obstacles.
2. Maintain Control at All Times: Always keep your hands on the remote controller and maintain control of your
aircraft when it is in flight, even when using intelligent functions such as the Intelligent Operating Planning
system, A-B Route operation mode, and Smart Return to Home.
3. Maintain Line of Sight: Maintain visual line of sight with your aircraft at all times and avoid ying behind buildings
or other obstacles that may block your view.
4. Monitor Your Altitude: For the safety of manned aircraft and other air trac, always y at altitudes lower than 98
feet (30 meters) and in accordance with all local laws and regulations.
Visit https://www.dji.com/ysafe for more information on critical safety features such as GEO Zones.
Calibrating the Compass
Ensure the compass is calibrated before every ight. Failure to do so may lead to unexpected ight behavior.
1. DO NOT calibrate your compass where magnetic interference may occur, such as locations close to magnetite
deposits or large metallic structures such as parking structures, steel-reinforced basements, bridges, cars, or
scaolding.
2. DO NOT carry objects (such as cell phones) that contain ferromagnetic materials near the aircraft during
calibration.
3. The compass should always be calibrated when moving from indoor spaces to outdoor spaces.
4. If the Aircraft Status Indicators blink red and yellow alternately after placing the aircraft on the ground, the
compass has detected magnetic interference. Change your location.
5. If the Aircraft Status Indicators blink red the calibration has failed. Change your location and try the calibration
procedure again.
Flying Considerations
1. DO NOT use the aircraft in adverse weather conditions such as heavy rain (precipitation rate exceeding 25 mm
or 0.98 inches in 12 hours), winds exceeding 17 mph (28 kph), fog, snow, and lightning.
2. Only y in open areas. Tall buildings and steel structures may aect the accuracy of the onboard compass and
GNSS signal.
3. DO NOT y near sources of strong electromagnetic radiation such as power lines, mobile phone base stations,
electrical substations, and radio transmission towers.
4. Aircraft and battery performance is subject to environmental factors such as air density and temperature. Be
very careful when ying over 6,560 feet (2 km) above sea level as the battery and aircraft performance may be
reduced.
5. In the Earth’s polar regions the aircraft can only operate in Attitude mode.
6. Ensure that there is a strong GNSS signal when operating.

12
©
2018 DJI All Rights Reserved.
AGRAS MG-1P SERIES Quick Start Guide
Obstacle avoidance is disabled in Attitude mode (which the aircraft enters in situations such as when the GNSS signal is
weak) and is not available if the operating environment is not suitable for the radar module, so extra caution is required in such
situations.
Return to Home (RTH)
It is important to take o with a strong GNSS signal to ensure that the Home Point is recorded by the aircraft. The
aircraft will automatically return to the Home Point in the following cases.
Smart RTH: You press the RTH button.
Failsafe RTH*: The remote controller signal is lost.
During RTH, if there is an obstacle within 20 m of the aircraft, the aircraft decelerates and then stops and hovers.
While decelerating, if the aircraft comes within 6 m of the obstacle it ies backward to a distance of around 6 m
from the obstacle and hovers. The aircraft then exits the RTH procedure and waits for pilot commands.
≥ 6 m
RTH
* If Failsafe RTH is disabled (the default setting in the DJI MG app) the aircraft hovers in place when the remote controller signal is lost.
Pesticide Usage
1. Avoid the use of powder pesticides as much as possible as they may reduce the service life of the spraying
system.
2. Pesticides are poisonous and pose serious risks to human safety. Use them in strict accordance with their
specications.
3. Residue on the equipment caused by splashes or spills when pouring or mixing the pesticide can irritate your
skin. Be sure to clean the equipment after pouring or mixing.
4. Use clean water to mix the pesticide to avoid blocking the strainer. Clear any blockages before using the
equipment.
5. Wear protective clothing to prevent direct body contact with the pesticide. Always rinse your hands and skin
after handling pesticides. Clean the aircraft and remote controller after applying the pesticide.
6. Eective use of pesticides relies on pesticide density, spray rate, spray distance, aircraft speed, wind speed,
and wind direction. Consider all factors when using pesticides, but never compromise the safety of people,
animals, or the environment in doing so.
7. DO NOT contaminate rivers or sources of drinking water.
It is important to understand basic ight guidelines, for the safety of both you and those around you.
Do not forget to read the Agras MG-1P / MG-1P RTK Disclaimer and Safety Guidelines.

AGRAS MG-1P SERIES Quick Start Guide
©
2018 DJI All Rights Reserved.
13
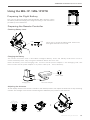
Using the MG-1P / MG-1P RTK
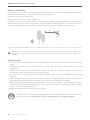
Preparing the Flight Battery
Only use DJI approved flight batteries (Model: MG-12000P). Check
the battery level before ying and charge according to the instructions
provided by the manufacturer.
Press once to check the battery level. Press once,
then again and hold to turn on/o.
Charging the Battery
The remote controller uses a removable Intelligent Battery. Press the battery level button once to
check the battery level. Fully charge the batteries before first-time use.
Place the battery into the Charging Hub, connect the AC power adapter to the Charging Hub, and
then connect the AC power adapter to a power outlet (100 - 240V, 50/60Hz).
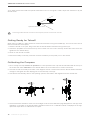
Adjusting the Antennas
Tilt the display device on the remote controller to the desired position, then adjust the antennas so they are facing
outward. The strength of the remote controller signal is aected by the position of the antennas.
Strong Unfold
Weak
Preparing the Remote Controller
Checking Battery Level
Model: MG-12000P
AC Power Adapter
Charging Hub
Power Outlet
Low High

14
©
2018 DJI All Rights Reserved.
AGRAS MG-1P SERIES Quick Start Guide
Try to keep the aircraft inside the optimal transmission zone. If the signal is weak, adjust the antennas or y the
aircraft closer.
Avoid using wireless devices that use the same frequency bands as the remote controller.
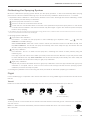
Getting Ready for Takeoff
When using your MG-1P / MG-1P RTK for the rst time activate it using the DJI MG app. Your DJI account and an
Internet connection are required.
1. Place the aircraft on an open, at ground with the Aircraft Status Indicators facing toward you.
2. Unfold the propellers and check that they are mounted onto the motors securely. Unfold the frame arms and
tighten the arm sleeves rmly.
3. Power on the remote controller.
4. Ensure the battery is securely mounted. Connect the battery to the power port on the aircraft.
Optimal Transmission Zone
4. The Aircraft Status Indicators show the current ight mode and the calibration page disappears in the app when
calibration is complete. If the Aircraft Status Indicators blink red or a calibration failure is displayed in the app,
repeat the steps above to calibrate the compass.
Calibrating the Compass
1. Go to the app and tap Perform an Operation to enter Operation View. Tap the Aircraft Status Bar at the top of
the screen and select Calibration in the Aircraft Status List, then follow the on-screen instructions.
2. Hold the aircraft horizontally and rotate it 360 degrees around a vertical axis until the Aircraft Status Indicators
change to solid green and the display goes to the next step in the app.
3. Hold the aircraft vertically, with its nose pointing upward, and rotate it 360 degrees around a vertical axis.

AGRAS MG-1P SERIES Quick Start Guide
©
2018 DJI All Rights Reserved.
15
Flight
In the DJI MG app go to Operation View. Ensure that there is a strong GNSS signal, otherwise the aircraft cannot
take o.
Takeo
Perform a Combination Stick Command (CSC) and then slowly push the throttle stick up to take o.
Landing
To land, pull down on the throttle stick to descend until the aircraft touches the ground. There are two methods to
stop the motors.
Method 1: When the aircraft has landed, push and hold the throttle stick down. The motors will stop
after 3 seconds.
Throttle Stick
(left stick in Mode 2)
OR
Throttle Stick
Calibrating the Spraying System
Be sure to calibrate the spraying system before your rst spray operation, or else it will adversely aect spraying
performance. Use the included measuring cup to ensure accuracy. Calibration takes around 6 to 14 minutes.
1. Preparation before calibration: If there are any bubbles in the hoses, discharge them before calibrating. If there
are no bubbles proceed directly to calibration.
1
Fill the spray tank with about 2 L of water.
2
Power on the remote controller and the aircraft
.
3
Loosen the four manual relief valves on the side of the sprinklers and press the Spray button on the remote
controller until the bubbles in the hoses have been fully discharged.* Tighten the valves and press the Spray
button to stop spraying.
* If the bubbles have still not been fully discharged after a long period of time, rotate the valve cover and remove it, then re-mount the
cover once the bubbles have been fully discharged.
2. Spraying System Calibration
1
Liquid level meter calibration
Pour about 1 L of water into the spray tank. In the DJI MG app go to Operation View > > , then tap
Calibrate in Flow IMU settings.
Select Nozzle Model, select the correct model in the list (the standard nozzle is model XR11001VS), then
tap Start Calibration. The aircraft will spray automatically, then when ready the app will indicate that the
aircraft is ready for left pump calibration.
2
Left pump calibration
Pour between 1 and 5 L of water into the spray tank, measuring the volume of water precisely using the
measuring cup.
In the app, input the volume of the water your have poured into the tank. Be sure to input the precise value
to avoid calibration bias. Tap Start Calibration and the aircraft will spray automatically, then when ready the
app will indicate that the aircraft is ready for right pump calibration.
3
Right pump calibration
Repeat the procedure described above for right pump calibration. Once the app indicates that right pump
calibration is complete, wait for a few more moments until the app indicates that the spraying system
calibration procedure is totally complete.
3. Discharge any bubbles in the hoses using the same procedure as used when preparing for calibration.

16
©
2018 DJI All Rights Reserved.
AGRAS MG-1P SERIES Quick Start Guide
Method 2: When the aircraft has landed, push the throttle stick down, then perform the same CSC that was used
to start the motors. Release both sticks once the motors have stopped.
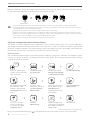
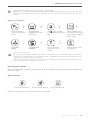
Using the Intelligent Operation Planning System
The remote controller is equipped with a screen with a built-in Android system which can run the DJI MG app.
The Intelligent Operation Planning system built-in to the app can be used to measure the operation area, identify
obstacles, congure waypoints, set aircraft settings, and produce ight route plans. Once ight routes have been
planned, they can be used to command the aircraft to y routes automatically.
Planning Field
The DJI MG app supports ight route planning either by walking to waypoints, obstacles, and calibration points
carrying the remote controller or by ying the aircraft to these points. The following description takes planning
using the aircraft as an example.
Fly the aircraft alongside
the boundary of the
operation area and tap
Add Waypoint at turning
points
Fly near to each
obstacle* in turn and
tap Start Obstacle
Measurement
Fly the aircraft around
the obstacle and tap
Add Waypoint at
several points around
the obstacle*
Tap End Obstacle
Measurement*
Power on the spraying
system remote controller,
then the aircraft
Tap Plan a Field >
Fly the aircraft
Tap Start Measuring
DJI MG
APP
The app will display
Manual Route (GNSS)
or Manual Route (RTK)
10
* If any obstacles exist in the operation area.
Tap End
Measurement
Adjust the ight route:
route angle, line spacing,
and collision avoidance
safety margin
Save the eldFly to the location
of each calibration
point and tap Add
Calibration Point
Take o immediately once the motors have started spinning, or else the aircraft may drift and injure nearby people.
Spinning propellers can be dangerous. Stay away from spinning propellers and motors. DO NOT start the motors in
conned spaces or when there are people nearby.
Always keep your hands on the remote controller when the motors are spinning.
Never stop the motors mid-ight unless in an emergency situation and if doing so will reduce the risk of damage or injury.
Method 1 is the recommended method for stopping the motors. When using Method 2 to stop the motors, the aircraft
may roll over if it isn’t completely on the ground. Use Method 2 with caution.
After landing, power o the aircraft before turning o the remote controller.
OR
Throttle Stick
Once you have nished planning tap in the upper left corner of the screen to return to the main screen.

AGRAS MG-1P SERIES Quick Start Guide
©
2018 DJI All Rights Reserved.
17
Operate the aircraft carefully when ying near obstacles to avoid collision.
Calibration points are used to rectify ight route biases caused by GNSS positioning deviations. Choose one or more xed
reference points for calibration like a metal peg or obvious marker that is easy to identify for bias rectication when using
the plan.
Only take o in open areas.
An operation can be paused by toggling the Pause switch. The aircraft will hover and record the breakpoint, and then the
aircraft can be controlled manually. To continue the operation, tap Resume in the app and the aircraft will return to the
breakpoint automatically and resume the operation.
The aircraft will hover at the end point of the ight route once the operation is complete. Instead of hovering the aircraft
can also be set to perform other ight actions in the app.
Starting an Operation
Adjust the ight route:
route angle, line spacing,
and collision avoidance
safety margin
Tap Rectify
Oset
Tap Perform an
Operation
Set the operation
parameters, then
conrm
Slide the slider to start
the operation
Take the aircraft to
one of the calibration
points
Tap Perform an
Operation in the app
main screen
Refer to the Agras MG-1P / MG-1P RTK User Manual for details.
Tap , select the eld
from the eld list and select
Use
More Operation Modes
Refer to the Agras MG-1P / MG-1P RTK User Manual for details about the A-B Route, Manual, and Manual Plus
operation modes.
More Functions
Operation Resumption System Data Protection
Empty Tank Warning

18
©
2018 DJI All Rights Reserved.
AGRAS MG-1P SERIES Quick Start Guide
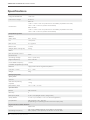
Specications
Airframe
Diagonal Wheelbase 1500 mm
Frame Arm Length 619 mm
Dimensions
MG-1P:
1460 × 1460 × 578 mm (Frame arms unfolded, propellers removed)
780 × 780 × 578 mm (Frame arms folded)
MG-1P RTK:
1460 × 1460 × 616 mm (Frame arms unfolded, propellers removed)
780 × 780 × 616 mm (Frame arms folded)
Propulsion System
Motors
Stator Size 60 × 10 mm
KV 130 rpm/V
Max Thrust 5.1 kg/rotor
Max Power 770 W
Weight (With cooling fan) 255 g
ESCs
Max Allowable Current
(Continuous)
25 A
Operating Voltage 50.4 V (12S LiPo)
Signal Frequency 30 to 450 Hz
Drive PWM Frequency 12 kHz
Foldable Propellers (21/21R)
Material High-performance engineered plastics
Diameter × Pitch 21 × 7 inch
Weight 58 g
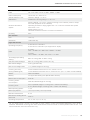
Spraying System
Spray Tank
Volume 10 L
Standard Operating
Payload
10 kg
Max Battery Size 151 × 195 × 70 mm
Sprinkler Kits
Model XR11001VS
Quantity 4
Max Spray Rate 0.45 L/min (Single nozzle, using water)
Spray Width 4 to 6 m (4 nozzles, 1.5 to 3 m above vegetation)
Droplet Size
XR11001VS: 130 - 250 μm
(Depending on operating environment and spray rate)
High-Precision Radar Module
Model RD2412R
Operating Frequency
CE / FCC / SRRC (China): 24.00 GHz to 24.25 GHz
MIC (Japan) / KCC (Korea): 24.05 GHz to 24.25 GHz

AGRAS MG-1P SERIES Quick Start Guide
©
2018 DJI All Rights Reserved.
19
Power Consumption 12 W
EIRP CE / FCC / MIC / KCC: 20 dBm; SRRC: 13 dBm
Field of View (FOV) Horizontal: 50°, Vertical: 10°
Altitude Detection and
Stabilization
Detection Range: 1 to 30 m
Stabilization Working Range: 1.5 to 10 m
Obstacle Avoidance
System
Sensing Range: 1.5 to 30 m (varies according to the material, position, shape,
and other properties of the obstacle)
Operating Conditions: Flying higher than 1.5 m over the obstacle with speed
lower than 7 m/s
Safety Distance: 2.5 m
Obstacle Avoidance Direction: Forward or backward
IP Rating IP67
FPV Camera
FOV 123° (H)
Resolution 1280×960 30p
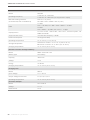
Flight Parameters
Operating Frequency
2.400 GHz to 2.483 GHz
5.725 GHz to 5.850 GHz (not supported in Japan)
EIRP
2.4 GHz
FCC: < 26 dBm; CE / MIC / KCC / SRRC: < 20 dBm
5.8 GHz
FCC / SRRC: < 26 dBm; CE / KCC: < 14 dBm
Total Weight (Excluding
battery)
MG-1P: 9.8 kg, MG-1P RTK: 9.9 kg
Standard Takeo Weight MG-1P: 23.8 kg, MG-1P RTK: 23.9 kg
Max Takeo Weight 24.8 kg (At sea level)
Max Thrust-Weight Ratio 1.71 (Takeo weight of 23.8 kg)
Hovering Accuracy
(Strong GNSS signal)
D-RTK enabled: horizontal ±10 cm, vertical ±10 cm
D-RTK disabled: horizontal ±0.6 m, vertical ±0.3 m (±0.1 m, radar module enabled)
GNSS* GPS+GLONASS
Battery DJI approved battery pack (Model: MG-12000P)
Max Power Consumption 6400 W
Hovering Power
Consumption
3800 W (Takeo weight of 23.8 kg)
Hovering Time*
20 min (Takeo weight of 13.8 kg with a 12000 mAh battery)
9 min (Takeo weight of 23.8 kg with a 12000 mAh battery)
Max Operating Speed 7 m/s
Max Flying Speed 10 m/s (P-mode), 15 m/s (A-mode)
Max Wind Resistance 8 m/s
Max Service Ceiling Above
Sea Level
2000 m
Operating Temperature 32° to 104° F (0° to 40° C)
* For the Asia-Pacific version of the MG-1P RTK, GNSS is GPS+GLONASS+BEIDOU when RTK is
enabled. Estimated hovering time was measured at sea level and in wind speeds under 3 m/s. This
value should be used for reference only.

20
©
2018 DJI All Rights Reserved.
AGRAS MG-1P SERIES Quick Start Guide
Remote Controller
Model GL300N
Operating Frequency
2.400 GHz to 2.483 GHz
5.725 GHz to 5.850 GHz (not supported in Japan)
Max Transmitting Distance
(unobstructed, free of interference)
FCC: 3.11 mi (5 km)
CE / MIC / KCC / SRRC: 1.86 mi (3 km)
EIRP
2.4 GHz
FCC: < 26 dBm; CE / MIC / KCC / SRRC: < 20 dBm
5.8 GHz
FCC / SRRC: < 26 dBm; CE / KCC: < 14 dBm
Display Device
5.5 inch screen, 1920×1080, 1000 cd/m
2
, Android system, 4G
RAM+16G ROM
Supported SD Cards microSD. Max Capacity: 128GB
Power Consumption 16 W (typical value)
Operating Temperature 14° to 104° F (-10° to 40° C)
Storage Temperature
Less than 3 months: -4° to 113° F (-20° to 45° C)
More than 3 months: 72° to 82° F (22° to 28° C)
Charging Temperature 41° to 104° F (5° to 40° C)
Remote Controller Intelligent Battery
Model WB37-4920mAh-7.6V
Battery Type LiPo battery
Capacity 4920 mAh
Voltage 7.6 V
Energy 37.39 Wh
Charging Temperature 41° to 104° F (5° to 40° C)
Charging Hub
Model WCH2
Input Voltage 17.3 - 26.2 V
Output Voltage and Current 8.7 V, 6 A; 5 V, 2 A
Operating Temperature 41° to 104° F (5° to 40° C)
AC Power Adapter
Model A14-057N1A
Voltage 17.4 V
Rated Power 57 W
Page is loading ...
-
 1
1
-
 2
2
-
 3
3
-
 4
4
-
 5
5
-
 6
6
-
 7
7
-
 8
8
-
 9
9
-
 10
10
-
 11
11
-
 12
12
-
 13
13
-
 14
14
-
 15
15
-
 16
16
-
 17
17
-
 18
18
-
 19
19
-
 20
20
-
 21
21


dji MG-1P Quick start guide
- Type
- Quick start guide
- This manual is also suitable for
Ask a question and I''ll find the answer in the document
Finding information in a document is now easier with AI
Related papers
Other documents
-
 T'nB RGTC032589 Datasheet
-
 QF RTK GNSS Base RTCM32 Station User guide
-
Anker Universal Smartphone Air Vent Car Mount Holder Cradle User manual
-
Foxtech GAIA 160HY-Hybrid A3 PRO User manual
-
Lorex Technology SG6350P User manual
-
Toro 102-2802 User manual
-
SKYCATCH SKCEX201 User manual
-
-
Autel Dragonfish User guide
-
Autel Dragonfish Standard Drone User guide

